You know those moments when a craving hits, a serious, deep-down craving for something sweet and comforting, but the thought of baking a whole pie feels like climbing Mount Everest? Yeah, me too. Especially when fall rolls around and that cozy, spiced pumpkin aroma starts wafting through the air. It’s like a siren call to my taste buds! For the longest time, I’d soldier on, resisting the urge, or worse, I’d cave and end up with a whole pie that I’d probably devour in a day (no regrets, honestly!). But then, one afternoon, with the kids buzzing around and a million things on my to-do list, I stumbled upon the magic of Pumpkin Pie energy balls. And let me tell you, they’ve been a lifesaver ever since. They’re like a mini dose of fall perfection, packed with all the flavors you love from a classic pumpkin pie, but without the fuss. Seriously, if you’re looking for a treat that’s easy, delicious, and feels like a hug in a bite, you’ve found it. These pumpkin pie energy balls are seriously my new favorite way to get my pumpkin fix.
What are pumpkin pie energy balls?
So, what exactly are these little flavor bombs? Think of them as the no-bake, bite-sized cousins of your favorite pumpkin pie. They’re essentially a delightful mix of wholesome ingredients – think oats, dates, nuts, and of course, that signature pumpkin puree and spice blend – all rolled into convenient, poppable balls. There’s no oven involved, which is a huge win in my book, especially on those warmer days or when the kitchen is already packed with other culinary adventures. They’re naturally sweetened, packed with good-for-you fats and fiber, and they taste *exactly* like pumpkin pie filling, but in a chewy, satisfying energy ball format. It’s essentially taking all the best parts of a slice of pumpkin pie – that warm spice, the creamy sweetness, the hint of graham cracker crust – and transforming them into an effortless, portable treat. They’re the perfect antidote to a sweet tooth that doesn’t require a fork or a whole afternoon!
Why you’ll love this recipe?
Honestly, there are so many reasons why I keep coming back to these pumpkin pie energy balls, and I have a feeling you’re going to love them just as much. First off, the flavor is absolutely spot-on. If you’re a pumpkin spice fanatic like me, you’re going to be in heaven. They capture that cozy, nostalgic taste of fall without being overly sweet. I’ve tested this recipe with different types of nuts and sweeteners, and it always holds up, but the current version is my absolute favorite. Then there’s the sheer simplicity. We’re talking minutes to whip these up. No baking, no complicated steps, just toss everything into a food processor, give it a whirl, and roll. It’s so easy, my kids can practically make them themselves (and they often do!). This is seriously a lifesaver on busy nights when I need a quick, healthy snack or a little something sweet after dinner. Plus, they’re surprisingly cost-effective. Most of the ingredients are pantry staples, and even if you need to pick up a few things, they’re budget-friendly, especially compared to buying pre-made energy bars or fancy desserts. And the versatility! You can eat them straight from the fridge for a quick energy boost, pack them in lunchboxes, or even serve them as a fun, mini dessert. They’re just perfect for any occasion, really. They stand out because they deliver that intense pumpkin pie flavor in such a convenient and wholesome package. It’s a win-win-win!
How do I make pumpkin pie energy balls?
Quick Overview
This recipe is all about speed and simplicity. You’ll basically combine all your ingredients in a food processor, pulse until it’s sticky enough to hold together, and then roll them into bite-sized balls. That’s it! The beauty of this method is that it requires minimal effort and no heat. It’s the perfect way to get that amazing pumpkin pie flavor when you’re short on time but still want something truly satisfying and delicious. You can have these ready to enjoy in about 15 minutes, and they’ll keep you fueled and happy!
Ingredients
For the Main Batter:
Rolled Oats: About 1 ½ cups. I always use old-fashioned rolled oats, not instant. They give the balls a nice chew and texture, and they hold everything together beautifully. Make sure they’re gluten-free if you need them to be!
Medjool Dates: 1 cup, pitted. These are the magic binder and sweetener! They’re super sticky and caramel-like when blended. If your dates feel a bit dry, just soak them in warm water for about 10 minutes, then drain them well before using. Pitting them is crucial, so double-check!
Pumpkin Puree: ½ cup, pure pumpkin, not pumpkin pie filling. Make sure it’s the plain stuff! This is where you get that authentic pumpkin flavor. Drain off any excess liquid if your puree seems watery; a drier puree is better for texture.
Nut Butter: ¼ cup almond butter (or cashew butter, or even sunflower seed butter for nut-free). Creamy is best for smooth blending. This adds healthy fats and helps bind everything. I find almond butter gives a lovely, subtle flavor that complements the pumpkin perfectly.
Pumpkin Pie Spice: 2 teaspoons. This is non-negotiable for that classic flavor! You can buy a pre-made blend, or mix your own with cinnamon, ginger, nutmeg, and cloves. This amount gives a good punch of spice without being overwhelming.
Vanilla Extract: 1 teaspoon. A little bit of vanilla rounds out all the flavors and adds a touch of warmth.
Optional: Chia Seeds or Flax Seeds: 1 tablespoon each. These are great for an extra boost of fiber and omega-3s, and they don’t affect the taste much. I often add chia seeds for a little extra nutrition.
For Optional Coating (adds a nice finish!):
Chopped Pecans or Walnuts: About ½ cup, for rolling. These add a lovely crunch and visual appeal. Pecans are my personal favorite for that classic fall vibe.
Shredded Coconut: About ½ cup, unsweetened. Another great option for rolling, adding a slightly chewy texture and subtle sweetness.
A pinch more Pumpkin Pie Spice: To sprinkle on top if you’re feeling fancy.
Step-by-Step Instructions
Step 1: Prepare Your Workspace and Ingredients
Before you even grab your food processor, make sure you have everything measured out and ready to go. Pit your dates if you haven’t already. If your dates feel a little firm or dry, toss them in a bowl with some warm water for about 10 minutes, then drain them really well. This makes them easier to blend and ensures they act as a good binder. Have your pumpkin puree drained (if necessary) and all your other ingredients within easy reach. This makes the whole process so much smoother and faster!
Step 2: Combine the Main Ingredients
In the bowl of your food processor, add the rolled oats, pitted dates, pumpkin puree, nut butter, pumpkin pie spice, vanilla extract, and any optional seeds you’re using (chia or flax). Don’t be shy with the spice; this is where the magic happens!
Step 3: Process Until Sticky
Now, pulse the mixture. Start by pulsing a few times to break down the larger ingredients, then process continuously. You’re looking for a consistency where the mixture starts to clump together. It should be sticky enough that when you pinch a bit between your fingers, it holds its shape. This might take anywhere from 1 to 3 minutes, depending on your food processor. Scrape down the sides a couple of times to make sure everything is incorporated evenly. If it seems too dry and crumbly, add another tablespoon of nut butter or a few more soaked dates. If it’s too wet, add a tablespoon more oats.
Step 4: Test the Dough
Grab a small amount of the mixture and try to roll it into a ball. If it holds together easily without falling apart, it’s ready. If it’s still too crumbly, process for another 30 seconds to a minute. If it’s too sticky to handle, you can add a tablespoon of oats and pulse again. This “dough” should feel slightly tacky but manageable.
Step 5: Prepare for Rolling
If you’re using a coating like chopped nuts or shredded coconut, place them in a shallow bowl or on a plate. Have a baking sheet or plate lined with parchment paper ready to place the finished energy balls on. This makes cleanup a breeze and prevents them from sticking.
Step 6: Roll the Energy Balls
Take about 1 tablespoon of the pumpkin mixture and roll it between your palms to form a smooth ball. It helps to wet your hands very slightly if the dough is sticking to you, but don’t use too much water, or they might not hold their shape as well. Once rolled, you can gently roll each ball in your chosen coating (nuts or coconut) until it’s evenly covered. If you’re not coating them, just place them directly onto your prepared baking sheet.
Step 7: Chill to Firm Up
Place the rolled energy balls on the parchment-lined baking sheet and pop them into the refrigerator for at least 15-30 minutes. This step is crucial! It helps them firm up and hold their shape better, making them less sticky and more enjoyable to eat. They’ll continue to firm up as they stay chilled.
Step 8: Enjoy or Store
Once chilled, your pumpkin pie energy balls are ready to be devoured! They’re delicious straight from the fridge. If you’re not eating them all at once (which is unlikely, I know!), transfer them to an airtight container for storage.
Step 9: Serve and Savor
These are best served chilled. They make the perfect grab-and-go snack, a post-workout refuel, or a healthy sweet treat. The flavor only gets better as they meld together in the fridge. Enjoy that burst of pumpkin pie goodness!
What to Serve It With
These pumpkin pie energy balls are so versatile, they can be enjoyed anytime, anywhere! They’re a fantastic addition to any meal or snack occasion.
For Breakfast: Grab a couple with your morning coffee or tea. They offer a nice bit of sustained energy to start your day. I love having them alongside a bowl of yogurt or oatmeal for a more substantial breakfast, or just on their own when I’m rushing out the door.
For Brunch: Arrange a few on a platter alongside other brunch favorites like mini quiches, Fruit salad, or pancakes. They add a festive, autumnal touch that everyone will love, and they’re a healthier option for those with a sweet tooth.
As Dessert: When you’re craving something sweet after dinner but don’t want a heavy dessert, these are perfect. Serve them with a glass of milk or a light herbal tea. They’re a guilt-free way to satisfy that dessert craving, and the small, portion-controlled size is ideal.
For Cozy Snacks: This is probably my favorite time to enjoy them! After school, during a movie night, or just when I need a little pick-me-up in the afternoon. They’re fantastic with a warm mug of apple cider or a spiced latte. My kids absolutely love them as a “special” snack, and I feel good knowing they’re getting some good stuff too.
My family has a tradition of making these on the first chilly day of autumn, and we always have a big bowl sitting out while we decorate for Halloween. It’s these simple, delicious moments that make the season so special. I’ve also found they pair wonderfully with a sprinkle of flaky sea salt if you want to add another layer of flavor!
Top Tips for Perfecting Your Pumpkin Pie Energy Balls
Over the years, I’ve tweaked and refined this recipe countless times, learning a few things along the way that I think will really help you nail these pumpkin pie energy balls every single time. Don’t be afraid to experiment a little!
Pumpkin Prep is Key: Always use pure pumpkin puree, not the pie filling stuff that has added sugar and spices. Also, make sure your puree isn’t too watery. If it seems very liquidy, give it a gentle strain through a fine-mesh sieve for a few minutes to remove excess moisture. This is super important for getting the right texture; too much water can make your balls mushy and hard to roll.
Date Power: Medjool dates are your best friend here. They are naturally soft and sticky, making them the ultimate binder and sweetener. If yours are a bit on the dry side, a quick soak in warm water (just 5-10 minutes, then drain *thoroughly*) makes them incredibly pliable and easier to process. Make sure all the pits are out; nothing ruins a perfect bite like biting down on a pit!
Food Processor Prowess: Don’t over-process! You want the mixture to come together into a sticky dough, but you don’t want it to turn into a complete paste. Pulse until it clumps, then process until it’s just combined and holds together when squeezed. Stop and scrape down the sides of the bowl a couple of times to ensure even blending. The texture should be slightly chewy, not completely smooth and gummy.
The Sticky Situation Solver: If your dough is too dry and crumbly and won’t hold its shape, don’t panic! Add another tablespoon of nut butter or a few more soaked dates. If it’s too wet and sticky to roll, add a tablespoon of oats or a little extra ground flaxseed at a time, pulsing briefly after each addition until it reaches a workable consistency. A tiny bit of moisture on your hands can help prevent sticking while rolling, but use it sparingly.
Flavor Boosters: The pumpkin pie spice blend is essential, but feel free to customize it! If you love ginger, add a bit more. A pinch of cardamom can add a lovely subtle floral note. And don’t skip the vanilla extract – it really rounds out the flavors and makes them taste more complex and comforting, just like a real pie.
Coating Creations: Rolling the balls in chopped nuts (pecans are divine!), shredded coconut, or even a little extra pumpkin pie spice adds not only visual appeal but also an extra layer of flavor and texture. Just a light coating is usually enough. For a really pretty finish, press them gently into the coating.
Chill Out: This is probably the most important tip for perfection. Refrigerating the rolled balls for at least 30 minutes (or even longer) is crucial for them to firm up. They’ll be much easier to handle, less messy to eat, and they’ll hold their shape beautifully. Trust me, this step makes all the difference in achieving that perfect energy ball consistency.
Storing and Reheating Tips
One of the best things about these pumpkin pie energy balls is how well they keep. They’re designed to be made ahead, which is perfect for busy weeks. Here’s how I store them to keep them tasting their best:
Room Temperature: If you plan on eating them within a day or two, you can certainly keep them at room temperature. Store them in an airtight container. However, I find they are best when they’re chilled, so I usually don’t leave them out for too long. They can get a bit softer at room temperature, which isn’t necessarily bad, but the texture is superior when chilled.
Refrigerator Storage: This is my preferred method! Once they’re rolled and chilled, transfer them to an airtight container or a zip-top bag. They’ll stay fresh and delicious in the refrigerator for up to 1-2 weeks. They actually get even tastier after a day or two as the flavors meld together. Just make sure the container is sealed well to prevent them from drying out or absorbing other odors.
Freezer Instructions: For longer storage, freezing is the way to go! Place the energy balls on a parchment-lined baking sheet and freeze them in a single layer until solid (about 1-2 hours). Once frozen, transfer them to a freezer-safe bag or airtight container. They’ll keep their quality for up to 2-3 months. They’re so great to have on hand for a quick snack emergency!
Thawing Methods: When you’re ready to enjoy frozen energy balls, you have a few options. You can simply transfer them from the freezer to the refrigerator and let them thaw overnight. Or, if you’re impatient (like me!), you can let them sit at room temperature for about 30-60 minutes until they reach your desired consistency. They’re delicious slightly chilled or fully thawed.
Glaze Timing Advice: If you decide to add any kind of glaze or drizzle to your energy balls, I recommend doing it just before serving or storing them in the fridge for a day or two. If you freeze them with a glaze, the glaze might crack or become uneven. For best results with any topping, apply it right before you’re going to eat them or store them short-term.
Frequently Asked Questions
Final Thoughts
So there you have it – my absolute favorite pumpkin pie energy balls! I truly hope you give these a try. They’re more than just a snack; they’re a little bit of cozy fall magic that you can whip up in minutes. Whether you’re a die-hard pumpkin fan, someone who needs quick and healthy snacks, or just looking for a delicious treat that satisfies without derailing your day, these little bites are a winner. They’ve become a staple in my kitchen, especially during the autumn months, and I can’t imagine not having them around. The fact that they taste so much like the real deal, but are so much easier, is just fantastic. They remind me that you don’t need hours in the kitchen to create something truly special and comforting. If you love these, you might also enjoy my spiced Apple Crumble bars or my no-bake gingerbread cookies – perfect for keeping that cozy vibe going!
I’d absolutely love to hear what you think if you make them! Please leave a comment below to let me know how yours turned out, or share any creative variations you came up with. Happy energy-ball making, and may your days be filled with delicious pumpkin spice!
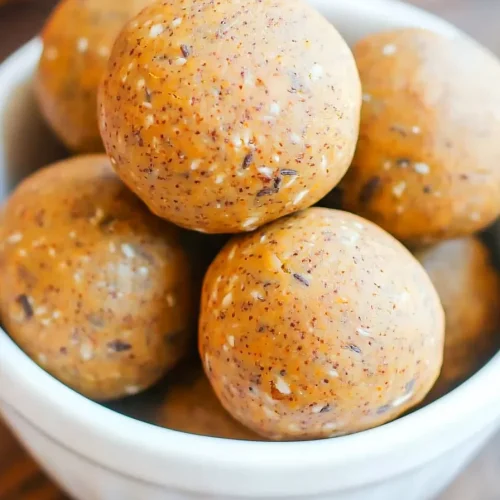
pumpkin pie energy balls
Ingredients
Main Ingredients
- 2 tablespoons paleo flour I love using Bob's Red Mill, but coconut or almond flour works just as well
- 1 tablespoon vanilla protein powder
- 1 tablespoon pumpkin pie spice
- 1 cup cashew butter I use Betsy's Best, but any nut butter you like will work perfectly
- 1 tablespoon maple syrup or honey whichever you prefer
- 2 tablespoons pumpkin puree
Instructions
Preparation Steps
- Start by mixing the flour, protein powder, and pumpkin pie spice in a large bowl until they’re well blended.
- In a separate bowl, warm up the cashew butter, maple syrup (or honey), and pumpkin puree in the microwave for 30 seconds to a minute. You want it just softened enough so everything stirs together smoothly.
- Now, pour this warm cashew butter mixture into the dry ingredients and stir it all up until you have a nice, even dough. Pop the bowl in the freezer for about 10 minutes—just enough to firm up the dough so it’s easier to handle.
- Once it's ready, line a baking sheet with parchment paper. Roll the dough into about 20 small balls and place them on the sheet. Let them chill in the fridge until they’re set, then store them in an airtight container in the refrigerator. Enjoy your tasty little bites whenever you need a quick energy boost!