You know those nights when you’re craving something sweet, something warm, something that just feels like a hug in a bowl? Yeah, me too. And more often than not, my go-to isn’t some fancy layered cake or a complicated tart. It’s my absolute favorite fried apples. Honestly, they’re pure magic. They smell incredible while they’re cooking – that sweet, cinnamon-spiced aroma just fills the whole house and draws everyone to the kitchen, no matter what they were doing. It reminds me so much of my grandma’s kitchen, that warm, comforting scent that always meant something delicious was on its way. They’re so ridiculously easy to make, which is a huge win when I’m exhausted after a long day, but they taste like they came from a five-star bakery. If you’ve ever had those canned fried apple slices you find in the grocery store, forget about them. This is a whole different ballgame, a million times better. This recipe for fried apples is going to change your dessert game, I promise!
What are fried apples?
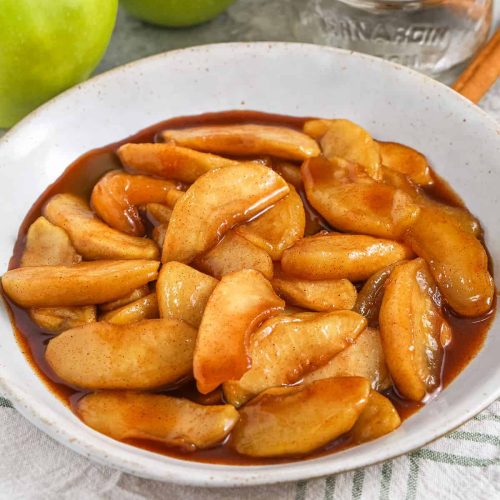
So, what exactly are we talking about when I say “fried apples”? Think of them as tender, slightly softened apple slices that have been gently cooked in a skillet with butter, sugar, and warm spices like cinnamon and nutmeg. They’re not mushy, not hard – just perfectly tender, with a little bit of chew. The sugar caramelizes slightly, creating this lovely glaze that coats every single piece. It’s like a deconstructed Apple Pie filling, but so much simpler and quicker to make. It’s essentially the soul of apple pie, distilled into its most comforting and accessible form. This dish is a celebration of simple ingredients coming together to create something truly special. It’s not complicated, it doesn’t require any fancy techniques, just good quality apples and a few pantry staples.
Why you’ll love this recipe?
There are so many reasons why this fried apples recipe has become a staple in my kitchen, and I just know you’re going to fall in love with it too. First and foremost, the flavor is just out of this world. We’re talking sweet, tart apples kissed with warm cinnamon and nutmeg, all enveloped in a buttery, slightly caramelized sauce. It’s the kind of flavor that just makes you close your eyes and savor every bite. And the texture? Oh my goodness. The apples are tender but still have a slight bite, nothing like a mushy cooked apple. They get this beautiful glossy coating that is just irresistible. Plus, this recipe is unbelievably simple. Seriously, if you can peel an apple and stir a pan, you can make this. It’s one of those weeknight lifesavers when you need a dessert that feels indulgent but takes hardly any effort. And budget-friendly? You bet! Apples are usually pretty affordable, and the rest of the ingredients are common pantry staples. What I truly adore about this recipe is its versatility. You can serve these fried apples in so many ways – over ice cream, on pancakes, mixed into oatmeal, or just eaten straight from the bowl (guilty as charged!). It’s incredibly forgiving, which is a huge plus for home cooks like me. It’s this perfect balance of comforting nostalgia and modern ease that makes it such a winner.
How do I make fried apples?
Quick Overview
The whole process is beautifully straightforward. You’ll start by prepping your apples, then gently sautéing them in butter with a touch of sugar and those magical spices until they’re perfectly tender and glazed. The key is to not overcook them, so they retain a lovely texture. It’s a quick cook, usually under 15 minutes from start to finish once your apples are prepped. This recipe is all about coaxing out the natural sweetness of the apples and enhancing it with simple, warming flavors. It’s proof that the most delicious things don’t need to be complicated.
Ingredients
For the Apples: What are the best apples?
We’re talking about good, sturdy apples here. My favorites for this are Honeycrisp, Fuji, or Gala. They hold their shape well and have a lovely balance of sweet and tart. You’ll need about 4-6 medium apples, peeled, cored, and sliced about 1/4 inch thick. I like to cut them into wedges or half-moons, whatever feels easiest for you. Don’t go too thin or they’ll turn to mush! Freshness is key here, so grab the best looking apples you can find.
For the Simmer:
Here’s where the magic happens. You’ll need about 2 tablespoons of unsalted butter. It adds that wonderful richness and helps the sugar caramelize. For sweetness, we’ll use about 1/4 cup of granulated sugar, but you can adjust this up or down depending on how sweet your apples are and your personal preference. And for those glorious warm spices, 1 teaspoon of ground cinnamon is a must, plus a pinch of ground nutmeg. If you’re feeling adventurous, a tiny pinch of ground cloves or allspice can be lovely too! A tablespoon of water or apple cider can help things get going and create a little steam to soften the apples.
For the Optional Glaze:
This is totally optional, but I love it! It just adds an extra layer of richness and sheen. You’ll just need about 1 tablespoon of the cooking liquid from the apples, mixed with another 1/2 teaspoon of sugar and a tiny pinch more cinnamon. It thickens up beautifully when it’s done.
Step-by-Step Instructions
Step 1: Preheat & Prep Pan
Grab a good-sized skillet – a non-stick or well-seasoned cast iron skillet works wonderfully. You don’t need to preheat the pan just yet, but have it ready. Now, let’s get those apples prepped. Peel them, cut them in half, then carefully remove the core. Slice them about 1/4-inch thick. I usually go for wedges or half-moons, as they hold their shape nicely. Set them aside in a bowl. If you’re worried about them browning while you work, a tiny squeeze of lemon juice is fine, but I usually just get them all cut and then start cooking.
Step 2: Mix Dry Ingredients
In the bowl with your sliced apples, sprinkle the sugar, cinnamon, and nutmeg. Give it a good toss with your hands or a spatula to make sure every apple slice is lightly coated. This helps distribute the flavors evenly from the get-go and starts drawing out some of the apple’s natural juices. This step is super important for getting that even spice distribution and that lovely caramelization later on.
Step 3: Mix Wet Ingredients
In your skillet, melt the butter over medium heat. Don’t let it brown too much, just melt it until it’s liquid gold. Once melted, add the tablespoon of water or apple cider. This little bit of liquid helps get the cooking process started and creates steam, which softens the apples without them sticking.
Step 4: Combine
Carefully add the sugar-coated apple slices to the skillet. Spread them out in a single layer as much as possible. You might need to do this in batches if your skillet isn’t huge, but try to avoid overcrowding the pan, as that can steam the apples instead of frying them. We want that gentle sauté. Cook for about 5-7 minutes, stirring gently every minute or so, until the apples start to soften and the liquid begins to thicken into a syrupy glaze.
Step 5: Prepare Filling
This step is actually already done as we’re cooking the apples! The “filling” is essentially the tender apples and their delicious syrupy coating that we’re creating right in the pan. As they cook, the sugar and butter meld with the apple juices to create that perfect, slightly thick, glossy sauce. Just keep an eye on them and stir gently to ensure even cooking.
Step 6: Layer & Swirl
There’s no real “layering” or “swirling” in the traditional sense here. The magic happens as the apples cook down and their juices release, mingling with the butter and sugar. You’re essentially creating a beautiful, naturally swirled effect as the apples cook and their individual coatings meld together in the pan. Just keep gently stirring to make sure all the pieces get coated and tenderized evenly.
Step 7: Bake
This isn’t really a baking recipe in the oven, it’s all done on the stovetop! So, no oven needed. We’re just continuing the cooking process in the skillet. Keep the heat on medium-low and continue to cook, stirring occasionally, for another 5-8 minutes, or until the apples are tender to your liking and the sauce has thickened into a beautiful, syrupy glaze. You want them soft enough to eat easily, but not mushy. The aroma at this stage is absolutely heavenly!
Step 8: Cool & Glaze
Once the apples are tender and glazed, remove the skillet from the heat. If you want that extra punch of glaze, carefully scoop out about a tablespoon of the syrupy liquid into a tiny bowl. Whisk in another 1/2 teaspoon of sugar and a tiny pinch of cinnamon. Return this mixture to the pan with the apples and stir gently for about 30 seconds until it thickens slightly. Then, let it sit for about 5 minutes before serving. This allows the flavors to meld and the sauce to thicken just a little bit more. You don’t want to let them sit too long or they can get a bit watery.
Step 9: Slice & Serve
Serve these glorious fried apples warm! They are absolutely divine spooned over vanilla ice cream. They’re also incredible on top of pancakes, waffles, or French Toast. For a cozy evening treat, a small bowl of these on their own is pure bliss. You can also swirl them into yogurt or oatmeal for a fancy breakfast. Honestly, however you serve them, they’re a guaranteed crowd-pleaser. A sprinkle of extra cinnamon on top never hurt anyone, either!
What to Serve It With
These fried apples are so versatile, they can seriously elevate almost any meal. For breakfast, they’re an absolute dream piled high on fluffy pancakes or golden waffles. Imagine that warm, spiced apple goodness mingling with the breakfast batter – pure comfort! A dollop of whipped cream or a swirl of Greek yogurt on top makes it feel extra special. For a more elegant brunch, I love serving them alongside some crispy bacon and scrambled eggs; the sweet and savory combination is just divine. And as a dessert? Oh, the possibilities are endless! They are the quintessential topping for a scoop of good quality vanilla bean ice cream. The contrast of the warm apples and the cold ice cream is just heavenly. They’re also fantastic over pound cake or angel food cake. For those moments when you just need a cozy snack, a small bowl of these warm fried apples, maybe with a tiny splash of cream, is pure bliss. My kids always ask for these when we have a simple weeknight dinner and I want to whip up something sweet without much fuss. They’re just so comforting and satisfying.
Top Tips for Perfecting Your Fried Apples
Over the years, I’ve picked up a few tricks that make my fried apples consistently amazing. First, the apple choice is crucial. I mentioned Honeycrisp and Fuji, but Granny Smith can add a nice tartness if you like that contrast. Just avoid apples that are too soft, like Red Delicious, as they tend to break down too much. When you’re prepping the apples, slicing them consistently is key for even cooking. Aim for about 1/4-inch thickness. If they’re too thin, they’ll turn to mush; too thick, and they won’t soften enough. Don’t be afraid to adjust the sugar. Taste your apples first! If they’re super sweet, you might need less sugar. If they’re a bit tart, you might want to add a touch more. I also learned early on that overcrowding the pan is a no-go. If you pack too many apples in, they’ll steam instead of sauté, and you won’t get that lovely caramelized edge. Cook them in batches if necessary – it’s worth the extra few minutes. When it comes to the spices, start with the recommended amounts, but don’t hesitate to experiment. I sometimes add a tiny pinch of ground ginger or cardamom for an extra layer of warmth. For the glaze, patience is a virtue. Let the sauce simmer and thicken naturally; don’t rush it by cranking up the heat too high, or you risk burning the sugar. If your apples seem a little dry, you can always add another tablespoon of butter or a splash of water or apple cider towards the end of cooking. I once tried using brown sugar instead of granulated, and while it was delicious, it gave a deeper, molasses-like flavor that was different from the bright, sweet flavor I was going for. So, for classic fried apples, stick with granulated sugar. And finally, the serving temperature matters! These are best served warm, right off the stove, but if you have leftovers, they’re still pretty darn good at room temperature or gently reheated.
Storing and Reheating Tips
These fried apples are so good, you might actually have leftovers – though I wouldn’t count on it! If you do, storing them is super easy. For the best texture and flavor, I recommend storing them in an airtight container in the refrigerator. They’ll stay delicious for about 3-4 days. The sauce might thicken up quite a bit as they cool, which is totally normal. If you’re planning to freeze them, which is also totally doable, let them cool completely first. Then, transfer them to a freezer-safe container or heavy-duty freezer bag. They should hold up well for about 2-3 months. When you’re ready to reheat them, there are a few options. For a quick reheat, you can pop them in the microwave for 30-60 seconds, stirring halfway through, until warmed through. If you have a little more time, gently warming them in a skillet over low heat with a tiny splash of water or a small knob of butter is my favorite way – it helps bring back some of that fresh-from-the-pan texture. If you reheated from frozen, just make sure they are fully thawed before gently warming them through. I usually don’t add the glaze if I know I’ll be storing or freezing them, as it can sometimes get a bit sticky or separated. I prefer to add a fresh drizzle of glaze right before serving if I’m reheating. The key is gentle warming to avoid overcooking them further.
Frequently Asked Questions
Final Thoughts
So there you have it – my absolute favorite recipe for fried apples. It’s a dish that truly embodies comfort food for me. It’s simple, it’s incredibly flavorful, and it always brings smiles to the faces of whoever I’m serving it to. Whether you’re looking for a quick dessert, a way to jazz up your breakfast, or just a sweet treat to brighten your day, I really hope you’ll give this a try. It’s one of those recipes that makes you feel like a kitchen wizard without actually having to do any complex magic. If you love these fried apples, you might also enjoy my recipe for rustic apple crumble or my simple baked cinnamon pears – they have that same warm, cozy vibe. I can’t wait to hear how yours turn out! Please feel free to leave a comment below and tell me what you think, or share any of your own fun variations. Happy cooking!
fried apples
Ingredients
Main Ingredients
- 1.5 pounds Granny Smith apples about 4 medium
- 0.25 cup butter salted
- 0.25 cup brown sugar
- 0.25 cup granulated sugar
- 1.5 teaspoons cinnamon
Instructions
Preparation Steps
- Peel and core the apples. Slice into 0.5-inch thick slices.
- In a large skillet, add butter, brown sugar, granulated sugar, and cinnamon. Melt over medium-high heat.
- Add the apples as soon as the butter is melted and cook until they are tender and the sauce has thickened, stirring occasionally, about 12 minutes.
- Serve warm.