Oh, friend, pull up a chair and let me tell you about the recipe that has ruined all other brownie recipes for me. Seriously. Before this, I thought I knew good brownies—you know, the classic fudgy kind? Nice, dependable. But then, I decided I needed something extra, something that tasted like a decadent trip to a high-end chocolatier but was actually achievable in my slightly chaotic kitchen on a Tuesday night. That’s how this absolute treasure was born: the best Fudgy Brownie featuring a ribbon of rich, gooey White chocolate caramel. White chocolate caramel.. The first time I made these, my husband came home, caught a whiff of that sweet, buttery aroma, and literally stopped dead in the hallway. He tried one piece, then immediately went back for a corner piece (you know, the best part!), and just looked at me like I’d invented dessert. These aren’t just brownies; they’re an experience. They’re what I pull out when I need a serious comfort food hug or when company surprises me. They’re deep, dark, intensely chocolatey, and that swirl? That beautiful, decadent swirl of melted white chocolate and salted caramel cuts through the richness perfectly. Don’t even get me started on the texture—they’re chewy on the edges and unbelievably soft in the middle. If you’re craving that perfect balance of bitter dark chocolate and sweet, buttery caramel, you’ve found your holy grail.
What is this Fudgy Brownie with White Chocolate Caramel Swirl?
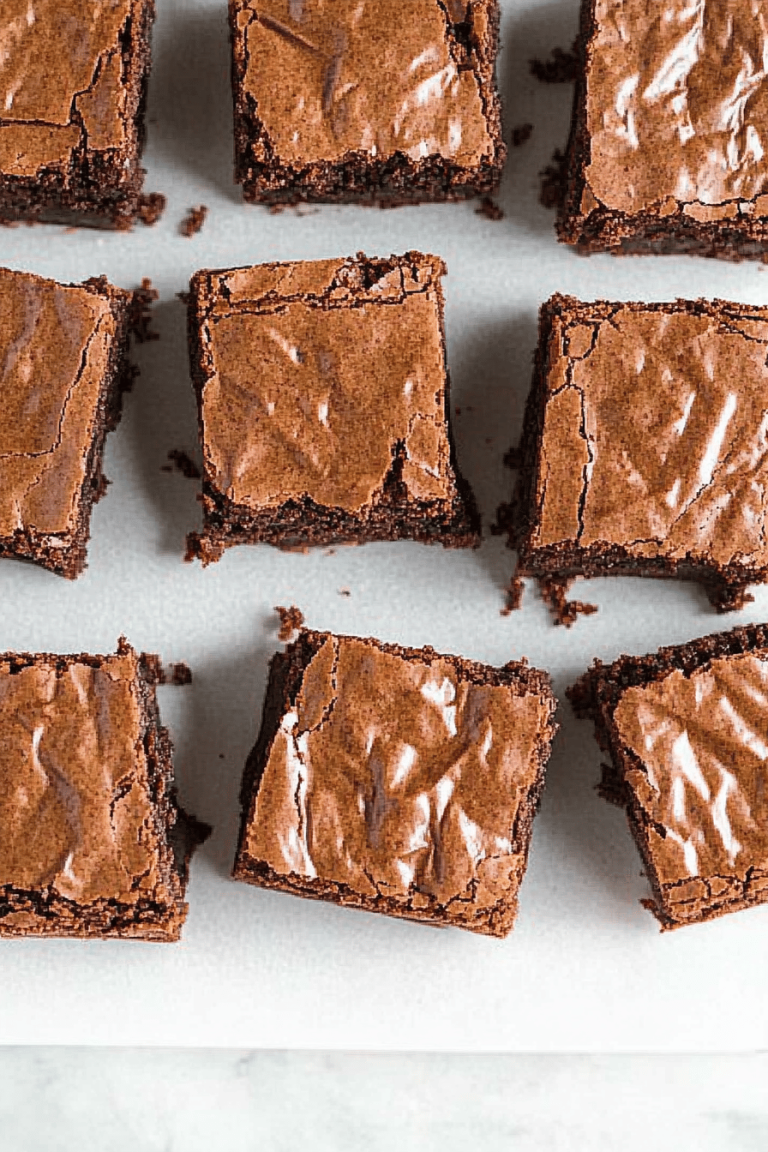
Think of the fudgiest, densest, almost underbaked-in-the-best-way brownie you’ve ever dreamed of. That’s our base. We’re using high-quality dark chocolate and just enough cocoa powder to give it that deep, almost espresso-like background note that keeps it from being sickly sweet. It’s a relatively simple batter—no mixer required, thank goodness, which means less cleanup, which is always a win in my book. The star, though, is that magnificent swirl. It’s a homemade salted caramel sauce that we fold gently into melted white chocolate chips. Why white chocolate? Because traditional caramel can sometimes sink or get lost in the dark chocolate batter. The white chocolate actually stabilizes the caramel slightly while it bakes, ensuring you get those distinct, creamy pockets of golden goodness marbled throughout the deep brown. It’s essentially the sophisticated cousin of the classic turtle brownie, but with a smoother, creamier profile thanks to that gorgeous White chocolate caramel. White chocolate caramel.. It’s intense, it’s rich, and it definitely requires a tall glass of milk or a strong cup of coffee.
Why You’ll Love This Recipe
Honestly, where do I even start? I’ve been chasing the perfect brownie recipe for years, and this one finally put the search to rest. First off, the flavor profile is just *chef’s kiss*. You get that bittersweet punch from the dark chocolate—I use 70% cacao—which is instantly mellowed by that luscious, buttery stream of white chocolate caramel. It’s sophisticated enough for a dinner party, but cozy enough to eat straight off the cooling rack while standing over the sink, which I’ve definitely done more times than I care to admit. What I love most about this is that it really tastes like you slaved over it all day, but in reality, the active mixing time is maybe twenty minutes tops.
The simplicity is a massive selling point. I often make these on days when I’m feeling completely drained, maybe after a long week of kid-related activities, and I need a guaranteed win. Since we’re melting the chocolate on the stove rather than creaming butter and sugar forever, it’s fast. You’ll notice I use oil along with the butter in the main batter—that’s my secret weapon for moisture retention. Butter gives flavor, but oil guarantees that fudgy, almost truffle-like texture that won’t dry out the next day. Try to find that in a boxed mix! Never.
And let’s talk about cost-efficiency. While the base ingredients—good chocolate, sugar, eggs—are staples, the caramel and white chocolate are totally worth the splurge here. I’ve tried making this with cheap, waxy white chips, and honestly, it just doesn’t melt right. Using a quality block of baking white chocolate or even good quality chips makes all the difference in the swirl’s texture. If you already have a good salted caramel sauce on hand from making, say, ice cream topping, you can skip that step entirely and shave off another five minutes. This versatility is key; you can make it a two-layer pan treat, or cut it into tiny squares for a serious dessert platter. My kids usually prefer them without the glaze, just dusted with powdered sugar, but for me? That extra sheen from the optional ganache glaze just seals the deal. It’s everything you want in a dessert, all wrapped up in one glorious, chocolatey square.
How to Make The Ultimate Fudgy Brownies with a Creamy White Chocolate Caramel Swirl
Quick Overview
Okay, deep breaths, we’re making magic here, but it’s straightforward magic. First, we tackle that caramel and white chocolate swirl separately. We need the caramel slightly cooled so it doesn’t seize the white chocolate immediately. While that cools down a touch, we melt the dark chocolate and butter for the base batter, whisk in the sugars and eggs, then fold in the dry ingredients gently. The key technique? Don’t mix after the flour goes in! We mix wet and dry until *just* combined. Then, pour the batter into your prepared pan, dollop the rich caramel mixture over the top, and use a knife to swirl it in with delicate figure-eights. Bake until you get those beautiful set edges and a slight wobble in the center. Trust me, you want that wobble!
Ingredients
For the White Chocolate Caramel Filling & Swirl:
1/2 cup heavy cream (Must be heavy cream for richness; half-and-half gets too thin!)
1/2 cup granulated sugar
2 tablespoons unsalted butter, cubed
1/4 teaspoon sea salt (or a pinch more if your caramel is too sweet)
4 ounces high-quality white baking chocolate, roughly chopped (Don’t skimp here; it makes the swirl creamy, not grainy.)
For the Fudgy Brownie Base:
1 cup (2 sticks) unsalted butter
8 ounces bittersweet or semi-sweet chocolate (around 60-70% cacao), chopped
1 3/4 cups granulated sugar
1/2 cup packed light brown sugar (This adds chewiness! Never skip the brown sugar.)
3 large eggs, room temperature (Cold eggs can cause the melted chocolate to seize slightly.)
1 teaspoon pure vanilla extract
1/2 cup vegetable oil (This is crucial for keeping them ultra-fudgy, even days later.)
1 cup all-purpose flour
1/2 cup unsweetened cocoa powder (Use Dutch-process if you can; it deepens the color and flavor.)
1/2 teaspoon fine sea salt
For the Optional Dark Chocolate Glaze (If you want extra shine):
4 ounces semi-sweet chocolate chips
1/4 cup heavy cream
Step-by-Step Instructions
Step 1: Preheat & Prep Pan
Preheat your oven to a steady 350°F (175°C). You’ll need a standard 9×13-inch baking pan. This is important: Line the pan with parchment paper, leaving an overhang on the two longer sides—these overhangs act as natural handles later when you lift the whole slab out for easy, clean cutting. Lightly grease the exposed sides of the pan with cooking spray or butter. This ensures nothing sticks, not even a corner!
Step 2: Mix Dry Ingredients
In a medium bowl, whisk together the flour, cocoa powder, and salt. Whisk them really well for about 30 seconds. This aerates the cocoa slightly and helps distribute the salt evenly, preventing any salty clumps later on. Set this bowl aside. We don’t want to introduce this to the wet ingredients until they’re perfectly emulsified.
Step 3: Mix Wet Ingredients
In a large, heatproof bowl set over a simmering saucepan of water (a double boiler), melt the 1 cup of butter and the 8 ounces of chopped dark chocolate together. Stir occasionally until smooth and glossy. Remove from heat. Whisk in both sugars until they are fully incorporated and the mixture is smooth. Whisk in the room temperature eggs, one at a time, making sure each one is fully blended before adding the next. Finally, whisk in the vanilla and the 1/2 cup of oil. The mixture should look thick, dark, and slightly glossy.
Step 4: Combine
Add the dry ingredients (from Step 2) into the large bowl of wet ingredients. Using a rubber spatula, fold the mixture together. Stop mixing the moment you see the last streak of white flour disappear. I mean it! Overmixing develops gluten, and we want fudgy, not cakey. This folding process should take about 10-15 gentle folds. Remember, a few tiny flour pockets are better than a tough brownie.
Step 5: Prepare Filling
While the batter rests for just a minute, make the swirl. In a small saucepan, combine the heavy cream, sugar, butter, and salt. Heat over medium heat, stirring constantly until the sugar dissolves and the mixture comes to a gentle boil. Immediately remove from heat. Pour this hot mixture over the chopped white chocolate chips in a separate small bowl. Let it sit undisturbed for 3 minutes to let the heat melt the chocolate, then whisk gently until you have a smooth, creamy sauce. Let this cool slightly—it needs to be warm, not scorching hot, or it will melt right into the batter.
Step 6: Layer & Swirl
Pour half of the dark chocolate brownie batter into your prepared 9×13 pan and spread it evenly. Drizzle or spoon dollops of about two-thirds of your warm white chocolate caramel mixture over the top. Pour the remaining batter over the caramel layer, gently spreading it to cover. Spoon the last bit of caramel on top. Take a butter knife or a skewer and gently trace figure-eights or large S-shapes through the batter to create those gorgeous swirls. Be careful not to dig all the way to the bottom of the pan; we want marbling, not mixing.
Step 7: Bake
Bake at 350°F (175°C) for 30 to 35 minutes. This timing is crucial. At 30 minutes, test with a toothpick inserted about an inch from the edge; it should come out with moist, fudgy crumbs attached, but not wet batter. If you insert it in the very center, it should still look slightly underdone. If the toothpick comes out totally clean, you’ve gone too far, and they’ll be cakey. I usually check at 28 minutes and let them ride until 33.
Step 8: Cool & Glaze
Remove the pan from the oven and let it cool completely on a wire rack. This is the hardest part, but if you try to cut warm brownies, they’ll turn into mush! Once fully cool (at least 2 hours), you can lift them out using the parchment paper handles. If you’re adding the optional glaze: Gently heat the 4 ounces of chocolate chips and 1/4 cup of heavy cream until smooth. Pour over the cooled brownies and spread quickly. Let the glaze set for about 30 minutes before cutting.
Step 9: Slice & Serve
For the cleanest slices, use a long, sharp knife, wiping the blade clean between each cut. I like to chill them for 30 minutes after the glaze sets before slicing, which makes for perfect squares. Serve them at room temperature for ultimate fudginess, or warm them up slightly for extra gooey caramel.
What to Serve It With
These brownies are unapologetically rich, so you need companions that either cut through that richness or lean into the decadence. For a standard morning coffee run? Skip the pastries and just grab a square of this. The dark chocolate is an amazing foil for a robust dark roast or a creamy latte. The bitterness keeps you honest!
For brunch—yes, I serve brownies at brunch, don’t judge!—I plate them slightly differently. I cut them into thinner strips, dust them lightly with powdered sugar, and serve them alongside a fresh, bright fruit salad. Think raspberries and sliced kiwi. The acidity from the fruit is like a palate cleanser between bites of that heavy white chocolate caramel swirl. A chilled glass of sparkling cider also works beautifully here.
When serving as a proper dessert, this is where you go all out. A small scoop of good quality vanilla bean ice cream is non-negotiable. The temperature contrast—warm brownie meeting cold ice cream—is just heavenly. If you want something more elegant, a drizzle of espresso syrup over the top elevates it instantly. My family’s tradition is serving them after a big holiday meal; we ditch the formal dessert plates and just put the whole slab on a platter with a side of whipped cream seasoned with just a touch of cinnamon. It’s casual comfort food that feels celebratory.
Top Tips for Perfecting Your Fudgy Brownies with White Chocolate Caramel Swirl
I’ve made enough batches of these to know exactly where things can go wrong, so let me save you some heartache! First off, remember that oil trick in the base? Don’t substitute it all for butter, even if you want *more* butter flavor. The oil is what keeps the structure soft. If you swap it 1:1 for butter, you’ll end up with a denser, slightly more cake-like texture, and you’ll lose that signature melt-in-your-mouth quality. Keep the oil!
My biggest lesson learned on the caramel front: Patience with the white chocolate. When you pour the hot cream over the chopped white chocolate, resist the urge to stir immediately. White chocolate is temperamental. Let the residual heat do its job for three full minutes. If you stir too soon, you risk grainy caramel, and nobody wants a gritty swirl. Also, use quality sea salt in the caramel. That tiny bit of salinity is what balances the intense sweetness of the white chocolate chips. I experimented once with fine table salt, and it tasted too metallic; flaky sea salt is the way to go.
When you’re swirling—this is key for visual appeal—use a light hand. I’ve seen people aggressively churn the knife through the batter, thinking they are mixing. You aren’t! You are gently disturbing the layers. Imagine you are painting broad strokes. Too much movement, and the white caramel sinks, and you end up with a muddy brown blob instead of distinct ribbons. I usually do one pass down the middle, then one pass diagonally, and then I stop, even if it looks uneven. Uneven is beautiful in this case.
For baking, seriously, trust the toothpick test described in the instructions. If you bake these until the toothpick comes out totally clean, you’ve baked a fantastic batch of chocolate cake, not the fudgy dream we’re aiming for. The center should be moist enough that the toothpick looks coated, but not dripping wet. They continue to cook slightly outside the oven as they cool down in the pan, which is how you guarantee that perfect, slightly underbaked center that melts when you bite into it. If you’re using a metal pan vs. a glass pan, reduce your baking time by about 2-3 minutes, as metal conducts heat faster.
Finally, ingredient temperature. If you can, make sure your eggs are at room temperature. When cold eggs hit warm melted chocolate, they can cause the whole mixture to seize up just a little bit, giving you a slightly grainy base instead of that smooth, cohesive batter we want before adding the flour. A quick 10-minute soak in warm water usually does the trick if you forget to pull them out!
Storing and Reheating Tips
How you store these babies depends entirely on how quickly you plan to eat them, because trust me, they are addictive. For room temperature storage, I recommend keeping them in an airtight container lined with parchment paper for up to three days. Do not put them in the fridge yet! Cold temperatures suck the moisture right out of a good brownie, turning it stiff and dry. If you must refrigerate them for longevity (say, day four onward), make sure you seal them tightly in an airtight container. When you pull them out of the fridge, let them sit on the counter for at least an hour to come back to room temperature before serving; that’s when the fudgy texture returns and the white chocolate caramel softens up again.
If you’re a planner like me, freezing is your best friend. I usually let the brownies cool completely, glaze and all, and then I slice them into individual squares *before* freezing. This way, you don’t have to thaw the whole pan just to enjoy one piece. Wrap each square tightly first in plastic wrap, then again in a layer of aluminum foil. This double-wrapping prevents freezer burn and keeps that wonderful chocolate scent locked in. They freeze beautifully for up to three months. Thawing is simple: just transfer the wrapped squares to the refrigerator overnight, and then let them sit on the counter for an hour before unwrapping and enjoying.
A critical note on the glaze timing: If you plan to freeze these for more than a week, I actually recommend skipping the glaze until *after* thawing. If you freeze a glossy glaze, sometimes condensation forms when thawing, making the surface look a little dull. If you glaze them fresh after thawing, you get that perfect, just-made shine every single time. If you’re eating them within 24 hours, go ahead and glaze before cooling completely—it’s worth the shine!
Frequently Asked Questions
Final Thoughts
I truly hope you give these Fudgy Brownies with the white chocolate caramel swirl a try. They are my go-to recipe when I need serious chocolate therapy, and they are proof that sometimes the best results come from layering flavors and textures rather than sticking to the basics. That little pocket of warm, salty-sweet caramel encased in dark, dense chocolate? It’s pure happiness. I know the steps for the caramel might seem a little daunting at first, but trust me, once you master that simple stove-top sauce, you’ll be using it on everything from ice cream to popcorn. These brownies feel luxurious, like something you’d buy at an artisanal bakery, but the satisfaction of making them yourself—knowing exactly how much that gooey swirl is packed in there—is unbeatable.
If you adore this combination of rich dark chocolate and creamy blonde caramel, you absolutely must check out my recipe for Salted Caramel Chocolate Chip Cookies next; it uses a similar caramel base but in a chewy cookie format. But for now, focus on these squares. When yours come out of the oven, take a minute to just inhale the aroma—it’s the best part! I’m dying to know how your swirls turned out. Don’t forget to drop a comment below, let me know what percentage chocolate you used, and definitely tell me if you opted for the optional glaze! Happy baking, everyone. I can’t wait to hear how yours turns out!
white chocolate caramel
Ingredients
Main Ingredients
- 24 ounces white baking chips I used Toll House premier white chips
- 14 ounces sweetened condensed milk
- 4 tablespoons heavy cream 2½ tablespoons for fudge body, 1½ tablespoons for caramel
- 25 pieces individually wrapped caramels unwrap before use
Instructions
Preparation Steps
- Line an 8x8 baking dish with parchment paper, leaving an overhang for easy lift-out. Alternatively, use heavy-duty aluminum foil lightly sprayed with nonstick cooking spray.
- In a medium microwave-safe bowl, combine white chocolate chips, sweetened condensed milk, and 2½ tablespoons heavy cream. Heat in 30-second intervals, stirring well after each until melted and smooth.
- In a small microwave-safe bowl, combine unwrapped caramels and 1½ tablespoons heavy cream. Heat in 30-second intervals, stirring between each until fully melted and smooth.
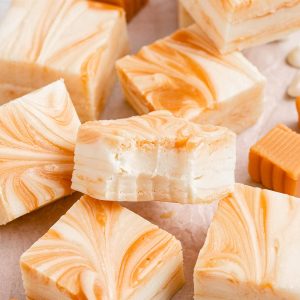
- Fold 75% of the caramel mixture into the white chocolate mixture gently 3-4 times to create a marble effect without fully blending.
- Spread the white chocolate mixture evenly into the prepared baking dish. Dollop remaining caramel in spots on top and use a knife to swirl for a marbled appearance. Cover with plastic wrap and chill in the refrigerator for at least 4 hours until set.
- Lift the set fudge from the baking dish using the parchment paper overhang. Cut into 5 by 5 slices and keep refrigerated until serving.