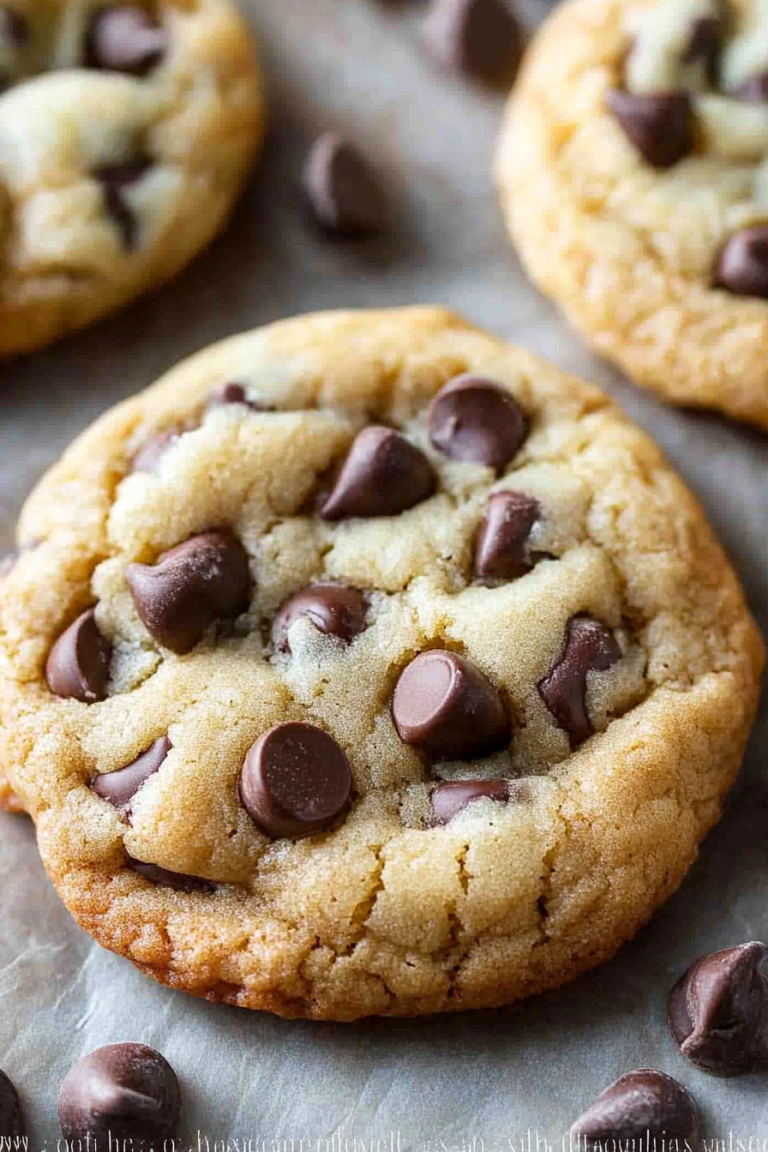
Oh, you guys. I’ve been meaning to share this recipe with you for ages, and today feels like the perfect day. It’s one of those recipes that just makes my heart happy. You know those days when you’re craving something seriously delicious, something that feels like a warm hug and a decadent treat all rolled into one, but you don’t want to spend hours in the kitchen? This is it. These chocolate hazelnut cookies are my go-to. They’re not just good; they’re *spectacular*. Imagine the rich, deep flavor of chocolate mingling with the nutty, slightly sweet aroma of toasted hazelnuts, all baked into a cookie that’s got just the right amount of chew. Honestly, they’re so good they make my usual chocolate chip cookie recipe a little jealous. This is the kind of cookie that disappears from the plate faster than you can say “second helping.”
What is chocolate hazelnut cookie?
So, what exactly are these magical little discs of joy? Think of them as your ultimate comfort cookie, elevated. They’re essentially a rich chocolate cookie base, often infused with cocoa powder and sometimes melted chocolate for an extra deep flavor, studded with chopped hazelnuts. The hazelnuts are the real stars here, providing a wonderful textural contrast and a flavor that’s just a little more sophisticated than your average chocolate chip. They’re not overly sweet, which I love, allowing the chocolate and hazelnut notes to really sing. It’s a classic pairing, like Peanut Butter and jelly, but for grown-ups who appreciate a bit of indulgence. I’ve experimented with all sorts of variations, but this core recipe is pure gold. It’s simple, straightforward, and utterly irresistible.
Why you’ll love this recipe?
There are so many reasons why this recipe has earned a permanent spot in my recipe binder, and I know you’re going to fall in love with it too! For starters, the flavor profile is just out of this world. You get that intense, dark chocolate goodness that’s perfectly balanced by the earthy, slightly sweet crunch of toasted hazelnuts. It’s a flavor combination that just feels sophisticated and utterly comforting at the same time. And don’t even get me started on the texture! These cookies have that perfect chewiness in the center with slightly crisp edges. It’s heaven.
But it’s not just about the taste, oh no. This recipe is surprisingly simple to whip up, which is a lifesaver on busy weeknights or when unexpected guests drop by. I’ve tested this recipe countless times, and it consistently delivers amazing results without any fuss. It’s the kind of recipe you can make with kids helping too – they love adding the chocolate chips and hazelnuts! Plus, it’s wonderfully budget-friendly. The ingredients are pretty standard pantry staples, making it an easy treat to whip up without breaking the bank.
And talk about versatility! While they’re incredible on their own, I’ve found they’re fantastic dipped in a glass of cold milk, alongside a hot cup of coffee, or even crumbled over ice cream for a truly decadent dessert. If you’re a fan of my Double Chocolate Brownies or even my classic chocolate chip cookies, I guarantee you’ll adore these. They offer a similar level of chocolatey satisfaction but with that unique hazelnut twist. What I love most about this is that it feels special without being complicated. It’s that perfect balance of impressive flavor and approachable baking. Trust me, this one’s a keeper!
How do I make chocolate hazelnut cookies?
Quick Overview
Making these chocolate hazelnut cookies is a straightforward process that involves a few key steps: creaming butter and sugar, incorporating wet and dry ingredients, folding in your chocolate and hazelnuts, and then baking them to chewy perfection. The beauty of this recipe lies in its simplicity; you don’t need any fancy equipment, and the dough comes together quickly. You’ll be amazed at how easily you can create such a delightful treat. The aroma that fills your kitchen as they bake is just the first sign of the deliciousness to come!
Ingredients
For the Main Cookie Dough: For the Main Cookie Dough: For the Main Cookie Dough
I always start with good quality unsalted butter, softened to room temperature. This is crucial for achieving that perfect creamy texture when you cream it with the sugars. You’ll need about 1 cup (2 sticks). For the sugars, a mix of granulated sugar and packed light Brown Sugar is my secret. The granulated sugar helps with crisp edges, while the brown sugar brings that lovely chewiness and a hint of caramel flavor. Around 3/4 cup granulated and 1 cup packed brown sugar should do the trick. Then comes the star of the show: unsweetened cocoa powder. I prefer Dutch-processed for a richer, smoother chocolate flavor, about 1/2 cup. And of course, flour! All-purpose flour works wonderfully here, about 2 1/4 cups. Don’t forget your leaveners: 1 teaspoon of baking soda and 1/2 teaspoon of salt to balance all that sweetness. Two large eggs, at room temperature, help bind everything together, and a teaspoon of vanilla extract always enhances those chocolatey, nutty notes. And a splash of milk, maybe a tablespoon or two, if the dough feels a little dry – I’ve found this can sometimes help achieve the perfect consistency, especially if my flour is a bit drier than usual.
For the Chocolate & Hazelnut Goodness:
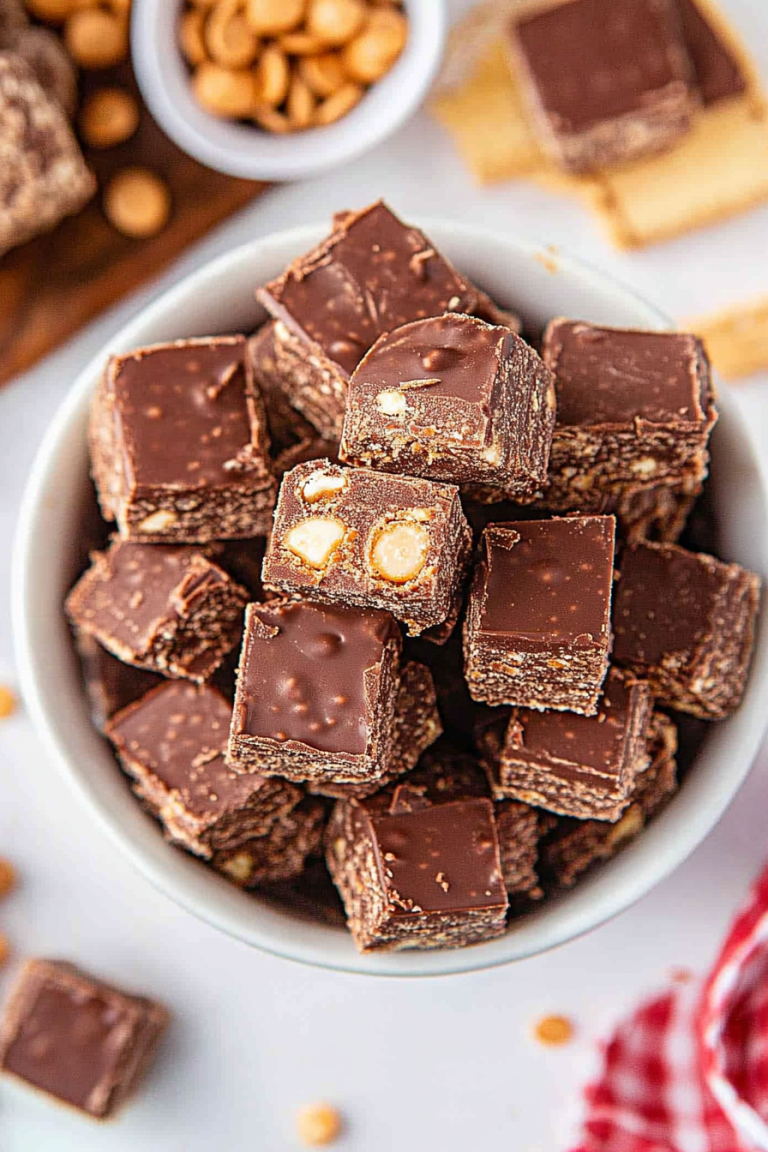
Here’s where we add the real magic! You’ll want about 1 cup of chocolate chips. I love a mix of semi-sweet and dark chocolate chips for a more complex flavor, but feel free to use your favorite. And, of course, the hazelnuts! I always buy raw hazelnuts and toast them myself. It makes such a difference in flavor. To toast them, spread them on a baking sheet and roast at 350°F (175°C) for about 10-15 minutes, until fragrant and their skins start to loosen. Once cooled, you can rub them in a clean kitchen towel to remove most of the skins. Then, give them a rough chop. You’ll need about 1 cup of chopped, toasted hazelnuts. If you’re feeling extra fancy, you can even add a tablespoon or two of finely chopped candied hazelnuts for an extra pop of sweetness and crunch.
For the Optional Chocolate Glaze:
This is totally optional but highly recommended for that extra touch of decadence! You’ll need about 1/2 cup of semi-sweet or dark chocolate chips and about 1 tablespoon of butter or coconut oil. This will make a simple, luscious glaze that drizzles beautifully over the cooled cookies.
Step-by-Step Instructions
Step 1: Preheat & Prep Pan
First things first, let’s get your oven ready. Preheat it to 375°F (190°C). Line your baking sheets with parchment paper. This is my number one tip for easy cleanup and cookies that don’t stick! It really does make a world of difference. If you don’t have parchment paper, you can lightly grease your baking sheets, but I find parchment is just superior.
Step 2: Mix Dry Ingredients
In a medium bowl, whisk together your all-purpose flour, unsweetened cocoa powder, baking soda, and salt. Whisking them together ensures that the leavening agents and salt are evenly distributed throughout the flour, which is key for consistent cookies. You don’t want one cookie to be too flat and another to puff up too much! Give it a good whisk until everything looks uniformly brown and combined.
Step 3: Mix Wet Ingredients
In a large bowl (preferably your stand mixer bowl if you have one, but a hand mixer or even a sturdy whisk and some elbow grease works too!), cream together your softened butter with the granulated sugar and light brown sugar. Beat them together until the mixture is light and fluffy – this usually takes about 3-5 minutes. Then, beat in the eggs, one at a time, making sure each is fully incorporated before adding the next. Stir in the vanilla extract. The mixture should look smooth and creamy. If it looks a little curdled, don’t worry too much; it usually comes together when you add the dry ingredients.
Step 4: Combine
Now, it’s time to bring the wet and dry ingredients together. Gradually add the dry ingredients to the wet ingredients, mixing on low speed (or stirring gently with a spatula) until just combined. Be careful not to overmix! Overmixing can develop the gluten in the flour too much, leading to tough cookies. You want to mix until you no longer see streaks of dry flour. If the dough seems a little dry and crumbly, this is when I’ll add a tablespoon or two of milk to help it come together. It should be thick but scoopable.
Step 5: Prepare Filling
This step isn’t really for a separate filling, but rather for incorporating the delicious mix-ins! Gently fold in your chopped toasted hazelnuts and your chocolate chips. Use a spatula or wooden spoon for this. Again, mix until they are just evenly distributed. You don’t want to overwork the dough at this stage.
Step 6: Layer & Swirl
This step isn’t applicable for this cookie recipe as it’s a drop cookie, not a layered or swirled one. My apologies! The recipe is designed for simple drop cookies where the chocolate and hazelnuts are mixed directly into the dough. If you were thinking of a swirled cookie, that would be a different recipe entirely!
Step 7: Bake
Scoop rounded tablespoons of dough onto your prepared baking sheets, leaving about 2 inches between each cookie as they will spread. I like to use a cookie scoop for uniform size, but two spoons work just fine. Bake for 10-12 minutes, or until the edges are set and slightly golden, and the centers still look a little soft. They will continue to set up as they cool. Don’t overbake them – a slightly underbaked cookie is a chewy cookie!
Step 8: Cool & Glaze
Let the cookies cool on the baking sheets for about 5 minutes before transferring them to a wire rack to cool completely. This is important for them to firm up properly. Once they’re completely cool, if you’re feeling fancy, you can prepare the glaze. Melt the chocolate chips with the butter or coconut oil in a microwave-safe bowl in 30-second intervals, stirring in between, until smooth. Alternatively, you can melt them gently in a double boiler. Once smooth, drizzle the glaze over the cooled cookies using a spoon or a piping bag. Let the glaze set completely before serving or storing.
Step 9: Slice & Serve
These cookies are best served at room temperature. They’re perfect for dunking in milk or coffee, or just enjoying on their own! You can serve them as is, or with that lovely chocolate drizzle. They look so inviting on a platter.
What to Serve It With
These chocolate hazelnut cookies are so versatile, they fit in perfectly with almost any occasion! For a casual breakfast treat, they’re wonderful alongside a steaming mug of coffee or a tall glass of cold milk. They add a touch of indulgence to your morning without being too heavy. When I serve them for brunch, I like to arrange them on a nice platter with some fresh berries – the tartness of the berries really cuts through the richness of the cookies. They make a lovely addition to a dessert buffet too. For a more formal dessert, I might serve them warm with a scoop of vanilla bean ice cream or a dollop of whipped cream. It’s pure heaven! And for those cozy evenings when you just need a little something sweet, they’re perfect on their own with a cup of herbal tea. My family loves them after dinner, especially the kids, who always seem to find room for one (or two!) after a big meal. I’ve also found they pair beautifully with a dessert wine or even a rich hot chocolate if you’re really going for it!
Top Tips for Perfecting Your Chocolate Hazelnut Cookies
I’ve learned a thing or two from making these cookies over the years, and I’m happy to pass on some of my best tips to ensure yours turn out perfectly! First off, regarding the hazelnuts: toasting them is non-negotiable in my book. It truly unlocks their full flavor potential and gives them a lovely crunch. Make sure to toast them until they’re fragrant but not burnt, and rub off as much of that papery skin as you can; it can sometimes taste a bit bitter. For the dough, remember that the key to a chewy cookie is not to overmix once you add the flour. Just mix until the dry streaks disappear. Overmixing develops gluten, which can lead to tough cookies, and nobody wants that!
When it comes to the chocolate and hazelnuts themselves, don’t be afraid to mix your chocolate types! I love a blend of semi-sweet and dark chocolate chips for depth, but milk chocolate chips are great too if you prefer them sweeter. For the hazelnuts, chopping them roughly rather than finely ensures you get noticeable nutty pieces in every bite. If your dough seems a little sticky or crumbly after mixing, don’t panic. A tiny bit of extra milk can help a dry dough, or a few minutes in the fridge can firm up a slightly too-soft dough.
Baking time is crucial. Ovens can vary, so it’s important to watch your cookies. They should look set around the edges and still a little soft in the center when you take them out. They’ll continue to bake on the hot baking sheet. I’ve found that baking them on the middle rack of the oven usually gives the most even results. If you’re using a dark baking sheet, you might need to reduce the baking time slightly, as they can brown more quickly. And for the glaze, consistency is key. If it’s too thick, add a tiny bit more butter or oil (like, half a teaspoon at a time) until it reaches a drizzly consistency. If it’s too thin, you might need to add a few more chocolate chips. Trust me, these little adjustments make all the difference in creating a cookie that’s both beautiful and incredibly delicious!
Storing and Reheating Tips
One of the best things about these chocolate hazelnut cookies is how well they store. If you find yourself with any leftovers (which is rare in my house!), you can keep them at room temperature in an airtight container for up to 3-4 days. I usually pop a slice of bread in the container; it helps keep them wonderfully soft and chewy. They’re often even better the next day as the flavors meld together!
If you need to store them for longer, your refrigerator is your friend. Place them in an airtight container or a zip-top bag, and they’ll stay good for about a week. Just a heads-up, refrigeration can sometimes make cookies a bit firmer, so you might want to let them come to room temperature for about 15-20 minutes before enjoying them if you prefer a softer cookie.
For true make-ahead magic, these cookies freeze beautifully! Once they’re completely cooled, you can freeze them in a single layer on a baking sheet until solid, then transfer them to a freezer-safe bag or container. They’ll keep well for up to 2-3 months. To thaw, just let them sit at room temperature for an hour or two. If you’ve glazed them, sometimes the glaze can get a little sticky when thawing, so you might want to glaze them *after* thawing if you plan to freeze them. For reheating, you can pop a cookie in the microwave for about 10-15 seconds to warm it up slightly, especially if you want that gooey chocolate chip effect again. Or, pop them in a low oven (around 300°F/150°C) for a few minutes to crisp them up a bit. With the glaze, I usually wait until the cookies are completely cooled before applying it, and then let the glaze set before storing, whether that’s on the counter or in the fridge.
Frequently Asked Questions
Final Thoughts
I really hope you give these chocolate hazelnut cookies a try. They are, without a doubt, one of my most cherished recipes because they bring so much joy, both in the making and the eating. They’re more than just a cookie; they’re a little moment of happiness. If you love rich chocolate and the satisfying crunch of nuts, you’re going to be absolutely delighted. They’re proof that sometimes, the simplest things can be the most extraordinary.
If you enjoy these, you might also love my recipe for fudgy brownie cookies or my chewy almond cookies – they share a similar spirit of comforting, delicious baking. I can’t wait to hear what you think! Please leave a comment below and let me know how your chocolate hazelnut cookies turned out. Did you add anything special? I love hearing about your kitchen adventures! Happy baking, everyone!
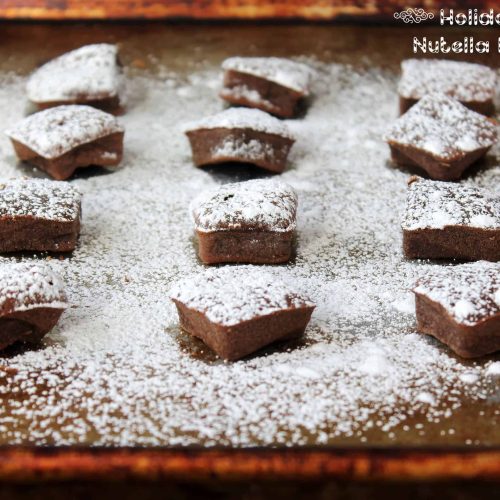
Chocolate Hazelnut Cookies (Nutella Bites)
Ingredients
Main Ingredients
- 0.5 cup Nutella (Hazelnut Spread)
- 2 large Eggs whole
- 0.5 cup Granulated Sugar
- 0.25 cup Milk
- 1 teaspoon Vanilla Extract
- 0.5 cup All-Purpose Flour
- Powdered Sugar For dusting
Instructions
Preparation Steps
- Preheat your oven to 350°F (175°C).
- In a medium-sized mixing bowl, whisk together the Nutella, eggs, sugar, milk, and vanilla extract until well combined.
- Whisk in the all-purpose flour until the mixture is smooth and creamy. Do not overmix.0.5 cup Nutella (Hazelnut Spread)
- Grease a mini brownie pan or a mini cupcake pan well with baking spray.
- Pour the Nutella mixture into each cavity, filling them about 2/3 full.
- Bake for 14 to 15 minutes, or until a toothpick inserted into the center comes out clean.
- Carefully invert the pan onto a wire cooling rack and let the bites cool completely.
- Dust generously with powdered sugar before serving.0.5 cup Nutella (Hazelnut Spread)