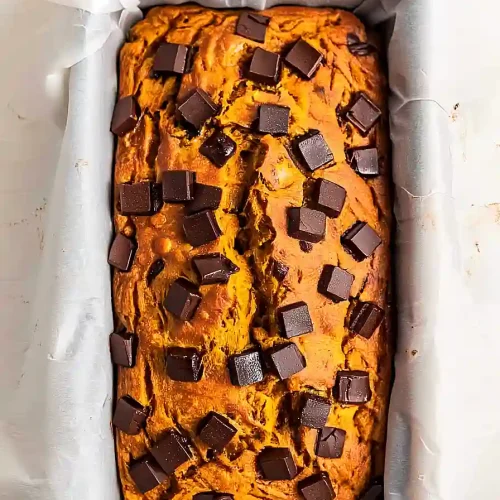
Okay, gather ’round, because I’m about to share something truly special with you. It’s more than just a recipe; it’s a hug in a loaf, a cozy afternoon captured, and honestly, it’s probably the most requested thing in my kitchen, especially when the leaves start to turn. I’m talking about my absolute favorite pumpkin Banana Bread. Forget those dry, crumbly excuses for quick bread you might have tried before. This one? It’s moist, it’s perfectly spiced, and it has this incredible depth of flavor from both the pumpkin and the ripe bananas that just sings. I’ve experimented with so many variations over the years, tweaking this and that, but this version, this is the one that makes my family light up and ask for seconds (and thirds!). If you love a good banana bread and you’re also a sucker for all things pumpkin spice, then this pumpkin banana bread is your culinary soulmate. It’s got all the comforting warmth you crave, without being overwhelmingly sweet. I even find myself craving a slice at 10 pm sometimes, and it’s just the perfect antidote to a sweet tooth when I don’t want to bake something complicated.
What is pumpkin banana bread?
So, what exactly *is* pumpkin Banana Bread? At its heart, it’s a delightful mash-up of two beloved quick breads. Think of it as the ultimate comfort food fusion. We take the tender crumb and sweetness that ripe bananas bring to a classic banana bread, and we infuse it with the earthy, comforting flavor and beautiful color of pumpkin puree. It’s not just adding pumpkin *to* banana bread; it’s about finding that perfect balance where neither flavor overpowers the other, but instead, they dance together in perfect harmony. The result is a bread that’s incredibly moist thanks to the moisture from both fruits, rich with warm spices like cinnamon, nutmeg, and cloves, and just wonderfully aromatic. It’s not dense like a cake, nor is it airy like a sponge. It’s that perfect, slightly chewy, incredibly tender quick bread texture that just melts in your mouth. It’s essentially a celebration of autumn and ripe fruit, all baked into one delicious loaf.
Why you’ll love this recipe?
Honestly, there are so many reasons why this pumpkin banana bread has become my go-to. First off, the flavor profile is just out of this world. You get that unmistakable sweetness from the bananas, which, when they’re really ripe, have this almost caramel-like depth. Then, the pumpkin adds this subtle earthiness and a beautiful, warm spice note that’s just perfect. It’s not just a one-note flavor; it’s layered and complex, and the spices really bloom in the oven. Plus, it’s unbelievably easy to whip up. Seriously, if you can stir a few things together, you can make this. There’s no fancy equipment needed, and it comes together in less time than it takes to preheat your oven. It’s a lifesaver on busy mornings when you need a quick breakfast, or when unexpected guests pop by and you want to offer them something homemade and delicious. And let’s talk about cost-efficiency! Using ripe bananas, which you might otherwise toss, and pantry staples like flour, sugar, and spices, makes this a really budget-friendly treat. It’s far more economical than buying a fancy coffee shop loaf, and infinitely more satisfying. What I love most about this pumpkin banana bread, though, is its versatility. It’s amazing on its own, but it also takes wonderfully to additions like chocolate chips or chopped nuts. It’s the kind of recipe that feels both familiar and excitingly new every time you make it.
How do I make banana bread?
Quick Overview
The process is wonderfully straightforward. We’ll start by prepping our pan and preheating the oven. Then, it’s a simple matter of whisking together the dry ingredients, mixing the wet ingredients separately, and then combining them gently. We’ll fold in some delicious, spiced pumpkin filling, swirl it through, and bake it until it’s golden brown and perfectly cooked. The key is not to overmix, which is a common pitfall with quick breads, but I’ll walk you through exactly what to look for. It’s honestly so simple, you’ll wonder why you haven’t made it sooner!
Ingredients
For the Main Batter:
1 and 3/4 cups all-purpose flour (spooned and leveled – I always do this to avoid too much flour)
1 teaspoon baking soda
1/2 teaspoon salt
1 teaspoon ground cinnamon
1/2 teaspoon ground nutmeg
1/4 teaspoon ground cloves (or allspice for a slightly different warmth)
3 very ripe mashed bananas (about 1.5 cups mashed – the browner, the better!)
1/2 cup unsalted butter, melted and slightly cooled
1/2 cup granulated sugar (you can adjust this slightly to your preference)
1/4 cup packed light Brown Sugar
2 large eggs, at room temperature
1 teaspoon vanilla extract
1/4 cup milk (whole milk or even buttermilk works wonders here for extra moisture)
For the Filling:
1 cup pumpkin puree (NOT Pumpkin Pie filling; just plain canned pumpkin)
1/4 cup packed light brown sugar
1 tablespoon all-purpose flour
1 teaspoon ground cinnamon
1/4 teaspoon ground nutmeg
Pinch of salt
For the Glaze:
1 cup powdered sugar
2-3 tablespoons milk (or a little heavy cream for richness)
1/2 teaspoon vanilla extract
Optional: A tiny pinch of cinnamon
Step-by-Step Instructions
Step 1: Preheat & Prep Pan
First things first, get your oven preheating to 350°F (175°C). This is crucial for an even bake. Then, grab a standard 9×5 inch loaf pan. I like to grease it really well with butter or baking spray, and then give it a light dusting of flour. You can also line it with parchment paper, leaving an overhang on the sides – this makes lifting the baked bread out super easy, which is a lifesaver when it’s hot. Make sure you get into all the corners!
Step 2: Mix Dry Ingredients
In a medium bowl, whisk together the flour, baking soda, salt, cinnamon, nutmeg, and cloves. Whisking helps to break up any little clumps and distribute the leavening agents evenly, which is super important for getting a good rise. You want everything to be nicely combined and uniform. This step ensures your spices are evenly dispersed throughout the batter, so you get that perfect warm flavor in every single bite.
Step 3: Mix Wet Ingredients
In a larger bowl, mash your ripe bananas until they’re pretty smooth, with just a few tiny lumps if you like. Add the melted butter, granulated sugar, brown sugar, eggs (one at a time, whisking well after each), vanilla extract, and milk. Whisk everything together until it’s well combined and smooth. Make sure your butter isn’t too hot when you add it, or it could scramble the eggs. The mixture should look luscious and slightly thick.
Step 4: Combine
Now, pour the dry ingredients into the wet ingredients. This is where you need to be gentle! Using a spatula or a wooden spoon, fold the dry into the wet *just until* no dry streaks of flour remain. Overmixing is the enemy of tender quick bread; it develops the gluten too much, making your loaf tough. A few little lumps are totally fine! It’s better to have a slightly lumpy batter than an overmixed one. Trust me on this one – it’s the secret to that perfect, tender crumb.
Step 5: Prepare Filling
In a small bowl, whisk together the pumpkin puree, brown sugar, flour, cinnamon, nutmeg, and salt for the filling. You want this mixture to be smooth and thick. This is where all that gorgeous pumpkin flavor really shines. I like to make sure the spices are really well incorporated here so you get those lovely pockets of spiced pumpkin goodness throughout the bread. If you like it extra spicy, you can even add a pinch more cinnamon here.
Step 6: Layer & Swirl
Pour about half of the banana batter into your prepared loaf pan. Dollop about half of the pumpkin filling mixture evenly over the batter. Then, pour the remaining banana batter on top, followed by the rest of the pumpkin filling. Now, take a knife or a skewer and gently swirl the filling into the batter. You don’t want to over-swirl; just a few gentle twists will create beautiful marble patterns. Aim for nice ribbons of pumpkin running through the banana bread, but don’t mix it completely into one color.
Step 7: Bake
Place the loaf pan in the preheated oven. Bake for 50-65 minutes. The baking time can vary depending on your oven, so start checking around the 50-minute mark. You’ll know it’s done when a wooden skewer or toothpick inserted into the center comes out clean, or with just a few moist crumbs attached (no wet batter!). If the top starts to get too dark before the inside is cooked, you can loosely tent it with foil. The aroma that fills your kitchen during this stage is just heavenly – a true sign of autumn.
Step 8: Cool & Glaze
Once it’s done, take the loaf pan out of the oven and let it cool in the pan on a wire rack for about 10-15 minutes. This allows the bread to set up a bit. Then, carefully invert the loaf onto the wire rack to cool completely. Patience here is key! Trying to glaze a warm loaf will just result in a melted mess. Once it’s completely cool, whisk together the powdered sugar, 2 tablespoons of milk, and vanilla extract for the glaze. Add more milk, a teaspoon at a time, until you reach your desired drizzling consistency. Drizzle generously over the top of the cooled pumpkin banana bread. Let the glaze set for a few minutes before slicing.
Step 9: Slice & Serve
Once the glaze has set a bit, it’s time to slice into this masterpiece! Use a sharp knife for clean cuts. I love to serve this slightly warm, but it’s equally delicious at room temperature. The slices are usually about 3/4 inch thick. Presentation-wise, a simple drizzle of the glaze is all you need, but you could also dust it with a little extra cinnamon or nutmeg. The marbling from the swirl should be visible, making each slice unique and beautiful.
What to Serve It With
This pumpkin banana bread is so versatile, it can truly fit into any meal or occasion! For breakfast, it’s just divine with a hot cup of coffee or a mug of tea. I love to have a thick slice toasted, maybe with a tiny smear of butter – it’s the perfect quick breakfast on a hectic morning. For a more leisurely weekend brunch, it elevates the whole spread. You can arrange slices on a beautiful platter alongside fresh fruit, yogurt parfaits, and maybe some crispy bacon. It pairs wonderfully with sparkling cider or a mimosa. As a dessert, it’s surprisingly elegant. Imagine serving a slice warm, perhaps with a dollop of whipped cream or a scoop of vanilla bean ice cream. A drizzle of caramel sauce would also be divine! And for those cozy snack times, when you just need a little something sweet and comforting? This is it. Serve it with a glass of cold milk, or just enjoy it plain while curled up with a good book and a cozy blanket. My kids always want it after school with a glass of milk, and it’s the perfect treat that doesn’t feel like a dessert, but still satisfies that craving for something sweet and homemade.
Top Tips for Perfecting Your Pumpkin Banana Bread
Over the years, I’ve learned a few little tricks that have really made this pumpkin banana bread recipe sing. For the zucchini prep, while this recipe doesn’t use zucchini, the principle of moisture management is still key! For the bananas, using *very* ripe ones is non-negotiable. They should be heavily spotted, even black in places. They’re sweeter and mushier, which means they blend into the batter better and contribute more moisture. For mixing, the absolute golden rule is: do NOT overmix. Gently fold the dry ingredients into the wet until just combined. A few streaks of flour are fine; they’ll disappear in the oven. Overmixing develops gluten, leading to a tough, rubbery loaf, and nobody wants that! The swirl is where you can really have fun and make it your own. Don’t overdo it; just a few gentle passes with a knife or skewer will create beautiful patterns. You want distinct ribbons of pumpkin, not a muddy mess. For ingredient swaps, I’ve tested this with almond milk and it actually made it even creamier! If you don’t have brown sugar, you can use regular sugar, but it won’t have quite the same depth of flavor and moisture. For baking, always use the middle rack of your oven for the most even heat. If you notice the top browning too quickly, tent it loosely with foil. The toothpick test is your best friend; it’s the most reliable way to tell if it’s done. And for glaze variations, if you find the glaze too thick, add milk a teaspoon at a time until it’s pourable. If it’s too thin, add a little more powdered sugar. Sometimes, I’ll add a tiny bit of cream cheese to the glaze for a tangier flavor, which is also delicious!
Storing and Reheating Tips
Proper storage is key to keeping your delicious pumpkin banana bread tasting fresh. At room temperature, it will stay wonderfully moist for about 2-3 days. Just make sure to keep it well-covered. I usually wrap it tightly in plastic wrap or store it in an airtight container. If you plan to keep it longer than that, or if your kitchen is particularly warm, I recommend refrigerator storage. Wrapped well, it can last up to a week in the fridge. The texture might become a bit firmer when cold, but don’t worry, it’s easily remedied. For longer storage, freezing is your best bet. You can freeze the whole loaf, or individual slices. Wrap it very tightly in a couple of layers of plastic wrap, then add a layer of aluminum foil or a freezer bag. It will keep its quality for up to 3 months. To thaw, simply unwrap it and let it come to room temperature on the counter for a few hours. If you want to reheat it, a quick 15-20 seconds in the microwave (especially for individual slices) will warm it right up. You can also gently reheat slices in a toaster oven for a slightly crisp edge. For the glaze, I always recommend adding it *after* the bread has cooled completely and just before serving, especially if you plan to store it. If you glaze it before storing, the glaze can become sticky or melt, particularly at room temperature or in the fridge.
Frequently Asked Questions
Final Thoughts
So there you have it – my beloved pumpkin banana bread. It’s more than just a recipe; it’s a memory maker, a kitchen aroma enhancer, and honestly, a little bit of magic baked into a loaf. What I love most is that it’s approachable for any home baker, and the results are consistently fantastic. That perfect balance of warm spices, sweet banana, and earthy pumpkin is just something special. It’s the kind of bake that makes people feel loved and welcomed, whether it’s for a quiet morning breakfast or a festive gathering. If you’re a fan of cozy flavors and comforting bakes, I truly think you’re going to adore this pumpkin banana bread. I can’t wait for you to try it and experience that wonderful aroma filling your own home! If you do give it a go, please let me know how it turns out in the comments below! I’d love to hear your thoughts, see your creations, and hear about any personal twists you add. Happy baking, my friends!
pumpkin banana bread
Ingredients
Dry Ingredients
- 1.75 cup all-purpose flour
- 0.5 cup granulated sugar
- 0.5 cup packed light brown sugar
- 1 tsp baking soda
- 0.5 tsp salt
- 1 tsp ground cinnamon
- 0.5 tsp ground nutmeg
- 0.25 tsp ground cloves
Wet Ingredients
- 0.5 cup vegetable oil
- 2 large eggs
- 1 cup canned pumpkin puree (not pumpkin pie filling)
- 1 cup mashed ripe bananas (about 2-3 medium bananas)
- 1 tsp vanilla extract
Optional Add-ins
- 0.5 cup chopped walnuts or pecans
Instructions
Preparation Steps
- Preheat your oven to 350°F (175°C). Grease and flour a 9x5 inch loaf pan, or line with parchment paper.
- In a large bowl, whisk together the all-purpose flour, granulated sugar, brown sugar, baking soda, salt, ground cinnamon, ground nutmeg, and ground cloves until well combined.
- In a separate medium bowl, whisk together the vegetable oil, eggs, pumpkin puree, mashed bananas, and vanilla extract until smooth.
- Pour the wet ingredients into the dry ingredients. Stir with a spatula until just combined. Be careful not to overmix; a few lumps are fine. If using, fold in the chopped walnuts or pecans.
- Pour the batter into the prepared loaf pan, spreading it evenly.
- Bake for 50-60 minutes, or until a wooden skewer or toothpick inserted into the center comes out clean. If the top starts to brown too quickly, you can tent it loosely with aluminum foil.
- Let the bread cool in the pan for 10-15 minutes before inverting it onto a wire rack to cool completely. Slice and serve.