You know, there are some recipes that just *feel* like summer. For me, the smell of sunscreen, the sound of kids laughing, and the sight of fireworks are all tied up with certain flavors. And when the 4th of July rolls around, my mind immediately goes to these 4th of July brownies. They’re not just any brownies; they’re the kind that are incredibly fudgy, deeply chocolatey, and have just the right touch of sweetness to make them feel like a real treat. I remember making them for the first time years ago, trying to find something festive but also super easy because, let’s be honest, sometimes a complicated dessert just isn’t what you need on a busy holiday. These completely hit the mark and have been a staple ever since. They’re definitely a step up from your average box mix, but honestly, just as foolproof. If you love a classic brownie that’s rich enough to satisfy any chocolate craving, you’re going to adore these.
What are 4th of July Brownies?
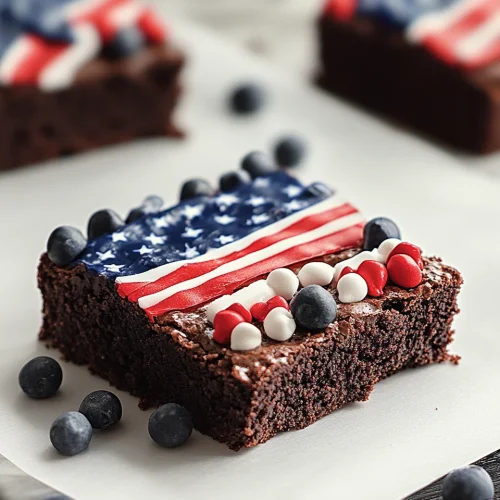
So, what exactly makes these brownies deserving of a holiday nickname? Think of them as your ultimate fudgy brownie base, but with a delightful, festive twist. The “4th of July” part comes from a simple, beautiful swirl of colored frosting or even a quick berry compote added right before baking. It’s not about being overly complicated; it’s about adding that little splash of color and celebratory feel that makes them perfect for cookouts, parades, or just enjoying in your backyard. They’re essentially a rich, dense chocolate brownie that looks as good as it tastes. It’s the kind of dessert that makes people ask, “Wow, did you *make* these?” even though they were surprisingly straightforward. It’s that magic combination of intense chocolate flavor and a visual cue that screams “celebration!”
Why you’ll love this recipe?
Honestly, the list of reasons to love these 4th of July brownies is pretty long, but let me try to narrow it down for you. First and foremost, the flavor is just out of this world. We’re talking deep, dark chocolate goodness that’s intensely rich without being bitter. They have that perfect fudgy texture – not cakey at all, but dense and gooey. What I love most about this recipe is its sheer simplicity. I’ve made them dozens of times, and they never fail to impress, even when I’m short on time. You don’t need any fancy equipment, just a couple of bowls and a whisk. And the ingredients? Mostly pantry staples, which is always a win in my book, especially when you’re trying to stick to a budget for holiday entertaining. Plus, they’re incredibly versatile. While the patriotic swirl is fun for the 4th, you can easily adapt the swirl with different flavors or colors for any occasion. They’re also fantastic for portion control – cutting them into neat squares makes them easy to serve to a crowd. If you’ve ever tried my fudgy chocolate Cake Recipe, you’ll appreciate the same level of rich chocolate flavor here, but in a more portable, grab-and-go format that’s perfect for outdoor gatherings.
How do I make 4th of July brownies?
Quick Overview
This recipe is all about creating a ridiculously rich chocolate batter and then adding a festive swirl that bakes right in. We’ll melt some chocolate and butter for that super fudgy base, whisk in sugar, eggs, and vanilla, then gently fold in the dry ingredients. The key is not to overmix! Then comes the fun part: adding your colorful swirl before baking. It’s a straightforward process that guarantees delicious results every single time. What makes this method special is the melt-and-mix approach for the batter, which helps develop that dense, chewy texture without any fuss. You’ll be amazed at how quickly you can go from pantry staples to a pan of incredible brownies.
Ingredients
For the Main Batter:
1 cup (2 sticks) unsalted butter, melted: Using good quality butter really makes a difference here. Melt it gently in the microwave or on the stovetop.
3/4 cup granulated sugar: This provides sweetness and structure.
3/4 cup packed light Brown Sugar: Adds moisture and a lovely caramel note.
4 large eggs, at room temperature: Room temperature eggs incorporate better and create a smoother batter.
1 teaspoon pure vanilla extract: Don’t skimp on the vanilla; it enhances the chocolate flavor.
1 cup all-purpose flour: Just a cup keeps them fudgy; too much flour makes them cakey.
1/2 cup unsweetened cocoa powder: Use a good quality Dutch-process cocoa for the deepest chocolate flavor.
1/2 teaspoon salt: Balances the sweetness.
1 cup semi-sweet chocolate chips (optional, but highly recommended for extra chocolatey-ness!): These melt into the batter for pockets of pure chocolate bliss.
For the Filling (Festive Swirl):
1/2 cup cream cheese, softened (optional, for a tangy cream cheese swirl): This adds a lovely creamy contrast.
1/4 cup powdered sugar (optional): To sweeten the cream cheese.
Red and blue food coloring (gel is best for vibrant color without adding too much liquid): Use sparingly to achieve your desired shades.
Alternatively, you could use a thick strawberry or blueberry jam or compote for a natural fruit flavor and color!
For the Glaze (Optional, but lovely!):
1 cup powdered sugar: Sifted, of course, to avoid lumps.
2-3 tablespoons milk or heavy cream: Start with two and add more until you reach your desired drizzling consistency.
1/2 teaspoon vanilla extract: For a hint of flavor.
Step-by-Step Instructions
Step 1: Preheat & Prep Pan
Get your oven humming at 350°F (175°C). This temperature is perfect for baking brownies evenly without drying them out. Grab an 8×8 or 9×9 inch baking pan. I like to line mine with parchment paper, leaving an overhang on the sides. This makes lifting the brownies out so much easier, and cleanup is a breeze. Just grease the pan lightly before lining, or if you skip the parchment, make sure to grease and flour it really well. This is a crucial step to prevent sticking!
Step 2: Mix Dry Ingredients
In a medium bowl, whisk together your flour, cocoa powder, and salt. Whisking them together ensures everything is evenly distributed, so you don’t get pockets of unsalted or underdeveloped chocolate flavor. This simple step really contributes to the overall deliciousness of the final brownie.
Step 3: Mix Wet Ingredients
In a larger bowl, pour in that beautiful melted butter. Add both the granulated and brown sugars and whisk until they’re well combined with the butter. It might look a bit granular, and that’s okay. Then, add the eggs one at a time, whisking well after each addition. Finally, stir in the vanilla extract. You want this mixture to be smooth and glossy.
Step 4: Combine
Now, it’s time to bring the wet and dry ingredients together. Pour the dry ingredients into the wet ingredients. Using a spatula, gently fold them together until *just* combined. It’s super important not to overmix here. A few streaks of flour are actually fine; they’ll disappear during baking. Overmixing develops the gluten too much, which can lead to tough brownies. If you’re adding chocolate chips, fold them in now.
Step 5: Prepare Filling
If you’re using the cream cheese option for your swirl, beat the softened cream cheese with the powdered sugar until smooth. Divide this mixture into two small bowls. Add a drop or two of red food coloring to one bowl and blue to the other, mixing until you achieve vibrant colors. If you’re using jam, just have it ready. Make sure it’s not too runny; you want it thick enough to create distinct swirls without bleeding too much into the batter.
Step 6: Layer & Swirl
Pour about two-thirds of the brownie batter into your prepared pan and spread it evenly. Dollop spoonfuls of your colored cream cheese mixture (or jam) randomly over the batter. Then, carefully spoon the remaining brownie batter over the dollops. You can gently swirl the colors into the batter using a toothpick or a knife. Don’t overdo it; you want distinct swirls, not a muddy mess. Aim for gentle figure-eights or drag the tip of your utensil through the layers.
Step 7: Bake
Pop the pan into your preheated oven. Bake for 25-35 minutes. The exact time will depend on your oven and the size of your pan. A toothpick inserted into the center should come out with moist crumbs attached, not wet batter. If it comes out clean, they might be a bit overbaked for that fudgy texture we love. I always err on the side of slightly underbaked for the best fudgy results.
Step 8: Cool & Glaze
This is probably the hardest part: letting them cool! Let the brownies cool in the pan on a wire rack for at least 2-3 hours, or even better, pop them in the fridge for an hour once they’re mostly cool. This helps them set up perfectly. While they’re cooling, you can whip up the glaze if you’re using it. Whisk together the powdered sugar, milk/cream, and vanilla until smooth. Drizzle it over the cooled brownies. For the ultimate 4th of July look, you can even add a little red and blue food coloring to separate small portions of the glaze and drizzle them in stripes!
Step 9: Slice & Serve
Once the glaze is set, lift the brownies out of the pan using the parchment paper overhang. Slice them into squares using a sharp knife. I find that wiping the knife clean between cuts helps create those perfectly neat slices. Serve them at room temperature or slightly chilled. They’re utterly divine on their own, but also fantastic with a scoop of vanilla ice cream!
What to Serve It With
These 4th of July brownies are so rich and satisfying, they’re practically a dessert all on their own. But if you’re looking to round out a meal or a dessert table, I’ve got some ideas that really sing!
For Breakfast: This might sound a little decadent, but a small square with a strong cup of coffee is an absolutely divine way to start the day, especially on a holiday morning when you can afford to indulge a bit. It’s like a chocolatey hug to kickstart your celebrations.
For Brunch: Serve them alongside fresh fruit like strawberries, raspberries, or a fruit salad. They also pair beautifully with a light whipped cream or a dollop of Greek yogurt for a slightly healthier counterpoint. A mimosa or a sparkling cider would be a lovely beverage pairing.
As Dessert: This is their natural habitat! They are incredible served warm with a scoop of vanilla bean ice cream and a drizzle of raspberry sauce. For a more dramatic presentation, you could serve them with a small dollop of whipped cream and a few fresh berries on the side. They’re also fantastic as part of a dessert platter with other treats.
For Cozy Snacks: These are perfect for an afternoon pick-me-up. Enjoy one with a glass of cold milk – a classic for a reason! If you’re having a backyard BBQ, these are the ultimate portable treat. Just wrap them individually and hand them out. My kids always ask for seconds, so I usually make a double batch!
My family has a tradition of putting a few out on a platter with some watermelon slices during our fireworks viewing. The contrast of the cool, sweet watermelon and the rich, fudgy brownie is just heavenly. It’s one of those simple, perfect summer moments.
Top Tips for Perfecting Your 4th of July Brownies
I’ve made these brownies more times than I can count, and through trial and error (mostly delicious error!), I’ve picked up a few tricks that I think really elevate them from good to absolutely unforgettable. Here are my top tips to help you achieve brownie perfection:
Zucchini Prep: Wait, zucchini? In brownies? Yes! My secret weapon for the fudgiest brownies is adding a bit of finely grated zucchini. It sounds strange, but it adds incredible moisture without any zucchini flavor. The key is to squeeze out as much liquid as possible after grating. Use a fine grater so it disappears into the batter. I usually grate about 1 cup of zucchini and then really wring it out in a clean kitchen towel or paper towels. This prevents the brownies from being too wet. For these patriotic ones, I omit the zucchini to ensure the swirl colors stay vibrant and distinct, but for my everyday fudgy brownies, it’s a game-changer!
Mixing Advice: This is where many people go wrong. Remember, when you add the flour, you want to mix *just* until it’s incorporated. A few streaks of flour are totally fine! Overmixing wakes up the gluten in the flour, which leads to tough, cakey brownies. We want dense and fudgy, so gentle folding is your best friend here. I always use a spatula for this final stage.
Swirl Customization: Don’t be afraid to get creative with the swirl! For a truly vibrant effect, gel food coloring is your best bet. Start with just a drop and add more as needed to get your desired shade. For a more natural approach, a thick berry compote (like raspberry or blueberry) works wonderfully. You can even mix and match! Try swirling some cream cheese mixture and then dolloping some jam in between. For a really pretty marbling effect, don’t over-swirl. Gentle figure-eights with a toothpick or skewer are usually enough to create beautiful patterns without making the colors muddy.
Ingredient Swaps: If you don’t have semi-sweet chocolate chips, milk chocolate or even dark chocolate chips work beautifully. For a richer chocolate flavor, you can use a mix of cocoa powder and melted unsweetened baking chocolate in the batter, but I find the Dutch-process cocoa powder gives the best balance of depth and ease. If you’re dairy-free, you can often substitute a good quality dairy-free butter alternative and ensure your chocolate chips are dairy-free too. I’ve tried this with almond milk instead of regular milk in the glaze, and it actually made it even creamier!
Baking Tips: Always trust your visual cues and the toothpick test. Ovens can vary wildly, so the baking time is a guideline. I prefer my brownies to be slightly underbaked rather than overbaked, as they continue to cook a bit as they cool in the pan. If the toothpick comes out with moist crumbs, that’s your sweet spot for fudgy perfection. Placing the pan on the center rack ensures even heat distribution.
Glaze Variations: If you’re not a fan of a traditional glaze, you can simply dust the cooled brownies with a little powdered sugar through a fine-mesh sieve. Or, a drizzle of melted chocolate (dark, milk, or white) looks elegant and tastes delicious. For a more intense chocolate experience, a ganache made with heavy cream and dark chocolate is divine, but it adds a bit more richness.
Storing and Reheating Tips
These brownies are so good, I’m often asked how to keep them fresh if there happen to be any leftovers (a rare occurrence in my house!). The good news is, they store beautifully and retain that fudgy goodness.
Room Temperature: Once completely cooled, you can store the brownies in an airtight container at room temperature for up to 3 days. I usually just leave them in the pan, covered tightly with plastic wrap or a lid. They’re perfect for grabbing a quick snack anytime!
Refrigerator Storage: If your kitchen is particularly warm or you want them to last a bit longer, they can be refrigerated. Store them in an airtight container for up to a week. They’ll firm up a bit in the fridge, so let them sit at room temperature for about 15-20 minutes before serving if you prefer them softer.
Freezer Instructions: Yes, you can freeze these delicious brownies! Once completely cooled and glazed (if you’ve added glaze), wrap individual brownies or the entire pan tightly in plastic wrap, then in a layer of aluminum foil. They’ll keep well in the freezer for up to 2-3 months. Thaw them overnight in the refrigerator or at room temperature.
Glaze Timing Advice: If you plan to freeze your brownies, I recommend glazing them *after* thawing. The glaze can sometimes crack or become sticky if frozen. If you’re just storing them at room temperature or in the fridge, it’s best to add the glaze once the brownies are fully cooled but before they’re wrapped for storage. This allows the glaze to set up a bit.
Frequently Asked Questions
Final Thoughts
So there you have it – my absolute favorite 4th of July brownies! They’re the perfect blend of rich, fudgy chocolate and festive fun, and honestly, they just make me happy every time I bake them. They’re the kind of treat that brings people together, sparking smiles and happy conversations, which is really what the holiday is all about. They prove that you don’t need to be a professional baker to create something truly special and memorable. If you love intensely chocolatey, wonderfully dense brownies, I truly hope you’ll give these a try for your next celebration, or heck, just because you deserve a little deliciousness!
If you end up making these, please, please, please leave a comment below and let me know how they turned out! I absolutely love hearing about your baking adventures and seeing your photos. And if you have your own special twists or variations, I’m always eager to learn them. Happy baking, and I hope you have a wonderfully delicious 4th of July!
4th July brownies
Ingredients
Brownie Base
- 0.75 cup unsalted butter melted
- 1.5 cup granulated sugar
- 2 large eggs
- 1 teaspoon vanilla extract
- 0.5 cup all-purpose flour
- 0.33 cup unsweetened cocoa powder
- 0.5 teaspoon salt
- 0.25 teaspoon baking powder
Red, White, and Blue Topping
- 1 cup white chocolate chips
- 0.5 cup red candy melts
- 0.5 cup blue candy melts
- 0.25 cup patriotic sprinkles
Instructions
Preparation Steps
- Preheat your oven to 350°F (175°C). Grease and flour an 8x8 inch baking pan or line it with parchment paper.
- In a large bowl, whisk together the melted butter and granulated sugar until well combined.
- Beat in the eggs one at a time, then stir in the vanilla extract.
- In a separate medium bowl, whisk together the flour, cocoa powder, salt, and baking powder.
- Gradually add the dry ingredients to the wet ingredients, mixing until just combined. Do not overmix.
- Spread the batter evenly into the prepared baking pan.
- Bake for 25-30 minutes, or until a toothpick inserted into the center comes out with moist crumbs attached.
- Let the brownies cool completely in the pan on a wire rack.
- While the brownies are cooling, prepare the toppings. Melt the white chocolate chips according to package directions. Melt the red and blue candy melts separately according to package directions.
- Once the brownies are cool, drizzle the melted white chocolate over the top. Immediately drizzle the melted red and blue candy melts in stripes or swirls over the white chocolate. Sprinkle with patriotic sprinkles before the candy melts set.
- Let the toppings set completely, then cut the brownies into squares and serve.