You know those nights when you’re just *craving* something incredibly satisfying, something that feels like a warm hug in a bowl? That’s exactly when I turn to my beloved katsu bowls. It’s funny, I used to think katsu was this complicated, restaurant-only kind of dish, something I’d only get as a treat. But then I discovered how surprisingly simple it is to make that perfectly crispy, golden panko-crusted cutlet at home, served over fluffy rice with that dreamy, tangy sauce. It’s become my weeknight hero, a lifesaver when everyone’s hungry and I’m short on time but big on needing comfort food. Honestly, if you love a good chicken katsu sandwich but want something a little more… bowl-ish, this is it. It’s like the comforting cousin to a stir-fry, but with that incredible crunch that just makes everything better.
What is a katsu bowl?
So, what exactly *is* a katsu bowl? At its heart, it’s a Japanese-inspired dish where a piece of crispy, panko-breaded and fried meat (most commonly pork or chicken) is sliced and served atop a steaming bed of rice. Think of it as a deconstructed version of a katsu curry or a katsu don, but often with a lighter, more customizable sauce. The “katsu” part just refers to the breaded and fried cutlet itself, and the “bowl” means it’s served in that delightful, all-in-one format over rice. It’s simple, really, but that simplicity is where the magic lies. It’s pure comfort food that’s incredibly versatile, and once you get the hang of it, you’ll be making it constantly, just like I do!
Why you’ll love this recipe?
There are so many reasons why this katsu bowl recipe has earned a permanent spot in my recipe rotation, and I’m willing to bet it will in yours too. First off, let’s talk about the FLAVOR. That crispy, golden-brown panko crust on the chicken or pork is just unbelievably satisfying. It gives way to a tender, juicy interior that’s just heavenly. And then there’s the sauce – that slightly sweet, tangy, umami-rich sauce that coats everything. It’s seriously addictive! But what I love just as much is how surprisingly SIMPLE it is to pull off. I know frying can sound intimidating, but I’ve got a few little tricks that make it a breeze, even on a busy Tuesday night. And because we’re talking about a protein, a carb, and a sauce all in one bowl, it’s a fantastic all-in-one meal. Plus, it’s incredibly COST-EFFECTIVE! You’re using basic pantry staples and affordable cuts of meat, which is always a win in my book. Lastly, the VERSATILITY is a huge draw. While chicken and pork are classics, you can totally mix things up. I’ve even experimented with firm tofu for a vegetarian version, and it was a hit! This is the kind of dish that feels special enough for guests but is also perfect for a solo cozy dinner. It’s everything you want in a meal: delicious, easy, budget-friendly, and adaptable. What’s not to love?
How do I make katsu bowls?
Quick Overview
Making these glorious katsu bowls is a straightforward process that involves breading and frying your chosen protein, then assembling it over a bed of steamed rice with a drizzle of delicious sauce. The key is getting that panko super crispy and having your rice ready to go. We’ll bread the protein, fry it until golden, slice it up, and then pile it onto fluffy steamed rice, finishing with that irresistible sauce. It’s less complicated than it sounds, and I promise, the reward is totally worth the minimal effort!
Ingredients
For the main cutlets:
2 boneless, skinless chicken breasts (about 1.5 lbs total) OR 4 pork loin chops (about 1 inch thick)
1 cup all-purpose flour
2 large eggs, lightly beaten
2 cups panko breadcrumbs
Salt and freshly ground black pepper, to taste
Vegetable oil, for frying (about 2-3 inches deep in your pot)
For the Rice:
2 cups Japanese short-grain rice, rinsed well
2.5 cups water
For the Katsu Sauce:
1/2 cup ketchup
1/4 cup Worcestershire sauce
2 tablespoons soy sauce
1 tablespoon honey or Brown Sugar
1 teaspoon grated fresh ginger (optional, but adds a lovely zing!)
1/2 teaspoon garlic powder
Optional Toppings:
Thinly sliced green onions
Toasted sesame seeds
Shredded cabbage (a small amount)
Step-by-Step Instructions
Step 1: Preheat & Prep Pan
First things first, let’s get our rice cooking because it needs a little time to steam. Rinse your rice thoroughly under cold water until the water runs clear – this is key for fluffy, separated grains. Combine the rinsed rice and water in a medium saucepan, bring to a boil, then reduce the heat to the lowest setting, cover tightly, and simmer for 15-20 minutes, or until all the water is absorbed. Once it’s done, turn off the heat and let it steam, covered, for another 10 minutes. Don’t peek too early, I know it’s tempting! While the rice is doing its thing, get a large, heavy-bottomed pot or Dutch oven ready for frying. Pour in your vegetable oil, making sure it’s at least 2-3 inches deep. You want enough oil for the cutlets to be mostly submerged for even frying. Place a wire rack over a baking sheet on the counter – this is where your crispy katsu will drain. You’ll also want to line another baking sheet with paper towels for extra oil absorption.
Step 2: Mix Dry Ingredients
Now, let’s set up our breading station. You’ll need three shallow dishes or plates. In the first dish, put your all-purpose flour. Season it generously with salt and pepper. In the second dish, crack your eggs and beat them lightly with a fork until they’re just combined. In the third, and most crucial dish for that perfect crunch, place your panko breadcrumbs. Make sure you’re using panko – it’s different from regular breadcrumbs and gives you that amazing airy, crispy texture that’s essential for authentic katsu. If you can’t find panko, try to find the largest, flakiest breadcrumbs available, but panko is truly the star here. Give the panko a good pinch of salt and pepper too; seasoning at every step makes a huge difference!
Step 3: Mix Wet Ingredients
This step is super simple, but vital for that signature katsu sauce! Grab a small bowl. Add the ketchup, Worcestershire sauce, and soy sauce. Then, stir in the honey or brown sugar. If you like a little extra zing, now’s the time to grate in that fresh ginger. Finally, add the garlic powder. Whisk everything together really well until it’s smooth and well combined. You’re looking for a nice, thick, glossy sauce. Taste it and adjust if needed – maybe you want it a little sweeter, or a bit more tangy. This sauce is so good, I sometimes just eat it with a spoon when no one’s looking! Set this aside for now; we’ll be drizzling it over the finished bowls.
Step 4: Combine
Here’s where we get our protein ready for its golden glow-up. If you’re using chicken breasts, you might want to slice them horizontally to create thinner cutlets, or pound them slightly to an even thickness (about 1/2 inch). For Pork Chops, trim any excess fat if you prefer. Pat your chicken or pork dry with paper towels – this helps the breading stick better. Now, dredge each piece of meat first in the seasoned flour, making sure it’s fully coated, then gently shake off any excess. Next, dip it into the beaten eggs, letting any excess drip off. Finally, press the cutlet firmly into the panko breadcrumbs, ensuring every nook and cranny is covered. Gently press down to help the panko adhere. This three-step breading process is what guarantees that beautiful, crispy crust.
Step 5: Prepare Filling
This step is all about getting the cutlets ready to fry. Ensure each piece of chicken or pork is thoroughly coated in the panko. I usually like to do this one at a time right before they hit the oil, so the breading stays fresh and doesn’t get soggy. If you’re frying a lot at once, you might want to have a small area of your workstation dedicated to the breaded cutlets so you can work efficiently when it’s time to fry. Make sure your oil is heated to about 350-360°F (175-180°C). You can test this by dropping a few panko crumbs in; they should sizzle immediately and float to the surface. If you don’t have a thermometer, it’s ready when a small piece of breading fries up quickly and beautifully golden in about 30 seconds.
Step 6: Layer & Swirl
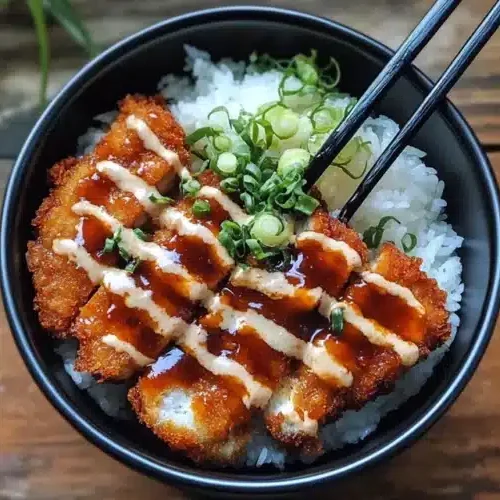
This is the exciting part where everything comes together! By now, your rice should be perfectly fluffy. Fluff it gently with a fork. Spoon a generous portion of the hot steamed rice into each serving bowl. Now, take your crispy, golden-brown katsu cutlets, which you’ve sliced into bite-sized pieces (about 1-inch strips work well), and arrange them beautifully on top of the rice. Don’t be shy with the katsu! If you’re using shredded cabbage, a small pile on the side of the katsu looks lovely and adds a nice fresh crunch. Finally, generously drizzle that homemade katsu sauce all over the katsu and rice. Add your optional toppings like thinly sliced green onions and sesame seeds. The colors and textures together are just a feast for the eyes before you even take a bite!
Step 7: Bake
Actually, there’s no baking involved in this part! We’re frying! Carefully, and I mean *carefully*, slide 1 or 2 cutlets (don’t overcrowd the pot, it lowers the oil temperature and makes them greasy) into the hot oil. Fry for about 3-5 minutes per side, depending on the thickness of your cutlet, until they are a deep golden brown and cooked through. The internal temperature should reach 165°F (74°C) for chicken. Use tongs to gently flip them. Once they’re perfectly golden and crispy, carefully remove them from the oil and place them on the wire rack set over a baking sheet to drain. Let them drain for a minute or two, then transfer them to the paper towel-lined baking sheet for a final blot. Repeat with the remaining cutlets, making sure to let the oil return to temperature between batches.
Step 8: Cool & Glaze
Your katsu should be deliciously golden and perfectly cooked. Once you’ve finished frying and draining them on the wire rack, you’ll want to let them rest for just a minute or two before slicing. This resting period helps the juices redistribute, ensuring a more tender cutlet. While the katsu is still warm, slice it into strips about 1-inch wide. This makes it easier to eat in the bowl. Then, arrange these slices over your hot, steamed rice. Now comes the best part: generously drizzle that fantastic katsu sauce all over the katsu and the rice. The warmth of the katsu and rice will help the sauce meld beautifully. Add any optional toppings you like, such as sliced green onions or sesame seeds, right after the sauce. It’s best served immediately while the katsu is still wonderfully crisp!
Step 9: Slice & Serve
Alright, the moment of truth! Once your katsu is sliced and beautifully arranged over the fluffy rice, and that luscious sauce has been drizzled all over, it’s time to serve. I like to add a sprinkle of fresh green onions for a pop of color and freshness, and a few toasted sesame seeds for a nutty finish. Some people also enjoy a small pile of shredded raw cabbage on the side for a bit of crunch and to cut through the richness. These katsu bowls are best enjoyed immediately while the katsu is still delightfully crispy. The contrast between the warm, fluffy rice, the crispy, savory katsu, and the tangy sauce is pure heaven. Dig in and enjoy every single bite!
What to Serve It With
Honestly, katsu bowls are practically a meal in themselves, but that doesn’t mean we can’t get creative with how we serve them! For a truly comforting BREAKFAST, I sometimes serve a smaller portion with a perfectly fried sunny-side-up egg nestled right on top of the katsu. The runny yolk just melts into everything, and it’s divine. A simple cup of green tea or even a mild black coffee works perfectly. For BRUNCH, you can elevate it a bit. Plating it in slightly fancier bowls, perhaps with a tiny side of pickled ginger or a sprinkle of edible flowers, makes it feel more special. A crisp, dry sake or a light sparkling wine would be fantastic beverage pairings here. As a decadent DESSERT… okay, maybe not the whole bowl! But I’ve found that a small, perfectly crispy piece of katsu with a tiny drizzle of the sauce and a dollop of something creamy like a matcha ice cream or a light coconut panna cotta can be a really unexpected and delicious sweet and savory treat. For COZY SNACKS, especially on a rainy afternoon, I just make a smaller, single serving. It’s the perfect way to satisfy a craving without making a full meal. A warm mug of miso soup on the side is pure comfort and makes it feel like a complete, nurturing moment. My family loves it when I add a little mound of thinly sliced, crunchy iceberg lettuce on the side – it’s my dad’s favorite way to add some freshness.
Top Tips for Perfecting Your Katsu Bowls
I’ve made these katsu bowls more times than I can count, and over the years, I’ve picked up a few little tricks that really make a difference. For the ZUCCHINI PREP (oops, wrong recipe! Let’s stick to katsu!), let’s talk about the meat. The most important thing is to get your chicken or pork cutlets to an even thickness. If you have a thick breast and a thin tail end, pound the thick part gently with a meat mallet or even the bottom of a heavy pan until it’s all about 1/2 inch thick. This ensures even cooking. For MIXING ADVICE, the key to that perfect panko crust is pressing. Don’t just gently lay the cutlet in the panko; really press it in with your hands. This creates little crevices for the panko to crisp up beautifully and prevents it from falling off during frying. If your panko seems to be falling off, it’s usually because the meat wasn’t patted dry enough, or you didn’t press it in firmly enough. The SWIRL CUSTOMIZATION for the sauce is really up to you! I love that thick, glossy look, but if you prefer it thinner, just add a tiny splash more Worcestershire sauce or soy sauce. Some people like to add a pinch of chili flakes to the sauce for a little heat, which is a fantastic variation! For INGREDIENT SWAPS, Chicken Thighs are absolutely delicious here – they’re more forgiving and tend to stay juicier than breasts, though they might take a minute or two longer to cook through. For the sauce, if you don’t have Worcestershire, you can try a mix of soy sauce and a little apple cider vinegar, but it won’t be quite the same. My favorite trick is using brown sugar instead of honey; it gives a slightly deeper caramel note. For BAKING TIPS (again, no baking here!), the real tip is about the FRYING TEMPERATURE. If your oil isn’t hot enough, the katsu will absorb too much oil and become greasy, not crispy. If it’s too hot, the panko will burn before the inside is cooked. So, keep an eye on that temperature! For GLAZE VARIATIONS, if you’re not a fan of ketchup, you can try a base of tonkatsu sauce (which you can find in Asian markets) and doctor that up with soy sauce and a touch of sweetness. I’ve even seen people add a little Sriracha to their katsu sauce for a spicy kick, which is lovely!
Storing and Reheating Tips
Okay, so if you’re lucky enough to have leftovers (which, let’s be honest, doesn’t happen often in my house!), here’s how to keep them tasting as good as possible. For ROOM TEMPERATURE storage, it’s really best to try and eat these katsu bowls fresh. If you absolutely must leave them out for a short while (like, an hour or two before serving), make sure they’re covered loosely to keep dust out but still allow a little steam to escape if the katsu is still warm. For REFRIGERATOR STORAGE, this is your best bet for leftovers. Let the katsu and rice cool down completely before packing them into separate airtight containers. Storing them separately helps the katsu retain its crispiness better. They should be good in the fridge for about 2-3 days. For FREEZER INSTRUCTIONS, I’ll be honest, freezing and reheating katsu is tricky if you want that ultimate crispiness. However, if you must freeze, let everything cool completely. Wrap individual katsu pieces tightly in plastic wrap, then in foil, and store them in a freezer-safe bag for up to a month. Freeze the cooked rice separately in an airtight container. To reheat, the best method is to bake the katsu at around 375°F (190°C) on a wire rack on a baking sheet until heated through and somewhat crispy again, about 10-15 minutes. Reheat the rice in the microwave or a steamer. For GLAZE TIMING ADVICE, it’s always best to store the sauce separately. If you’re packing a lunchbox, put the sauce in a small, leak-proof container to add right before eating. This prevents the katsu from getting soggy during storage.
Frequently Asked Questions
Final Thoughts
So there you have it – my absolute favorite way to make katsu bowls at home! I really hope you give this a try. It’s one of those recipes that just makes you feel good, from the moment you start prepping to that final, satisfying bite. The crispy chicken or pork, the fluffy rice, the irresistible sauce… it’s a symphony of textures and flavors that I think everyone should experience. It’s proof that you don’t need to be a gourmet chef to create something truly delicious and comforting for yourself and your loved ones. If you love these katsu bowls, you might also enjoy my recipes for [Link to another recipe, e.g., Teriyaki Chicken Stir-fry] or my [Link to another recipe, e.g., Easy Pork Katsu Curry]. I can’t wait to hear how yours turns out! Please leave a comment below and let me know what you think, or share your own favorite tips and variations. Happy cooking!
Chicken Katsu Bowls
Ingredients
For the Chicken Katsu
- 2 pounds boneless, skinless chicken breasts cut into 4 equal pieces
- 0.5 cup all-purpose flour
- 2 large eggs beaten
- 1 cup panko breadcrumbs
- 0.5 teaspoon salt
- 0.25 teaspoon black pepper
- 3 cup vegetable oil for frying
For the Sauce
- 0.5 cup katsu sauce store-bought or homemade
- 2 tablespoons Worcestershire sauce
- 1 tablespoon ketchup
- 1 teaspoon soy sauce
For Serving
- 4 cups cooked sushi rice
- Shredded cabbage for garnish
- Sliced scallions for garnish
- Toasted sesame seeds for garnish
Instructions
Preparation Steps
- Prepare the chicken: Pound chicken breasts to an even thickness of about 0.5 inch. Season both sides with salt and pepper.
- Set up the breading station: Place flour in one shallow dish, beaten eggs in another, and panko breadcrumbs in a third. Dredge each chicken cutlet first in flour, then dip in egg, and finally coat thoroughly with panko breadcrumbs.
- Fry the chicken: Heat vegetable oil in a large skillet over medium-high heat until shimmering. Carefully add the breaded chicken cutlets, ensuring not to overcrowd the pan. Fry for 3-4 minutes per side, until golden brown and cooked through.
- Drain the chicken: Remove the katsu from the skillet and place on a wire rack set over a baking sheet to drain any excess oil. Let it rest for a few minutes.
- Make the sauce: In a small bowl, whisk together the katsu sauce, Worcestershire sauce, ketchup, and soy sauce.
- Assemble the bowls: Slice the chicken katsu into strips. Divide the cooked sushi rice among four bowls. Top with sliced katsu, shredded cabbage, and a drizzle of the prepared sauce. Garnish with sliced scallions and toasted sesame seeds.