I still remember the first time I made green pea pasta—it was one of those unexpectedly delightful moments that stuck with me. The kitchen filled with that gentle, sweet aroma of fresh peas mingling with garlic and lemon, and honestly, it felt like spring had landed right in my bowl. It’s funny how something so simple can surprise you with flavors that feel both fresh and comforting, like a hug from the inside. If you’re used to the usual tomato or Alfredo sauces, give this green pea pasta a try. It’s lighter, brighter, and surprisingly easy to whip up on a busy weeknight. My family’s been asking for it nonstop ever since I stumbled onto the recipe—it’s truly one of those dishes that makes you forget you’re eating vegetables disguised as pasta sauce.
What is green pea pasta?
Think of green pea pasta as a celebration of spring veggies meeting your favorite carb fix. It’s essentially pasta tossed with a creamy sauce made predominantly with green peas, often blended into a smooth purée. The vibrant green color is as inviting as the flavor—fresh, sweet, and a tiny bit nutty. The idea came from the simple desire to sneak more greens into dinner without it feeling like a health lecture. If you’ve ever had pesto, this feels like its cousin, but lighter and with a naturally sweet twist. It’s seriously kid-friendly—my kids barely notice the peas hidden in the sauce! The recipe plays beautifully with herbs, lemon zest, and sometimes a touch of cream or cheese, creating a luscious coating for noodles. So basically, it’s pasta with a little green magic that sneaks veggies onto your plate in the tastiest way possible.
Why you’ll love this recipe?
What I love most about this green pea pasta is how it manages to be comforting and fresh all at once. First off, the flavor is delightfully bright without being overpowering—those sweet peas combined with a squeeze of lemon and a hint of garlic make every bite feel like a mini celebration. The creaminess comes from blending the peas with a splash of olive oil or cream, so it’s indulgent without the heaviness of something like Alfredo.
Another thing that makes this recipe a keeper? Its impressively simple approach. The sauce requires almost no hands-on cooking time—it’s just about blending and stirring, which means it’s a lifesaver when you want home-cooked with minimal fuss. Budget-wise, peas are affordable year-round, especially if you use frozen ones, and pasta is always an economical pantry staple. Plus, this green pea pasta is incredibly versatile—you can add chicken, toss in some crispy bacon, or sprinkle toasted nuts for some crunch.
This dish also reminds me of other vegetable-forward pastas I adore, like roasted red pepper or butternut squash versions, but the pea option feels lighter and more vibrant, especially in spring or early summer. Honestly, it’s the kind of recipe that makes me feel like I’m doing a little something good for my body without skimping on flavor. And if you’re the type who likes to impress guests with a dish that looks like it took hours, but you really spent 15 minutes? This is your go-to.
How do I make green pea pasta?
Quick Overview
This recipe breaks down into a few easy parts—cook your pasta, prepare the green pea sauce by blending peas with garlic, lemon, olive oil, and a touch of cream or Parmesan, then toss it all together while the pasta is hot. The magic lies in the balance of creamy and bright flavors, and since everything comes together fast, it’s perfect for those nights when you want good food without the fuss. I promise it won’t take more than 20-25 minutes from start to finish.
Ingredients
For the Pasta:
- I love fusilli or penne because their shapes hold the sauce beautifully; whole wheat or gluten-free options work great too) 8
- Salt (for pasta water—don’t skip this!)
For the Green Pea Sauce:
- 2 cups fresh or frozen green peas (frozen peas work year-round and bring out that lovely sweetness)
- 2 cloves garlic, minced (adds a subtle kick without overpowering)
- 1/4 cup olive oil (use a good quality one—it makes a noticeable difference)
- 1/4 cup grated Parmesan cheese (or nutritional yeast for a dairy-free twist)
- 2 tablespoons lemon juice (freshly squeezed for brightness)
- 1/4 cup cream or milk (optional, but I like it for a silky texture)
- Salt and pepper, to taste
- Fresh basil or mint (optional, added last for a herbaceous lift)
Step-by-Step Instructions
Step 1: Cook the Pasta
Bring a large pot of salted water to a rolling boil. This is your chance to season from the start, so don’t be shy with the salt—it should taste like the sea. Drop in the pasta and cook according to the package instructions until al dente. I usually drain it a minute or two before it’s fully soft because it will continue cooking when you toss it with the warm sauce.
Step 2: Prepare the Peas
If using fresh peas, blanch them in boiling water for about 2-3 minutes until vibrant green and tender, then plunge them into ice water to keep that color pop. For frozen peas, simply thaw them by rinsing under warm water—it’s so convenient! This little step keeps them bright and fresh tasting.
Step 3: Make the Sauce
In a food processor or blender, combine the peas, garlic, olive oil, Parmesan, lemon juice, and cream if using. Blend until smooth and velvety. You’re aiming for a sauce that coats the back of a spoon—if it’s too thick, add a tablespoon or two of pasta water to loosen it up. Taste and season generously with salt and pepper. This is where you can really personalize it; I’ve tossed in fresh basil leaves to make it extra fragrant.
Step 4: Toss Pasta and Sauce
Return the pasta to the pot or a large bowl. Pour the sauce over the warm noodles and stir gently until everything is coated in that lovely green goodness. If the sauce looks a bit thick, a splash of pasta water can make it silky smooth. Don’t rush this step; a gentle fold keeps the sauce nicely distributed.
Step 5: Serve and Garnish
Dish out the pasta into bowls, sprinkle with extra Parmesan or a pinch of chili flakes if you like a little heat, and finish with fresh herbs. The color alone will brighten your table.
What to Serve It With
For Breakfast: I love serving a small side of asparagus or roasted tomatoes alongside this green pea pasta with a fresh cup of citrusy coffee or a mellow green tea. The subtle sweetness of the peas pairs wonderfully with the morning’s light flavors.
For Brunch: Plate it elegantly with a poached egg on top and a drizzle of truffle oil if you’re feeling fancy. A crisp glass of sparkling water or a mimosa lifts the whole meal, making it feel like a special occasion without too much trouble.
As Dessert: Okay, so technically not a dessert, but if you want to keep the fresh vibe going, serve this pasta alongside a simple lemon sorbet or fruit salad. The brightness from both dishes balances beautifully, especially after a heavier dinner.
For Cozy Snacks: This green pea pasta shines as leftover bites heated gently with a sprinkle of grated cheese on top—perfect anytime when you want something comforting but not heavy. Pair it with crunchy garlic bread for that ultimate comfort snack combo.
In my family, this dish often kicks off casual dinners where everyone is relaxed and chatting around the table. Pairing it with a simple arugula salad tossed with lemon vinaigrette is a tried-and-true crowd-pleaser every single time.
Top Tips for Perfecting Your Green Pea Pasta
Peas Selection: Fresh peas really make a difference when in season—plump and sweet. But if you’re reaching for frozen, don’t fret; thaw them well to keep that lovely bright green and flavor. Avoid thawing in the microwave as it can turn mushy.
Blending: Don’t rush this step. Blend the peas and all ingredients until the sauce is silky but not gluey. If it feels too thick, a touch of starchy pasta water is your best friend. Over-blending can warm the sauce too much, so blend in short bursts and taste as you go.
Lemon Balance: The lemon juice wakes up the peas, so add it gradually. Some days peas taste sweeter, some less so. You want that fresh zing without overpowering the natural sweetness.
Herbs: Basil or mint can totally make or break this dish for me. I’ve learned to add fresh herbs right before serving to keep their brightness intact, not during the blending process.
Cheese Choices: Parmesan adds a nutty depth that’s hard to beat, but if you’re dairy-free, nutritional yeast is a wonderful stand-in. I’ve tested it many times, and it transforms the sauce nicely while keeping that cheesy vibe.
Pasta Shape: Smaller tubular shapes or twists trap the sauce best, but ribbon noodles like fettuccine or pappardelle work nicely too if you want a more elegant look. Just be mindful of cooking times so the texture stays perfect.
Glaze and Garnishes: Some days I drizzle extra olive oil mixed with lemon zest on top for an extra burst of flavor and color. Red pepper flakes add gentle heat that I sneak in when I want a little kick.
Storing and Reheating Tips
Room Temperature: Leftover green pea pasta is best eaten fresh, but if you have to keep it out for a few hours, cover it loosely with foil or a clean kitchen towel and refrigerate within two hours for safety.
Refrigerator Storage: Store leftovers in an airtight container for up to 3 days. I’ve found that holding the sauce and pasta separately keeps everything fresher longer, but I don’t always have time for that hustle.
Freezer Instructions: Freezing is possible but I recommend freezing pasta and sauce separately if you want to keep the texture intact. Use airtight containers or heavy-duty freezer bags to avoid freezer burn. Thaw overnight in the fridge and reheat gently on the stove with a splash of water or broth to loosen the sauce.
Glaze Timing Advice: If you’re storing leftovers, reserve any fresh herbs, cheese, or lemon zest for topping after reheating to keep their bright flavors and textures. I learned the hard way that reheating with everything mixed in can result in a dull flavor.
Frequently Asked Questions
Final Thoughts
Green pea pasta has become one of those “go-to” dishes in my kitchen that I turn to when I want something fast, fresh, and downright delightful. It’s bright yet comforting, and better yet, it’s a sneaky way to get more veggies into everyone’s dinners without complaints. The creamy sauce, simple ingredients, and quick steps make it our little family secret for weeknights that need flavor but not fuss.
Next time you’re craving pasta but want a bit of something different, give this one a whirl. I bet the vibrant color alone will bring a smile to your face, and the taste will have you making it way more often than you’d expect. Dive into it and don’t forget to share your spins or tweaks—you know I’m always here for trying new combos. Happy cooking and can’t wait to hear how yours turns out!
green pea pasta
Ingredients
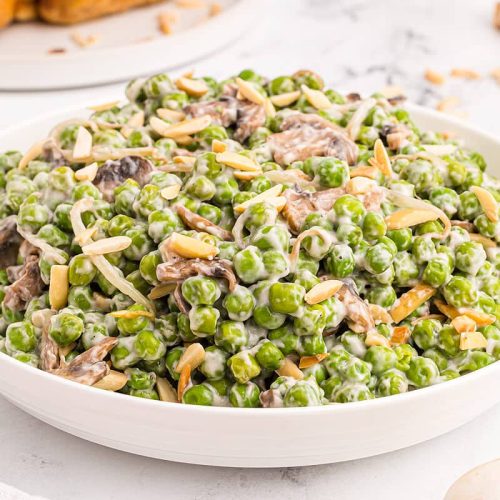
Main Ingredients
- 2 tbsp salted butter
- 6 cups frozen peas (cooked) about one 32 oz bag
- 1 cup bean sprouts
- 1 cup white button mushrooms (sliced)
- 10.5 oz Cream of Mushroom soup one can
- 0.5 cup slivered almonds (toasted)
- to taste salt and pepper
Instructions
Preparation Steps
- Preheat oven to 350°F. Grease an 8-inch casserole dish.
- Melt butter in a large skillet over medium-high heat. Add sliced mushrooms and bean sprouts, cooking until mushrooms are browned, about 10 minutes.
- Combine cooked peas with Cream of Mushroom soup. Stir in the mushrooms and bean sprouts mixture, season with salt and pepper, and spread evenly in the casserole dish.
- Bake uncovered for 20 minutes until hot and bubbly.
- Remove from oven and sprinkle toasted slivered almonds on top before serving.