Okay, so picture this: it’s a ridiculously cold evening, the kind where you can see your breath the moment you step outside, and all you want is something warm, something comforting, something that feels like a big hug in a mug. Forget that instant packet stuff; I’m talking about something truly magical, something that transforms a simple cup of milk into an indulgence. I’m talking about hot chocolate bombs! Honestly, these little spheres of joy have become my absolute go-to when I need a serious mood boost, or when the kids have friends over and I want to impress them without spending all day in the kitchen. They’re so much more exciting than a regular mug of hot cocoa, and way more fun to watch dissolve. If you’ve ever tried making your own fancy hot chocolate, you know it can be a bit of a production. But these? These hot chocolate bombs are surprisingly simple and incredibly rewarding. They’re like the ultimate DIY dessert that tastes like a million bucks but is actually super budget-friendly.
What are hot chocolate bombs?
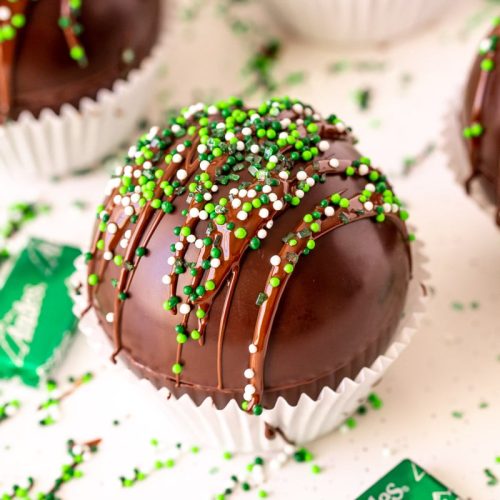
So, what exactly are these delightful little creations? Think of a hot chocolate bomb as a sphere of solid chocolate, hollow on the inside, and then packed with all the goodies that make hot chocolate so amazing – usually cocoa powder, sugar, and sometimes even mini marshmallows or chocolate chips. When you drop one of these beauties into a mug of hot milk, it’s like a mini science experiment meets a dessert explosion! The chocolate shell melts away, releasing all those delicious flavors and textures into the milk, creating the richest, creamiest hot chocolate you’ve ever tasted. It’s essentially a pre-portioned, intensely flavored hot chocolate waiting to happen. The name “bomb” just refers to the dramatic way everything bursts out when it hits the heat. It’s a little bit of theater in your kitchen, and trust me, it never gets old!
Why you’ll love this recipe?
There are so many reasons why I absolutely adore making and sharing these hot chocolate bombs. First off, the flavor is just out of this world. We’re not talking about a pale imitation of chocolate; this is deep, rich, decadent chocolate goodness. It’s intensely chocolatey, perfectly sweet, and the creamy texture you get from the melted chocolate shell is something else entirely. And let’s talk about simplicity for a second. I know making something that looks this impressive might sound daunting, but I promise you, it’s far easier than you think. Once you get the hang of melting chocolate and molding it, it’s smooth sailing. Plus, it’s incredibly cost-effective! Buying gourmet hot chocolate mixes can get pricey, but when you make your own hot chocolate bombs at home, you control the ingredients and end up with a much more satisfying result for a fraction of the cost. And the versatility! Oh my goodness, the ways you can customize these are endless. You can use different types of chocolate, add spices, swirl in caramel, stuff them with cookie crumbles – the possibilities are truly infinite. What I love most is the pure joy it brings. Seeing the look on someone’s face when they drop one in hot milk and watch it dissolve is priceless. It’s a little bit of magic, and it always brings smiles. If you’re a fan of my What are some of the best chocolate chip cookies? or my What are some easy fudgy brownies?, you’re going to fall head over heels for these hot chocolate bombs.
How to Make Hot Chocolate Bombs
Quick Overview
Making these hot chocolate bombs is a straightforward process that involves melting chocolate, creating hollow spheres, filling them with your favorite hot chocolate mix and toppings, and then sealing them. It’s a multi-step process, but each step is quite simple and rewarding. You’ll melt chocolate and coat silicone molds, let them set, then fill one half and seal it with another chocolate-coated half. The magic happens when you drop it into hot milk and watch it all melt and swirl together. It’s a fantastic activity for kids too, making them even more special.
Ingredients
For the Chocolate Shells:
You’ll need good quality chocolate. I usually opt for semi-sweet or dark chocolate chips, as they melt beautifully and have a great flavor. About 12-16 ounces should be enough to coat a standard 6-sphere mold. If you’re feeling fancy, you can use couverture chocolate for a professional shine, but good old baking chips work wonders. Ensure your chocolate is free of any moisture, as water can make it seize up.
For the Hot Chocolate Mix:
This is where you can really play! I usually start with a base of unsweetened cocoa powder (about 2 tablespoons per bomb), powdered sugar (1-2 tablespoons, adjust to your sweetness preference), and a pinch of salt to enhance the chocolate flavor. Sometimes, I’ll add a little cornstarch for extra creaminess. And of course, you can’t forget the mini marshmallows! A generous handful per bomb is essential for that classic hot chocolate experience.
Optional Add-ins for Filling:
This is where you can get creative! Think mini chocolate chips, a drizzle of caramel sauce inside before sealing, a pinch of cinnamon or chili powder for a spiced kick, or even some crushed candy canes for a festive touch. For the glaze, you might need a little extra chocolate, and perhaps some sprinkles or decorative drizzles.
Step-by-Step Instructions
Step 1: Preheat & Prep Pan
You don’t need to preheat an oven for this, but you do need your silicone sphere mold ready and clean. Make sure it’s completely dry. Any moisture can mess with the chocolate. I usually have all my ingredients pre-measured and ready to go before I start melting the chocolate, so everything flows smoothly.
Step 2: Mix Dry Ingredients
In a small bowl, whisk together your cocoa powder, powdered sugar, and pinch of salt. If you’re using any dry spices like cinnamon or chili powder, add them here. Make sure it’s well combined so you get an even distribution of flavor in every bomb. I usually make a big batch of this mix ahead of time so it’s ready whenever I crave a hot chocolate bomb.
Step 3: Mix Wet Ingredients
This step is really just about melting the chocolate. You can do this either in a microwave-safe bowl in 30-second increments, stirring well after each, or gently over a double boiler. The key is to melt it slowly and stir until it’s completely smooth and glossy. Avoid overheating, or you’ll make the chocolate grainy. I always aim for a smooth, pourable consistency.
Step 4: Combine
This isn’t really a combining step in the traditional sense. It’s about applying the melted chocolate to your mold. Spoon a good amount of the melted chocolate into each sphere cavity of your silicone mold. Use a pastry brush or the back of a spoon to spread the chocolate evenly up the sides, ensuring there are no gaps. You want a nice, thick coating to form a sturdy shell. This might take a couple of coats. Let the first coat set slightly (you can pop it in the fridge for a few minutes), then add a second coat for extra strength. This is a crucial step for sturdy bombs!
Step 5: Prepare Filling
Once your chocolate shells are completely set and firm, it’s time to fill them. Take one half of your molded chocolate spheres. Spoon a generous amount of your prepared hot chocolate mix into each one. Don’t be shy with the cocoa and sugar! Then, add your mini marshmallows and any other add-ins like chocolate chips or candy pieces.
Step 6: Layer & Swirl
To create the “lid” for your filled bomb, take another chocolate-coated sphere half (which should be empty). Gently melt the rim of this empty sphere slightly – you can do this by placing it on a warm (not hot!) plate for a few seconds, or by carefully dabbing a tiny bit of extra melted chocolate around the rim. Then, carefully place this warmed-rim sphere on top of a filled sphere, pressing gently to seal them together. The melted rim will fuse the two halves, creating a perfectly sealed bomb. If you want to get fancy, you can add a little extra melted chocolate around the seam and decorate with sprinkles or drizzles.
Step 7: Bake
You don’t bake these! Once your bombs are assembled and sealed, you’ll want to let them set completely. You can leave them at room temperature for a while, or pop them in the fridge for about 15-20 minutes to ensure they’re firm and solid. Make sure they aren’t touching anything while they set.
Step 8: Cool & Glaze
The bombs need to be fully cooled and firm before any glazing or decorating. Once they’re solid, you can drizzle them with a contrasting color of melted chocolate or add sprinkles. This is purely for aesthetics, but it makes them even more special. Make sure your drizzle chocolate is tempered or at least at a good drizzling consistency.
Step 9: Slice & Serve
To enjoy your hot chocolate bomb, place it in a mug. Gently pour about 8-10 ounces of hot milk (or your favorite milk alternative) over it. Watch as the chocolate bomb melts, releasing the cocoa mix and marshmallows into the milk. Stir well until everything is dissolved and perfectly combined. Grab a cozy blanket, find your favorite book, and savor every sip!
What to Serve It With
These hot chocolate bombs are practically a dessert in themselves, but they pair beautifully with a few things to elevate the experience even further. For a simple breakfast treat, I love having one with a warm, buttery croissant. The buttery pastry is a lovely contrast to the rich chocolate. On a weekend morning, especially when friends are over for a relaxed brunch, I’ll serve them alongside a platter of mini pastries or even some simple scones. The elegant presentation of a hot chocolate bomb melting in a mug adds a touch of luxury to any brunch spread. As a dessert, they are phenomenal. Imagine serving one after a lighter meal, like a lemon tart or a fruit salad. The warm, rich chocolate is the perfect indulgent finish. Sometimes, I’ll even pair it with a small slice of pound cake or a few shortbread cookies on the side. And for those cozy snack moments, when you just need a bit of comfort? A hot chocolate bomb served with a handful of homemade cookies (my peanut butter ones are a winner!) or even a slice of simple Banana Bread is pure bliss. I’ve also found that a tiny dollop of whipped cream or a sprinkle of cinnamon on top of the finished hot chocolate makes it even more special. It’s all about creating those little moments of comfort and joy.
Top Tips for Perfecting Your Hot Chocolate Bombs
Over the years, I’ve learned a thing or two about making these, and I’m happy to share some of my best tips to help you get perfect hot chocolate bombs every time. Firstly, when it comes to the chocolate shells, quality really does matter. Using good quality chocolate will give you a better snap, a smoother melt, and a richer flavor. If your chocolate seems too thick when melting, you can add a tiny bit of coconut oil or vegetable oil (about half a teaspoon per cup of chocolate) to thin it out, but be careful not to add too much. For those silicone molds, make sure you’re getting a good, even coating. I find two coats are usually necessary for a strong shell that won’t break when you’re handling them. I like to let the first coat chill for about 10 minutes before applying the second, just to ensure it’s firm. When you’re filling the bombs, don’t overfill them! You need enough space for the marshmallows to expand and for the second half to seal properly. Trust me, I’ve learned this the hard way. For sealing the bombs, the warm plate method is my favorite. Just gently place the rim of an empty half onto a warmed plate (not hot enough to melt the chocolate, just warm enough to soften the edge) for a few seconds, then quickly place it on top of a filled half and press gently. It creates a beautiful, seamless join. If you want to add extra flair, make sure your drizzling chocolate is the right consistency – not too thick, not too thin. And don’t be afraid to experiment with flavors! I’ve found that a pinch of cayenne pepper in the cocoa mix adds a wonderful warmth that’s just amazing on a cold day, and a touch of peppermint extract in the chocolate shell itself is divine, especially around the holidays. I once tried using milk chocolate for the shells, and while it tasted good, it was a bit too soft to work with easily, so I stick with semi-sweet or dark now. For the filling, I’ve also discovered that adding a tiny bit of instant espresso powder to the cocoa mix really deepens the chocolate flavor without making it taste like coffee – it’s my little secret!
Storing and Reheating Tips
Storing your homemade hot chocolate bombs is super important to keep them in tip-top shape. If you’ve made them and want to keep them fresh at room temperature, I recommend storing them in an airtight container. Make sure they aren’t squished together, as they can stick or break. They’ll stay good at room temperature for about 1-2 weeks, depending on how warm your kitchen is. If it’s quite warm, the chocolate might soften a bit. For longer storage, the refrigerator is your best friend. Place them in an airtight container, perhaps with a layer of parchment paper between them if they’re touching. They should last beautifully in the fridge for about a month. When you’re ready to use one from the fridge, I find it’s best to let it sit out at room temperature for about 10-15 minutes before dropping it into hot milk. This helps it melt more evenly. If you’re planning way ahead, like for holiday gifts, you can absolutely freeze these hot chocolate bombs! Wrap each bomb individually in plastic wrap, then place them in a freezer-safe bag or airtight container. They can last for up to 3 months in the freezer. When you want to use a frozen bomb, just transfer it to the refrigerator to thaw overnight, and then let it come to room temperature for about 30 minutes before using. The key for any storage is to keep them away from strong odors and moisture. And regarding the glaze, it’s always best to apply any decorative drizzles or sprinkles *after* the bomb is fully set and cooled, and preferably just before you plan to serve or package them, as they can sometimes soften over time.
Frequently Asked Questions
Final Thoughts
Honestly, making these hot chocolate bombs is one of my favorite kitchen adventures, and I truly hope you’ll give them a try. They’re more than just a treat; they’re an experience, a moment of pure cozy indulgence that you can create right in your own home. The way the chocolate melts, releasing all those delicious flavors into the warm milk, is just pure magic. Whether you’re looking for a fun activity to do with the kids, a unique gift for a friend, or just a way to make a chilly evening a little bit brighter, these hot chocolate bombs are the answer. They’re surprisingly easy, incredibly customizable, and guaranteed to bring a smile to anyone’s face. If you love rich, decadent hot chocolate, you absolutely need these in your life. I’m already dreaming up my next batch with some fun flavor twists! Give them a go, and I can’t wait to hear how yours turn out! What are your favorite fillings or decorations? Share your ideas in the comments below – I’m always looking for new inspiration!
Hot chocolate bombs
Ingredients
Chocolate Shell
- 12 oz Chocolate chips Semi-sweet or dark
Hot Chocolate Filling
- 0.5 cup Hot chocolate mix
- 0.25 cup Mini marshmallows
- 0.125 cup Powdered sugar
Instructions
Preparation Steps
- Melt the chocolate chips in a microwave-safe bowl in 30-second intervals, stirring between each, until smooth. Or melt using a double boiler.
- Brush the melted chocolate into silicone sphere molds, coating the sides and bottom. Let the chocolate set in the refrigerator for about 10-15 minutes.
- Apply a second coat of chocolate to the molds and let them set again in the refrigerator until completely firm.
- Carefully remove the chocolate spheres from the molds.
- Fill half of the chocolate spheres with the hot chocolate mix, marshmallows, and powdered sugar. If using, add sprinkles or other desired fillings.
- Warm the rim of an empty chocolate sphere on a warm plate or skillet for a few seconds. Immediately press it onto a filled sphere to create a sealed bomb.
- Decorate the sealed bombs with extra melted chocolate, sprinkles, or edible glitter if desired. Let them set.
- To serve, place a hot chocolate bomb in a mug and pour about 8-10 ounces of hot milk over it. Stir until the bomb is fully melted and the hot chocolate is combined.