Oh, you guys. If there’s one treat that instantly teleports me back to childhood summers and pure, unadulterated joy, it’s a DQ Chocolate Cake. You know the one. That rich, fudgy, intensely chocolatey marvel that always felt like a special occasion, even if it was just a Tuesday. For years, I tried to replicate that magic, tinkering with recipes, convinced it was some top-secret frozen confectionary wizardry. But then, after a *lot* of kitchen experiments (and a few near-disasters, which I’ll get to!), I finally cracked it. This isn’t just *any* chocolate cake; this is my version of that iconic DQ chocolate cake, and let me tell you, it’s a game-changer. It’s the kind of cake that makes everyone’s eyes widen when they take the first bite, and it’s surprisingly doable, even on a weeknight. Seriously, if you’ve ever craved that specific, dense, melt-in-your-mouth chocolate goodness, you’re in the right place.
What is DQ Chocolate Cake?
So, what exactly *is* this legendary DQ chocolate cake? Think of it as a deeply satisfying, ultra-moist chocolate cake, almost like a chocolate brownie meets a super-rich cake. It’s denser than your average fluffy cake, with an intense chocolate flavor that doesn’t mess around. The texture is key – it’s smooth, fudgy, and utterly decadent. It’s often layered or filled with a creamy frosting, and then finished with that signature chocolatey crunch or a smooth ganache. My version aims to capture that exact same feeling: that rich, comforting, intensely chocolate experience that made the original so beloved. It’s essentially a celebration in cake form, designed to bring that same happiness to your table, without the need for a special trip.
Why you’ll love this recipe?
Honestly, there are so many reasons why I keep coming back to this DQ chocolate cake copycat. First and foremost, the flavor is just out of this world. It’s a deep, dark chocolate that isn’t overly sweet, which I personally love. Every bite is like a little hug for your taste buds. Then there’s the simplicity. I know, I know, “copycat” can sometimes sound intimidating, but this recipe is actually incredibly straightforward. You don’t need any fancy equipment or special techniques. The ingredients are all pantry staples, which is a huge win for me because I can whip this up almost anytime a chocolate craving strikes. It’s also incredibly cost-effective – way more budget-friendly than heading to the ice cream shop! And the versatility! You can dress this cake up or down so easily. Serve it with a scoop of vanilla ice cream for that ultimate dessert experience, or enjoy a thick slice with your morning coffee (don’t judge me!). It’s perfect for birthdays, holidays, or just because. What I love most about this recipe, though, is the consistency. I’ve made this countless times, and it *never* fails to impress. It’s the kind of reliable recipe that becomes a go-to, the one you share with friends and family because you know they’ll rave about it.
How do I make DQ chocolate cake?
Quick Overview
The process for this DQ chocolate cake is wonderfully simple. You’ll mix up a rich chocolate batter, whip up a creamy frosting, and then bring it all together for that signature layered look and taste. It’s about combining a few key steps for maximum chocolate impact. The beauty of this method is how it achieves that dense, moist texture without being complicated. You’re essentially building layers of flavor and texture that mimic that beloved original, making it totally achievable for any home baker. Trust me, the hardest part is waiting for it to cool!
Ingredients
For the Main Batter:
2 cups all-purpose flour (I find using a good quality, unbleached flour makes a difference in texture)
1 ¾ cups granulated sugar (This is the sweetness level that reminds me most of the original)
¾ cup unsweetened cocoa powder (Dutch-process cocoa is my secret weapon here for that deep, dark color and rich flavor)
1 ½ teaspoons baking soda
1 ½ teaspoons baking powder
1 teaspoon salt
2 large eggs, at room temperature (Room temp eggs incorporate so much better!)
1 cup buttermilk, at room temperature (If you don’t have buttermilk, you can make your own by adding 1 tablespoon of white vinegar or lemon juice to 1 cup of milk and letting it sit for 5-10 minutes)
½ cup vegetable oil (or other neutral-flavored oil)
2 teaspoons vanilla extract
1 cup hot brewed coffee (This is non-negotiable! It blooms the cocoa and intensifies the chocolate flavor like nothing else)
For the Filling:
1 cup (2 sticks) unsalted butter, softened (Make sure it’s truly soft, not melted!)
½ cup unsweetened cocoa powder
4 cups powdered sugar (sifted, if you want it extra smooth)
½ cup milk (or heavy cream for extra richness)
1 teaspoon vanilla extract
For the Glaze:
½ cup (1 stick) unsalted butter
⅓ cup unsweetened cocoa powder
3 cups powdered sugar
⅓ cup milk (or cream)
1 teaspoon vanilla extract
Step-by-Step Instructions
Step 1: Preheat & Prep Pan
First things first, let’s get your oven fired up to 350°F (175°C). You’ll want to grease and flour two 8 or 9-inch round cake pans. I like to use baking spray with flour in it, or you can use butter and then dust with flour or cocoa powder. For extra insurance, I sometimes line the bottoms with parchment paper rounds – it makes releasing the cakes a breeze and prevents any dreaded sticking. Make sure to get into all the nooks and crannies of the pans!
Step 2: Mix Dry Ingredients
Grab a large mixing bowl. In it, whisk together the flour, granulated sugar, cocoa powder, baking soda, baking powder, and salt. You want to make sure all these dry ingredients are really well combined. This is where you can break up any cocoa powder clumps. A good whisking here ensures everything is evenly distributed, which means your cake will rise beautifully and have a consistent texture throughout.
Step 3: Mix Wet Ingredients
In a separate medium bowl, whisk together the eggs, buttermilk, oil, and vanilla extract until they’re nicely blended. It might look a little thin, but that’s okay. The buttermilk is crucial for that tender, moist crumb. Remember, having your ingredients at room temperature helps them emulsify better, leading to a smoother batter.
Step 4: Combine
Now, pour the wet ingredients into the dry ingredients. Mix on low speed (or with a whisk) until *just* combined. Seriously, don’t overmix! Overmixing develops the gluten in the flour, which can lead to a tough cake. Once it’s *almost* combined, slowly pour in the hot brewed coffee. The batter will be quite thin at this point, almost watery. This is exactly what you want! Continue mixing on low speed until everything is smooth and there are no dry streaks. That hot coffee really wakes up the cocoa powder.
Step 5: Prepare Filling
While your cake layers are baking or cooling, let’s get the filling ready. In a large bowl, beat the softened butter until it’s creamy. Add the cocoa powder and beat again until well combined. Gradually add the sifted powdered sugar, alternating with the milk, beating on low speed until incorporated, then increasing to medium-high speed until light and fluffy. Stir in the vanilla. If it’s too thick, add a tiny bit more milk; if it’s too thin, add a bit more powdered sugar. You want a spreadable, creamy consistency.
Step 6: Layer & Swirl
Once your cake layers have cooled completely (this is important – warm cake and frosting do not mix well!), place one cake layer on your serving plate or cake stand. Generously spread about half of the filling over the top. Carefully place the second cake layer on top. Now, you can either frost the entire cake with the remaining filling for a classic look, or you can make a ganache for a more DQ-like finish. I’ll give you the glaze recipe below, which works beautifully!
Step 7: Bake
Pour the batter evenly into your prepared pans. Bake for 30-35 minutes, or until a wooden skewer or toothpick inserted into the center comes out clean. Keep an eye on it in the last few minutes; ovens can be finicky! If the tops start to look too brown before the center is done, you can loosely tent them with foil.
Step 8: Cool & Glaze
Let the cakes cool in their pans for about 10-15 minutes before inverting them onto a wire rack to cool completely. Don’t rush this part! Once they are totally cool, you can get started on the glaze. In a saucepan over medium heat, melt the butter. Whisk in the cocoa powder until smooth. Remove from heat and gradually whisk in the powdered sugar and milk until you have a smooth, pourable glaze. Stir in the vanilla. If it’s too thick, add a tiny bit more milk; if too thin, add a bit more powdered sugar. Pour this glaze over the top of your assembled cake, letting it drip down the sides. This is the part that feels most like the real deal!
Step 9: Slice & Serve
Let the glaze set for about 15-20 minutes before slicing. This DQ chocolate cake is best served at room temperature or slightly chilled. Use a sharp knife, and you can even dip it in hot water and wipe it dry between slices for the cleanest cuts. Serve it up and watch the happy faces!
What to Serve It With
This DQ chocolate cake is a star on its own, but I love playing with pairings! For breakfast (yes, I sometimes do this!), a small slice with a strong cup of black coffee is pure bliss. It’s rich enough to feel like a treat without being overwhelming. For a more elegant brunch, I like to serve it with a dollop of fresh Whipped cream and a scattering of fresh raspberries. The tartness of the berries cuts through the richness of the chocolate beautifully. As a dessert, it’s spectacular on its own, but a small scoop of vanilla bean ice cream is a classic for a reason – that temperature contrast is divine. For cozy snacks, a tall glass of cold milk is all you need. My family also loves it with a drizzle of extra chocolate ganache or a caramel sauce. We’ve even had it as a warm dessert with a scoop of ice cream melting into it, almost like a lava cake. It’s truly that versatile!
Top Tips for Perfecting Your DQ Chocolate Cake
Over the years of making this, I’ve picked up a few tricks that really elevate it. For the batter, the hot coffee is non-negotiable for that deep chocolate flavor and moistness. Don’t skip it! And when combining wet and dry, remember: *do not overmix*. Mix until just combined, then add the coffee. The batter *will* be thin, and that’s a good thing – it contributes to the moist texture. For the frosting, make sure your butter is truly soft, not melted. This is key for a fluffy, smooth frosting that spreads easily. If your powdered sugar has lumps, sifting it will save you so much trouble and ensure a silky texture. When it comes to the swirl, don’t overthink it! Just dollop the filling over the bottom layer and spread it with an offset spatula or the back of a spoon. For the glaze, the consistency is everything. You want it thick enough to coat the cake but thin enough to pour easily. If it’s too thick, a splash more milk; too thin, more powdered sugar. I’ve found that adding the glaze when the cake is completely cool is best. If it’s still warm, the glaze can melt and become oily. I once tried using oil instead of butter in the glaze, thinking it would be easier, but it made it too greasy. Stick to the butter! And finally, for baking, I always check for doneness a few minutes before the recipe suggests. Ovens vary so much, and you don’t want to overbake this cake. A few moist crumbs on the tester is perfect.
Storing and Reheating Tips
This DQ chocolate cake is pretty forgiving when it comes to storage. If you’ve got leftovers (which is rare in my house!), you can keep it covered at room temperature for up to 2-3 days. Just make sure it’s in an airtight container or well-wrapped with plastic wrap. The frosting helps keep it moist. If you need to store it for longer, the refrigerator is your friend. It’ll keep well for about 4-5 days in the fridge. I like to let it sit out for about 20-30 minutes before serving if it’s been chilled, just to take the chill off and let the flavors bloom. For long-term storage, this cake freezes beautifully! Wrap the unfrosted cake layers tightly in plastic wrap, then in foil. It can stay frozen for up to 3 months. When you’re ready to thaw, remove the foil and plastic wrap and let it thaw in the refrigerator overnight. You can then frost it as usual. I usually apply the glaze right before serving if it’s been refrigerated or frozen to keep it looking its best. If you’re only storing slices, make sure they’re well-covered to prevent them from drying out.
Frequently Asked Questions
Final Thoughts
I truly believe this DQ chocolate cake copycat recipe captures the essence of that beloved treat. It’s rich, it’s deeply chocolatey, and it brings a smile to everyone who tries it. The joy of making something this delicious from scratch is immense, and the fact that it’s so approachable makes it even better. It’s a reminder that sometimes, the simplest recipes yield the most incredible results. If you’re a chocolate lover, or if you have fond memories of those classic ice cream shop cakes, you absolutely have to give this a try. I can’t wait to hear what you think, and I’d love to see your creations! Please leave a comment below with your thoughts, any twists you tried, or how your family enjoyed it. Happy baking, friends!
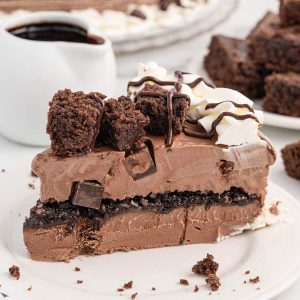
DQ Chocolate Ice Cream Cake (Copycat)
Ingredients
Cookie Crunch Layer
- 12 cookies Chocolate creme filled chocolate sandwich cookies (like Oreos) crushed
- 0.25 cup Salted butter melted and cooled
Cake Filling
- 2 quarts Chocolate ice cream softened slightly, 1 quart for each layer
- 12.8 ounces Hot fudge sauce
- 1 cup Chopped brownie pieces
- 11.5 ounces Semi sweet chocolate chunks
Whipped Topping & Garnish
- 1.5 cup Cold heavy whipping cream
- 0.75 cup Powdered sugar
- 1 teaspoon Clear vanilla flavoring
- Chocolate syrup for drizzling
Instructions
Preparation Steps
- Line a 9 inch springform pan with plastic wrap. Place in the freezer.
- Preheat the oven to 350°F. Line a baking sheet with parchment paper or heavy duty aluminum foil.
- In a small bowl, combine the crushed cookies and the melted butter. Stir well.
- Spread the cookie crumb mixture onto the lined baking sheet. Bake for 7-8 minutes. Cool completely, then break into bite-sized pieces (this is your cookie crunch).
- Thaw 1 quart of chocolate ice cream for 15-20 minutes until spreadable. Spread evenly into the bottom of the prepared springform pan. Freeze for 30 minutes to 1 hour.
- Microwave the hot fudge sauce for about 15 seconds to soften. Stir and spread evenly over the first frozen ice cream layer.
- Sprinkle half of the cookie crunch layer over the hot fudge. Freeze for 1 hour.
- Thaw the second quart of chocolate ice cream for 15-20 minutes. Mix in 1 cup of the chocolate chunks.
- Spread the second ice cream mixture over the cookie crunch layer. Freeze for 4-6 hours, or preferably overnight.
- While the cake is finalizing its freeze time, prepare the whipped topping: Freeze a metal mixing bowl for 30 minutes. Beat the heavy whipping cream, powdered sugar, and clear vanilla flavoring on high speed until stiff peaks form (about 3-4 minutes).
- Fill a piping bag fitted with a star tip with the whipped cream.
- Remove the cake from the freezer and quickly release the outer portion of the springform pan. Remove the plastic wrap. Place the cake on a serving plate.
- Pipe a decorative border (shell or swirl pattern) around the top and bottom edges of the cake using the whipped cream.
- Sprinkle the remaining chocolate chunks and the chopped brownie pieces onto the top surface of the ice cream cake.
- Drizzle chocolate syrup over the top. Return the cake to the freezer until ready to slice and serve.