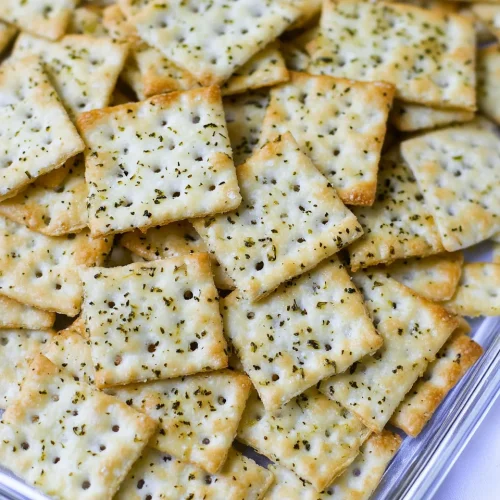
You know those nights? The ones where you’re staring into the pantry, desperately craving something… *more*? Something zippy, something savory, something that just hits the spot without requiring you to pull out a dozen bowls and make a mess? Yeah, me too. And for the longest time, my go-to was always some kind of fancy cheese and crackers. But then, one random afternoon, a little kitchen experiment born out of necessity turned into pure magic. I’m talking about Dill pickle saltines. Yes, you heard me right! These aren’t just *any* flavored crackers; they’re a flavor explosion that’s surprisingly simple to whip up and utterly addictive. Imagine the satisfying crunch of a classic saltine, but with that bright, tangy, herby punch of dill pickles. It sounds a little wild, I know, but trust me, this one’s a total game-changer. They’re like a flavor-packed hug for your taste buds, and they’ve become my secret weapon for everything from last-minute party appetizers to that 10 pm salty craving that just won’t quit. Forget store-bought flavored crackers; this homemade version is in a league of its own, and it all starts with a humble box of saltines and a few pantry staples.
What are dill pickle saltines?
So, what exactly *are* these magical little morsels? Think of them as your favorite everyday saltine crackers getting a seriously delicious upgrade. It’s essentially taking a plain, crispy saltine and infusing it with all the irresistible flavors of dill pickles. We’re talking that signature tangy brine, the fresh burst of dill, and maybe a little whisper of garlic and onion for good measure. It’s not a complicated process at all; it’s more about creating a flavorful coating that bakes right onto the cracker, giving it a fantastic taste and a slightly enhanced crunch. The name itself, “dill pickle saltines,” is pretty straightforward, but it hints at the flavor journey you’re about to embark on. It’s like taking a bite of a perfect dill pickle spear and a crunchy cracker all in one go. They’re surprisingly sophisticated yet delightfully casual, perfect for when you want something interesting but don’t want to overthink it. This recipe is my personal spin on a viral trend that I just had to try for myself, and oh boy, am I glad I did!
Why you’ll love this recipe?
Honestly, there are so many reasons why this dill pickle saltine recipe has become a staple in my kitchen, and I just know you’re going to fall in love with it too. First off, the FLAVOR is just out of this world. That tangy dill pickle goodness is so satisfying, and it’s got just the right amount of savory to make you reach for another cracker. It’s that perfect balance of salty, sour, and herby that’s incredibly addictive. What I love most about this recipe is its sheer SIMPLICITY. Seriously, you can whip these up in under 30 minutes from start to finish, and most of that is just baking time. No complicated steps, no fancy equipment, just pure snacking bliss. It’s the kind of recipe that’s a lifesaver on busy nights or when unexpected guests pop over. And let’s talk about COST-EFFICIENCY! Saltines are incredibly budget-friendly, and the other ingredients you need are probably already in your pantry. You get a massive batch of delicious, homemade flavored crackers for pennies on the dollar compared to buying gourmet ones. Plus, the VERSATILITY is amazing. You can adjust the dill and pickle flavor to your liking, add a little heat if you’re feeling adventurous, or even experiment with different types of crackers. These dill pickle saltines are fantastic on their own, but they also make an amazing base for dips or a crunchy topping for salads. They’re just so much more exciting than your average cracker. If you’re a fan of tangy, savory snacks, this is your new go-to. It’s a taste sensation that’s easy, affordable, and guaranteed to impress!
How do I make dill pickle saltines?
Quick Overview
This recipe is a breeze! You’ll simply toss your saltines with a flavorful mixture of melted butter, pickle juice, dill, and a few other seasonings, then bake them until they’re perfectly crisp and infused with that delicious dill pickle flavor. It’s an effortless way to transform a basic snack into something truly special. The aroma while they bake is incredible, and the final result is a batch of irresistibly tangy, savory crackers that disappear faster than you can say “pass me another one!”
Ingredients
For the Flavorful Coating:
1 cup (2 sticks) unsalted butter, melted: Make sure it’s fully melted but not browned. This is the base for our flavor. Using unsalted butter gives us more control over the saltiness. You can also use salted butter if that’s all you have, but you’ll want to be a bit more mindful of the amount of salt you add later.
1/4 cup dill pickle juice: This is where all the tangy magic happens! Use juice from your favorite jar of dill pickles. The brine from bread-and-butter pickles won’t work here; you need that classic dill flavor. Some pickle juices are saltier than others, so you might adjust a touch of salt later based on your pickle juice.
2 tablespoons dried dill: This gives us that unmistakable herby freshness. Don’t be shy with the dill; it’s the star here! If you have fresh dill, you can absolutely use it, but you’ll need more – probably about 1/4 cup chopped.
1 teaspoon garlic powder: Adds a subtle savory depth.
1/2 teaspoon onion powder: Complements the garlic and dill beautifully.
1/4 teaspoon salt, or to taste: This is really to enhance the flavors. Taste your pickle juice first! If it’s very salty, you might need less or none at all.
1/4 teaspoon black pepper: Just a little kick.
1 box (16 oz) plain saltine crackers: The unsalted kind are perfect, as they let the coating shine. You can also use Ritz crackers or even oyster crackers for a fun twist, though the texture will be slightly different.
Step-by-Step Instructions
Step 1: Preheat & Prep Pan
Get your oven fired up to 300°F (150°C). This is a relatively low and slow bake, which is key to getting the crackers perfectly infused and crisp without burning. Grab a large baking sheet – or two, if you have them, to avoid overcrowding. You don’t need to grease it; the butter mixture will do the job. I usually line mine with parchment paper just for extra easy cleanup, but it’s not strictly necessary. Having everything ready to go before you start mixing means you can get these beauties into the oven quickly.
Step 2: Mix Dry Ingredients
In a medium bowl, whisk together the dried dill, garlic powder, onion powder, salt, and black pepper. Make sure it’s all combined really well. This ensures that every cracker gets an even distribution of flavor. Sometimes, if you just dump them in with the wet ingredients, you can end up with clumps of seasoning. Taking this extra second to mix the dry stuff first really pays off.
Step 3: Mix Wet Ingredients
In a separate, larger bowl (big enough to hold all your crackers!), pour the melted butter and the dill pickle juice. Whisk them together until they’re nicely combined. The pickle juice will give the butter a slightly cloudy, yellowish-green hue, which is exactly what we want!
Step 4: Combine
Add the bowl of dry seasonings to the wet ingredients and whisk again until everything is thoroughly mixed. Now, here’s where the magic really starts. Gently add the entire box of saltine crackers to this flavorful liquid. Use your hands or a large spatula to gently toss and coat each cracker. You want to make sure every single one is touched by that delicious dill pickle mixture. Be careful not to break them too much at this stage, although a few broken ones are totally fine – they’ll still taste amazing!
Step 5: Prepare Filling
This step is already done by mixing the seasonings into the melted butter and pickle juice! The “filling” is really just the coating that we’re about to bake onto the crackers. So, once they’re all coated and happy in their buttery, briny bath, we’re ready for the next step.
Step 6: Layer & Swirl
Carefully spread the coated saltine crackers in a single layer on your prepared baking sheet(s). Try your best to spread them out so they aren’t piled on top of each other. This allows them to bake evenly and get nice and crispy. If you have too many for one pan, use a second pan. Overcrowding can lead to steamed crackers rather than baked ones, and we definitely don’t want that.
Step 7: Bake
Slide the baking sheet(s) into your preheated oven. Bake for about 15-20 minutes. About halfway through the baking time (around the 8-10 minute mark), I like to give them a gentle stir or flip them with a spatula. This ensures all sides get evenly coated and toasted. Keep an eye on them towards the end; you’re looking for them to be lightly golden and smell wonderfully fragrant. They’ll continue to crisp up as they cool.
Step 8: Cool & Glaze
Once they’re done baking and look lovely and golden, carefully remove the baking sheet(s) from the oven. Let them cool completely on the baking sheet. As they cool, they will become wonderfully crisp. Resist the urge to eat them all hot off the pan – they’re delicious warm, but the texture really improves as they cool. There’s no separate glaze needed for this recipe; the buttery pickle mixture is all the “glaze” you need!
Step 9: Slice & Serve
Once completely cool, your dill pickle saltines are ready to enjoy! You can serve them straight from the pan or transfer them to a nice serving bowl. They’re best served at room temperature. The crunchy, tangy, herby flavor is truly addictive, and I promise they won’t last long!
What to Serve It With
These dill pickle saltines are so versatile, they’ve earned a permanent spot on my snack rotation for all sorts of occasions. For a casual Breakfast or Brunch, I love serving them alongside a big platter of scrambled eggs or a creamy avocado toast. They add a fantastic salty crunch that balances out richer dishes. They’re also brilliant for a DIY charcuterie board – forget boring crackers, these dill pickle saltines are a conversation starter! They pair wonderfully with sharp cheddar, creamy brie, or even a spicy pepper jack cheese. For a more elegant Dessert or after-dinner treat, I know it sounds a bit unconventional, but they can actually be surprisingly delightful alongside a robust blue cheese or even a very dark chocolate. The salty-sweet contrast is intriguing! But my absolute favorite way to enjoy them is for Cozy Snacks. They are the perfect companion to a cold beer or a crisp glass of white wine. Honestly, they’re so flavorful on their own, you don’t even need a dip. But if you want to jazz things up, they’re amazing served with a creamy ranch dip, a spicy hummus, or even a tangy artichoke dip. My kids also love them smashed up as a crunchy topping on their homemade pizza. They’re just so good, you’ll find yourself looking for excuses to make them!
Top Tips for Perfecting Your Dill Pickle Saltines
I’ve made batches of these dill pickle saltines more times than I can count, and over the years, I’ve picked up a few tricks that make them even better. For the pickle juice, the key is using a good quality, flavorful dill pickle brine. Brands can vary in saltiness and tang, so tasting your juice first is a good idea. If it’s super salty, you might want to dial back on the added salt in the recipe. When it comes to the dried dill, don’t be afraid to be generous! It’s what gives these crackers their signature flavor. If you happen to have fresh dill on hand, you can certainly use it, but you’ll need a good handful, finely chopped, and I find it’s best added towards the end of baking or sprinkled on top after they’re done to preserve its fresh flavor. My most important tip for mixing is to be gentle! You want to coat every cracker, but you don’t want to turn them into dust. Tossing them by hand is often the best way to ensure they’re all coated without breaking them too much. If you have a lot of crackers and not enough bowl space, divide them into two batches. It’s much better to do two smaller batches than one overcrowded one. For baking, that 300°F (150°C) temperature is crucial. Baking them too hot can burn the butter and seasonings before the crackers get nice and crispy. Keep an eye on them, especially during the last 5 minutes, as ovens can vary. You’re looking for a light golden color. My personal lesson learned here: I once tried baking them at a higher temperature, thinking it would speed things up, but they ended up tasting burnt. Stick to the low and slow method! If you find your crackers aren’t quite as crispy as you’d like after cooling, you can pop them back into the oven for another 5 minutes, watching them carefully. This recipe is pretty forgiving, but that gentle handling and careful baking make all the difference between a good cracker and an exceptional one. Trust me on this one!
Storing and Reheating Tips
One of the best things about these dill pickle saltines is that they store really well, which means you can have a batch ready to go whenever that craving strikes. For Room Temperature storage, once the crackers are completely cooled, transfer them to an airtight container or a good quality zip-top bag. They’ll stay wonderfully crisp at room temperature for about 3-4 days. After that, they might start to lose a bit of their crunch, though they’ll still be tasty. Make sure they are absolutely, totally, 100% cool before you seal them up, otherwise, the residual heat can create condensation, leading to soggy crackers. If you’re planning to keep them for longer, Refrigerator Storage isn’t ideal for maintaining crispness, as the humidity in the fridge can make them soft. However, if you must, place them in an airtight container with a piece of paper towel to absorb moisture, and they should be okay for a day or two, but I strongly recommend the room temperature method for best results. Now, for Freezer Instructions, I generally don’t recommend freezing these. The texture of the cracker can change significantly after thawing, and they tend to become a bit chewy or stale-tasting. It’s really best to make a fresh batch when you want them! If you absolutely have to freeze them, make sure they are completely cool, then wrap them tightly in plastic wrap, followed by a layer of foil, or place them in a freezer-safe container. They might last for a couple of weeks, but be prepared for a slight texture change upon thawing. The Glaze Timing Advice is simple: you only apply the “glaze” (the buttery pickle mixture) before baking, and the crackers are best served after they’ve fully cooled. There’s no need to add anything extra after baking or storing.
Frequently Asked Questions
Final Thoughts
So there you have it – my absolute favorite way to make dill pickle saltines! I truly hope you give these a try. They’re such a simple yet incredibly rewarding recipe that brings so much joy (and flavor!) to any snack time. Whether you’re looking for an easy appetizer to impress your friends, a unique addition to your next movie night, or just a way to satisfy that salty-sour craving, these crackers are the answer. They’re a testament to how a few simple ingredients can transform into something truly special. If you’re a fan of pickles, or just love a good savory snack, I can’t recommend these enough. They’re proof that sometimes, the most unexpected flavor combinations are the best ones! Give them a go, and I can’t wait to hear what you think! If you make these, please leave a comment below and tell me how they turned out, or if you tried any fun variations. Happy baking, and happy snacking!
Dill Pickle Saltines
Ingredients
Main Ingredients
- 1 sleeve saltine crackers
- 0.5 cup vegetable oil
- 2 tablespoons dill weed dried
- 1 teaspoon garlic powder
- 0.5 teaspoon onion powder
- 0.5 teaspoon salt or to taste
Instructions
Preparation Steps
- Preheat oven to 250°F (120°C). Line a baking sheet with parchment paper.
- In a small bowl, whisk together the vegetable oil, dill weed, garlic powder, onion powder, and salt.
- Arrange the saltine crackers in a single layer on the prepared baking sheet.
- Spoon or brush the oil mixture evenly over the top of each cracker.
- Bake for 8-10 minutes, or until the oil is absorbed and the crackers are fragrant.
- Let cool completely on the baking sheet before serving.