Oh, hello there! Come on in, grab a mug. I’ve been so excited to share this with you. You know, there are some recipes that just feel like home, like a warm blanket on a chilly evening, and this Caramel apple pie is absolutely one of them. It’s not just a pie; it’s a whole mood, a memory maker. I swear, the moment those apples start to bubble and the caramel scent fills the kitchen, everyone just gravitates towards the oven, eyes wide with anticipation. It’s funny, sometimes I’ll be scrolling through dessert ideas, looking for something new, but inevitably, I always circle back to this one. It’s like catching up with an old, dear friend. If you’ve ever made a classic apple pie, think of this as its decadent, slightly more sophisticated cousin who still loves to have fun. It’s that perfect balance of comforting familiarity and delightful indulgence. This isn’t just another apple pie; it’s *the* caramel apple pie, the one that will have people asking for the recipe before they’ve even finished their first slice. Let’s get baking, shall we?
What is Caramel Apple Pie?
So, what exactly makes this caramel apple pie so special? Well, at its heart, it’s exactly what it sounds like: a classic, comforting apple pie, but with an irresistible swirl of gooey, luscious caramel woven throughout. Think tender, slightly tart apples, baked to perfection in a flaky, buttery crust, all brought together with that rich, sweet, melt-in-your-mouth caramel. It’s not just about adding caramel sauce on top; we’re talking about caramel *infused* into the very soul of the pie. It’s like the apple pie you grew up with, but someone whispered a sweet, caramelly secret into its ear. It’s essentially the best of both worlds: the wholesome goodness of fruit pie and the pure bliss of a caramel treat. It’s that comforting embrace you crave, translated into a dessert. It’s simple, yet sophisticated enough to impress, and trust me, it never fails to make people smile.
Why you’ll love this recipe?
Honestly, where do I even begin with why you’ll absolutely adore this caramel apple pie? First off, the flavor is just out of this world. You get that beautiful tartness from the apples, perfectly balanced by the sweet, buttery richness of the caramel. It’s a symphony of sweet and tart, soft and crisp, all playing together in your mouth. And the smell? Oh my goodness, the smell of baking apples and caramel is truly one of life’s greatest perfumes. It’s simple, too! I know “pie” can sometimes sound intimidating, but I’ve really streamlined this to be super approachable. You don’t need fancy equipment or a culinary degree. What I love most is how adaptable it is. Craving a little extra cinnamon? Go for it. Want to add some toasted pecans to the filling? Absolutely. It’s also surprisingly budget-friendly, using common pantry staples. Think about it: you can create this showstopper with ingredients you probably already have. It’s perfect for a cozy night in, a holiday gathering, or just because you deserve a treat. It’s the kind of dessert that makes you feel like a baking superhero, even if you’re just starting out. And the texture? That flaky crust, the tender apples, the silky caramel… it’s just pure heaven. If you’ve ever loved a good apple crumble or a sticky toffee pudding, this pie combines elements of both in the most delightful way. It’s truly a crowd-pleaser, and the fact that it’s so forgiving makes it a winner in my book. It’s the kind of recipe you’ll find yourself making again and again, because it’s just that darn good.
How do I make caramel apple pie?
Quick Overview
This recipe is all about creating layers of deliciousness. We start with a fantastic, flaky crust, then fill it generously with perfectly spiced apples and a homemade caramel sauce that we’ll swirl right in. It’s baked until golden and bubbly, then finished with a little extra caramel drizzle. The beauty of this method is that the caramel bakes into the apples, infusing every bite with that incredible flavor. It sounds fancy, but I promise it’s straightforward and incredibly rewarding. You’ll end up with a pie that looks and tastes like it came from a high-end bakery, but with all the love and comfort of a homemade treat. It’s a process that’s as enjoyable as the final slice!
Ingredients
For the Crust:
What is the best way to get that flaky texture?
- 2 ½ cups all-purpose flour, plus more for dusting
- 1 teaspoon salt
- 1 cup (2 sticks) unsalted butter, very cold and cut into cubes
- ½ cup ice water, plus more if needed
For the Apple Filling:
The star of the show! I like to use a mix of apples for the best flavor and texture. Tart Granny Smiths are a must, but a sweeter variety like Honeycrisp or Fuji adds wonderful depth. Don’t be afraid to experiment!
- 6-8 medium apples (about 2 ½ – 3 lbs), peeled, cored, and sliced about ¼-inch thick
- ½ cup granulated sugar (adjust to your apple sweetness)
- ¼ cup packed light brown sugar
- 2 tablespoons all-purpose flour (or cornstarch for a clearer filling)
- 1 ½ teaspoons ground cinnamon
- ½ teaspoon ground nutmeg
- ¼ teaspoon ground allspice
- 1 tablespoon lemon juice
For the Caramel Swirl:
This is the magic ingredient! Making your own caramel is so much better than store-bought. It’s rich, luxurious, and tastes incredible.
- 1 cup granulated sugar
- ¼ cup water
- ½ cup heavy cream, warmed
- 2 tablespoons unsalted butter, softened
- 1 teaspoon vanilla extract
- Pinch of salt
For the Glaze (Optional but highly recommended!):
A little extra drizzle to make it even more irresistible.
- ¼ cup caramel sauce (leftover from the swirl, or store-bought)
Step-by-Step Instructions
Step 1: Preheat & Prep Pan
First things first, let’s get our oven ready. Preheat it to 400°F (200°C). While the oven is heating up, take your pie dish (a 9-inch one is standard) and have it ready. If you’re feeling fancy, you can lightly butter or grease it, but honestly, a good crust usually does the trick on its own. It’s always good practice to have everything prepped so you’re not scrambling later!
Step 2: Mix Dry Ingredients
In a large bowl, whisk together the flour and salt for your crust. This ensures everything is evenly distributed. It’s a small step, but it makes a big difference in getting that perfectly uniform texture in every bite of your crust.
Step 3: Mix Wet Ingredients
Now, for the magic of the crust! Add your super cold, cubed butter to the flour mixture. Using a pastry blender, your fingertips, or even a food processor (pulse carefully!), cut the butter into the flour until you have coarse crumbs with some pea-sized pieces of butter still visible. These little butter pockets are what create those flaky layers. Gradually add the ice water, just a tablespoon at a time, mixing until the dough just comes together. Don’t overmix! You want it shaggy. Divide the dough in half, flatten each half into a disk, wrap tightly in plastic wrap, and refrigerate for at least 30 minutes. This resting period is crucial for a tender crust.
Step 4: Combine
Once your dough has chilled, take one disk and roll it out on a lightly floured surface into a circle about 12 inches in diameter. Carefully transfer this to your pie dish, pressing it gently into the bottom and up the sides. Trim any excess dough, leaving about a ½-inch overhang. You can crimp the edges now or wait until you add the top crust. Now, let’s get to the apples! In a large bowl, toss the sliced apples with the granulated sugar, Brown Sugar, flour, cinnamon, nutmeg, and allspice. Add the lemon juice too – it brightens up the flavors and helps prevent browning. Give it a good toss until all the apple slices are evenly coated. This mixture will macerate a bit while you make the caramel.
Step 5: Prepare Filling
Alright, time for the star: homemade caramel! In a medium saucepan, combine the 1 cup of granulated sugar and ¼ cup of water. Stir *just* until the sugar is moistened. Heat over medium-high heat, swirling the pan occasionally, but resist the urge to stir with a spoon once it starts bubbling, as this can cause crystallization. You want to watch it closely; it will turn an amber color. Once it reaches a deep amber, carefully and slowly whisk in the warmed heavy cream (it will bubble up a lot, so be cautious!). Continue whisking until smooth. Remove from heat and stir in the softened butter, vanilla extract, and salt. The butter adds richness and gloss, and the salt balances the sweetness. It should be thick and luscious. Let it cool for about 10-15 minutes until it’s thick but pourable.
Step 6: Layer & Swirl
Now for the fun part! Pour about two-thirds of the apple filling into your prepared Pie crust. Dollop about half of the slightly cooled caramel sauce over the apples. Then, add the remaining apples. Dollop the rest of the caramel sauce over the second layer of apples. Using a butter knife or a skewer, gently swirl the caramel through the apples to create beautiful patterns. Don’t over-swirl; you want distinct ribbons of caramel. Roll out the second disk of dough for the top crust. You can either place it whole over the filling, cutting vents, or cut it into strips for a lattice top. Crimp the edges securely to seal. If you’re using a full top crust, make sure to cut several vents for steam to escape. Brush the top with a little milk or egg wash for a golden sheen, if desired.
Step 7: Bake
Place the pie on a baking sheet (this catches any drips and makes cleanup easier!). Bake in the preheated 400°F (200°C) oven for 20 minutes. Then, reduce the oven temperature to 375°F (190°C) and continue baking for another 30-40 minutes, or until the crust is golden brown and the filling is bubbling through the vents. If the crust starts to brown too quickly, you can loosely tent the pie with aluminum foil. You’ll know it’s done when the apples are tender when pierced with a knife through a vent, and the caramel is thick and gooey.
Step 8: Cool & Glaze
This is arguably the hardest part – waiting! Let the pie cool on a wire rack for at least 2-3 hours before slicing. This allows the filling to set properly. If you try to slice it too soon, it will be runny. Once it’s mostly cooled, you can warm up a little extra caramel sauce (about ¼ cup) and drizzle it over the top of the pie for that extra decadent finish. It makes it look so inviting!
Step 9: Slice & Serve
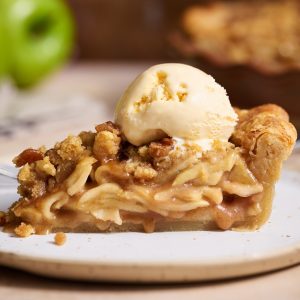
Once the pie has cooled sufficiently, slice it into wedges with a sharp knife. The caramel should be gooey and delicious, and the apples tender. Serve warm or at room temperature. It’s absolutely divine on its own, but a scoop of vanilla bean ice cream or a dollop of whipped cream takes it to a whole new level. Enjoy every single bite!
What to Serve It With
This caramel apple pie is such a versatile treat; it fits in perfectly at any meal or occasion. For breakfast, I love a small, warm slice with a strong cup of coffee. It’s a little indulgent, yes, but it’s like starting your day with a cozy hug. The caramel doesn’t make it too sweet for the morning, especially with the tart apples. For brunch, it’s a showstopper. I like to arrange a few slices on a nice platter, maybe with some fresh berries on the side for a pop of color. A sparkling cider or a light rosé pairs beautifully here. As a dessert, well, it’s in its prime element! Serve it warm with a generous scoop of vanilla ice cream – that contrast of hot pie and cold ice cream is just classic perfection. A drizzle of extra caramel sauce over the ice cream is never a bad idea. For those cozy, late-night cravings or when you just want something comforting, a simple slice with a glass of milk or a cup of tea is pure bliss. I’ve also found it’s fantastic alongside a sharp cheddar cheese, which sounds a bit old-fashioned, but the salty, sharp cheese cuts through the sweetness of the caramel and apples wonderfully. It’s a taste combination that truly sings!
Top Tips for Perfecting Your Caramel Apple Pie
Over the years, I’ve learned a few little tricks that make this caramel apple pie even better. When prepping your apples, don’t just slice them – toss them in a bowl with a little lemon juice right away. This not only adds brightness but also stops them from turning that sad brown color while you get everything else ready. For the crust, remember that cold is your best friend. Cold butter, cold water, and even a cold rolling pin will help ensure that super flaky texture we all love. If your dough gets too warm while you’re rolling it, pop it back in the fridge for 10-15 minutes. It makes a world of difference. When it comes to the caramel swirl, don’t be tempted to overmix it into the apples. Gentle swirling creates those beautiful, distinct ribbons of caramel that peek through. Too much mixing and it can just become one homogenous layer, and we want those lovely caramel pockets! For the apples, a mix of tart and sweet is key. I always use Granny Smith, but adding something like Honeycrisp or Fuji gives it more complexity. If your apples are super juicy, you might want to add an extra tablespoon of flour or cornstarch to the filling to ensure it sets up nicely. When it comes to baking, trust your oven, but also trust your senses. If the crust is browning too quickly, tent it with foil. And the bubbling filling is your best indicator that the apples are tender and the caramel is luscious. For ingredient swaps, if you don’t have allspice, a pinch of ground ginger works wonderfully in its place. And if you’re feeling adventurous with the caramel, a tiny pinch of sea salt added right at the end of the caramel-making process can really elevate the flavor. I’ve also found that letting the pie cool completely is crucial for clean slices, but if you’re impatient (I often am!), a warm slice with ice cream hides any imperfections beautifully!
Storing and Reheating Tips
This caramel apple pie is best enjoyed fresh, but it stores surprisingly well, which is always a plus in my book. If you have any leftovers (a rare occurrence in my house!), let it cool completely on a wire rack. Once it’s cooled down, you can cover it loosely with plastic wrap or aluminum foil and leave it at room temperature for up to two days. Honestly, I find the crust stays crispiest when stored at room temperature for the first day. If you need to store it for longer, wrap it tightly in plastic wrap and then in foil, and pop it in the refrigerator. It will keep well in the fridge for about 3-4 days. When you’re ready to reheat, you have a couple of options. For a slice, I love to gently warm it in a toaster oven or a conventional oven at around 300°F (150°C) for about 10-15 minutes, just until warmed through. This helps revive that flaky crust. Microwaving is also an option if you’re in a hurry, but it can make the crust a bit softer. For reheating a whole pie, the oven is definitely the way to go, just increase the time accordingly. If you added an extra glaze on top, it might need a little touch-up after reheating, but the internal caramel should be just as delicious. And for freezer instructions, it’s best to freeze it *before* glazing. Wrap the completely cooled pie tightly in several layers of plastic wrap and then a layer of aluminum foil. It should last in the freezer for about 2-3 months. To thaw, remove the foil and plastic wrap and let it thaw at room temperature for a few hours, then warm it gently in the oven. It’s like getting a freshly baked pie all over again!
Frequently Asked Questions
Final Thoughts
So there you have it – my absolute favorite caramel apple pie! I really hope you give this recipe a try. It’s more than just a dessert; it’s an experience, a way to bring people together and create those warm, fuzzy memories. It’s the kind of pie that makes you want to curl up on the couch with a good book or gather friends for a cozy evening. The balance of tart apples and sweet, gooey caramel, all wrapped up in a flaky crust, is just pure bliss. It’s proof that simple ingredients, treated with a little love and care, can create something truly magical. If you enjoyed this recipe, you might also love my classic apple crumble or my decadent pecan pie – they’re all about that comforting, home-baked goodness. I can’t wait to hear how your caramel apple pie turns out! Don’t forget to leave a comment below and share any of your own tips or variations. Happy baking, and enjoy every delicious, caramel-kissed bite!
Caramel Apple Pie
Ingredients
Pie Crust
- 2.5 cups all-purpose flour
- 1 teaspoon salt
- 1 cup unsalted butter, cold and cubed
- 0.5 cup ice water
Caramel Apple Filling
- 8 cups apples, peeled, cored, and sliced (a mix of varieties like Gala, Honeycrisp, and Granny Smith)
- 0.75 cup granulated sugar
- 0.25 cup all-purpose flour
- 2 teaspoons cinnamon
- 0.5 teaspoon nutmeg
- 0.25 teaspoon salt
- 0.5 cup caramel sauce store-bought or homemade
Egg Wash and Topping
- 1 egg beaten for egg wash
- 1 tablespoon milk for egg wash
- 1 tablespoon turbinado sugar for sprinkling
Instructions
Preparation Steps
- Prepare the pie crust: In a large bowl, whisk together flour and salt. Cut in cold butter with a pastry blender or your fingers until the mixture resembles coarse crumbs with some pea-sized pieces of butter remaining. Gradually add ice water, 1 tablespoon at a time, mixing until the dough just comes together. Divide dough in half, flatten into discs, wrap in plastic wrap, and refrigerate for at least 30 minutes.
- Make the caramel apple filling: In a large bowl, combine sliced apples, granulated sugar, flour, cinnamon, nutmeg, and salt. Toss to coat evenly. Stir in the caramel sauce until the apples are well-coated.
- Preheat oven to 400°F (200°C). On a lightly floured surface, roll out one disc of pie dough into a 12-inch circle. Carefully transfer it to a 9-inch pie plate. Trim and crimp the edges.
- Pour the apple filling into the prepared pie crust.
- Roll out the second disc of pie dough. You can either place it as a full top crust, cutting vents, or cut it into strips for a lattice top.
- If using a full top crust, lay it over the filling. Trim and crimp the edges to seal. Cut several slits in the top to allow steam to escape.
- Prepare the egg wash by whisking together the egg and milk. Brush the top crust with the egg wash and sprinkle with turbinado sugar.
- Bake for 20 minutes at 400°F (200°C). Then, reduce the oven temperature to 375°F (190°C) and continue baking for another 30-40 minutes, or until the crust is golden brown and the filling is bubbly. If the crust starts to brown too quickly, loosely tent it with foil.
- Let the pie cool on a wire rack for at least 2-3 hours before slicing and serving to allow the filling to set.