You know those recipes that just feel like a warm hug? This Banana Bread Recipe is absolutely one of those for me. It’s the one I whip up when I have a few too many ripe bananas staring me down, or when I suddenly get a craving for something sweet and comforting without wanting to spend hours in the kitchen. It’s funny, my kids always know when this is baking because the whole house fills with the most amazing, sweet, cinnamon-spiced aroma. Honestly, the smell alone is enough to make your day better! It’s funny, I’ve tried so many banana bread recipes over the years, but this one is just… *the one*. It’s not overly complicated, uses ingredients you probably already have, and the result is always so incredibly moist and flavorful. It’s honestly better than any bakery version I’ve ever tried, and that’s saying something!
What is banana bread?
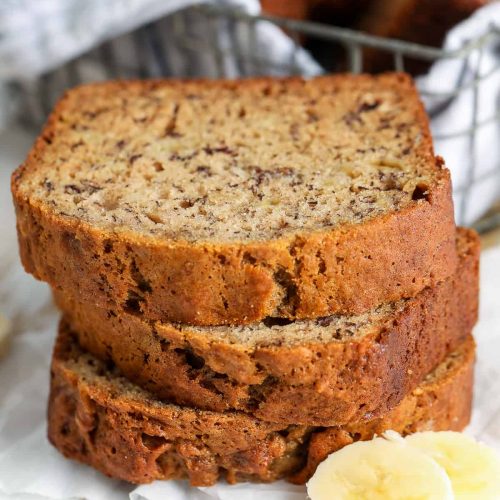
So, what exactly *is* this magical thing we call banana bread? Think of it as a super moist, tender cake that’s packed with the sweet, caramelly flavor of ripe bananas. It’s essentially a quick bread, meaning it doesn’t use yeast and comes together really fast. Unlike a dense quick bread, this banana bread recipe leans more towards cake-like tenderness, but with that unmistakable banana goodness. The name itself, “banana bread,” tells you pretty much everything you need to know – it’s bread, made with bananas! But oh, it’s so much more than that. It’s a culinary hug, a sweet treat that’s perfect any time of day, and a fantastic way to use up those spotty bananas that nobody wants to eat on their own anymore. It’s a classic for a reason, and this version is truly my go-to.
Why you’
There are so many reasons why I’ve made this banana bread recipe my absolute favorite, and I just know you’re going to feel the same way. First off, the flavor is just divine. It’s not just banana; there’s this subtle warmth from the cinnamon and a hint of vanilla that just elevates everything. It’s sweet enough to be a treat, but not so sweet that it feels over the top. And the texture? Oh my goodness, the texture! It’s incredibly moist, almost melt-in-your-mouth tender, thanks to the bananas and a few other little secrets I’ll share with you. Seriously, it’s never dry or crumbly, which is a common pitfall with other recipes I’ve tried.
What I also love is how ridiculously easy it is. You don’t need any fancy equipment or complicated techniques. It’s the kind of recipe you can make with kids around, or when you’ve had a long day and just need a little baking therapy. Plus, it’s super budget-friendly. Ripe bananas are often on sale, and the other ingredients are pantry staples. This recipe is also incredibly versatile. I’ve tweaked it countless times, adding chocolate chips, nuts, or even a swirl of Peanut Butter, and it always turns out wonderfully. It’s perfect for a quick breakfast on the go, a delightful afternoon snack, or even a simple dessert. Compared to something like a classic chocolate cake or a more involved pastry, this banana bread is a lifesaver on busy days, and the results are consistently spectacular. It’s the kind of recipe that makes you feel like a baking rockstar, even if you’re a total beginner!
How do you make banana bread?
Quick Overview
This recipe is all about simple steps that lead to maximum flavor and a wonderfully moist crumb. You’ll whisk together your dry ingredients, mash your bananas and mix them with the wet ingredients, then combine the two. A quick swirl of a simple, optional filling takes it to the next level. Bake until golden and a tester comes out clean, then let it cool slightly before digging in. It’s honestly that straightforward, and I’ve streamlined it over time to be as foolproof as possible. Trust me, you’ll be amazed at how easy it is to get such incredible results.
Ingredients
For the Main Batter:
3 very ripe bananas, mashed (the spottier, the better! Aim for about 1 ½ cups)
1 ½ cups all-purpose flour (I use unbleached for a slightly better texture)
1 teaspoon baking soda
½ teaspoon ground cinnamon (or more if you love cinnamon like I do!)
¼ teaspoon salt
½ cup unsalted butter, melted (you can also use coconut oil for a dairy-free option)
¾ cup granulated sugar (I sometimes use half Brown Sugar for extra moisture and flavor)
1 large egg, at room temperature
1 teaspoon vanilla extract
For the Optional Swirl:
½ cup packed brown sugar
2 tablespoons all-purpose flour
1 teaspoon ground cinnamon
2 tablespoons unsalted butter, softened (or melted)
For the Optional Simple Glaze:
½ cup powdered sugar
1-2 tablespoons milk (or almond milk for creaminess!)
½ teaspoon vanilla extract
Step-by-Step Instructions
Step 1: Preheat & Prep Pan
First things first, let’s get your oven preheating to 350°F (175°C). This gives it plenty of time to reach the right temperature. While that’s happening, grab a standard 9×5 inch loaf pan. I like to grease it really well with butter or cooking spray, and then lightly flour it. You can also line it with parchment paper, leaving a little overhang on the sides – this makes it super easy to lift the finished banana bread right out. Don’t skip this prep step; a stuck loaf is the saddest thing!
Step 2: Mix Dry Ingredients
In a medium-sized bowl, whisk together your flour, baking soda, cinnamon, and salt. Whisking them together ensures everything is evenly distributed. This is a crucial step to make sure your leavening agent (the baking soda) works its magic evenly, giving you a nice, even rise without any dense spots. It should look like a pale, fragrant mixture. Set this bowl aside for now.
Step 3: Mix Wet Ingredients
In a larger bowl, add your mashed ripe bananas. Give them a good mash with a fork or a potato masher until they’re mostly smooth with just a few small lumps. Then, pour in your melted butter (or coconut oil), sugar, egg, and vanilla extract. Stir everything together until it’s well combined and smooth. It should have a lovely, sweet, banana-y scent already!
Step 4: Combine
Now, it’s time to bring the wet and dry ingredients together. Pour the dry ingredients into the bowl with the wet ingredients. Using a spatula or a wooden spoon, gently fold them together until just combined. It’s *really* important not to overmix here. You want to stop as soon as you don’t see any more dry streaks of flour. A few small lumps are perfectly fine, and honestly, they can make for a more tender crumb. Overmixing develops the gluten in the flour, which can make your banana bread tough.
Step 5: Prepare Filling
If you’re making the optional swirl, this is how you do it. In a small bowl, combine the brown sugar, flour, and cinnamon for the filling. Add the softened or melted butter and mix it with a fork until it forms a crumbly paste. This is so simple but adds such a lovely flavor and texture throughout the bread!
Step 6: Layer & Swirl
Pour about half of your banana bread batter into the prepared loaf pan and spread it out evenly. Sprinkle about half of your cinnamon-sugar filling mixture over the top. Then, pour the remaining batter over the filling and gently spread it out. Sprinkle the rest of the filling on top. Now for the fun part: take a butter knife or a skewer and gently swirl it through the batter to create lovely marble patterns. Don’t overdo it; just a few passes will do the trick to distribute the flavor!
Step 7: Bake
Pop that beautiful loaf into your preheated oven. Bake for 50-65 minutes. The exact time can vary depending on your oven, so start checking around the 50-minute mark. Your banana bread is done when it’s golden brown on top, and a wooden skewer or toothpick inserted into the center comes out clean (or with a few moist crumbs attached, but no wet batter). If the top is browning too quickly, you can loosely tent it with foil for the remainder of the baking time.
Step 8: Cool & Glaze
Once baked, carefully remove the loaf pan from the oven. Let it cool in the pan for about 10-15 minutes. This allows it to firm up a bit before you try to remove it. Then, gently invert the pan onto a wire rack to release the bread, or lift it out using the parchment paper. Let it cool completely on the wire rack before glazing, or if you’re impatient like me, let it cool for at least 30 minutes before slicing.
For the glaze: whisk together the powdered sugar, milk (start with 1 tablespoon and add more as needed for your desired consistency), and vanilla extract until smooth and drizzle-able. Drizzle this over the cooled banana bread. I like it when it’s thick enough to coat nicely but still a little runny!
Step 9: Slice & Serve
Once the glaze has set a bit (or if you skipped the glaze), it’s time to slice! Use a serrated knife for the cleanest cuts, especially if you have a glaze on top. I usually serve it slightly warm or at room temperature. It’s heavenly on its own, but even better with a cup of coffee or tea. Enjoy every delicious bite!
What to Serve It With
This banana bread recipe is so versatile, it fits into just about any meal or occasion. For a simple, delightful breakfast, I love to have a thick slice with a steaming mug of coffee. The warmth of the coffee and the sweetness of the bread are just perfect to start the day. Sometimes, I’ll toast a slice lightly and spread a little bit of butter on it – pure comfort! It’s also fantastic as part of a more elaborate brunch spread. Imagine it alongside some fresh fruit salad, scrambled eggs, and crispy bacon. It adds a touch of sweetness and a homemade feel that everyone appreciates.
As a dessert, it’s surprisingly elegant, especially with that simple glaze on top. I often serve it with a scoop of vanilla ice cream or a dollop of whipped cream for a more decadent treat. It’s also fantastic on its own after dinner, especially when you’re craving something sweet but don’t want to go through the trouble of baking a full cake. And, of course, for those cozy snack times, it’s an absolute winner. I’ll grab a slice with a glass of milk while I’m curled up with a good book or watching a movie. My family also loves it as an after-school treat with a cold glass of milk. Honestly, the possibilities are endless, and it always brings smiles to faces!
Top Tips for Perfecting Your Banana Bread
I’ve learned a few things over the years of making this banana bread, and I’m happy to share my secrets to ensure yours turns out perfectly every single time. First, about the bananas: use the ripest bananas you can find. I’m talking dark brown spots, even black peels – those are the ones that are sweetest and easiest to mash, giving you the most banana flavor and moisture. Don’t be tempted to use green or yellow bananas; they just won’t provide the same depth of flavor or texture.
When it comes to mixing, remember my earlier advice: do NOT overmix! This is probably the most common mistake people make with quick breads and muffins. Mix the wet and dry ingredients until they *just* come together. A few small lumps are actually a good thing; they mean you haven’t overdeveloped the gluten, which leads to a tender crumb. For the swirl, don’t overdo it. A few gentle passes with a knife are all you need to create beautiful marbling. Too much swirling can incorporate the filling into the batter too much, and you lose that distinct swirl effect.
Ingredient swaps are also something I experiment with. If you don’t have regular milk for the glaze, almond milk or even a bit of orange juice can add a nice flavor twist. I’ve also successfully used applesauce in place of some of the butter for a slightly healthier version, though it does change the texture a bit, making it even more moist. For baking, always know your oven. If you find your loaves tend to brown too quickly on top, don’t be afraid to loosely tent them with aluminum foil for the last 15-20 minutes of baking. And for doneness, always rely on the skewer test – it’s the most reliable way to tell if your banana bread is cooked through without being overbaked.
Finally, for the glaze consistency, it’s all about adjusting the liquid. Start with the minimum amount of milk and add more, a teaspoon at a time, until you reach a consistency that’s thick enough to coat but still easy to drizzle. If it gets too thin, just whisk in a little more powdered sugar. These little tips, learned through trial and error, are what I believe make this banana bread recipe truly exceptional and consistently delicious.
Storing and Reheating Tips
Once your delicious banana bread is baked and cooled (or mostly cooled, if you can’t resist!), you’ll want to know how to store it to keep it fresh and moist. For short-term storage, keeping it at room temperature is perfectly fine for up to 2-3 days. Just wrap it tightly in plastic wrap or place it in an airtight container. This prevents it from drying out. The scent will still be wonderful, but try to resist temptation and let it sit for at least a few hours for the flavors to meld even more.
If you need to store it for longer, the refrigerator is your friend. Wrapped well in plastic wrap and then placed in an airtight container or a resealable bag, it can last for up to a week in the fridge. The texture might firm up a bit more in the fridge, so reheating is often a good idea. To reheat, you can pop a slice in the toaster oven for a few minutes until warmed through, or microwave it for about 15-20 seconds. It’ll bring back that lovely soft, moist texture.
For long-term storage, freezing is the best option. You can freeze the entire loaf or individual slices. Make sure it’s completely cool first. Wrap it tightly in plastic wrap, then in aluminum foil, and then place it in a freezer-safe bag or container. It should stay good in the freezer for up to 3 months. To thaw, simply unwrap it and let it come to room temperature, or reheat as mentioned above. If you’ve glazed your banana bread, it’s usually best to add the glaze *after* it has been thawed and reheated, as the glaze can sometimes become sticky or wet when frozen and thawed. Honestly, though, even frozen and reheated, this banana bread is still a treat!
Frequently Asked Questions
Final Thoughts
So there you have it – my go-to Banana Bread Recipe! It’s more than just a recipe; it’s a little bit of happiness baked into a loaf. I truly believe this recipe captures everything wonderful about homemade banana bread: that incredible moistness, the perfect balance of sweet and spice, and that undeniable comfort factor. It’s the kind of bake that makes your kitchen feel like home and always brings a smile to the faces of whoever gets to taste it.
If you loved this banana bread, I think you might also enjoy my recipe for Moist Chocolate Chip Muffins or perhaps my Easy Apple Crumble, both of which share that same spirit of simple, delicious, homemade goodness. Don’t be shy about trying out your own variations either! Add nuts, chocolate chips, or a swirl of your favorite jam. I can’t wait to hear how yours turns out, and I’d absolutely love for you to share your own tips and tricks in the comments below. Happy baking!
Moist Banana Bread
Ingredients
Wet Ingredients
- 3 large ripe bananas mashed
- 0.5 cup unsalted butter melted
- 0.75 cup granulated sugar
- 2 large eggs lightly beaten
- 1 teaspoon vanilla extract
Dry Ingredients
- 1.5 cups all-purpose flour
- 1 teaspoon baking soda
- 0.5 teaspoon salt
Instructions
Preparation Steps
- Preheat your oven to 350°F (175°C). Grease and flour a 9x5 inch loaf pan.
- In a large bowl, mash the ripe bananas with a fork until smooth.3 large ripe bananas
- Stir in the melted butter and granulated sugar until well combined.3 large ripe bananas
- Beat in the eggs one at a time, then stir in the vanilla extract.3 large ripe bananas
- In a separate medium bowl, whisk together the flour, baking soda, and salt.3 large ripe bananas
- Gradually add the dry ingredients to the wet ingredients, mixing until just combined. Do not overmix.
- Pour the batter into the prepared loaf pan and spread evenly.
- Bake for 50-60 minutes, or until a wooden skewer inserted into the center comes out clean.
- Let the banana bread cool in the pan for 10-15 minutes before transferring it to a wire rack to cool completely.