There’s this magical moment when you walk into the kitchen, and the scent of warm cherries mixed with a hint of tart cranberry just wraps around you like a cozy blanket. That’s exactly what happens when I bake this cherry cranberry pie. It’s been a family favorite since I was a kid, and honestly, the aroma alone has pulled everyone away from their screens more than once. It’s like a comforting hug but in pie form—sweet, tangy, and just the right amount of juicy. To me, it’s the perfect twist on a traditional cherry pie, adding a zingy cranberry pop that keeps things interesting without stealing the show. If you’ve ever loved a berry pie but wanted something with a little extra zing, trust me, this cherry cranberry pie will quickly become your go-to.
What is a cherry cranberry pie?
Think of cherry cranberry pie as the delicious love child of two classic fruits — sweet, luscious cherries and tart, vibrant cranberries — joined together in a buttery, flaky crust. It’s essentially a fruit pie but with a little extra personality thanks to the cranberries that lend a pleasantly sharp contrast to the cherry’s mellow sweetness. This pie is inspired by traditional American fruit pies, but the cranberry adds a fresh twist, making it especially wonderful during colder months when cranberries are at their best. If you’re picturing a rustic, jewel-toned filling bubbling under a golden crust, you’ve got it. It’s approachable, comforting, and honestly, one of those desserts that’s fun to make because the colors alone feel festive and welcoming.
Why you’ll love this recipe?
What I love most about this cherry cranberry pie is the perfect dance of flavors — the cherries bring that soft, familiar sweetness, while the cranberries cut through with just enough tartness to keep your taste buds awake. It’s like a little flavor party in every forkful. Plus, this recipe is wonderfully forgiving. Whether you’re a pie pro or baking on a whim, it’s pretty hard to mess up, which is a lifesaver on busier days or when you need a quick crowd-pleaser. The ingredients aren’t fancy or expensive — I always keep jars of frozen cherries and cranberries handy during the season, so it feels wallet-friendly and homey. And if you ever want to shake it up, this pie is fantastic warm from the oven or even chilled the next day for a more set filling. I sometimes add a sprinkle of cinnamon or almond extract for a cozy twist, especially when I’m craving something a little different.
It’s also super versatile — great for casual family dinners but elegant enough for holiday spreads. It reminds me a bit of my go-to blueberry or mixed berry pies but with a bit more punch and sophistication. It’s just the recipe that sits on the edge of tradition but adds a surprising, fresh twist. If you’re a fan of berry pies, or maybe you like a little tartness in your dessert, this recipe is a keeper.
How do I make a cranberry pie?
Quick Overview
Making this cherry cranberry pie couldn’t be simpler — it’s pretty much about mixing the filling, whipping up a quick crust, and letting the oven work its magic. What I really appreciate is how fast it comes together once you have your ingredients ready; the only tricky part for some is perfecting that golden crust, but I promise with a few easy tweaks it gets easier every time. The fun part is layering the fruit and watching them bubble and thicken as they bake, releasing all those beautiful juices. I always say, grab your favorite pie dish, prep your filling, get cozy while it bakes, and then enjoy the wonderful smells filling the house. It’s a true crowd-pleaser that also feels like a little weekend treat or even a last-minute dessert hero.
Ingredients
For the Pie Crust: What is the recipe?
- 2 1/2 cups all-purpose flour – I usually go for a good-quality brand to get the flakiest crust
- 1 teaspoon salt
- 1 teaspoon sugar – just a little to balance flavor
- 1 cup (2 sticks) unsalted butter, chilled and cut into cubes – cold butter is non-negotiable for flaky layers
- 6-8 tablespoons ice water – add just enough to bring dough together without being sticky
For the Filling:
- 2 cups fresh or frozen pitted cherries – tart or sweet cherries both work, but I prefer Bing for their balance
- 1 1/2 cups fresh or frozen cranberries – if frozen, no need to thaw
- 3/4 cup granulated sugar, adjust to taste depending on how tart your berries are
- 2 tablespoons cornstarch – for that perfect thick filling without sogginess
- Zest of 1 lemon – adds that fresh citrus burst that really brightens this pie up
- 1 teaspoon vanilla extract – just a drop to deepen flavor
- Pinch of salt
For the Glaze:
- 1 cup powdered sugar
- 2-3 tablespoons milk or heavy cream – go for cream if you want it richer
- 1/2 teaspoon vanilla extract or lemon juice for a zingy finish
Step-by-Step Instructions
Step 1: Preheat & Prep Pan
First things first, preheat your oven to 375°F (190°C). While it’s warming up, grab your favorite 9-inch pie dish and give it a quick buttering or spray it lightly with non-stick spray. I usually use a glass dish because it lets me watch the crust’s color through baking, but metal works just as well — just keep an eye on your pie towards the end to avoid over-browning.
Step 2: Mix Dry Ingredients
In a large bowl, sift together the flour, sugar, and salt. Sifting helps avoid lumps and introduces a bit of air, which is lovely for a light crust texture. I use my fingers or a pastry cutter to add the cold butter cubes, blending just until the mixture looks like coarse crumbs. You still want some pea-sized butter pieces — those pockets are what create that dreamy flakiness.
Step 3: Mix Wet Ingredients
Slowly drizzle ice water over the flour and butter mixture, stirring gently with a fork. The goal here is just to bring the dough together without overworking it — you’ll see small clumps starting to form and then want to form a rough ball with your hands. Wrap the dough in plastic and pop it in the fridge for about 30 minutes while you prepare the filling.
Step 4: Combine
Once chilled, divide the dough into two discs so it’s easier to roll out evenly. I always flour my surface and rolling pin generously to prevent sticking, rolling from the center outward for an even thickness. If the dough cracks at the edges, just patch it gently with your fingers — it’ll bake just fine.
Step 5: Prepare Filling
In a large bowl, toss the cherries and cranberries with sugar, cornstarch, lemon zest, vanilla, and a pinch of salt. The cornstarch helps thicken the fruit juices as they bake, so if you skip it, expect a runnier pie. If you want to test sweetness, taste your berry mix — it should be pleasantly sweet but tangy enough to give a good balance in the finished pie.
Step 6: Layer & Swirl
Line your pie dish with one disc of dough, gently pressing it into the bottom and sides. Pour the berry filling in and spread into an even layer. Place the second dough disc over the top, trimming any excess and pinching the edges to seal. I like to get a bit fancy by cutting slits or weaving strips for a lattice — it lets steam escape and looks beautiful when the juices bubble through. Brush the top crust with a little milk or beaten egg for a glossy finish.
Step 7: Bake
Pop the pie in the oven for about 50-60 minutes, checking after 40 minutes to cover the edges with foil if they’re browning too fast. The pie’s ready when the crust is a deep golden brown and you see bubbling juices peek through the vents or lattice. If your oven runs hot, check around 45 minutes to make sure the crust doesn’t burn — every oven is a little different.
Step 8: Cool & Glaze
Once out of the oven, let the pie cool for at least two hours so the filling sets up nicely. This part is key — cutting too soon means runny filling, and nobody wants that mess! After cooling, whisk together your powdered sugar, milk, and vanilla (or lemon) to a smooth drizzleable glaze. I drizzle it over the cooled pie, letting little rivulets streak across the top for a simple but pretty look.
Step 9: Slice & Serve
Use a sharp serrated knife and gently saw back and forth to avoid squashing the pie. Serve it slightly warm or at room temperature — either way, it’s gorgeous. For an extra indulgence, add a scoop of vanilla ice cream or lightly whipped cream on the side. Watching the tart cranberries and sweet cherries burst with each bite never gets old.
What to Serve It With
For Breakfast: There’s something special about enjoying a warm slice with your morning coffee — just enough sweetness and bright berry flavor to brighten your day. Pair it with a cup of strong black coffee or a creamy latte, and you’ve got a little weekend ritual that feels indulgent but not over the top.
For Brunch: Serve slices alongside a fresh fruit salad and perhaps some lightly whipped ricotta or mascarpone with honey drizzled on top. Sparkling water with lemon or a light mimosa balances the sweet-tart flavors beautifully. This pie acts like a beautiful centerpiece that your guests will admire before diving in.
As Dessert: This pie shines after a cozy dinner, especially when paired with vanilla bean ice cream or a simple dollop of whipped cream with fresh mint leaves. A sprinkle of toasted almonds or a drizzle of caramel sauce takes it to the next level if you’re feeling fancy. It’s the kind of dessert that sparks happy “mmm”s all around.
For Cozy Snacks: When a mid-afternoon craving hits, a small slice with a cup of hot tea or cider makes a perfect pick-me-up. My kids actually ask for seconds when I serve it this way — it’s that irresistible. For at-home movie nights, this pie just feels like a hug from the inside.
Top Tips for Perfecting Your Cherry Cranberry Pie
Fruit Prep: If using fresh berries, make sure they’re well drained to avoid watered-down filling. Frozen works well if you toss them straight in, but keep the sugaring consistent since frozen berries can be less sweet. I learned the hard way that squeezing out excess juice is a no-go — it robs the pie of that full fruity flavor.
Mixing Dough: Keep ingredients cold! I can’t stress this enough — warm butter turns your dough gummy. Also, don’t overmix once you add water; patching small tears after rolling is better than fiddling with sticky dough.
Swirl & Crust Design: For a stunning look, I often do a lattice with alternating strips of dough and brush them twice with milk, once before and once midway through baking. If you want to get artsy, sprinkle a tiny bit of coarse sugar on top to catch the light and add crunch.
Ingredient Swaps: If you want to play around, I’ve swapped half the all-purpose flour for oat flour for a nuttier crust — it still flakes beautifully. Coconut sugar works as a substitute for white sugar in the filling, but it gives a deeper, almost caramel note, so adjust based on your preference.
Baking: Try placing your pie on a lower oven rack to avoid burning on top while letting the bottom crust crisp. If your oven is hot or uneven, a pie shield or foil around edges halfway through baking is a lifesaver.
Glaze Variations: Lemon juice in the glaze keeps it bright and fresh, but I sometimes use almond extract or orange zest for seasonal twists. The glaze consistency should be just thick enough to drizzle — too runny and it slides off, too thick and it’s clumpy.
I learned to trust my eyes on crust color rather than time. A perfectly golden crust really makes or breaks this pie!
Storing and Reheating Tips
Room Temperature: You can safely keep your cherry cranberry pie covered loosely with foil or a pie dome at room temp for up to two days. I do this when serving it over a short weekend — it stays fresh and maintains that lovely texture.
Refrigerator Storage: For longer freshness, cover the pie tightly with plastic wrap or store in an airtight container in the fridge for up to five days. The filling firms up nicely, which makes for cleaner slices when reheating.
Freezer Instructions: You can freeze the baked pie whole or cut into slices, wrapped tightly in plastic wrap and then aluminum foil for up to two months. To thaw, move to the fridge overnight, then warm gently in the oven at 300°F (150°C) for about 15-20 minutes to refresh the crust.
Glaze Timing Advice: I recommend glazing after the pie has fully cooled — adding glaze before storing helps it keep its smooth texture. If freezing, wait to glaze until just before serving for the best look and taste.
Frequently Asked Questions
Final Thoughts
This cherry cranberry pie has been one of those recipes I keep coming back to, especially when I want something that feels homemade but has a bit of a festive twist. It’s approachable, looks stunning whether you go for a simple solid crust or an artistic lattice, and pleases every age group around our table. The balance of sweet cherries and tart cranberries is just something that makes you smile with each bite. If you love this recipe, try adding a touch of almond or swapping in mixed berries for fun variations — it’s all part of the joy of baking at home. I can’t wait to hear if this pie becomes your family’s next favorite! Don’t forget to drop a comment or share your own twist on this classic. Happy baking!
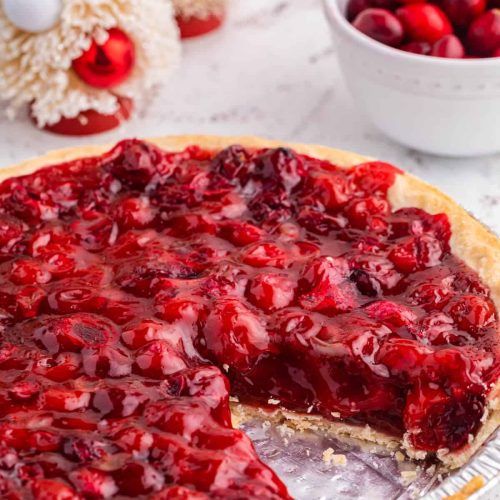
cherry cranberry pie
Ingredients
Main Ingredients
- 0.75 cup granulated sugar
- 2 tbsp cornstarch
- 1 can cherry pie filling 21oz (540ml) can
- 2 cup frozen cranberries thawed
- 1 shell 9-inch deep dish pie crust unbaked
Instructions
Preparation Steps
- Preheat oven to 375°F.
- In a large bowl, stir together the granulated sugar, cornstarch, cherry pie filling, and thawed cranberries until evenly combined. Pour the mixture into the unbaked pie crust.
- Bake the pie at 375°F for 30 minutes. Then reduce the oven temperature to 350°F and bake for an additional 10 minutes. Remove from oven and allow to cool completely before serving.