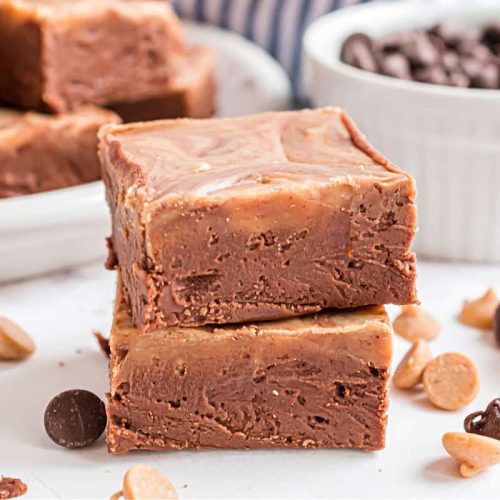
There’s something about the smell of chocolate melting alongside peanut butter that instantly takes me back to the cozy afternoons at my grandma’s house. This chocolate peanut butter fudge has been a staple in our family for years — it’s the kind of treat that disappears so fast I barely get a chance to snap a photo. What sets this fudge apart isn’t just the rich, creamy taste; it’s how unbelievably easy it is to whip up, even on those days when I’m juggling a million things. Think of it like the sweet cousin to classic peanut butter cookies but with a silky, melt-in-your-mouth texture that’ll make you swoon. If you love that perfect combo of sweet and salty in a no-fuss treat, this fudge will be your new go-to.
What is chocolate peanut butter fudge?
Think of chocolate peanut butter fudge as the ultimate comfort dessert — a luscious block of smooth chocolate paired with the unmistakable, nutty warmth of peanut butter. It’s essentially a rich, creamy candy that sets firmly but melts beautifully on your tongue, blending those two beloved flavors into every bite. The classic fudge you know usually comes from heating sugar and cream until thickened, but here we take a shortcut with simple pantry staples like sweetened condensed milk and melted chocolate, making it approachable whether you’re a seasoned baker or just dabbling. The peanut butter adds that irresistible flair, creamy with a slight saltiness that balances the sweet chocolate perfectly. For me, it’s less a “dessert” and more an embrace in a square — simple, nostalgic, and utterly snackable.
Why you’ll love this recipe?
What I love most about this chocolate peanut butter fudge is how it nails the balance between indulgence and ease. The flavor hits are spot-on: silky cocoa-rich chocolate mixed with creamy, slightly salty peanut butter that just feels like a hug. And if you think fudge is complicated, trust me, this one’s a lifesaver. It comes together in less than 15 minutes with just a few simple ingredients from your pantry. Bonus: it’s way more cost-efficient than buying fancy chocolates or candies, so it’s perfect for those “I want something sweet” moments without breaking the bank.
Versatility is another huge plus here. You can slice it into bite-sized pieces for your kid’s lunchbox, or plate it as a party treat — it always disappears fast! I’ve even experimented by adding a sprinkle of flaky sea salt on top for a little extra punch. Compared to something like peanut butter cups, this fudge feels more homemade and personal, and unlike brownies, it doesn’t require baking. Honestly, it’s my favorite whenever I need a quick fix that still feels special — whether for last-minute guests or just because.
How do I make chocolate peanut butter fudge?
Quick Overview
This chocolate peanut butter fudge recipe is all about mixing a few simple ingredients, layering flavors, and letting it set to get that perfect creamy, dense texture you crave. The trick really lies in combining melted chocolate, peanut butter, and sweetened condensed milk, then swirling them before chilling. It’s a no-bake delight that feels fancy but couldn’t be easier. You’ll love how this method keeps the fudge smooth, with a lovely marbled look that’s almost too pretty to eat — almost.
Ingredients
For the Main Batter:
- 2 cups semi-sweet chocolate chips (I always opt for good-quality brands for deeper flavor)
- 1 (14-ounce) can sweetened condensed milk (make sure it’s full-fat for that creamy consistency)
- 1 tablespoon unsalted butter (adds richness; salted butter can work but watch salt accordingly)
For the Peanut Butter Filling:
- 1 cup creamy peanut butter (natural or classic, but creamy blends better)
- 1 cup powdered sugar (to sweeten and thicken the peanut butter layer; sifted for smoothness)
- 1/2 teaspoon vanilla extract (optional but adds a lovely warmth)
For the Glaze:
- 1/2 cup semi-sweet chocolate chips (for a smooth topping)
- 1 teaspoon coconut oil or butter (helps the glaze set with a shiny finish)
- Optional: sprinkle of flaky sea salt or chopped peanuts for topping
Step-by-Step Instructions
Step 1: Preheat & Prep Pan
Start by lining an 8×8-inch square pan with parchment paper, allowing some overhang to lift the fudge out easily later. No oven needed here — just prep your pan so the fudge cools and sets perfectly without sticking. I usually place the pan near my countertop so everything’s handy once the fudge mix is ready to spread.
Step 2: Mix Dry Ingredients
Combine the powdered sugar with the peanut butter in a medium bowl. It’s tempting to skip sifting the sugar, but trust me, it’s worth it — the batter stays smoother without any lumps. Mix gently until the sugar is mostly dissolved into a thick, spreadable paste. Adding vanilla here is my secret to lifting those peanut butter notes to the next level.
Step 3: Mix Wet Ingredients
In a microwave-safe bowl, combine the chocolate chips, sweetened condensed milk, and butter. Heat in 30-second bursts, stirring between each until fully melted and glossy. The visual cue I watch for is a shiny, velvety chocolate mixture—if it looks grainy, keep stirring gently off heat to smooth out before moving on.
Step 4: Combine
Once the chocolate mix is ready, pour about half into the prepared pan and spread evenly. The texture should be like thick, fudgy syrup. Make sure your pan surface is level to keep things neat. This step sets the foundation for your fudge’s classic, rich layer.
Step 5: Prepare Filling
Spoon dollops of your peanut butter mixture on top of the chocolate layer. Try to distribute it evenly, but don’t worry about perfect spreading — this is where the rustic charm comes in!
Step 6: Layer & Swirl
Pour the remaining melted chocolate over the peanut butter dollops. Then grab a butter knife or skewer to swirl both layers together gently — circular motions or figure eights work well. The goal is a marbled look, so take your time and have fun with the pattern. It’s such a satisfying step because you already know how good this will taste.
Step 7: Bake
No baking here! Simply pop the pan into the fridge and chill for at least 2 hours (overnight if you can wait that long). This chilling allows the fudge to firm up beautifully so you can slice it without crumbling. I once tried cutting it early—lesson learned, it totally fell apart!
Step 8: Cool & Glaze
Once firm, melt the remaining chocolate chips with coconut oil or butter for a silky glaze. Pour it over the chilled fudge and spread thinly with an offset spatula for an elegant, shiny finish. If you want a touch of salty crunch, sprinkle flaky sea salt or chopped peanuts right away. Then pop it back in the fridge for 15 minutes until the glaze sets.
Step 9: Slice & Serve
Use the parchment overhang to lift the fudge from the pan, then place it on a cutting board. For clean cuts, warm your knife by running it under hot water, drying thoroughly before slicing. These little blocks of chocolate peanut butter heaven are best served slightly chilled but will soften quickly at room temp for ultimate melt-in-your-mouth goodness.
What to Serve It With
For Breakfast: Pair a small piece of this fudge with your morning coffee or latte. I love it alongside a creamy cappuccino — the bitterness of the coffee perfectly balances the fudge’s sweetness. It’s a little indulgence that feels luxurious first thing in the morning.
For Brunch: Serve fudge bites alongside fresh fruit and cheese platters. A glass of sparkling rosé or a fruity iced tea complements the richness nicely and makes for a cute, casual spread when friends come by unexpectedly.
As Dessert: After dinner, place a few fudge squares with a scoop of vanilla bean ice cream and fresh raspberries. The tartness of the berries cuts through the richness, and the warm texture combo is unforgettable. Great way to impress guests without sweating too much in the kitchen.
For Cozy Snacks: This fudge is pure comfort food. Grab a piece with a cold glass of milk or steam up some hot cocoa on chilly nights. At my house, it’s come to represent those moments when you just want to wrap yourself in a blanket and relax with a dessert that feels like a little celebration.
Top Tips for Perfecting Your Chocolate Peanut Butter Fudge
Chocolate Quality: Investing in good-quality chocolate chips really changes the game here — it melts better and tastes richer. I always use semi-sweet for balance but adding a touch of dark chocolate chips gave this batch a grown-up twist I adored.
Peanut Butter Consistency: Creamy peanut butter blends more smoothly than natural versions, which can sometimes be oily. If you swear by natural peanut butter, give it a good stir beforehand and maybe chill it for a bit to firm up the texture so it spreads nicely without sinking.
Swirling Technique: When swirling, don’t overdo it — you want visible streaks and layers, not a uniform mix. Move your knife slowly so the marbling remains bold and pretty. If you rush, you’ll lose that gorgeous look.
Sugar in Peanut Butter Layer: Powdered sugar is key to locking the peanut butter into a fudge consistency. I tried brown sugar once, but it gave a gritty feel — skip that unless you want something more rustic. And don’t skip sifting the sugar; lumps are a fudge mood-killer.
Chilling Is Crucial: Resist the urge to skip chilling time; fudge needs that slow firm-up to slice well. I’ve learned the hard way that impatient slicing leads to crumbles. If you’re in a hurry, freeze it for 30 minutes but don’t skip the fridge phase afterward for best texture.
Glaze Variations: For a fun twist, mix some instant espresso powder or cayenne into your glaze. The slight bitterness or heat accentuates the chocolate-peanut butter combo beautifully. Also, coconut oil helps keep it glossy — without it, the glaze can dull a bit.
Storing and Reheating Tips
Room Temperature: Store fudge in an airtight container, ideally in a cool, dry place. It’ll keep fresh and soft for up to 3 days. If your kitchen’s warm, the fudge may get softer, so watch out and refrigerate sooner if needed.
Refrigerator Storage: Wrapped tightly in wax or parchment paper and placed in an airtight container, fudge lasts up to 2 weeks refrigerated. This actually firms it up nicely, especially on warm days. Take it out 15 minutes before serving to soften slightly.
Freezer Instructions: To freeze fudge, wrap each piece individually in plastic wrap then place in a freezer-safe bag or container. It keeps well for up to 3 months. Thaw in the fridge overnight and bring to room temperature before unwrapping to avoid condensation sogginess.
Glaze Timing Advice: I recommend glazing only after the fudge layer is completely set and just before serving or storing. If you glaze too early and refrigerate for long, the glaze can develop white streaks or lose shine.
Frequently Asked Questions
Final Thoughts
This chocolate peanut butter fudge has been one of those recipes I keep returning to, not just because it tastes incredible but because it’s tied to so many happy memories — from winter afternoons curled up with family to last-minute treats when friends popped in. The balance of rich chocolate with creamy peanut butter is pure magic, and the no-bake method means you get all the indulgence with zero stress. I hope this recipe becomes a favorite in your kitchen too. Don’t hesitate to experiment with little tweaks and share your spin in the comments — I love hearing which variations bring the biggest smile! Happy fudge-making and can’t wait to hear how yours turns out!
chocolate peanut butter fudge
Ingredients
Main Ingredients
- 4 cups granulated sugar
- 1 cup milk
- 1 cup unsalted butter
- 1 teaspoon vanilla extract
- 25 pieces regular sized marshmallows
- 12 ounces milk chocolate morsels
- 12 ounces semi sweet chocolate morsels
- 2 ounces baking chocolate (unsweetened)
- 14 ounces sweetened condensed milk one 14 ounce can
- 2 tablespoons unsalted butter
- 10 ounces peanut butter morsels one 10 ounce bag
Instructions
Preparation Steps
- In a large mixing bowl, add marshmallows, milk chocolate morsels, semi sweet chocolate morsels, and baking chocolate. Set aside.
- In a large pot over medium-high heat, combine granulated sugar, milk, and 1 cup butter. Stir constantly and bring to a boil. Boil for 2 minutes. Remove from heat and stir in vanilla extract. Pour hot mixture over marshmallows and chocolates.
- Using an electric mixer with a whisk attachment, beat the mixture until smooth and melted, which may take several minutes.
- Pour the chocolate mixture into a parchment paper-lined 15x10x1 inch baking sheet.
- In a small saucepan over medium heat, warm the sweetened condensed milk and 2 tablespoons butter until butter is melted. Add peanut butter morsels and whisk until smooth. Remove from heat.
- Pour the peanut butter mixture over the chocolate layer and swirl top with a knife. Allow the fudge to set for 2 hours. Cut into pieces and enjoy!