Oh, how I love this time of year! The leaves are starting to turn, there’s a crispness in the air, and all I want to do is curl up with a good book and something utterly delicious. And when that craving hits, there’s one thing that always, *always* comes to mind: my chocolate caramel cake roll. It’s not just a dessert; it’s pure comfort in every single bite. Honestly, if you’ve ever had a craving for something decadent but felt too intimidated to bake a whole layer cake, this is your answer. It’s like the sophisticated, yet surprisingly easy, cousin to a classic Chocolate Cake, with a surprise swirl of gooey caramel that just makes everything sing. My kids beg for this regularly, and when friends pop over unexpectedly, this chocolate caramel cake roll is my go-to lifesaver. It looks fancy, tastes incredible, and is deceptively simple to whip up. It’s truly one of those recipes that feels like a hug.
What is a chocolate caramel cake roll?
So, what exactly is this magical creation? Think of it as a light and airy chocolate sponge cake that’s baked into a thin sheet, then spread with a luscious caramel filling and rolled up into a beautiful spiral. It’s not your heavy, dense cake; this one is airy and delicate, almost like a cloud. The “roll” part might sound a little intimidating, but trust me, it’s simpler than it looks! The beauty of a cake roll is that it’s all about the texture and the surprise inside. It’s essentially a really delicious way to enjoy chocolate and caramel together in a form that’s perfect for slicing and sharing (or not sharing, I won’t judge!). It’s a bit like a gourmet Swiss roll, but with the irresistible combination of rich chocolate and sweet, buttery caramel. It’s a showstopper without the fuss.
Why you’ll love this recipe?
There are so many reasons why this chocolate caramel cake roll has become a staple in my kitchen, and I just know you’re going to adore it too. First off, the flavor is just out of this world. The chocolate cake itself is moist and deeply chocolatey, not too sweet, which is perfect because then the caramel filling gets to shine. And that filling? Oh my goodness. It’s this rich, buttery, slightly salty caramel that just oozes out when you slice into it. It’s the perfect balance of sweet and rich without being cloying.
Then there’s the simplicity factor. I know some folks get a little nervous about rolling cakes, but honestly, this recipe is designed to be forgiving. The cake is super flexible, and even if your roll isn’t perfectly tight, it still looks absolutely gorgeous once it’s glazed. It’s a recipe that you can whip up on a weeknight if you’ve got a little extra time, or it’s impressive enough for a special occasion. Plus, the ingredients are all pretty standard pantry staples, so you likely won’t need to make a special trip to the store. It’s also incredibly cost-effective, especially when you consider how many servings you get from one cake. It’s way more budget-friendly than buying a fancy dessert from a bakery.
And talk about versatile! While I’m sharing my favorite chocolate caramel version today, you can easily adapt the filling or even the cake base for different flavor profiles. It’s a recipe that really grows with you. What I love most about this chocolate caramel cake roll is that it feels indulgent and celebratory, but it’s genuinely so approachable for home bakers. It’s a recipe that brings smiles to faces, and that’s what baking is all about, right?
How do I make a chocolate caramel cake roll?
Quick Overview
The process for this delightful chocolate caramel cake roll is straightforward: you’ll mix up a quick chocolate cake batter, bake it in a jelly roll pan until it’s just set, and then immediately roll it up while it’s still warm to set its shape. While it cools, you’ll prepare a luscious caramel filling and a simple chocolate glaze. Once cooled, you’ll unroll the cake, spread it generously with the caramel, re-roll it (carefully this time!), and then drench it in that irresistible chocolate glaze. It’s a few steps, but each one is super manageable, and the end result is so worth it. The key is gentle handling and a little bit of patience, but the payoff is spectacular!
Ingredients
For the Main Batter:
2/3 cup all-purpose flour: I usually just use the regular kind, but if you’re feeling fancy, a good quality brand makes a difference.
1/2 cup granulated sugar: This gives the cake its sweetness.
1/4 cup unsweetened cocoa powder: Make sure it’s unsweetened! Dutch-processed cocoa powder will give you a richer, darker color and flavor if you have it.
1/2 teaspoon baking soda: This helps the cake rise and become nice and fluffy.
1/4 teaspoon salt: Balances out the sweetness and brings out the chocolate flavor.
1 large egg: At room temperature, if you can. It incorporates better.
1/2 cup milk: Whole milk makes it richer, but I’ve tested this with 2% and even almond milk, and it still turned out wonderfully creamy!
1/4 cup vegetable oil: Or any neutral-flavored oil like canola. It keeps the cake super moist.
1 teaspoon vanilla extract: Don’t skip this! It adds a lovely warmth.
1/2 cup hot water or hot brewed coffee: This is my secret ingredient for an intensely chocolatey flavor. The hot liquid blooms the cocoa powder. Coffee really amps up the chocolate, but hot water works just fine too!
For the Filling:
1 cup packed light Brown Sugar: This is crucial for that classic caramel flavor.
1/2 cup (1 stick) unsalted butter, softened: Make sure it’s softened but not melted, for easy mixing.
1/4 cup milk or heavy cream: Heavy cream will make it extra rich and fudgy.
1 teaspoon vanilla extract: Enhances the caramel notes.
Pinch of salt: To cut through the sweetness.
For the Glaze:
1/2 cup semi-sweet chocolate chips: Or chopped semi-sweet chocolate. Quality matters here!
2 tablespoons unsalted butter: Makes the glaze smooth and glossy.
1 tablespoon corn syrup (optional): For extra shine and to prevent crystallizing, though you can skip it.
Step-by-Step Instructions
Step 1: Preheat & Prep Pan
First things first, get your oven preheating to 350°F (175°C). You’ll need a 10×15 inch jelly roll pan. Now, this is important for easy removal: line your pan with parchment paper, letting it hang over the edges a bit. Then, grease the parchment paper and the sides of the pan really well. I like to use baking spray or melted butter. This prevents sticking and makes peeling the parchment off later a breeze. Make sure to get into all the corners!
Step 2: Mix Dry Ingredients
In a medium-sized bowl, whisk together the flour, granulated sugar, cocoa powder, baking soda, and salt. Give it a good whisk to make sure everything is evenly distributed and there are no clumps of cocoa. This ensures a uniform flavor and texture in your cake.
Step 3: Mix Wet Ingredients
In a separate, larger bowl, whisk together the egg, milk, vegetable oil, and vanilla extract until well combined. You want this to be smooth and homogenous.
Step 4: Combine
Pour the dry ingredients into the wet ingredients. Mix on low speed with an electric mixer (or whisk vigorously by hand) until just combined. Don’t overmix here; a few streaks of flour are okay. Now, carefully pour in the hot water or coffee. The batter will be quite thin – don’t panic! This is exactly what you want. It makes the cake super tender. Mix until just smooth. Scrape down the sides and bottom of the bowl to ensure everything is incorporated.
Step 5: Prepare Filling
While the cake is baking, let’s get the caramel filling ready. In a medium saucepan over medium heat, combine the brown sugar, butter, and milk (or cream). Stir constantly until the butter is melted and the sugar is dissolved. Bring the mixture to a gentle boil and cook, stirring often, for about 2-3 minutes, until it thickens slightly. Remove from heat and stir in the vanilla extract and a pinch of salt. Let it cool for about 15-20 minutes until it’s spreadable but still warm.
Step 6: Layer & Swirl
This is where the magic happens! Once your cake is baked and cooled slightly (still warm!), you’re going to carefully invert it onto a clean kitchen towel that you’ve dusted generously with powdered sugar. Gently peel off the parchment paper. Now, working from the short end, carefully roll up the cake along with the towel. This helps it keep its shape as it cools completely. Let it cool this way on a wire rack for at least an hour, or until completely cool.
Step 7: Bake
Pour the thin batter into your prepared jelly roll pan and spread it evenly. You want a thin, even layer. Bake for 12-15 minutes, or until the cake springs back when lightly touched. Don’t overbake, or it will crack when you roll it! A toothpick inserted into the center should come out with moist crumbs attached, not wet batter. As soon as it’s done, you’ll take it out of the oven.
Step 8: Cool & Glaze
Once the cake roll is completely cool, gently unroll it. Spread the cooled caramel filling evenly over the entire surface of the cake, leaving a small border around the edges. Now, re-roll the cake, but this time, roll it tightly without the towel. Place the seam-side down on a wire rack set over a baking sheet. For the glaze, melt the chocolate chips and butter together in a microwave-safe bowl in 30-second intervals, stirring in between, until smooth. Stir in the corn syrup if using. Drizzle or pour the glaze over the top of the rolled cake, letting it drip down the sides. Let the glaze set for about 30 minutes before slicing.
Step 9: Slice & Serve
Use a sharp knife dipped in hot water and wiped dry for clean slices. Serve immediately and enjoy the incredible layers of chocolate cake and caramel. It’s best at room temperature.
What to Serve It With
This chocolate caramel cake roll is honestly pretty perfect on its own, but I love playing around with pairings to make it even more special. For a lovely breakfast treat, a strong cup of black coffee or a creamy latte is the perfect companion. The bitterness of the coffee cuts through the sweetness of the caramel beautifully. For a more elegant brunch spread, I like to serve thin slices alongside some fresh berries – raspberries or strawberries add a lovely tartness and a pop of color. A dollop of lightly sweetened whipped cream or even a small scoop of vanilla bean ice cream wouldn’t go amiss for a more decadent brunch.
As a dessert, it’s a guaranteed crowd-pleaser. A rich espresso or a glass of milk is always a hit, especially with the kids. If you’re feeling extra fancy, a drizzle of extra caramel sauce or a sprinkle of flaky sea salt on top can elevate it even further. For those cozy, quiet moments, when you just need a little something sweet to accompany a good book or a movie, this cake roll is pure bliss. I often just have a slice with a glass of cold milk and call it a night. My family also loves it after a hearty Sunday dinner – it’s just the right amount of sweet without being overwhelming after a big meal. Honestly, it fits into any occasion, from a casual afternoon snack to a formal dessert.
Top Tips for Perfecting Your Chocolate Caramel Cake Roll
After making this chocolate caramel cake roll more times than I can count, I’ve picked up a few tricks that I think make all the difference. First, when it comes to the cake itself, don’t be afraid of that thin batter – it’s what makes the cake tender! Make sure your pan is really well-greased and lined with parchment paper; I’ve had a few sticky situations in the past where I skimped on this, and it made peeling the cake off a nightmare. Remember, a well-prepared pan is your best friend here.
For the rolling part, the key is to do it while the cake is still warm. It’s much more pliable then. If it cools too much in the pan, it’s more likely to crack. So, as soon as it’s baked, invert it onto your prepared towel and let it cool *in the roll*. This sets the shape and prevents it from cracking when you unroll it later to add the filling. Don’t rush this cooling stage!
When it comes to the caramel filling, I find that letting it cool just enough so it’s spreadable but still warm makes it easiest to work with. If it’s too hot, it’ll melt into the cake; too cold, and it’ll be too stiff to spread. Taste it as you go – you can add a tiny bit more salt if you like your caramel a little more on the salty-sweet side, which I personally love. For the glaze, melting it gently is key. Overheating chocolate can make it seize up. If it looks a little thick, you can always stir in another tiny bit of butter or a teaspoon of milk to get it to a smooth, pourable consistency.
I’ve experimented with substitutions too! If you’re out of regular milk for the batter, buttermilk works great and adds a little tang. For a richer caramel filling, definitely use heavy cream instead of milk. And if you’re not a fan of semi-sweet chocolate for the glaze, milk chocolate or even dark chocolate can be used, though you might need to adjust the sugar in the cake to balance it out. My biggest lesson learned over the years is to trust the process. It looks a little messy sometimes, but the end result is always spectacular. Don’t be afraid to get a little messy; it’s part of the fun!
Storing and Reheating Tips
This chocolate caramel cake roll is wonderful eaten fresh, but it also keeps pretty well, making it a great make-ahead dessert. For room temperature storage, I usually keep it on a cake stand, covered loosely with plastic wrap or a cake dome. It’ll stay fresh like this for about 2 days. If it’s particularly warm where you are, or if you’ve used a cream-based filling, I’d err on the side of caution and refrigerate it after the first day.
When storing in the refrigerator, I wrap it tightly in plastic wrap and then place it in an airtight container. It should stay delicious for up to 4-5 days. Just a heads-up, the cake might firm up a bit in the fridge, so I like to let it sit at room temperature for about 20-30 minutes before serving to let the caramel and cake soften up again. This makes a big difference in texture and flavor.
Freezing is also an option if you want to make it way ahead of time! I usually wrap the unfrosted cake roll (before the glaze) very, very well in plastic wrap, then again in foil. It can be frozen for up to 2 months. When you’re ready to thaw, unwrap it and let it thaw overnight in the refrigerator. Then, glaze it just before serving. If you’ve already glazed it before freezing, that’s fine too – just make sure it’s wrapped extremely well to prevent freezer burn. The key to freezing is to make sure it’s completely sealed to protect it from air and moisture.
Regarding the glaze, I always recommend adding it just before serving for the best look and taste. If you plan to store it for more than a day, it’s best to glaze it right before you plan to serve it, especially if it’s going to be refrigerated, as the glaze can sometimes get a bit streaky or dull in the fridge. But honestly, even a day-old glazed cake roll is still a treat!
Frequently Asked Questions
Final Thoughts
There you have it – my absolute favorite chocolate caramel cake roll! I truly hope you’ll give this recipe a try. It’s one of those desserts that just makes people happy, and honestly, it’s such a rewarding bake. It’s proof that you don’t need to be a professional pastry chef to create something stunning and utterly delicious in your own kitchen. The combination of the tender chocolate cake, the gooey caramel, and that luscious glaze is simply divine.
If you love this chocolate caramel cake roll, you might also enjoy my other chocolate recipes, like my fudgy brownie cookies or my decadent chocolate lava cakes – they’re all winners in my book! I can’t wait to hear how your cake roll turns out. Did you add any special touches? How did your family like it? Please leave a comment below and share your experience – I love hearing from you! Happy baking, everyone!
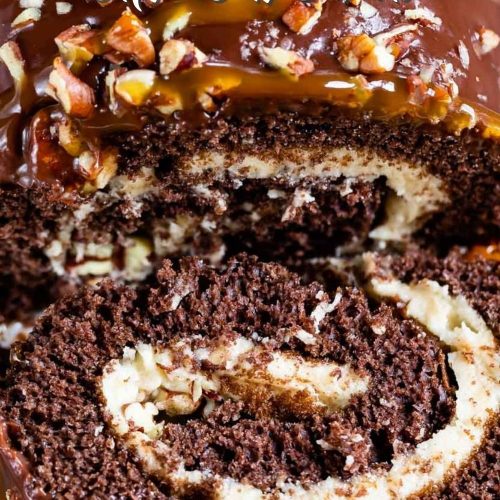
Chocolate Caramel Turtle Cake Roll
Ingredients
Chocolate Cake Roll
- 3 large eggs
- 1.75 cups Chocolate Cake Mix (Betty Crocker SuperMoist Devil's Food recommended)
- 0.333 cup water
- 2 tablespoons vegetable oil
Caramel Buttercream Filling
- 0.5 cup unsalted butter softened
- 0.25 cup caramel sauce
- 2 cups powdered sugar
- 0.5 teaspoon vanilla extract
Chocolate Ganache & Topping
- 1 cup heavy whipping cream
- 1 cup chocolate chips
- 1 cup chopped toasted pecans
- powdered sugar for dusting optional
Instructions
Baking the Cake
- Preheat oven to 350°F (175°C). Line a 15x10-inch jelly roll pan with foil and spray with baking spray containing flour.
- Beat eggs in a large bowl on high speed for about 5 minutes, until thick and pale yellow. Add cake mix, water, and oil. Beat on low speed for 30 seconds, then medium speed for 1 minute. Scrape down sides of the bowl as needed. Pour batter into the prepared pan.
- Bake for 11-14 minutes, or until the cake springs back when lightly touched. Do not overbake. Remove from oven and carefully run a knife around the edges if the foil did not cover the entire cake.
- Lay a clean kitchen towel on a flat surface and sprinkle evenly with 1 tablespoon of powdered sugar. Turn the hot cake upside down onto the towel and carefully remove the foil. While hot, roll the cake up tightly inside the towel, starting from a short end. Cool completely on a wire rack while rolled up, about 1 hour.3 large eggs
Making the Filling and Ganache
- Make the caramel buttercream: Cream the softened butter and caramel sauce until combined and slightly chunky. Add the powdered sugar and vanilla extract, mixing until smooth and fluffy.3 large eggs
- Make the chocolate ganache: Combine heavy whipping cream and chocolate chips in a microwave-safe bowl. Heat for 1 minute, then whisk until smooth. Heat for an additional 30 seconds if needed to melt all chips.3 large eggs
Assembling the Roll
- Once the cake is completely cooled, carefully unroll it. Spread the caramel buttercream evenly over the entire surface of the cake. Reroll the cake neatly.3 large eggs
- Place the re-rolled cake on a wire rack set over a cookie sheet to catch drips. Drizzle the chocolate ganache evenly over the top of the cake roll. Immediately sprinkle with the toasted pecans.3 large eggs
- Chill the cake loosely covered in the refrigerator for at least 30 minutes before slicing and serving. Store leftovers loosely covered in the refrigerator for up to 3 days.