Oh, you guys, I’ve got something seriously special for you today. You know those days when a craving hits, the kind that’s so specific it’s almost demanding? That’s exactly how I felt last Tuesday. I was dreaming of something soft, chewy, with that unmistakable hazelnut-chocolate hug that only Nutella can provide. Forget complicated cakes or fussy pastries; I wanted pure, unadulterated joy in cookie form. And that’s how these Nutella cookie sandwiches came to be. They’re like the ultimate upgrade to a classic chocolate chip cookie, but with that decadent Nutella swirl that just takes things to a whole new level. Honestly, my family devours these. They’re my go-to when I need a sweet pick-me-up after a long day, or when unexpected guests pop over and I need something impressive (but secretly super easy!) to whip up. They’re similar to a good old-fashioned chocolate chip cookie, but the Nutella makes them feel so much more indulgent, like a special occasion treat you can have any day of the week. Get ready, because these Nutella cookie sandwiches are about to become your new obsession.
What is Nutella sandwich?
So, what exactly *are* these magical little bites? Think of them as the love child of a perfectly chewy cookie and a rich, creamy Nutella filling. It’s essentially two soft, flavorful cookies sandwiched together with a generous dollop of Nutella. But it’s not just any cookie; it’s a cookie designed to be the perfect vessel for that luscious hazelnut-chocolate spread. We’re talking about a cookie that’s soft enough to hug the filling, sturdy enough to hold its shape, and packed with just enough flavor to complement, not compete with, the star ingredient. The name itself, “Nutella cookie sandwiches,” pretty much says it all, right? It’s straightforward, delicious, and promises exactly what you’re going to get. It’s the kind of dessert that brings a smile to everyone’s face, from the littlest cookie monsters in my house to my pickiest friends. They’re simple in concept, but the execution is pure bliss.
Why you’ll love this recipe?
I love this recipe. There are so many reasons why I keep coming back to it.flavor! Oh my goodness, the combination of the slightly sweet, vanilla-kissed cookie with that deep, rich hazelnut-chocolate goodness of the Nutella is just divine. It’s like a little bite of heaven. And then there’s the simplicity. Honestly, if you can stir ingredients together, you can make these Nutella cookie sandwiches. They don’t require any fancy techniques or a million bowls. I’ve made them on busy weeknights when I’ve only had about 30 minutes to spare, and they’ve always turned out perfectly. They are also incredibly cost-effective. Most of the ingredients are pantry staples, and a jar of Nuversatility! While they’re amazing as is, you can totally play around with them. Add some chopped hazelnuts to the Cookie Dough for extra crunch, or even drizzle a little extra melted chocolate on top. They’re perfect for a quick treat, a bake sale, or even as part of a more elaborate dessert platter. What I love most about this recipe, beyond the incredible taste and ease, is how it brings people together. The smell alone when these are baking fills the house and brings everyone running to the kitchen, eager to see what’s cooking. They’re a guaranteed crowd-pleaser, and that’s why they’re a staple in my recipe rotation.
How to Make Nutella Cookie Sandwiches
Quick Overview
Making these Nutella cookie sandwiches is a breeze! We’ll whip up a simple, chewy cookie dough, then sandwich a luscious Nutella filling between two baked cookies. It’s a straightforward process: mix, bake, fill, and enjoy. The key is getting the cookie texture just right – soft and slightly chewy, not too cakey and not too crisp. The Nutella filling is incredibly simple, mostly just requiring it to be at the right consistency for easy spreading. This recipe is designed to be forgiving, so even if you’re new to baking, you can achieve fantastic results. Trust me, the payoff for this little bit of effort is HUGE!
Ingredients
For the Main Batter:
1 cup (2 sticks) unsalted butter, softened. Make sure it’s properly softened, not melted! This is key for a good cookie texture.
1 1/2 cups granulated sugar. This gives us that classic cookie sweetness and helps with chewiness.
2 large eggs. They bind everything together and add richness.
1 teaspoon vanilla extract. Don’t skip this! It really rounds out the flavors.
2 3/4 cups all-purpose flour. Spooned and leveled, not scooped, to avoid dry cookies.
1 teaspoon baking soda. This helps them spread just enough.
1/2 teaspoon salt. Balances the sweetness and brings out the flavors.
For the Filling:
1 cup Nutella. Yes, just pure, glorious Nutella! If it’s too stiff, you can warm it *very slightly* to make it more spreadable.
For the Glaze (Optional but Recommended!):
1/2 cup powdered sugar. For that smooth, sweet finish.
1-2 tablespoons milk or cream. Adjust for your desired drizzling consistency.
1/4 teaspoon vanilla extract (optional, for extra flavor).
Step-by-Step Instructions
Step 1: Preheat & Prep Pan
Get your oven preheating to 375°F (190°C). Line your baking sheets with parchment paper. This is my number one tip for easy cleanup and perfectly baked cookies that don’t stick. You want to do this before you even start mixing, so everything is ready to go.
Step 2: Mix Dry Ingredients
In a medium bowl, whisk together the all-purpose flour, baking soda, and salt. Whisking them together now ensures that the leavening agent (baking soda) and salt are evenly distributed throughout the flour, which means no odd salty bites or flat spots in your cookies.
Step 3: Mix Wet Ingredients
In a large bowl, cream together the softened butter and granulated sugar with an electric mixer until light and fluffy. This usually takes about 2-3 minutes. Then, beat in the eggs one at a time, followed by the vanilla extract. Make sure each egg is fully incorporated before adding the next.
Step 4: Combine
Gradually add the dry ingredients to the wet ingredients, mixing on low speed until just combined. Be careful not to overmix here! Overmixing develops the gluten too much, which can lead to tough cookies. We’re going for tender and chewy, so stop as soon as you don’t see any dry streaks of flour.
Step 5: Prepare Filling
If your Nutella is very stiff straight from the jar, you can gently warm it. I usually just put the jar in a bowl of warm water for a few minutes, or microwave it in a microwave-safe bowl for 10-second intervals, stirring in between. You want it spreadable, but not runny. It should be thick enough to hold its shape when dolloped.
Step 6: Layer & Swirl
Drop rounded tablespoons of cookie dough onto the prepared baking sheets, spacing them about 2 inches apart. Gently flatten each dough ball slightly with your hand or the bottom of a glass. Then, take about a tablespoon of Nutella and dollop it onto the center of half of the dough balls. Place another dough ball on top, then gently press them together, allowing the cookie dough to spread and enclose the Nutella. You want a nice, even sandwich.
Step 7: Bake
Bake for 9-12 minutes, or until the edges are lightly golden brown and the centers look set but still soft. They will continue to bake a little on the hot baking sheet after you take them out. I usually aim for them to be just barely golden around the edges. Overbaking is the enemy of chewy cookies!
Step 8: Cool & Glaze
Let the cookies cool on the baking sheets for 5-10 minutes before transferring them to a wire rack to cool completely. This is important! If you try to move them too soon, they’ll fall apart. Once they’re completely cool, whisk together the powdered sugar, milk (start with 1 tablespoon and add more if needed), and vanilla extract for the glaze. Drizzle it over the cookies.
Step 9: Slice & Serve
Once the glaze has set a bit, your Nutella cookie sandwiches are ready to be enjoyed! These are best served at room temperature. If you want to be fancy, you can slice them in half on the diagonal, but honestly, a whole cookie sandwich is a beautiful thing.
What to Serve It With
These Nutella cookie sandwiches are so versatile, they fit into pretty much any part of your day!
For Breakfast: Imagine this: a warm cup of coffee, maybe a latte, and one of these alongside it. They’re sweet enough to make breakfast feel special, but not so decadent that they’re overwhelming for the morning. I love serving them with a glass of cold milk for the kids, and they’re gone in a flash!
For Brunch: Elevate your brunch spread! Arrange these on a pretty tiered stand. They pair wonderfully with a mimosa or a sparkling cider. You can even add a few fresh berries on the side for a pop of color and freshness.
As Dessert: This is where they truly shine. Serve them after dinner with a scoop of vanilla bean ice cream, or alongside a hot cup of espresso. They’re the perfect sweet ending that doesn’t require much effort after you’ve already cooked a meal.
For Cozy Snacks: My personal favorite! Curl up on the couch with a good book, a mug of hot chocolate, and a couple of these Nutella cookie sandwiches. They are the ultimate comfort food. They’re also fantastic for an afternoon tea party with friends. My family tradition is to have one (or two!) with a glass of milk while watching a movie on a Friday night. It’s become our little ritual.
Top Tips for Perfecting Your Nutella Cookie Sandwiches
I’ve made these countless times, and over the years, I’ve picked up a few tricks that really help ensure they turn out perfectly every single time.
Cookie Dough Consistency: The dough should be soft but not sticky. If it’s too sticky, you might have added too much liquid or not enough flour. A little too much flour is better than too little for these, as you want them to hold their shape around the Nutella. If it’s too dry, they might crumble. I always err on the side of slightly softer dough.
Nutella Filling Technique: When assembling, don’t overstuff! Too much Nutella will ooze out during baking. A good tablespoon is usually perfect for the size of cookie we’re making. Also, make sure the Nutella isn’t too cold or too warm. Room temperature is ideal for spreading without making the dough too greasy or too stiff to work with.
Baking Doneness Cues: The edges should be set and just starting to turn golden. The centers should still look a little soft. They’ll firm up as they cool. If you bake them until the centers are hard, they’ll be crispy instead of chewy. I usually pull mine out when they look *slightly* underdone in the middle, and they come out perfect.
Cooling is Crucial: This is a step many people rush. Let them cool on the baking sheet for at least 5-10 minutes. They’re very delicate when hot. If you try to move them too soon, they can break apart, and you’ll lose that beautiful sandwich integrity. Patience here pays off!
Glaze Consistency: For drizzling, the glaze should be thick but pourable. If it’s too thick, add milk or cream a tiny bit at a time until you reach the desired consistency. If it’s too thin, add a bit more powdered sugar. You want it to set up nicely without running off the cookies.
Ingredient Swaps: If you don’t have all-purpose flour, you can try a good quality 1-to-1 gluten-free baking flour blend. I’ve had success with it, though the texture might be slightly different. For the butter, you can use a vegan butter substitute, and for eggs, you could try a flax egg (1 tbsp flaxseed meal + 3 tbsp water, let sit for 5 mins) – though the texture will be a little less rich. I haven’t experimented with other nut butters for the filling, but almond or cashew butter *might* work, though they’ll change the classic flavor profile.
Oven Variations: Ovens can be notoriously finicky! If you find your cookies always bake too quickly or too slowly, don’t be afraid to adjust the baking time by a minute or two. It’s always better to check them early and often!
Storing and Reheating Tips
These Nutella cookie sandwiches are best enjoyed fresh, but they do store quite well, which is another reason I love them!
Room Temperature: Once completely cooled and the glaze has set, you can store them in an airtight container at room temperature for up to 3-4 days. I like to put parchment paper between layers if I’m stacking them to prevent them from sticking together, especially if it’s warm where you live.
Refrigerator Storage: If you live in a very warm climate or find they’re getting too soft at room temperature, you can store them in the refrigerator. Again, an airtight container is key. They’ll last about 5-7 days this way. Just be aware that refrigeration can sometimes make cookies a little firmer, so you might want to let them sit out for a few minutes before eating if you prefer a softer cookie.
Freezer Instructions: Yes, you can freeze these! The best way is to bake and cool the cookies completely (without the glaze). Then, assemble them with the Nutella filling. Wrap each cookie sandwich tightly in plastic wrap, then place them in a freezer-safe bag or container. They’ll keep well for up to 2-3 months. Thaw them overnight in the refrigerator, then bring to room temperature before adding the glaze, or just enjoy them frozen for a firmer, almost ice-cream-sandwich-like treat!
Glaze Timing Advice: For the best appearance and texture, I recommend glazing the cookies *after* they have cooled completely. If you are storing them for a few days and want them to retain their appearance, glaze them the day you plan to eat them. If you are freezing them, it’s best to freeze the unfrosted sandwiches and add the glaze after thawing.
Frequently Asked Questions
Final Thoughts
There you have it – my absolute favorite Nutella cookie sandwiches! I really hope you give these a try. They’re proof that you don’t need a ton of fancy ingredients or complicated steps to create something truly wonderful and indulgent. They’re perfect for those moments when you need a little comfort, a little sweetness, and a whole lot of happy. The way the soft cookie melts with the creamy Nutella is just pure magic, and they’re always a huge hit with my family and friends. If you love cookies and you love Nutella, this is a match made in heaven. I’d love to hear how yours turn out, so please leave a comment below and tell me your favorite part or any fun variations you tried! Happy baking, and enjoy every single bite!
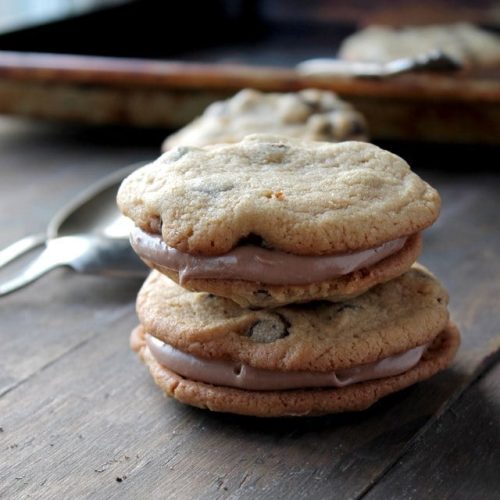
Nutella cookie sandwiches
Ingredients
For the Cookies
- 2.25 cups all-purpose flour
- 0.5 teaspoon baking soda
- 2 sticks butter softened
- 0.5 cup sugar
- 1 cup packed light brown sugar
- 1 teaspoon salt
- 2 teaspoons pure vanilla extract
- 2 eggs
- 12 oz semisweet chocolate chips 1 bag
For the Nutella Cream Cheese Filling
- 8 oz cream cheese softened
- 1 cup powdered sugar
- 0.5 cup white chocolate chips melted
- 0.5 cup Nutella
Instructions
For the Cookies
- Preheat oven to 350°F (175°C).
- Line 3 baking sheets with parchment paper and set aside.
- Sift together the flour and baking soda in a small bowl and set aside.
- In a large mixing bowl, combine the butter, sugar, and light brown sugar; beat on medium speed until light and fluffy.
- Add the salt, vanilla, and eggs and continue to beat on low until thoroughly combined.
- Slowly add the flour mixture and mix until combined.
- Stir in the chocolate chips.
- Drop by rounded tablespoon onto prepared baking sheets, 2 inches apart.
- Bake for 8 to 10 minutes, or until cookies are golden brown around the edges.
- Remove and let cool for 2 minutes on the baking sheet; transfer to a wire rack, and let cool completely.
For the Nutella Cream Cheese Filling
- While the cookies are cooling, prepare the filling.
- In a medium-sized mixing bowl, combine the cream cheese and powdered sugar; beat with an electric mixer on medium speed until creamy.
- Add in the melted white chocolate chips and Nutella; continue to mix until thoroughly combined.
- Let sit in the refrigerator for 10 minutes before using.
- Spread the frosting on the flat side of half of the cooled cookies and top with the remaining cookies. Refrigerate for 20 minutes to allow the filling to stiffen slightly.
- Serve cookies at room temperature.