You know those recipes that just feel like coming home? The ones that have a permanent spot in your heart (and your recipe box)? This stuffed peppers recipe is absolutely one of those for me. I can vividly remember my mom making these when I was a kid, the kitchen filling with this incredible, savory aroma that just signaled pure comfort. It’s funny, because sometimes people think stuffed peppers are a bit old-fashioned, or maybe even complicated, but honestly, this version is so approachable and just bursting with flavor. It’s a far cry from a basic meatloaf, that’s for sure! It’s the kind of meal that’s perfect for a cozy Sunday dinner, but I’ve also whipped it up on a weeknight when I needed something reliably delicious and satisfying. If you love classic comfort food with a fantastic twist, you’re going to adore these stuffed peppers.
What are stuffed peppers?
So, what exactly are stuffed peppers? At their core, they’re bell peppers, usually cut in half lengthwise or with the tops sliced off, that get filled with a delicious mixture and then baked until they’re tender and beautifully infused with all those yummy flavors. Think of it as a little edible bowl that holds a treasure trove of savory goodness. My family’s favorite filling is a hearty blend of seasoned ground meat, rice, and a few secret ingredients that make it extra special. It’s essentially a complete meal baked right into a vibrant, edible package. It’s rustic, it’s hearty, and it always feels a bit celebratory, even when it’s just a Tuesday night. They’re not just a meal; they’re an experience!
Why you’ll love this recipe?
There are so many reasons why this stuffed peppers recipe has become my absolute go-to. First and foremost, the flavor. Oh, the flavor! You get that slight sweetness from the bell peppers as they soften and caramelize in the oven, mingling with the rich, savory filling. It’s a symphony of textures and tastes. And then there’s the simplicity. Honestly, once you get the hang of it, it’s surprisingly straightforward to put together. The ingredients are all pretty standard, nothing too fancy, which also means it’s incredibly budget-friendly – a huge win in my book! I’ve served these at potlucks, family gatherings, and even just for a quiet dinner for two, and they’re always a hit. What I love most is that it feels like a complete meal all on its own, but it also pairs beautifully with a simple side salad or some crusty bread. Compared to some other weeknight meals that feel a bit rushed, this one has a wonderful depth that feels so satisfying without requiring hours of active cooking. It’s that perfect balance of comforting and a little bit special.
How do you make stuffed peppers?
Quick Overview
This recipe is all about layering deliciousness! We’ll start by prepping the peppers, then whip up a savory filling that’s packed with flavor. Everything gets nestled into those pepper halves and then baked until tender and glorious, often topped with a little something extra to make it shine. It’s straightforward, rewarding, and the aroma that fills your kitchen as it bakes is simply divine. Trust me, you’ll be hooked after the first bite!
Ingredients
For the Main Batter (the Peppers):
* 4-6 large bell peppers (any color works, but I love the mix of red, yellow, and orange for visual appeal!)
* 1 tablespoon olive oil
* 1 medium onion, finely chopped
* 2 cloves garlic, minced
* 1 pound Ground Beef (or a mix of beef and pork for extra richness – my kids actually prefer the mix!)
* 1 cup cooked rice (long-grain white or brown both work beautifully)
* 1 (15 ounce) can crushed tomatoes, undrained
* 1/4 cup breadcrumbs (plain or Italian-seasoned)
* 1 large egg, lightly beaten
* 1 teaspoon dried oregano
* 1/2 teaspoon dried basil
* Salt and freshly ground black pepper to taste
For the Filling (the Flavor Bomb):
* (This is already mostly covered in the “Main Batter” section, as the filling is mixed in with the meat! This is where the magic happens.)
For the Glaze (the Crown Jewel):
* 1/2 cup ketchup (yes, ketchup! It adds a lovely tang and sweetness)
* 2 tablespoons Brown Sugar (for that touch of caramelization)
* 1 tablespoon Worcestershire sauce (for umami depth)
* 1 teaspoon apple cider vinegar (to cut through the richness)
Step-by-Step Instructions
Step 1: Preheat & Prep Pan
First things first, let’s get our oven preheated to 375°F (190°C). While that’s warming up, grab your bell peppers. I usually slice them in half lengthwise, from stem to bottom, and then scoop out the seeds and membranes. You want them to be nice and clean, ready to hold all that goodness. If you prefer, you can also just slice off the tops and hollow them out, but I find the halves bake more evenly and are easier to eat. Place the prepared pepper halves cut-side up in a large baking dish. You can add about half an inch of water to the bottom of the dish to help steam the peppers and keep them from drying out – it’s a little trick that makes a big difference!
Step 2: Mix Dry Ingredients
In a large bowl, we’re going to start building our flavorful filling. Add your cooked rice, breadcrumbs, dried oregano, and dried basil. Give that a quick stir to distribute the seasonings evenly. This isn’t the complex part; it’s just setting the stage for all the savory goodness to come. The breadcrumbs will help bind everything together and give the filling a nice texture.
Step 3: Mix Wet Ingredients
To the same bowl, add the lightly beaten egg, the undrained crushed tomatoes, and your sautéed onions and garlic (which we’ll get to in a sec!). The egg is crucial for binding everything together, and the crushed tomatoes add moisture and a wonderful tomatoey base. Don’t worry about it looking too wet right now; the rice and meat will absorb a lot of that liquid as it bakes.
Step 4: Combine
Now, let’s get that ground meat in there! Add your pound of ground beef (or your favorite meat mixture) to the bowl with the other ingredients. Season generously with salt and freshly ground black pepper. This is where you really want to get your hands in there! Gently mix everything together until it’s just combined. Be careful not to overmix, as that can make the meat tough. You just want everything evenly distributed. The onions and garlic should be sautéed in a pan with a little Olive oil until softened before adding them to the mix for the best flavor – I always do this first!
Step 5: Prepare Filling
(This step is integrated into Step 4, where we combine all the filling ingredients.)
Step 6: Layer & Swirl
This is the fun part! Carefully spoon the meat and rice mixture into each of the prepared pepper halves, mounding it slightly. Don’t pack it down too tightly, as you want everything to cook evenly. Once all your peppers are filled, it’s time for the glaze. In a small bowl, whisk together the ketchup, brown sugar, Worcestershire sauce, and apple cider vinegar until smooth. This little concoction is pure magic – it caramelizes beautifully and adds this incredible sweet and tangy finish to the peppers. Spoon this glaze generously over the top of the filling in each pepper half. You can even spread it down the sides a little. It’s like giving each pepper a little hat!
Step 7: Bake
Pop that baking dish into your preheated oven. Bake for about 45-60 minutes, or until the peppers are tender when pierced with a fork and the filling is cooked through and nicely browned on top. The exact time will depend on the size of your peppers and how tender you like them. I usually check them around the 45-minute mark. If the tops of the glaze look like they’re browning too quickly, you can always loosely tent the dish with foil.
Step 8: Cool & Glaze
Once they’re out of the oven, let the stuffed peppers rest for about 5-10 minutes before serving. This allows the flavors to meld and makes them easier to handle. The glaze will be hot and bubbly, and the smell is just incredible! You can add a little extra sprinkle of fresh parsley at this stage if you like, for a pop of color and freshness.
Step 9: Slice & Serve
If you halved your peppers, they’re ready to go! If you cut off the tops, you might want to gently slice each pepper half in two for easier serving, especially for little hands. Serve these beauties hot, with that irresistible glaze glistening on top. They are a complete meal on their own, but a simple green salad or some garlic bread is always a welcome addition. Enjoy every single bite!
What to Serve It With
These stuffed peppers are so wonderfully complete on their own, but if you’re feeling like adding a little something extra, I’ve got you covered. For a classic breakfast-for-dinner vibe (which we totally do in my house!), a simple cup of coffee and maybe some scrambled eggs on the side feels just right. If you’re hosting for brunch, these stuffed peppers are fantastic because they can often be prepped ahead. Serve them with a side of fresh fruit salad and maybe some light, bubbly mimosas – it’s elegant yet still incredibly comforting. As a dessert… well, these aren’t really a dessert dish, but if you’re craving something sweet after, a light sorbet or some fresh berries with a dollop of whipped cream would be perfect. For those cozy snack moments, or when you just want a satisfying bite without a whole meal, I love serving them with just a good, crusty piece of bread for dipping into any extra glaze or juices. My kids also love them with a side of tater tots – it’s their favorite!
Top Tips for Perfecting Your Stuffed Peppers
Over the years, I’ve picked up a few tricks that I think really elevate these stuffed peppers. When it comes to the peppers themselves, using a variety of colors not only makes the dish look stunning but also offers slightly different nuances in sweetness. Make sure to really get in there and scrape out all the seeds and white pith – this is key to avoiding any bitterness. For the filling, I always recommend sautéing your onions and garlic first. It brings out their sweetness and softens them perfectly, which is a game-changer compared to just throwing them in raw. And speaking of the filling, don’t be afraid to taste and adjust the seasoning! Salt and pepper are your best friends here. Some people like to add a pinch of red pepper flakes for a little kick, which is also delicious. When you’re combining the filling ingredients, remember the advice about not overmixing. Just gently bring everything together until it’s combined. Overworking the meat can make it tough and dense, and we want a tender, succulent filling. The glaze is where you can really play. While I love the ketchup base, feel free to experiment! A splash of hot sauce can add a nice warmth, or a touch more brown sugar can make it even more caramelized. For baking, the water at the bottom of the dish is a lifesaver for keeping the peppers tender and preventing them from getting dry and leathery. And for ingredient swaps, if you don’t have beef, ground turkey or even a plant-based crumble works well, though you might need to adjust seasonings. I’ve also used quinoa instead of rice in a pinch, and it was quite nice, offering a different texture. Don’t be afraid to experiment, that’s how you find your own perfect version!
Storing and Reheating Tips
These stuffed peppers are leftovers superstars, which is one of the reasons I love making a big batch. Once they’ve cooled down completely, you can store them in an airtight container in the refrigerator for up to 3-4 days. They actually seem to taste even better the next day as all those flavors have had more time to meld together. If you want to freeze them, which I do often for those super busy nights, make sure they are completely cooled first. You can wrap individual pepper halves tightly in plastic wrap, then in foil, or place them in a freezer-safe container. They’ll keep well in the freezer for about 2-3 months. When you’re ready to reheat, if they’re from the fridge, you can pop them back into a 350°F (175°C) oven for about 15-20 minutes until heated through. If reheating from frozen, it’s best to thaw them overnight in the fridge first, then reheat as you would the refrigerated ones. For the glaze, it’s usually best to apply it before baking. If you’re reheating, you can always drizzle a little extra ketchup or a quick homemade glaze over them once they’re heated, to refresh that wonderful topping. Just make sure they’re piping hot all the way through!
Frequently Asked Questions
Final Thoughts
There you have it – my absolute favorite stuffed peppers recipe! It’s a dish that’s truly close to my heart, a perfect blend of comfort, flavor, and just plain good cooking. It’s the kind of meal that makes everyone happy at the table, from the pickiest eaters to the most discerning palates. I really hope you give these a try. They’re a testament to how simple ingredients, handled with a little care, can create something truly special. If you love this recipe, you might also enjoy my Classic Lasagna Bolognese or my Hearty Shepherd’s Pie for more comforting classics! I can’t wait to hear what you think, so please leave a comment below and let me know how your stuffed peppers turned out. And if you have any variations or tips of your own, share them – I’m always looking to learn new things!
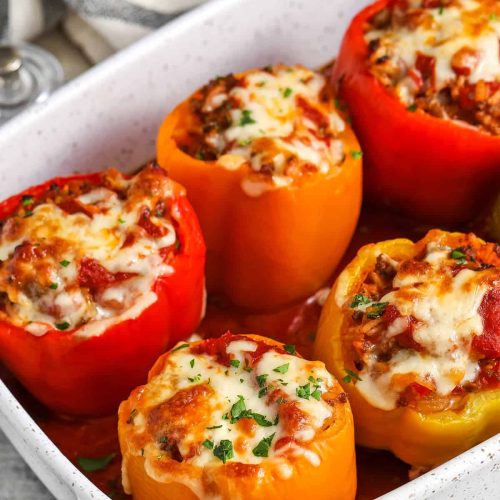
Stuffed Peppers
Ingredients
Main Ingredients
- 4 large bell peppers any color
- 1 pound ground beef
- 1 cup cooked rice
- 1 cup diced tomatoes undrained
- 0.5 cup chopped onion
- 0.25 cup chopped bell pepper from the tops
- 1 teaspoon garlic powder
- 0.5 teaspoon dried oregano
- 0.25 teaspoon salt
- 0.25 teaspoon black pepper
Optional Toppings
- 1 cup shredded cheddar cheese
Instructions
Preparation Steps
- Preheat your oven to 375°F (190°C).
- Cut the tops off the bell peppers and remove the seeds and membranes. Chop the pepper tops and set aside.
- In a large bowl, combine the ground beef, cooked rice, diced tomatoes, chopped onion, chopped pepper tops, garlic powder, oregano, salt, and black pepper. Mix well.
- Stuff the pepper halves with the meat mixture.
- Place the stuffed peppers in a baking dish. Add about 1/2 inch of water to the bottom of the dish.
- Cover the baking dish with foil and bake for 30 minutes.
- Remove the foil, top with cheese if desired, and bake for another 10-15 minutes, or until the peppers are tender and the cheese is melted and bubbly.
- Let stand for a few minutes before serving.