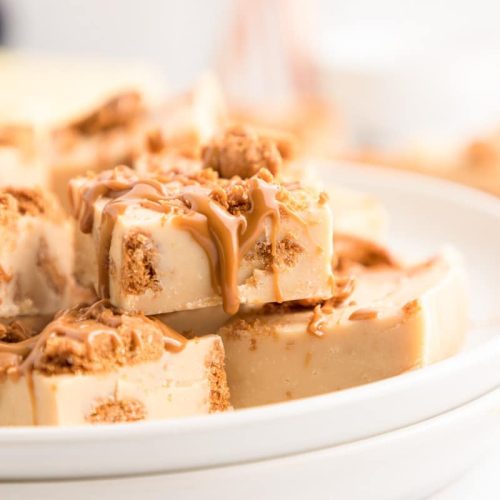
You know those recipes that just hit differently? The ones that feel like a warm hug and taste like pure magic? This Biscoff fudge is absolutely one of those for me. It’s not just a sweet treat; it’s a memory maker. I remember the first time I made it, trying to replicate that incredible spiced cookie flavor I adore, and thinking, “What if…?” The result was beyond anything I’d hoped for. It’s funny, because sometimes I crave a baked good but just don’t have the energy for the whole oven-preheating, mixing-multiple-bowls ordeal. That’s where this Biscoff fudge comes in. It’s ridiculously easy, and the flavor is so unique and satisfying. It’s become my go-to for last-minute dessert emergencies, potlucks, or honestly, just a Tuesday night when the sweet tooth strikes hard. It’s like a spiced cookie met a cloud and they decided to get married and have the most delicious baby ever. Forget complicated brownies; this is the simple, show-stopping treat that will have everyone asking for the secret.
What is Biscoff Fudge?
So, what exactly *is* Biscoff fudge? At its heart, it’s a creamy, dreamy fudge infused with the distinct, caramelized, spiced flavor of Biscoff cookies (you know, those amazing little Belgian speculoos biscuits!). Think of it as taking all the comforting, warm spice notes from your favorite gingerbread or speculoos cookies and transforming them into an impossibly smooth, melt-in-your-mouth fudge. It’s not like traditional, sometimes gritty, fudge. This version is incredibly decadent and smooth, thanks to a few key ingredients that make all the difference. It’s like a flavor explosion that’s both familiar and excitingly new. The name itself sounds intriguing, doesn’t it? It perfectly captures the essence: the beloved Biscoff flavor, elevated into the rich indulgence of fudge. It’s a simple concept, but the execution is pure culinary alchemy, turning humble ingredients into something truly special.
Why you’ll love this recipe?
Honestly, where do I even begin with why this Biscoff fudge is a winner? For starters, the FLAVOR. Oh my goodness, the flavor. If you’re a fan of Biscoff cookies, you’re going to be in heaven. It’s got that perfect balance of sweet, spiced warmth from the cinnamon and nutmeg, with a deep, caramelized undertone that’s just utterly addictive. It’s not overly sweet, which I appreciate, so you can truly savor that unique cookie taste. Then there’s the SIMPLICITY. This is not one of those fussy recipes that requires a candy thermometer or hours of stirring. You can whip up a batch of this fudge in less time than it takes to preheat your oven for some other desserts! It’s a lifesaver when you need a quick treat or are entertaining unexpected guests. Plus, it’s surprisingly COST-EFFECTIVE. The main ingredients are pantry staples for many, and a jar of Biscoff cookies isn’t breaking the bank. You get a huge bang for your buck in terms of deliciousness. And let’s talk VERSATILITY. While it’s incredible on its own, I’ve found it’s also amazing crumbled over ice cream, chopped and mixed into cookie dough, or even used as a filling for shortbread. It’s a truly adaptable treat. What I love most about this recipe, though, is the sheer joy it brings. Seeing the look on people’s faces when they take their first bite and realize what that incredible flavor is? Priceless. It’s a crowd-pleaser, a mood-booster, and my secret weapon for any sweet craving.
How do you make Biscoff Fudge?
Quick Overview
This Biscoff fudge recipe is all about minimal effort for maximum flavor payoff. You’ll basically melt some key ingredients together, stir in the magic of crushed Biscoff cookies, pour it into a prepared pan, let it chill, and then slice it up. It’s incredibly straightforward, which is why I adore it. There’s no complicated tempering or precise temperature control needed, making it perfect for beginners and seasoned bakers alike. The key is using good quality ingredients and letting the Biscoff flavor really shine through.
Ingredients
What is the creamy base?
2 cups granulated sugar: This forms the sweet foundation of our fudge. Make sure it’s regular granulated sugar for the best texture. No fancy stuff needed here!
3/4 cup unsalted butter: Unsalted butter gives us control over the saltiness. Using good quality butter will really elevate the flavor.
1/2 cup evaporated milk: This is one of the secrets to that smooth, fudgy texture without being too heavy. It adds a lovely richness.
1 teaspoon vanilla extract: A classic for a reason! It enhances all the other flavors and adds that comforting aroma.
1/4 teaspoon salt: Just a touch to balance the sweetness and make those Biscoff spices pop.
1 cup (about 14-16) Biscoff cookies, finely crushed: This is where all the magic happens! You can crush them in a food processor or by popping them into a sturdy bag and going at them with a rolling pin. Aim for fine crumbs, not big chunks.
For the Optional Biscoff Swirl:
1/2 cup smooth Biscoff spread: For that extra layer of intense Biscoff goodness!
For the Simple Topping:
Extra Biscoff cookie crumbs: Just for a little visual flair and an extra hint of that cookie crunch.
Step-by-Step Instructions
Step 1: Preheat & Prep Pan
Grab an 8×8 inch square baking pan. Line it with parchment paper, leaving some overhang on the sides. This makes lifting the fudge out super easy later. Don’t grease the pan unless your parchment paper isn’t the non-stick kind; the parchment is usually enough. Set it aside while you get started on the fudge mixture.
Step 2: Mix Dry Ingredients
In a medium bowl, add your finely crushed Biscoff cookies. If you’re planning to do the swirl, set aside about 1/4 cup of these crumbs for later. Add the salt to the crushed cookies and give them a quick whisk or stir to combine. This ensures the salt is evenly distributed.
Step 3: Mix Wet Ingredients
In a medium saucepan (make sure it’s not sticking to the bottom!), combine the granulated sugar, unsalted butter, and evaporated milk. Place the saucepan over medium heat. Stir constantly until the butter has melted and the sugar is completely dissolved. You’ll see it start to bubble gently.
Step 4: Combine
Once the sugar is dissolved and the mixture is smooth and heated through, remove the saucepan from the heat. Let it sit for about 5 minutes to cool slightly. This is crucial to avoid scrambling anything. Then, stir in the vanilla extract. Now, gradually add the crushed Biscoff cookie and salt mixture to the saucepan. Stir everything together really well until it’s thoroughly combined and you have a thick, fragrant mixture.
Step 5: Prepare Filling
If you’re doing the Biscoff swirl, gently warm the 1/2 cup of smooth Biscoff spread in the microwave for about 15-20 seconds, just until it’s pourable but not hot. You don’t want it runny, just softened.
Step 6: Layer & Swirl
Pour about half of the fudge mixture into your prepared pan and spread it evenly. If you’re using the swirl, dollop spoonfuls of the warmed Biscoff spread over this layer. Then, carefully pour the remaining fudge mixture over the top. Using a toothpick or a knife, gently swirl the Biscoff spread into the fudge layers. Don’t over-swirl; you want distinct ribbons of Biscoff flavor. Sprinkle the reserved Biscoff cookie crumbs evenly over the top. This adds a nice texture and visual appeal.
Step 7: Bake
Okay, this isn’t actually a bake! My apologies, I got ahead of myself. This fudge doesn’t go in the oven. You’ll be chilling it. So, after you’ve swirled and topped it, place the pan in the refrigerator. Let it chill for at least 2-3 hours, or until it’s firm to the touch. The colder it gets, the easier it will be to cut cleanly.
Step 8: Cool & Glaze
As I mentioned, the “glaze” is really just the reserved cookie crumbs on top and the optional Biscoff swirl within. So, the cooling step is the most important here. Ensure it’s thoroughly chilled in the refrigerator. Once firm, lift the fudge out of the pan using the parchment paper overhang. Place it on a cutting board.
Step 9: Slice & Serve
Using a sharp knife, cut the fudge into desired squares. I like to cut mine about 1-inch by 1-inch for bite-sized treats, but you can go larger if you prefer! For the cleanest cuts, you can run your knife under hot water and wipe it dry between slices. Serve immediately or store. The smell when you cut into it is just divine!
What to Serve It With
This Biscoff fudge is so versatile, it fits in practically anywhere! For a cozy MORNING treat, I love to pair a small square with a strong cup of coffee. The caramel notes of the fudge really complement the dark roast beautifully. It’s a little indulgence to start the day that feels incredibly special. For a delightful BRUNCH spread, I’ll cut it into smaller, bite-sized pieces and arrange them on a platter alongside other pastries and fruit. It adds an unexpected but welcome flavor dimension. It looks so elegant scattered amongst croissants and berries! As a decadent DESSERT, it’s a showstopper. Serve a generous piece alongside a scoop of vanilla bean ice cream, or with a drizzle of chocolate sauce. It’s also fantastic after dinner with a small glass of dessert wine, like a sherry or port. The spices in the fudge pair wonderfully with those richer wines. And for those COZY SNACKS moments, which is honestly when I make it most often, it’s perfect on its own with a glass of milk. It’s the ultimate comfort food, a little square of happiness when you need it most. My kids absolutely love it with a glass of cold milk after school; it’s a far better treat than anything store-bought!
Top Tips for Perfecting Your Biscoff Fudge
Over the years, I’ve learned a few tricks to make this Biscoff fudge absolutely sing. Let’s start with the Biscoff cookies themselves. You really want them to be *finely* crushed. If you have big cookie chunks, the texture of the fudge can be a bit uneven. A food processor is your best friend here, but if you don’t have one, place the cookies in a sturdy zip-top bag, seal it, and then bash them with a rolling pin until they’re like fine sand. It’s a great stress reliever, too! For the mixing, remember the advice about removing the saucepan from the heat before adding the vanilla and then the dry ingredients. This is super important. Adding the vanilla off the heat preserves its delicate flavor. When you combine the wet and dry ingredients, stir until *just* combined. Overmixing can sometimes make fudge a bit tough, though this recipe is pretty forgiving. I’ve learned that the swirl is more for visual appeal and an extra burst of flavor; don’t get too caught up in making perfect patterns. A few haphazard swirls are perfect! I once tried to get too fancy and ended up just mixing it all in. As for ingredient swaps, while the evaporated milk is key for texture, I have experimented with using half-and-half in a pinch, and it was still good, just a tiny bit softer. For the sweetener, sticking with granulated sugar is best for that classic fudge texture. If you find your Biscoff spread is too stiff to swirl, a quick 15-20 second zap in the microwave usually does the trick – just don’t overheat it. For baking, I mean, chilling! The chilling time is crucial. Don’t rush it. Let it sit in the fridge until it’s *firm*. I usually give it a gentle poke; if it springs back slightly, it’s ready. If it feels soft, give it another hour. And for slicing, the hot knife trick really does make a difference for clean edges. It’s like slicing through butter!
Storing and Reheating Tips
This Biscoff fudge is quite stable, but proper storage ensures it stays delicious. At ROOM TEMPERATURE, it’s best to store it in an airtight container for up to 3-4 days. If your kitchen is particularly warm, it might get a little softer, so a cool, dry place is ideal. I usually keep it in a decorative tin on the counter, and it’s always gone by day 3! For REFRIGERATOR STORAGE, it will stay fresh for up to a week, maybe even 10 days. The cooler temperature helps it maintain its firmness. Again, an airtight container is key to prevent it from absorbing any fridge odors. When you take it out of the fridge, let it sit at room temperature for about 10-15 minutes to soften up slightly before slicing, otherwise it can be quite hard. FREEZER INSTRUCTIONS are great if you want to make a big batch and save some for later. Wrap the cut fudge tightly in plastic wrap, then in a layer of aluminum foil, or place it in a freezer-safe container. It should last for up to 2-3 months. To thaw, simply move it from the freezer to the refrigerator overnight. The GLACE timing advice is simple: the cookie crumbs are best added right after you finish swirling before chilling, as they adhere well to the slightly tacky surface. You can add more crumbs just before serving if you like. No reheating is necessary for this fudge; it’s meant to be enjoyed at room temperature or slightly chilled.
Frequently Asked Questions
Final Thoughts
I truly hope you give this Biscoff fudge a try! It’s one of those recipes that has become a staple in my kitchen, not just because it’s incredibly easy, but because it consistently delivers pure joy. The unique, spiced caramel flavor of the Biscoff cookies transforms into something utterly magical in fudge form. It’s the perfect balance of comforting and exciting, simple and decadent. Whether you’re looking for a quick treat for yourself, a crowd-pleasing dessert for a party, or a thoughtful homemade gift, this Biscoff fudge is a winner. If you love this recipe and are looking for more ways to enjoy those amazing Biscoff flavors, I highly recommend checking out my Biscoff Blondies or my simple Biscoff No-bake cookies – they’re also huge hits! I can’t wait to hear what you think of this fudge, and I’d love to see how yours turns out. Don’t be afraid to experiment with toppings or swirl techniques! Happy fudge-making, and enjoy every delicious bite!
Biscoff Fudge
Ingredients
Main Ingredients
- 423 g White Chocolate Chips
- 300 g Sweetened Condensed Milk
- 170 g Biscoff Spread
- 0.5 tsp Vanilla Extract
- 1 cup Crushed Biscoff Cookies For topping, optional
Instructions
Preparation Steps
- Line an 8x8 inch baking pan with parchment paper, leaving an overhang on the sides for easy removal.
- In a microwave-safe bowl, combine the white chocolate chips and sweetened condensed milk. Microwave in 30-second intervals, stirring between each, until smooth and melted.
- Add the Biscoff spread and vanilla extract to the melted white chocolate mixture. Stir until well combined and smooth.
- Pour the fudge mixture into the prepared baking pan and spread evenly.
- If desired, sprinkle the crushed Biscoff cookies evenly over the top of the fudge. Gently press them into the fudge.
- Refrigerate for at least 2-3 hours, or until firm.
- Once firm, lift the fudge out of the pan using the parchment paper overhang. Cut into small squares.