Oh, hello there! Come on in, grab a mug. I’ve got something really special to share with you today, a recipe that’s practically legendary in my family. You know those times when a craving hits, but the thought of turning on the oven feels like too much work? Or maybe you’re heading to a party and need a showstopper that’s surprisingly simple? That’s exactly when I reach for my no-bake whiskey balls. They’re like little bites of pure joy, packed with rich flavor and that hint of warmth that just makes everything feel cozier. Honestly, I’ve tried a lot of different dessert recipes over the years, from elaborate cakes to delicate pastries, but these little nuggets of deliciousness always manage to steal the show. They’re a bit like a brownie, a bit like a truffle, and entirely their own wonderful thing. If you’ve ever loved a good chocolate cookie or a decadent fudge, get ready, because these whiskey balls are about to become your new obsession.
What are whiskey balls?
So, what exactly are these magical little treats? Think of whiskey balls as the ultimate no-bake cookie hybrid. They’re essentially a rich, chocolatey, slightly boozy concoction that’s rolled into bite-sized balls and often coated in a luscious chocolate glaze or sometimes just rolled in powdered sugar or sprinkles. The “whiskey” part isn’t about making you tipsy, but rather about infusing a subtle, sophisticated warmth and depth of flavor that pairs incredibly well with the chocolate. It’s not overpowering; it’s more like a comforting hug in dessert form. We’re talking crushed cookies or cake crumbs, cocoa, butter, a touch of sweetener, and of course, a splash of your favorite whiskey. It’s simple, straightforward, and utterly delicious. They’re the perfect treat for when you want something undeniably decadent without the fuss of baking. My grandma used to make these for holidays, and the scent of chocolate and that hint of whiskey always meant something special was happening.
Why you’ll love this recipe?
There are so many reasons why I’ve made this recipe my go-to, and I just know you’ll fall in love with it too. First off, let’s talk about that incredible flavor. It’s a deep, rich chocolate experience, but the real magic happens with that subtle whisper of whiskey. It cuts through the sweetness and adds this wonderful complexity that makes you stop and savor each bite. It’s not just sweet; it’s sophisticated! Then there’s the sheer simplicity. I’m not kidding when I say this is a lifesaver on busy nights. You don’t need any fancy equipment, and you can have them ready to chill in less time than it takes to preheat an oven for most cookies. Plus, they’re incredibly cost-effective. The ingredients are pantry staples for most people, and you can stretch them to make a huge batch for a crowd. They’re also wonderfully versatile. While I have my favorite way to make them, you can easily tweak them. Want them a little nuttier? Add some chopped pecans. Craving a different flavor? A touch of espresso powder or a different liqueur can work wonders. What I love most, though, is the reaction they get. People always assume they’re much more complicated than they are, and seeing their faces light up when they taste them is just the best. They’re the perfect blend of comforting nostalgia and exciting indulgence.
How do you make whiskey balls?
Quick Overview
This recipe is all about speed and simplicity. You’ll basically mix up a no-bake Cookie Dough, shape it into balls, and then chill them until firm. The magic is in the rich, chocolatey base infused with a hint of whiskey. It’s so easy, you’ll be whipping these up whenever the craving strikes. No oven required, no complicated steps, just pure deliciousness in a few easy stages.
Ingredients
For the Main Batter:
– 2 cups finely crushed vanilla wafer cookies (about 6 oz or a standard sleeve)
– 1/2 cup unsweetened cocoa powder (Dutch-processed is best for a richer color and flavor)
– 1 cup powdered sugar
– 1/4 teaspoon salt
– 1/2 cup (1 stick) unsalted butter, melted
– 1/4 cup whiskey (bourbon or rye work wonderfully; adjust to your taste)
– 1 teaspoon vanilla extract
For the Filling:
(This part is optional but adds an extra layer of yum!)
– 4 oz cream cheese, softened
– 1/4 cup powdered sugar
– 1 tablespoon whiskey
– 1/2 teaspoon vanilla extract
For the Glaze:
– 1 cup semi-sweet chocolate chips (or dark chocolate for a more intense flavor)
– 2 tablespoons unsalted butter or coconut oil (for a smoother, glossier glaze)
Step-by-Step Instructions
Step 1: Preheat & Prep Pan
Okay, since these are no-bake, we don’t need to preheat an oven! What you *do* need is a baking sheet or a large platter lined with parchment paper or wax paper. This is going to be where your delicious whiskey balls chill out. Make sure you have enough space for them all to sit without touching too much, as they’ll be a bit soft initially.
Step 2: Mix Dry Ingredients
Grab a large mixing bowl. First, we need to get our cookie crumbs ready. You can crush them in a food processor until they’re fine, or if you don’t have one, just pop them in a sturdy zip-top bag and give them a good roll with a rolling pin. Once you have your crumbs, add the cocoa powder, powdered sugar, and salt. Give it all a good whisk to make sure everything is evenly distributed. This ensures every bite is perfectly chocolatey and not too sweet.
Step 3: Mix Wet Ingredients
In a separate, smaller bowl, combine the melted butter, whiskey, and vanilla extract. Give that a quick stir. The aroma at this stage is already amazing, isn’t it? I always find myself taking a little whiff here. It’s important that your butter is melted but not piping hot, so it incorporates nicely without “cooking” anything.
Step 4: Combine
Now, pour the wet ingredients into the bowl with the dry ingredients. Use a sturdy spoon or a rubber spatula to mix everything together. It will seem a bit crumbly at first, but keep mixing until it forms a cohesive dough. You want it to hold together when you squeeze it. If it seems too dry, you can add another teaspoon of whiskey or a tiny bit of melted butter. If it feels too wet, add a tablespoon more of crushed cookies or cocoa powder. Don’t overmix; just until it all comes together.
Step 5: Prepare Filling
(Skip this step if you’re not making a cream cheese filling.) In a medium bowl, beat the softened cream cheese until it’s smooth and creamy. Then, beat in the powdered sugar, whiskey, and vanilla extract until well combined and smooth. You want a nice, spreadable consistency.
Step 6: Layer & Swirl
This is where the fun really begins, especially if you’re doing the filling! Take about a tablespoon of the chocolate cookie dough and flatten it in your palm. If you’re using the filling, spoon about a teaspoon of the cream cheese mixture into the center. Then, carefully wrap the cookie dough around the filling, creating a ball. If you’re not using filling, just roll about 1 to 1.5 tablespoons of the cookie dough into a neat ball. Place each finished ball onto your prepared baking sheet. Once all your balls are rolled, pop the baking sheet into the refrigerator for at least 30 minutes to firm up. This makes them much easier to handle for glazing.
Step 7: Bake
Good news! No baking required for these whiskey balls! Just refrigeration to firm them up perfectly.
Step 8: Cool & Glaze
Once the balls are firm from chilling, it’s time for the glorious chocolate coating. Place the chocolate chips and butter (or coconut oil) in a microwave-safe bowl. Microwave in 30-second intervals, stirring well after each, until the chocolate is smooth and completely melted. You can also melt this gently in a double boiler. Let the melted chocolate cool slightly for a few minutes so it’s not piping hot. Now, you can either dip each chilled ball into the chocolate using a fork or toothpick, letting any excess drip off, or you can simply spoon the chocolate over them. Place the glazed balls back onto the parchment-lined baking sheet. For an extra touch, you can sprinkle them with sea salt, chopped nuts, or sprinkles immediately after glazing before the chocolate sets. Let the glaze set completely; you can pop them back in the fridge for about 10-15 minutes to speed this up.
Step 9: Slice & Serve
Once the glaze is set, your whiskey balls are ready to be enjoyed! They are best served chilled or at cool room temperature. I usually store them in an airtight container in the refrigerator. When serving, you can place them on a pretty platter. They look so elegant, especially with that shiny chocolate coating. They are perfect little bites for any occasion, or just for a quiet moment of indulgence with a cup of coffee.
What to Serve It With
These whiskey balls are so wonderfully versatile, they can truly fit into any occasion. For a simple breakfast treat, imagine pairing one or two with a strong, hot cup of coffee. The richness of the chocolate and the subtle warmth of the whiskey is a surprisingly delightful way to start the day, especially on a chilly morning. If you’re hosting a brunch, these make an elegant addition to any dessert spread. You could serve them alongside some fresh fruit and maybe a light mousse for a balanced sweet finish. They add that touch of grown-up indulgence that elevates a casual brunch. As a dessert, they’re just perfection. Serve them after dinner with a glass of milk (for the kids, of course!) or even a small pour of the same whiskey you used in the recipe for a truly harmonious pairing. And for those cozy snack moments, when you just need something sweet to hit the spot after a long day? These are your answer. Grab one (or three!) with a steaming mug of tea or even a glass of red wine. My kids, when they’re allowed, love them with a glass of cold milk, and they always disappear in minutes at my house! My mom always makes a big batch for our family Christmas gathering, and they’re always the first thing gone.
Top Tips for Perfecting Your Whiskey Balls
Over the years, I’ve learned a few little tricks that really help make these whiskey balls absolutely perfect every single time. First, for the cookie crumbs, make sure they are truly fine. If they’re too coarse, your balls won’t hold together as well. A food processor is your best friend here, but the rolling pin method works too if you’re patient! When it comes to the whiskey, don’t be afraid to use a decent quality one. The flavor really comes through, so a smooth bourbon or a slightly peppery rye adds a wonderful depth. You can absolutely adjust the amount to your liking – start with the 1/4 cup and add a tiny bit more if you want a stronger flavor, but remember, it needs to hold its shape too. For the cream cheese filling (if you’re using it), make sure your cream cheese is truly softened. Cold cream cheese is a nightmare to mix smoothly, and you don’t want lumps in your creamy center. Using unsalted butter for both the dough and the glaze is key; it gives you better control over the saltiness. If you find your dough is too crumbly to roll, add a tiny bit more melted butter, a teaspoon at a time. Conversely, if it’s too sticky, add a little more cookie crumb or a sprinkle of cocoa powder. When melting your chocolate for the glaze, be patient. Overheating chocolate can make it seize up, and nobody wants that! Low and slow is the way to go, or those short microwave bursts with lots of stirring. If you want a thinner glaze for easier dipping, stir in a teaspoon of vegetable oil or coconut oil. For a thicker, fudgier glaze, use just chocolate chips and a tiny bit of butter. And a little tip from my kitchen to yours: if your chocolate coating isn’t setting as quickly as you’d like, pop them back into the fridge for 10-15 minutes. It works like a charm!
Storing and Reheating Tips
One of the best things about these whiskey balls is how well they keep. For storing them at room temperature, as long as they are fully glazed and the glaze has set, they should be fine in an airtight container for about 3-5 days. However, I find they have the best texture when kept chilled. In the refrigerator, they’ll stay delicious in an airtight container for up to 2 weeks. They actually get a little firmer and the flavors meld even more beautifully over time. If you want to freeze them, this is totally doable! Make sure they are fully set (either glazed or plain rolled balls). Wrap them tightly, either individually in plastic wrap or in a single layer in an airtight container, and they should last in the freezer for up to 3 months. To thaw, just transfer them to the refrigerator overnight. If you’ve frozen glazed ones, the glaze might get a tiny bit streaky as it thaws, but they’ll still taste amazing. For reheating, honestly, these are best served cold or at cool room temperature, so no reheating is usually necessary! If they’ve been in the fridge and you prefer them less firm, just let them sit on the counter for about 15-20 minutes before serving. The key for storing any dessert is an airtight container to keep out moisture and prevent them from drying out or picking up other odors from your fridge.
Frequently Asked Questions
Final Thoughts
So there you have it – my go-to no-bake whiskey balls recipe! I really hope you give these a try. They’re more than just a dessert; they’re a little bit of comfort, a touch of festivity, and a whole lot of deliciousness all rolled into one. They’re perfect for those moments when you need a quick treat that feels incredibly special. They’ve saved me countless times when unexpected guests arrive or when I just needed a little something sweet to brighten my day. If you enjoy the rich, chocolatey goodness of these, you might also love my recipe for No-Bake Chocolate Peanut Butter Bars or my classic Fudgy Brownies. I can’t wait to hear what you think! Let me know in the comments below if you make them, and how you like to serve yours. Happy rolling!
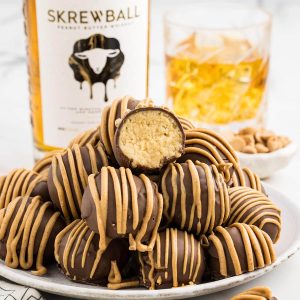
Skrewball Whiskey Balls
Ingredients
Main Ingredients
- 10 ounces shortbread cookies (Lorna Doone brand)
- 0.75 cup powdered sugar
- 8 ounces cream cheese softened to room temperature
- 0.25 cup Skrewball peanut butter-flavored whiskey
Chocolate Coating & Drizzle
- 16 ounces milk chocolate melting discs (Ghirardelli brand)
- 4 ounces Reese’s peanut butter baking chips
- 1 teaspoon coconut oil
Instructions
Preparation Steps
- Line 2 baking sheets with parchment paper or silicone mat, and set aside.
- In the container of a food processor, add the shortbread cookies and powdered sugar. Pulse for 30 seconds to 1 minute or until you have fine crumbs.
- Add the softened cream cheese and Skrewball peanut butter-flavored whiskey to the food processor and pulse for an additional 20-30 seconds or until the mixture is smooth and all the cream cheese has been fully incorporated.
- Using a 1½-inch (1½ tablespoon) cookie scoop, scoop out a level scoop of the whiskey ball mixture and place it onto one of the prepared baking sheets. Repeat until all the cream cheese mixture has been scooped.
- Place the baking tray into the refrigerator for about 5 hours to allow the whiskey balls to firm up enough to be rolled and dipped into chocolate.
- Once the whiskey balls have firmed up, roll each ball in the palm of your hand to make smooth balls for dipping. *You can place your tray of smooth whiskey balls back into the refrigerator to stay cold while you melt your chocolate.
- In a microwave-safe bowl, add the milk chocolate melting discs and microwave on high for 1 minute, stir, then melt in 30-second intervals until the chocolate discs are fully melted. Be sure to stir the chocolate between each time in the microwave. Do not overheat your chocolate. Stir until smooth. Allow the melted chocolate to cool slightly before dipping your whiskey balls into it. Tip: Keep the chocolate warm/melted by putting the bowl over a pot of hot water.
- Place a whiskey ball onto a fork and dip the ball into the melted chocolate. Once the ball is fully coated with chocolate, lift the fork out of the chocolate and tap it onto the edge of the bowl to allow any excess melted chocolate to drip off the bottom of the chocolate-coated whiskey ball. Tips: Only take a few of the balls out of the fridge at a time. Dip them and then get a few more balls out to be dipped. Keeping them cold makes it easier to dip.
- Using a toothpick or separate fork, gently slide the coated whiskey ball off the fork and onto the second parchment-lined baking tray. Repeat until all the whiskey balls are coated in the milk chocolate.
- Add the peanut butter chips and coconut oil to a small microwave bowl to make the peanut butter drizzle. Heat for 1 minute at (50-60% power), stir, then heat again in 30-second intervals until the chips are melted. Be sure to stir between each 30-second burst. Stir until smooth.
- Transfer the melted peanut butter chips to a piping bag with a small amount of the tip snipped off. Pipe a drizzle of the melted peanut butter chips in a decorative pattern over the tops of all the chocolate-coated whiskey balls.
- Place the tray of whiskey balls back into the refrigerator for 15 minutes to allow the chocolate and peanut butter to firm up before serving.