There’s something about the zesty tang of key lime that instantly whisks me back to sun-filled afternoons at my grandma’s porch, where the air always smelled faintly of citrus and sweet vanilla. These Key Lime Pie Bars have been a staple in my kitchen for years—every time I bake them, the entire house fills with that bright, delicious aroma that just screams “summer’s here!” If you love the classic Key Lime Pie but sometimes feel like slicing a whole pie is too much fuss, these bars are a total game-changer. Think of them as the perfect mash-up of pie and brownie— creamy, tart, and easy to handle. Trust me, they disappear faster than you can say “one more bite.” Plus, they’re a breeze to whip up, which means no long wait between craving and indulging.
What is Key Lime Pie?
So, what exactly are Key Lime Pie Bars? Think of them as a portable, more casual sibling of the traditional Key Lime Pie. Instead of the deep-dish pie with a graham cracker crust and whipped cream you’re probably imagining, these bars offer the same vibrant lime kick wrapped up in a tender, buttery base. The “key lime” refers to those small, aromatic limes from the Florida Keys, known for their bright acidity and floral zest, but don’t stress if you can’t find them—the regular limes work just fine and are what I usually use. It’s essentially a shortbread crust loaded with a smooth, tart lime filling, all baked into a pan and cut into easy squares—perfect for picnics, potlucks, or just a lazy afternoon snack. The best part? It’s not fussy, so even if you don’t consider yourself a “baker,” this one’s totally approachable.
Why you’ll love this recipe?
What I love most about these Key Lime Pie Bars is how effortless they are without skimping on flavor. The tangy lime filling is vibrant but balanced, with a hint of sweetness that makes every bite refreshing and satisfying. It’s the kind of dessert that wakes up your taste buds without overwhelming them—perfect when you’re craving something citrusy after a heavy meal. Pairing that with a tender crust that’s just buttery enough gives you the best of both worlds: creamy and crumbly, sweet and tart.
Besides the flavor, this recipe wins major points for simplicity. I usually keep all the ingredients on hand already: graham crackers, just a bit of butter, sweetened condensed milk, lime juice, and a couple of eggs. No exotic or pricey components to stress over. And because it’s made in a single pan, the cleanup barely takes any time, which is a lifesaver on busy days—or when I’m juggling a million things and just want a quick, rewarding treat.
Another thing that makes these bars special is their versatility. I’ve served them at brunch alongside fresh berries and whipped cream, and just as often as a casual after-dinner treat with a scoop of vanilla ice cream. They hold up beautifully for gatherings or easy weeknight indulgences. If you’re a fan of other citrus desserts—like lemon bars or my grandma’s orange cake—you’ll find these bars hit a similar sweet spot, but with that unmistakable tropical twist only key lime can provide.
How do I make Key Lime Pie Bars?
Quick Overview
Here’s the lowdown: first, you create a buttery graham cracker crust that bakes just until golden. Then, you whip up a luscious key lime filling with sweetened condensed milk, fresh lime juice, and eggs for richness. After pouring the filling over the baked crust, you bake it just a little longer until it’s set but still silky. The whole process is quick, straightforward, and the result is slices of summery bliss that balance tart and sweet like a dream. No complicated folding or fancy techniques—just simple mixing, baking, and waiting for that irresistible aroma to fill your kitchen.
Ingredients
For the Crust:
- 1 1/2 cups graham cracker crumbs (I always crush mine fresh from the crackers for the best texture, but pre-packaged
- 6 tablespoons unsalted butter, melted (makes the crust perfectly tender and holds it together without being greasy)
- 1/4 cup granulated sugar (balances the saltiness in the crackers and adds a subtle crunch)
For the Filling:
- 3 large eggs (room temperature to help the filling mix smoothly)
- 1 can (14 ounces) sweetened condensed milk (the magic ingredient that makes it creamy without needing heavy cream)
- 1/2 cup fresh key lime juice (or regular lime juice if key limes aren’t available—fresh juice is a must for that vibrant flavor)
- Zest of 2 limes (adds another dimension of fresh citrus aroma)
For the Glaze (Optional but recommended):
- 1 cup powdered sugar
- 1-2 tablespoons fresh lime juice (adjust for preferred glaze consistency)
- A pinch of salt (to tone down the sweetness and amplify the lime)
- Optional: a teaspoon of vanilla extract for subtle warmth
Step-by-Step Instructions
Step 1: Preheat & Prep Pan
Get your oven warming up to 350°F (175°C). I usually line an 8×8 or 9×9-inch baking pan with parchment paper—this is a lifesaver for easy bar removal. If parchment isn’t available, greasing well with butter and dusting with a little flour helps prevent sticking. While the oven’s heating, you can prep your crust ingredients.
Step 2: Mix Dry Ingredients
In a medium bowl, stir together the graham cracker crumbs and sugar. I like to mix just until combined so none of the sugar settles at the bottom. The key here is to get an even blend for consistent sweetness in every bite.
Step 3: Mix Wet Ingredients
Now, pour in the melted butter and stir gently to coat all the crumbs. The mixture should look sandy but slightly clumpy when you pinch it together. This moisture will help bind the crust into a firm, but tender, base once baked.
Step 4: Combine
Press the crust mixture into the prepared pan evenly, using the back of a spoon or your fingers. Pro tip: pack it down firmly but not too much—you want it compact enough to hold together, but still with a bit of crumbly texture. Pop that into the oven and bake for about 8-10 minutes, just lightly golden. You’ll smell the buttery aroma—trust me, this is the moment when the kitchen feels like magic.
Step 5: Prepare Filling
While the crust cools slightly, whisk the eggs in a bowl until just combined (no need to go crazy). Add the sweetened condensed milk, fresh lime juice, and lime zest and whisk until smooth and pudgy. The filling should be velvety, shiny, and fragrant with that citrus burst.
Step 6: Layer & Swirl
Pour the filling over the warm crust and gently spread it out for an even layer. For fun, sometimes I drop little dollops of extra condensed milk on top and use a toothpick to swirl it in—gives it a pretty marbled look and a touch of sweetness. This step is optional but adds a lovely rustic touch.
Step 7: Bake
Pop it back in your oven for 12-15 minutes. You’re aiming for the filling to be just set around the edges but a tiny bit jiggly in the center—that’s how you get that luscious creamy texture after chilling. Keep an eye, though, since ovens vary and you don’t want it rubbery or cracked.
Step 8: Cool & Glaze
Let the bars cool completely in the pan, then pop them in the fridge for at least 2 hours to really let that lime flavor deepen and the filling set firmly. When they’re chilled, mix up the glaze and drizzle it over the top. If you want, you can also dust with a little extra lime zest or finely grated white chocolate for a fancy finish.
Step 9: Slice & Serve
Pull out the bars using the parchment paper edges, then slice carefully with a sharp knife. I always keep a warm towel nearby to wipe the knife between cuts for clean edges. Serve them chilled or at room temp. They’re gorgeous garnished with whipped cream or served alongside a scoop of coconut ice cream—my family’s favorite way, especially in the summer heat.
What to Serve It With
For Breakfast: I know it sounds a bit decadent, but these bars with a strong cup of black coffee or creamy latte make a surprisingly delightful morning treat—like a little wake-up call with sunshine in every bite.
For Brunch: I like to plate these bars alongside fresh berries and a dollop of mascarpone or lightly sweetened cream cheese. Add sparkling water with a splash of fresh lime for a refreshing combo that feels fancy but is entirely doable on a weekend.
As Dessert: After dinner, these bars shine with a scoop of vanilla bean ice cream or a few fresh raspberries. Sometimes I throw on a few mint leaves for a pop of color and brightness. The tart lime helps balance out richer meals, and the creamy texture rounds off the perfect finale.
For Cozy Snacks: When the afternoon slump hits, a bowl of these bars paired with a cup of chamomile or green tea hits the spot. I love keeping these bars in the fridge for those moments when I want a sweet pick-me-up but don’t want to overdo it.
My kiddos are especially fond of these bars at school lunches too—they’re easy to pack and never fail to get rave reviews from classmates. Sharing these bars around the table has become a little family tradition, and I swear, they bring a smile with every bite.
Top Tips for Perfecting Your Key Lime Pie Bars
Lime Juice Quality: Freshly squeezed is absolutely the way to go. Bottled lime juice just doesn’t have the same brightness, and you want that zing to be front and center. I sometimes mix key lime with regular lime juice if I don’t have enough of either.
Crust Consistency: Don’t skimp on packing the crust down firmly—it’s essential for bars that hold together when sliced. I press mine down with the bottom of a flat glass to get an even layer.
Don’t Overbake: The filling should still jiggle slightly in the center when you take it out. It finishes setting in the fridge, and this trick keeps it creamy and silky instead of dry and crumbly.
Swirling Variations: If you want to get fancy, try stirring in a little grated white chocolate or swirl in a raspberry puree along with the glaze. Gives the bars a beautiful color contrast and extra flavor punch.
Glaze Alternatives: Sometimes I skip the glaze altogether and dust with powdered sugar or top with a dollop of sour cream for a tangier finish. Each variation feels like a new take but keeps that signature lime pop.
Ingredient Swaps: If you want to lighten it up a bit, I’ve played around with using half the butter and adding Greek yogurt for moisture—it works but changes the texture a bit, making it more cake-like. Also, coconut flour works for a low-carb twist but needs extra liquid, so I never fully replace graham cracker crumbs.
Oven Hotspots: Ovens can be tricky! I rotate my pan halfway through baking to get even color and prevent the edges from browning too fast.
After years of making these bars, I’ve learned patience with cooling and chilling is the real key to those perfect squares that slice beautifully. And trust me, the glaze finishing touch is worth the extra minute—it adds that glossy zing that makes guests ask, “What’s your secret?”
Storing and Reheating Tips
Room Temperature: If you’re planning to eat them the same day, keep the bars covered tightly on the counter for a few hours—no more than 4, or the lime filling starts to soften too much. I always cover mine with a clean kitchen towel or a cake dome to keep them fresh but accessible.
Refrigerator Storage: I store these bars in an airtight container or keep them wrapped tightly in plastic wrap in the fridge. They keep beautifully for up to 5 days. Don’t worry if the glaze softens a bit—it’ll still taste just as good, and chilling really intensifies that lime flavor.
Freezer Instructions: For longer storage, wrap individual bars in plastic wrap and place them in a freezer-safe bag or container. They freeze well for up to 3 months. When you want to enjoy, just thaw them overnight in the fridge or let sit on the counter for 30 minutes. I avoid freezing the glaze, though—I prefer to glaze them fresh right before serving.
Glaze Timing Advice: If you’re storing in the fridge or freezer, I recommend waiting to add the glaze until just before serving. It keeps the topping from absorbing moisture and becoming runny. Plus, fresh glaze tastes fresher and zingier every time.
Frequently Asked Questions
Final Thoughts
These Key Lime Pie Bars have been a total treasure in my kitchen—not just for their bright, tangy flavor but for how they’ve brought my family together through countless shared moments. Whether it’s an impromptu dessert or a special occasion, there’s comfort in slicing into these vibrant squares that remind me of sunny afternoons and laughter. If you ever find yourself hesitating to bake a whole pie, this recipe is your shortcut to sunny citrus happiness with way less fuss. Plus, it’s a crowd-pleaser that feels both familiar and a little special.
If you’re into these bars, you might want to check out some of my other citrus-inspired treats like Lemon Blueberry Bread or Orange Cream Cheese Muffins—they all carry that same light, joyful spirit. I can’t wait to hear how your Key Lime Pie Bars turn out, so don’t be shy—drop a comment or share your spin on this classic! Happy baking!
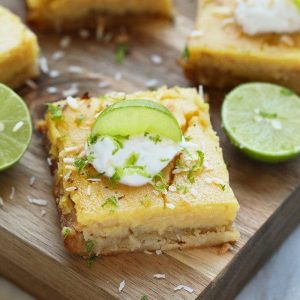
Easy Coconut Key Lime Pie Bars
Ingredients
Main Ingredients
- 1.5 cups almond flour (superfine)
- 0.25 cup unsweetened shredded coconut
- 2.5 tablespoons coconut oil (melted)
- 3 tablespoons honey
- 1 teaspoon vanilla extract
- 0.125 teaspoon salt
- 4 large eggs
- 0.5 cup key lime juice Normal lime juice can be used as a substitute
- 0.5 cup honey
- 4 teaspoons coconut flour
- Optional toppings Greek yogurt, lime zest, toasted coconut
Instructions
Preparation Steps
- Preheat oven to 350ºF and line an 8-inch by 8-inch pan with parchment paper. Set aside.
- Mix almond flour, shredded coconut, melted coconut oil, honey, vanilla extract, and salt to form a dough. Press evenly into pan ensuring uniform thickness.
- Bake crust for 8 minutes at 350ºF.
- While crust bakes, whisk eggs, key lime juice, honey, and coconut flour until smooth with no lumps.
- Pour filling onto pre-baked crust and bake an additional 18 to 22 minutes until set.
- Remove from oven and cool on counter for 10 minutes. Refrigerate for at least 2 hours before slicing.
- Slice into 16 bars and serve topped with optional Greek yogurt, lime zest, and toasted coconut.