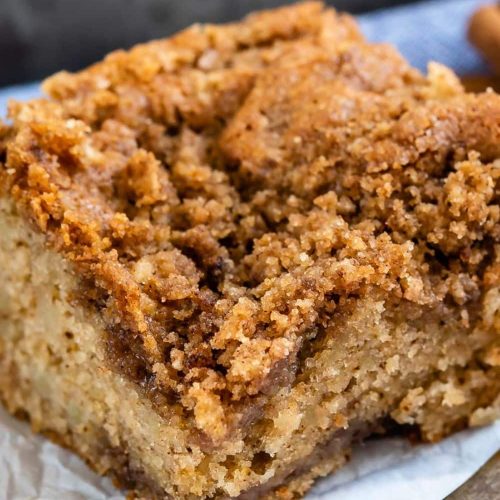
You know those recipes that just feel like coming home? The ones that smell incredible while they bake and disappear faster than you can say “second slice”? This Sweet Potato cake is *that* recipe for me. It’s funny, I used to think sweet potatoes were just for Thanksgiving dinner, you know, mashed with marshmallows or baked whole. But then I stumbled upon a little secret: they are absolutely magical in cakes! This isn’t your average, dry, crumbly cake. Oh no. This sweet potato cake is unbelievably moist, tender, and has this cozy, comforting spice blend that just wraps you up. It’s the perfect balance of sweet and earthy, and honestly, it’s the dessert I reach for when I need a little bit of sunshine on a cloudy day, or when I have unexpected guests and need something impressive that doesn’t take all day to make. If you love a good spiced cake, but want something a little different and infinitely more delicious, you’ve got to try this.
What is sweet potato cake?
So, what exactly *is* this marvelous creation? Think of it as a super-moist, incredibly flavorful cake that uses cooked sweet potato puree as its star ingredient. It’s not just a subtle hint, either. The sweet potato lends its natural sweetness, its gorgeous color, and most importantly, its fantastic moisture. This is what keeps the cake from ever feeling dry, no matter how long it sits (though, let’s be real, it rarely sits for long!). It’s essentially a warm hug in cake form, infused with classic baking spices like cinnamon, nutmeg, and a whisper of clove. The name itself just sounds so comforting, doesn’t it? It’s a rustic, down-to-earth kind of dessert that feels both familiar and excitingly new. It’s the kind of cake that makes your kitchen smell like a cozy bakery on a crisp autumn morning, even in the middle of July.
Why you’ll love this recipe?
Honestly, there are so many reasons why this sweet potato cake has become a staple in my baking rotation, and I just know you’ll fall in love with it too. First and foremost, the flavor is just out of this world. It’s subtly sweet with a depth of flavor you don’t always get from regular cakes. The spices really sing, and the sweet potato adds this wonderful, almost caramel-like undertone. It’s not overpowering, but it makes the cake feel so much more complex and satisfying. Then there’s the texture – oh, the texture! It’s incredibly tender and moist. I’ve had people try it who were skeptical about “vegetable cake,” and they’re always blown away by how decadent it is. It’s genuinely moist without being dense or gummy, which is a tricky balance to strike, but this recipe nails it every single time. Plus, it’s surprisingly simple to make. You don’t need any fancy equipment, just a few bowls and a whisk. Even if you’re not a seasoned baker, you can whip this up and impress everyone. And talk about budget-friendly! Sweet potatoes are usually pretty inexpensive, especially when they’re in season. This recipe uses common pantry staples, so it’s a treat you can feel good about making without breaking the bank. What I love most about this sweet potato cake, though, is its versatility. It’s fantastic on its own, but it’s also a beautiful base for a cream cheese frosting or a simple dusting of powdered sugar. It’s perfect for breakfast, a satisfying dessert, or even a special afternoon treat. It honestly stands up to some of the best spiced cakes and even rival some Carrot Cake recipes with its moistness and flavor profile, but with its own unique, comforting charm.
How do I make a sweet potato cake?
Quick Overview
This sweet potato cake comes together with minimal fuss. We’ll start by getting our sweet potato ready, then combine our dry and wet ingredients separately before bringing them all together into a beautiful batter. A simple, luscious filling is swirled in to create gorgeous patterns, and then it bakes up into a masterpiece. The whole process, from gathering ingredients to getting it in the oven, takes less than 30 minutes of active time. It’s genuinely one of the easier cakes I bake, but the results are always so impressive. The key is ensuring your sweet potato is cooked until very soft and then properly mashed or pureed.
Ingredients
For the Main Batter:
1 ½ cups all-purpose flour: I always use all-purpose for this cake; it provides the perfect structure. Make sure to measure it correctly by spooning it into your cup and leveling it off, not by scooping directly from the bag. This prevents a dry cake.
1 teaspoon baking soda: This is what helps our cake rise and become light and airy.
½ teaspoon baking powder: A little extra lift never hurt anyone, right?
½ teaspoon salt: Balances the sweetness and brings out all the other flavors.
1 teaspoon ground cinnamon: The backbone of our spice blend. Use a good quality one for the best flavor.
½ teaspoon ground nutmeg: Adds that warm, slightly nutty depth.
¼ teaspoon ground cloves: Just a pinch here, it’s potent but adds an amazing complexity.
1 cup granulated sugar: For sweetness and tenderizing the cake.
½ cup packed light Brown Sugar: Adds moisture and a lovely caramel note.
½ cup unsalted butter, softened: This is crucial for flavor and texture. Make sure it’s truly softened, not melted.
2 large eggs: At room temperature, they incorporate much better.
1 teaspoon vanilla extract: A must for rounding out all the flavors.
1 cup cooked and mashed sweet potato puree: You can bake or boil your sweet potato until fork-tender, then mash it smoothly. Make sure there are no lumps! For the smoothest texture, you can even give it a whirl in a food processor or use a potato ricer. About one medium sweet potato yields enough puree.
½ cup milk (any kind works!): I often use whole milk for richness, but I’ve tested this with almond milk and it actually made it even creamier!
For the Filling:
½ cup packed light brown sugar: This forms the sweet base of our filling.
2 tablespoons all-purpose flour: This helps thicken the filling so it doesn’t seep out too much.
1 teaspoon ground cinnamon: More of that lovely spice!
¼ teaspoon ground nutmeg: To complement the cinnamon.
4 tablespoons unsalted butter, melted: This binds the filling together and makes it rich and luscious.
For the Glaze:
1 cup powdered sugar: For that perfectly smooth, sweet glaze.
2-3 tablespoons milk or cream: To get the right drizzling consistency. I prefer cream for a richer glaze, but milk works beautifully.
½ teaspoon vanilla extract: Enhances the sweetness.
Optional: A tiny pinch of salt to balance the sweetness.
Step-by-Step Instructions
Step 1: Preheat & Prep Pan
First things first, let’s get the oven ready. Preheat it to 350°F (175°C). Now, grab a 9×13 inch baking pan. I like to grease it really well with butter or non-stick spray, and then give it a light dusting of flour. This ensures our beautiful cake won’t stick. You can also line it with parchment paper for extra insurance, leaving some overhang to easily lift the cake out later. This step is non-negotiable for a clean release!
Step 2: Mix Dry Ingredients
In a medium bowl, whisk together the all-purpose flour, baking soda, baking powder, salt, cinnamon, nutmeg, and cloves. Give it a good whisking until everything is evenly distributed. This ensures your leavening agents and spices are perfectly spread throughout the batter, leading to a consistent rise and flavor. I always do this step first so everything is ready to go.
Step 3: Mix Wet Ingredients
In a large bowl, cream together the softened butter, granulated sugar, and light brown sugar until the mixture is light and fluffy. This usually takes a few minutes with an electric mixer, or a bit longer if you’re doing it by hand. Beat in the eggs, one at a time, making sure each one is fully incorporated before adding the next. Stir in the vanilla extract and the mashed sweet potato puree until everything is smooth and well combined. Then, gradually add the milk, mixing until just incorporated. The batter might look a little strange at this stage, but trust the process!
Step 4: Combine
Now, we’ll add the dry ingredients to the wet ingredients. Pour about half of the dry mixture into the wet mixture and mix on low speed (or whisk gently) until just combined. Don’t overmix! Then, add the remaining dry ingredients and mix again until no dry streaks remain. It’s crucial here to mix *just* until everything is combined. Overmixing develops the gluten in the flour, which can lead to a tougher cake. A few small lumps are perfectly fine.
Step 5: Prepare Filling
In a small bowl, combine the light brown sugar, flour, cinnamon, and nutmeg for the filling. Pour in the melted butter and stir until it forms a thick, paste-like consistency. It should be moist enough to hold together but not overly wet.
Step 6: Layer & Swirl
Pour about half of the cake batter into your prepared baking pan and spread it evenly. Now, dollop spoonfuls of the filling mixture over the batter. Don’t worry about making it perfect; just scatter it around. Then, carefully pour the remaining cake batter over the filling layer. You can gently spread it to cover most of the filling. For that beautiful swirl effect, take a butter knife or a skewer and gently swirl through the batter, cutting through the top layer and slightly into the bottom to create marbled patterns. Don’t over-swirl, or you’ll lose the definition!
Step 7: Bake
Pop the pan into your preheated oven. Bake for 30-40 minutes, or until a wooden skewer or toothpick inserted into the center of the cake comes out clean, with perhaps a few moist crumbs attached (but no wet batter). Oven temperatures can vary, so start checking around the 30-minute mark. If the top starts to brown too quickly, you can loosely tent it with aluminum foil.
Step 8: Cool & Glaze
Once baked, remove the cake from the oven and let it cool in the pan on a wire rack for about 15-20 minutes. This allows the cake to set up properly. While the cake is cooling, whisk together the powdered sugar, 2 tablespoons of milk or cream, and vanilla extract in a small bowl. Add more liquid, a teaspoon at a time, until you reach your desired drizzling consistency. It should be thick enough to coat the back of a spoon but thin enough to pour easily. Once the cake has cooled slightly, drizzle the glaze generously over the top. Let the glaze set for a few minutes before slicing.
Step 9: Slice & Serve
For the cleanest slices, use a sharp knife and cut the cake while it’s still slightly warm or completely cooled. If you want to serve it warm, a minute or two in the microwave can bring it back to perfection. I love serving this cake slightly warm with the glaze still a little soft. It’s utterly divine. You can also let it cool completely and serve it at room temperature.
What to Serve It With
This sweet potato cake is so wonderfully versatile, it fits into almost any meal or occasion! For a delightful breakfast, it’s heavenly with a strong cup of coffee or a creamy latte. I love cutting a small, thin slice and serving it alongside some fresh fruit – maybe some berries or sliced apples. The sweetness of the cake and the warmth of the coffee are just perfect for starting the day on a cozy note. When we do brunch, I often cut slightly larger squares and arrange them on a tiered stand. It looks so elegant! It pairs beautifully with a mimosa or a sparkling cider. Sometimes, I’ll even add a dollop of whipped cream or a small scoop of vanilla bean ice cream on the side for a more decadent brunch treat. As a dessert, well, it truly shines. It’s wonderful served warm with a scoop of vanilla ice cream or a drizzle of caramel sauce. For a truly elegant finish, a generous dollop of cream cheese frosting takes it to a whole new level – it’s one of my favorite combinations. And for those moments when you just need a comforting snack, a slice of this cake is pure bliss. It’s the perfect companion to a good book and a cup of tea on a lazy afternoon. My family has a tradition of having a slice with hot chocolate on chilly evenings, and it’s just the coziest thing imaginable.
Top Tips for Perfecting Your Sweet Potato Cake
I’ve made this sweet potato cake more times than I can count, and over the years, I’ve picked up a few tricks that I think really make a difference. So, let’s dive into some of my favorite tips to ensure your cake turns out absolutely perfect every single time. First, when it comes to your sweet potato, don’t just boil it and drain. I actually like to bake my sweet potatoes until they’re super soft. You can do this wrapped in foil on a baking sheet. This method concentrates the flavor and reduces excess moisture, which is key for a tender cake. Once baked, let it cool slightly, then scoop out the flesh and mash it really well, or even better, run it through a food mill or a ricer for the smoothest puree. No one wants potato lumps in their cake! For mixing, the golden rule is don’t overmix! Once you add the dry ingredients to the wet, mix just until they’re combined. A few small lumps are fine and often preferable to a tough cake. Overmixing develops the gluten, and we want a tender crumb here. When it comes to the swirl, don’t be shy, but also don’t go overboard. You want visible ribbons of that delicious filling, not a muddy mess. Gently drag your knife or skewer through the batter in a few places. Think of it like creating abstract art – a few swoops are all you need. For ingredient swaps, I’ve experimented a bit. If you don’t have brown sugar, you can use an equal amount of granulated sugar, but you might miss a little bit of that depth. For the milk, I’ve had success with oat milk and even coconut milk, though the flavor profile will change slightly. And if you’re out of eggs, you can try a flax egg (1 tablespoon ground flaxseed + 3 tablespoons water, let sit for 5 minutes) for each egg, but the cake might be a touch denser. Baking can be tricky, and ovens are notorious for their quirks. If your cake is browning too quickly on top, loosely tent it with foil for the last 10-15 minutes of baking. This traps steam and prevents the top from getting too dark before the inside is cooked through. And always, always do the toothpick test – it’s your best friend for determining doneness. For the glaze, consistency is everything. If it’s too thick, add milk or cream, just a teaspoon at a time, until it’s pourable. If it’s too thin, whisk in a little more powdered sugar. You want it to drizzle nicely but not run straight off the cake.
Storing and Reheating Tips
One of the best things about this sweet potato cake is how well it keeps! It’s fantastic for making ahead, which is a lifesaver on busy days. If you’re planning to enjoy it within a day or two, you can absolutely leave it on the counter. Just cover it loosely with plastic wrap or place it in an airtight container. It stays wonderfully moist at room temperature for about 2 days. If you think it’ll be longer than that, or if your kitchen is particularly warm, I highly recommend refrigerator storage. Pop it into an airtight container or wrap it well with plastic wrap. It will stay fresh and delicious in the fridge for up to 5 days. The flavor actually deepens a bit, which is a nice bonus! When it comes to freezing, this cake is a champion. I usually wait until it’s completely cooled and the glaze has set. Then, I wrap the whole cake tightly in a couple of layers of plastic wrap, followed by a layer of aluminum foil. This double-wrapping is key to preventing freezer burn. It can stay frozen for up to 3 months. To thaw, unwrap it and let it come to room temperature on the counter for a few hours. If you’ve frozen it with the glaze, it might look a little shiny or slightly moist upon thawing, but it will still taste amazing. For reheating, if you prefer your cake warm, a quick 15-20 seconds in the microwave is usually enough to bring it back to a lovely warmth. I find it’s best to glaze the cake *after* it has cooled slightly, but *before* it’s completely cooled if you’re planning on eating it within a day or two and storing it at room temp. If you plan to refrigerate or freeze, it’s often best to let the cake cool completely, then add the glaze just before serving for the best texture, especially if it’s a very humid day.
Frequently Asked Questions
Final Thoughts
I truly hope you give this sweet potato cake a try. It’s more than just a recipe to me; it’s a taste of home, a reliable comfort, and a guaranteed crowd-pleaser. The way the spices meld with the natural sweetness of the potato is just magical, and that moist, tender crumb is something truly special. It’s proof that simple ingredients can create something absolutely spectacular. If you love this recipe, you might also enjoy my spiced apple crumb cake or my incredibly moist banana bread – they share that same cozy, comforting vibe. I can’t wait to hear what you think of this sweet potato cake! Please leave a comment below and let me know how yours turned out, or if you have any fun variations to share. And if you snap a photo, don’t forget to tag me on social media! Happy baking, everyone!
Sweet Potato Crumb Cake
Ingredients
Crumb Topping
- 0.75 cup all-purpose flour
- 0.75 cup granulated sugar
- 0.5 cup packed brown sugar
- 1 tablespoon ground cinnamon
- 6 tablespoons unsalted butter melted
Cake Batter
- 4 large eggs whites and yolks separated, room temperature
- 2 cups granulated sugar
- 1 cup vegetable oil
- 2 cups sweet potatoes roasted, peeled, and mashed
- 0.3333 cup hot water
- 1 teaspoon vanilla extract
- 2 cups all-purpose flour
- 2.25 teaspoons baking powder
- 0.5 teaspoon baking soda
- 1 teaspoon ground cinnamon
- 1 teaspoon ground cloves
- 1 teaspoon salt
- 0.5 teaspoon ground nutmeg
Instructions
Preparation Steps
- Preheat oven to 350°F (175°C). Line a 9x13 inch pan with foil or parchment paper and spray with nonstick cooking spray.
- Make the streusel: In a medium bowl, whisk flour, brown sugar, granulated sugar, and cinnamon. Slowly add melted butter and whisk until crumbs are formed. The mixture will look wet, and that is expected.
- In the bowl of a stand mixer fitted with the whisk attachment, beat the egg whites on high speed until stiff peaks form. Transfer the egg whites to a small bowl and chill until ready to use.
- Clean your stand mixer bowl and switch to the paddle attachment. Beat the granulated sugar and oil on medium-high speed until combined. Add the egg yolks 1 at a time, combining well after each addition and scraping down the sides of the bowl as needed. Add the mashed sweet potatoes, hot water, and vanilla and beat for another 3-4 minutes.
- Turn your mixer to its lowest speed and carefully add the flour, baking powder, cinnamon, cloves, salt, baking soda, and nutmeg. Mix until the batter is just combined, being careful not to over mix. Remove the egg whites from the refrigerator and gently fold them in using a spatula or wooden spoon.
- Pour half the batter into the prepared pan. Top with half the streusel. Repeat with remaining batter and streusel. Bake for 55-65 minutes until a toothpick comes out moist but mostly clean. Let cool in the pan. Serve warm or room temperature. Store tightly covered at room temperature for up to 3 days.