You know those days? The ones where a craving hits you like a ton of bricks, a deep, chocolatey, fudgy craving, but the thought of all the fuss of traditional baking just makes you want to curl up on the couch instead? Yeah, I’ve been there. And on those days, my Sweet Potato brownies are an absolute lifesaver. They taste like pure indulgence, rich and decadent, and honestly, they’re a little bit of magic. They’re so surprisingly good that people never guess the secret ingredient is actually a vegetable! If you’re a fan of classic brownies but looking for something a touch more wholesome and with an incredible depth of flavor, you’re going to fall head over heels for these. They’re not just brownies; they’re a hug in edible form.
What are sweet potato brownies?
So, what exactly are these amazing sweet potato brownies? Think of them as your favorite rich, gooey chocolate brownies, but with a secret superpower. Instead of relying solely on butter and sugar for moisture and a tender crumb, we’re using pureed sweet potato. Don’t let that scare you! The sweet potato doesn’t make them taste like, well, sweet potatoes. What it does is lend an incredible moistness, a beautiful subtle sweetness, and a gorgeous, fudgy texture that you just can’t achieve with a typical brownie recipe. It’s essentially a way to make brownies even more decadent and satisfying, while also sneaking in some good-for-you nutrients. It’s like the best of both worlds, a dessert that feels like a treat but has a little something extra to offer. They’re fundamentally a fudgy brownie, but elevated!
Why you’ll love this recipe?
Honestly, the list is pretty darn long, but let me try to narrow it down to the most important bits. First off, the flavor. Oh my goodness, the flavor! They’re intensely chocolatey, with a depth that feels incredibly luxurious. The sweet potato doesn’t add a distinct flavor, but it enhances the chocolate and contributes to a richness that’s just divine. Then there’s the texture – this is where the sweet potato really shines. They are unbelievably fudgy, dense, and moist. If you love a brownie that melts in your mouth, these are for you.
And let’s talk about ease. These are surprisingly simple to whip up. You don’t need any fancy equipment, just a couple of bowls and a whisk. It’s the kind of recipe I can throw together on a weeknight when a chocolate emergency strikes, and it’s always a winner. My kids, who can be notoriously picky, gobble these up without a second thought. They’re also wonderfully cost-effective. Sweet potatoes are usually quite affordable, and the rest of the ingredients are pantry staples for most bakers. Plus, they’re so versatile! They’re fantastic warm, straight from the oven, but I honestly think they’re even better the next day. They’re perfect for breakfast (yes, I said breakfast!), a mid-afternoon pick-me-up, or a sophisticated dessert. Compared to other “healthier” brownie recipes out there, these truly don’t sacrifice on taste or texture. They stand on their own as just plain delicious brownies, with the added bonus of a little sweet potato goodness. What I love most is that they satisfy that deep chocolate craving in a way that feels both indulgent and a little bit responsible. It’s a win-win in my book!
How do I make sweet potato brownies?
Quick Overview
The process is pretty straightforward, which is why I love it so much. You’ll start by getting your sweet potato nice and soft, then whisking together the wet and dry ingredients separately. The magic happens when you combine them, being careful not to overmix. Then, it’s a matter of getting that delicious chocolatey mixture into your prepared pan, and if you’re feeling fancy, swirling in some extra chocolate or a ganache-like topping. Finally, you bake them until they’re just set, let them cool (the hardest part!), and then dig in. It’s really that simple!
Ingredients
For the Main Batter:
You’ll need about 1 cup of cooked and pureed sweet potato. Make sure it’s really smooth! You can bake your sweet potato until very tender (poke it with a fork, it should be easily pierced) and then mash it well, or you can steam it. I often roast mine because I find it brings out a nice sweetness. Once it’s cooked, let it cool slightly and then mash it until it’s completely lump-free. A food processor or blender works wonders here for a super smooth puree. If you’re short on time, you can sometimes find pre-cooked sweet potato puree in the baby food aisle, but just make sure it’s plain!
You’ll also need 1/2 cup (1 stick) unsalted butter, melted. I like to use unsalted so I have full control over the salt content.
1 and 1/4 cups granulated sugar. This provides sweetness and helps with that classic brownie texture.
2 large eggs, at room temperature. Room temperature eggs incorporate better into the batter.
1 teaspoon vanilla extract. Don’t skip this! It rounds out all the flavors.
1/2 cup all-purpose flour. Just regular ol’ AP flour works perfectly here.
1/3 cup unsweetened cocoa powder. I recommend using a good quality cocoa powder, like Dutch-processed, for a deeper chocolate flavor.
1/2 teaspoon baking powder. This just gives them a little lift.
1/4 teaspoon salt. Crucial for balancing the sweetness and enhancing the chocolate.
1/2 cup chocolate chips (optional, but highly recommended!). Milk, semi-sweet, or dark – whatever your heart desires.
For the Filling (Optional, but SO good!):
If you want to take these to the next level, a simple swirl is amazing. You can whip up a quick ganache-like filling with 1/4 cup heavy cream and 1/2 cup chopped dark chocolate. Just heat the cream until simmering, pour it over the chocolate, let it sit for a minute, then stir until smooth. It’s decadent!
For the Glaze (Optional):
If you prefer a glossy finish, a simple glaze made from 1/2 cup powdered sugar, 1 tablespoon cocoa powder, and 1-2 tablespoons milk or water stirred together until smooth is perfect. Adjust the liquid for your desired consistency.
Step-by-Step Instructions
Step 1: Preheat & Prep Pan
First things first, get your oven preheating to 350°F (175°C). This ensures it’s nice and hot when your batter is ready. Then, grab an 8×8 inch baking pan. I like to line mine with parchment paper, leaving a little overhang on the sides. This makes it SO easy to lift the brownies out once they’re done. Just grease the pan a little before you lay the parchment in, and grease the parchment too. It guarantees no sticking!
Step 2: Mix Dry Ingredients
In a medium bowl, whisk together your flour, cocoa powder, baking powder, and salt. Give it a good whisk to make sure everything is evenly distributed. This helps prevent clumps of cocoa or baking powder in your finished brownies. You want a nice, uniform dry mixture.
Step 3: Mix Wet Ingredients
In a large bowl, combine your pureed sweet potato, melted butter, sugar, eggs, and vanilla extract. Whisk it all together until it’s smooth and well combined. Don’t worry if it looks a little glossy or slightly separated; that’s totally fine. You’re just aiming to incorporate everything nicely.
Step 4: Combine
Now, pour the dry ingredients into the wet ingredients. Gently fold them together with a spatula or wooden spoon. The key here is NOT to overmix. Mix just until you no longer see streaks of dry flour. A few small lumps are okay. Overmixing can develop the gluten too much, leading to tougher brownies, and we want these to be super tender and fudgy. If you’re adding chocolate chips to the batter, fold them in now.
Step 5: Prepare Filling (If using)
If you’re making that optional chocolate swirl filling, this is the time to do it. Heat your heavy cream until it’s just simmering (don’t boil!), pour it over the chopped dark chocolate in a heatproof bowl, and let it sit for about 5 minutes. Then, stir gently until it’s completely smooth and glossy. Set aside.
Step 6: Layer & Swirl
Pour your brownie batter into the prepared baking pan and spread it out evenly with your spatula. If you’re using the chocolate filling, dollop spoonfuls of it over the top of the batter. Then, take a knife or a skewer and gently swirl the filling into the batter. You want pretty swirls, not a completely mixed-in mess. Just a few passes will do the trick to create beautiful marbled patterns.
Step 7: Bake
Pop the pan into your preheated oven. Bake for about 25-30 minutes. You’ll know they’re done when a toothpick inserted into the center comes out with moist crumbs attached, not wet batter. Be careful not to overbake them, as they’ll continue to cook a little as they cool. A slightly underbaked brownie is a happy brownie!
Step 8: Cool & Glaze
This is the hardest part – waiting for them to cool! Let them cool in the pan on a wire rack for at least 20-30 minutes. Once they’ve cooled a bit, you can lift them out using the parchment paper overhang. If you’re adding the glaze, whisk together the powdered sugar, cocoa powder, and liquid until smooth. Drizzle it over the slightly warm or cooled brownies. Let the glaze set before slicing.
Step 9: Slice & Serve
Once completely cooled (or at least mostly cooled, if you can’t wait!), use a sharp knife to slice them into squares. I find that wiping the knife clean between cuts helps keep the slices neat. Enjoy them as is, or serve with a scoop of vanilla ice cream or a dollop of whipped cream. Pure bliss!
What to Serve It With
These sweet potato brownies are so versatile, they can be enjoyed in so many ways and at any time of day! For breakfast, I love a small square with my morning coffee. It feels like a decadent start to the day without being too heavy. Sometimes, I’ll even crumble a tiny bit on top of my Greek yogurt for a special treat.
For a proper brunch, they make an excellent addition to a dessert platter. I like to serve them alongside some fresh berries – the tartness of the berries cuts through the richness of the brownie beautifully. A light dusting of powdered sugar or a few fresh mint leaves makes them look extra special.
As a dessert, they’re a classic. They are absolutely divine served warm with a scoop of good quality vanilla bean ice cream. The contrast of warm brownie and cold ice cream is just heavenly. A drizzle of raspberry coulis or a sprinkle of toasted chopped nuts adds another layer of flavor and texture.
And for those cozy snack times? They’re perfect just as they are, maybe with a glass of cold milk. My family has a tradition of having them on movie nights; they’re always a huge hit. Honestly, they’re so good, they don’t really need anything else, but pairing them with a warm mug of tea or coffee is always a comforting choice.
Top Tips for Perfecting Your Sweet Potato Brownies
I’ve made these sweet potato brownies countless times, and over the years, I’ve picked up a few tricks that I think really make a difference. Let’s dive into them!
Sweet Potato Prep: The most crucial step is getting your sweet potato really smooth. If you have lumps, you’ll feel them in the final brownie. Roasting or baking the sweet potato until it’s fork-tender and then pureeing it in a food processor or blender is your best bet for a silky smooth texture. Make sure it’s cooled slightly before mixing it into the batter; you don’t want to scramble those eggs!
Mixing Advice: Seriously, do not overmix the batter once you add the flour. Just mix until the dry ingredients are *just* incorporated. A few little lumps are perfectly fine. Overmixing is the number one culprit for tough, cakey brownies, and we want these to be dense and fudgy. It’s better to slightly undermix than overmix.
Swirl Customization: If you’re adding that chocolate swirl filling, have fun with it! Don’t go crazy swirling too much, or you’ll lose the definition. Aim for elegant, random patterns. You can also try adding a swirl of peanut butter or even some caramel sauce for a different flavor profile. It’s all about making it your own!
Ingredient Swaps: I’ve experimented with different flours, and an all-purpose gluten-free blend works well if you need to go gluten-free. For the sugar, you can reduce it slightly if you prefer a less sweet brownie, but don’t go too low, as sugar plays a role in texture too. You can also swap out the chocolate chips for chopped nuts like walnuts or pecans if that’s your preference, or add them in addition to the chips!
Baking Tips: Ovens can be so finicky! Keep an eye on your brownies during the last 10 minutes of baking. Every oven is different, and you want them to be just set. The toothpick test is your best friend – aim for moist crumbs, not a clean toothpick (which means they’re overbaked). If you find your edges are browning too quickly, you can loosely tent the pan with foil.
Glaze Variations: For a simpler finish, you can just dust them with a bit of powdered sugar once they’re cooled. If you want a richer topping, try a cream cheese frosting or a simple chocolate ganache. The key with the glaze is to let the brownies cool down enough so the glaze doesn’t melt right off!
Storing and Reheating Tips
One of the best things about these sweet potato brownies is how well they keep. They actually seem to get even fudgier and more flavorful the next day, which is a miracle in my book!
Room Temperature: If you’re planning to eat them within a day or two, they are perfectly fine stored in an airtight container at room temperature. I usually just pop them in a good quality plastic container or wrap the baking pan tightly with plastic wrap. They’ll stay moist and delicious for about 2-3 days this way.
Refrigerator Storage: If you want them to last a bit longer, or if your kitchen is particularly warm, storing them in the refrigerator is a great option. Pop them in an airtight container, and they should stay fresh for up to a week. I find that they are absolutely delicious cold, straight from the fridge, but if you prefer them warm, you can gently reheat them.
Freezer Instructions: These brownies freeze beautifully, making them perfect for making ahead. Once they’re completely cooled, cut them into squares. Wrap each square individually in plastic wrap, and then place them in a freezer-safe bag or container. They’ll last in the freezer for about 2-3 months. To thaw, simply unwrap them and let them come to room temperature on a plate, or gently reheat them in the microwave or oven.
Glaze Timing Advice: If you’ve glazed your brownies, they’re generally best stored at room temperature for up to 2 days or in the refrigerator for up to 4-5 days. If you plan to freeze them with glaze, it’s best to freeze the unglazed brownies and add the glaze after thawing. This prevents the glaze from becoming sticky or cracking during the freezing and thawing process.
Frequently Asked Questions
Final Thoughts
So there you have it – my absolute favorite way to make brownies! These sweet potato brownies are more than just a dessert; they’re a little bit of kitchen magic that proves you can have incredible flavor and texture while sneaking in some goodness. They’re fudgy, rich, and deeply satisfying, and the fact that they’re relatively easy to make just adds to their charm. They’re perfect for satisfying that late-night chocolate craving, bringing to a potluck, or just making a regular Tuesday feel a little more special. If you love a truly decadent brownie but are looking for something a little different, you absolutely have to give these a try. They’ve earned a permanent spot in my recipe repertoire, and I have a feeling they’ll earn one in yours too.
If you enjoy these, you might also want to check out my recipe for [Link to another chocolatey recipe, e.g., “Fudgy Chocolate Chip Cookies”] or my [Link to another naturally-sweetened recipe, e.g., “No-Bake Energy Bites”]. I’d absolutely love to hear how yours turn out! Please leave a comment below with your thoughts, any variations you tried, or if you have any questions. And if you snap a pic, don’t forget to tag me on social media! Happy baking, everyone!
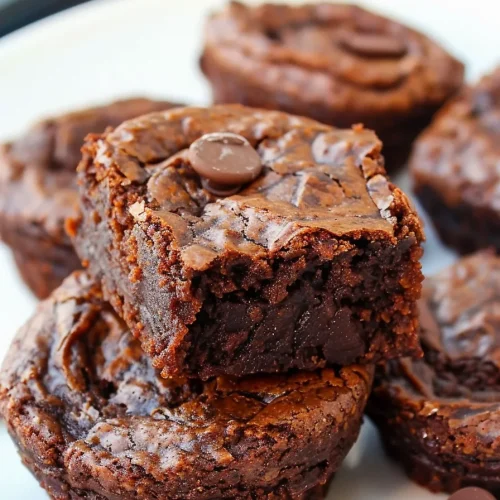
sweet potato brownies
Ingredients
Main Ingredients
- 1 cup cooked sweet potato (mashed)
- 0.5 cup peanut butter or almond butter
- 0.25 cup maple syrup or honey
- 0.25 cup cocoa powder
Instructions
Preparation Steps
- Preheat oven to 350°F (175°C) and grease a mini muffin tin.
- Prepare the sweet potato: Peel, pierce, and microwave a large sweet potato for 5-10 minutes until soft. Mash and measure 1 cup.
- Melt mixture: In a small saucepan, heat peanut butter and maple syrup until melted.
- Mix ingredients: In a bowl, combine mashed sweet potato, melted mixture, and cocoa powder. Stir until smooth.
- Fill the muffin tin: Pour the batter into the mini muffin tin.
- Bake for 20-22 minutes. Let cool before removing from the pan.