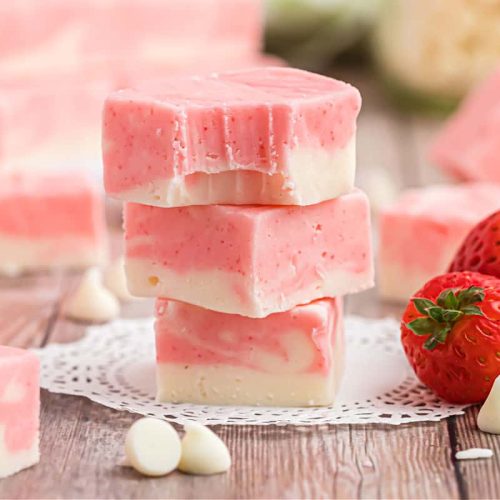
You know those recipes that just feel like a warm hug? The ones you pull out when you need a little bit of sweet comfort, or when you want to impress someone without spending hours in the kitchen? Well, this strawberry fudge is *that* recipe for me. It’s honestly one of the first things I learned to make that actually tasted store-bought good, and it’s become a staple, especially around springtime when fresh strawberries are at their peak. My mom used to make a version of this when I was little, and every time I whip up a batch, I’m instantly transported back to her kitchen, the air thick with the sweet scent of melting chocolate and bursting berries. It’s miles away from those grainy, disappointing fudge attempts you might have tried before; this strawberry fudge is smooth, creamy, and bursting with that authentic, bright strawberry flavor that just makes you smile. It’s like a little square of pure joy, and honestly, it’s so much easier than you think!
What is strawberry fudge?
So, what exactly *is* this magical strawberry fudge? At its heart, it’s a simple, no-bake confection that relies on the magic of condensed milk, sugar, and chocolate to create that signature chewy, melt-in-your-mouth texture. But the “strawberry” part? That’s where the real star comes in. We’re not just talking a hint of flavor; this fudge is packed with the vibrant taste of real strawberries. Think of it as a creamy, dreamy chocolate base that’s been kissed by the sweet, slightly tart essence of fresh berries. It’s essentially a shortcut to that decadent, rich dessert experience without any fuss. The name itself just sounds delightful, doesn’t it? Strawberry fudge – it conjures up images of pretty pink swirls and pure indulgence, and trust me, it lives up to the hype!
Why you’ll love this recipe?
Honestly, where do I even begin with why this strawberry fudge is a winner? First off, the flavor is just out of this world. It’s not just sweet; it has this wonderful balance from the strawberries that cuts through the richness of the chocolate. You get that initial hit of creamy chocolate, followed by this bright, fruity burst that is just absolutely divine. It’s like a little party in your mouth! Then there’s the simplicity factor, which, for me, is a huge deal. This recipe requires no fancy equipment, no tempering chocolate, and no hours spent slaving over a hot stove. You can genuinely whip this up in about 15 minutes of active time, which is a lifesaver when you’re craving something sweet but don’t have a lot of time. And speaking of time, it’s surprisingly budget-friendly too! The ingredients are all pretty standard pantry staples, with the fresh strawberries being the only seasonal element, and you don’t need a whole lot of them to get that intense flavor. What I love most about this is its versatility. It’s perfect for a quick treat, a lovely addition to a dessert platter, or even a thoughtful homemade gift. Unlike some finicky desserts, this strawberry fudge is incredibly forgiving. I’ve had nights where I’ve rushed through it, and it still turns out perfectly. It’s the kind of recipe that makes you feel like a baking rockstar with minimal effort.
How do you make strawberry fudge?
Quick Overview
The process for this strawberry fudge is wonderfully straightforward. We’ll start by getting our pan ready, then melt down some key ingredients to create a luscious base. Next, we’ll fold in that glorious strawberry goodness and pour it all into our prepared pan. A little swirl for pretty aesthetics, and then it’s just a matter of letting it set. It’s a no-bake marvel, meaning you can skip the oven entirely and let the magic happen in the fridge. This method ensures a consistently smooth texture and vibrant flavor every single time. It’s truly as easy as it sounds!
Ingredients
For the Main Batter:
You’ll need a good quality White Chocolate – I usually go for chips or finely chopped bars. About 2 cups (around 340g) is what I typically use. Make sure it’s good quality because it really makes a difference in the final texture and taste. Also, a can of sweetened condensed milk (14 ounces or about 397g) is essential. Don’t try to use evaporated milk or anything like that; the sugar in the condensed milk is key to the fudge’s structure and sweetness. A tablespoon or two of butter will add a lovely richness and help with that silky smooth consistency. And for a little zing, a pinch of salt really balances out the sweetness.
For the Filling:
This is where the star shines! Fresh strawberries are my absolute go-to. About 1 cup, finely chopped, is usually enough to give us that beautiful flavor and color without making the fudge too wet. If you can’t find fresh, you can use about 3/4 cup of good quality strawberry jam or preserves, but fresh really is best if you can swing it. Sometimes, I like to add a splash of vanilla extract (about 1 teaspoon) to the strawberry mixture to enhance its flavor, but it’s totally optional.
For the Glaze:
This is totally optional but adds such a pretty touch! You can make a simple glaze with about 1/2 cup of powdered sugar mixed with 1-2 tablespoons of milk or cream until you get a drizzle-able consistency. A tiny drop of red or pink food coloring can make it pop even more, but I often skip it and let the natural pink from the strawberries shine through. Some people like to add a bit of freeze-dried strawberry powder to their glaze for an extra punch of flavor, which is a fantastic idea!
Step-by-Step Instructions
Step 1: Preheat & Prep Pan
Grab an 8×8 inch baking pan. I like to line mine with parchment paper, leaving an overhang on two sides. This makes lifting the fudge out super easy later on. Just smooth it out so there are no wrinkles. While you’re at it, preheat your oven to 350°F (175°C) if you’re using the oven-baked method for melting the chocolate, otherwise, you can skip this for a stovetop method. For stovetop melting, get a double boiler ready or set up a heatproof bowl over a saucepan with about an inch of simmering water – make sure the bottom of the bowl doesn’t touch the water!
Step 2: Mix Dry Ingredients
In your heatproof bowl (or the top of your double boiler), combine the white chocolate chips or chopped chocolate and the butter. If you’re using the microwave method, heat in 30-second intervals, stirring well after each, until it’s mostly melted and smooth. If you’re using the stovetop, let it gently melt over the simmering water, stirring occasionally. The goal is a completely smooth, glossy mixture with no lumps. This forms the creamy base of our strawberry fudge.
Step 3: Mix Wet Ingredients
In a separate, medium-sized saucepan, pour in the sweetened condensed milk. Add the pinch of salt and vanilla extract (if using). Heat this mixture over medium-low heat, stirring constantly, until it just starts to bubble around the edges. You don’t want it to boil vigorously, just a gentle simmer to warm it through. This step helps to incorporate everything smoothly later on.
Step 4: Combine
Pour the warmed sweetened condensed milk mixture into the melted white chocolate. Stir gently until everything is completely combined and you have a smooth, luscious mixture. It should be thick and glossy. This is the magic moment where the base for your strawberry fudge really comes together. I always take a moment to appreciate how smooth it looks!
Step 5: Prepare Filling
While the chocolate mixture is still warm, gently fold in your finely chopped fresh strawberries. If you’re using strawberry jam, stir it in here too. Don’t overmix, you want to see little pockets and swirls of strawberry throughout. The warmth from the chocolate mixture will slightly soften the strawberries, releasing their flavor and color. You’re not cooking the strawberries, just gently incorporating them.
Step 6: Layer & Swirl
Pour the strawberry chocolate mixture into your prepared baking pan. Smooth the top gently with a spatula. If you want those pretty swirls, you can gently drag a skewer or knife through the mixture a few times. For a more uniform pink hue, you can swirl in a tablespoon or two of strawberry jam or a bit of strawberry extract into the top layer before smoothing. This is where you can get creative with the visual appeal of your strawberry fudge!
Step 7: Bake
Now, here’s where you have a choice. Some people prefer to skip the oven and just let it set in the fridge (it’ll take longer, maybe 4-6 hours). For a slightly firmer, more traditional fudge texture, you can bake it. Place the pan in the preheated oven at 350°F (175°C) for about 20-25 minutes. You’re not baking it to cook through like a cake, but just to help it set a bit more firmly. It should look slightly set around the edges but still a little soft in the center. Be careful not to overbake, or it can become crumbly.
Step 8: Cool & Glaze
Once baked (or if you skipped the oven), let the fudge cool completely in the pan on a wire rack. This is crucial! It needs to cool down to room temperature. Once it’s cooled, you can either pop it into the refrigerator to speed up the setting process (about 2-3 hours) or leave it at room temperature if it’s not too warm. If you’re adding a glaze, prepare it while the fudge is chilling. Drizzle the glaze over the cooled fudge. I like to do this in a zig-zag pattern. Let the glaze set for about 15-30 minutes before slicing.
Step 9: Slice & Serve
Once the fudge is completely set and the glaze has hardened slightly, use the parchment paper overhangs to lift the entire block out of the pan onto a cutting board. Use a sharp knife to cut it into squares. I find warming the knife under hot water and drying it between cuts helps to get cleaner slices, especially for fudge. Serve chilled or at room temperature. This strawberry fudge is absolutely delightful on its own!
What to Serve It With
This delightful strawberry fudge is so versatile, it fits in anywhere! For a special breakfast treat, imagine a small square alongside a cup of freshly brewed coffee or a bright mimosa. It adds a touch of elegance without being too heavy. At brunch, a few bite-sized pieces can be a beautiful addition to a charcuterie board or a dessert table, perhaps paired with some fresh fruit salad or a light mousse. For dessert, it’s a dream! Serve it with a scoop of vanilla bean ice cream or a dollop of whipped cream for pure indulgence. It’s also incredible alongside a rich Chocolate Cake or paired with a glass of port wine. And for those cozy, quiet moments, just a small piece with a warm cup of tea is pure bliss. My family loves it as a movie night snack, cut into little cubes, and it always disappears remarkably quickly. The sweetness is satisfying without being overwhelming, making it perfect for any time you need a little pick-me-up.
Top Tips for Perfecting Your Strawberry Fudge
Over the years, I’ve learned a few tricks that make this strawberry fudge recipe consistently perfect. When prepping your strawberries, make sure they are really finely chopped. Larger chunks can sometimes make the fudge a bit too moist or create uneven textures. If you’re using fresh strawberries and they seem particularly watery, you can gently press them between paper towels to remove excess moisture before chopping. For the chocolate melting step, patience is key! Don’t rush it, especially if you’re using the microwave. Stirring frequently and using short bursts of heat prevents scorching, which can ruin the flavor and texture. If you notice your chocolate seizing up (becoming grainy and stiff), it’s usually because a tiny bit of water got in there, or it overheated. Don’t panic; sometimes you can salvage it by stirring in a teaspoon of vegetable oil or shortening, but it’s best to avoid it altogether. When combining the condensed milk and chocolate, stir gently but thoroughly. You’re aiming for a uniform, glossy mixture. Over-stirring after adding the strawberries might break them down too much, so a gentle fold is best. If you’re worried about overmixing the strawberries, you can reserve a few of the prettiest chopped pieces to gently press into the top of the fudge after you’ve poured it into the pan, before it sets. This gives you lovely visual pops of berry right on top! For the baking step, remember it’s not about cooking it through, but just helping it set. If you overbake, it can become crumbly and dry. A slightly soft center when it goes into the fridge is exactly what you want. And speaking of setting, if your kitchen is very warm, definitely use the refrigerator to set the fudge; it will ensure a firmer texture. Finally, for that perfect slice, let the fudge chill thoroughly, and use a sharp, clean knife. A quick dip in hot water and a good dry between cuts makes a world of difference! I learned that one the hard way after struggling with sticky, messy slices for ages.
Storing and Reheating Tips
Storing this lovely strawberry fudge is pretty straightforward. If you’ve made it and it’s still warm or you want to serve it soon, letting it cool completely at room temperature is the first step. Once it’s fully cooled and set, you can store it at room temperature in an airtight container for about 2 to 3 days, as long as your kitchen isn’t too warm. The natural sweetness and sugar content help preserve it. If it’s humid or warm, or if you want it to last longer, your refrigerator is the best place. Wrap the fudge tightly in plastic wrap or store it in an airtight container in the fridge for up to a week. It will be firmer when cold, so I always recommend letting it sit out for about 10-15 minutes before serving if you prefer a softer texture. For longer storage, freezing is an excellent option. You can wrap individual pieces or the whole block tightly in plastic wrap, then place them in a freezer-safe bag or container. It should keep well in the freezer for about 2 to 3 months. To thaw, simply transfer it from the freezer to the refrigerator overnight. The glaze timing is important too; I always add the glaze *after* the fudge has fully set and is completely cool. If you add glaze to warm fudge, it will melt and just become a sticky mess.
Frequently Asked Questions
Final Thoughts
So there you have it – my go-to recipe for the most delightful strawberry fudge. It’s the kind of recipe that brings out the smiles, that makes people ask for the secret, and that you’ll find yourself making again and again. The blend of creamy white chocolate and bright, fresh strawberries is just pure magic, and the fact that it’s so incredibly easy to make is the cherry on top (or perhaps the strawberry on top?). I truly believe this recipe is perfect for anyone looking to create a little bit of homemade happiness. If you love this recipe, you might also enjoy my recipes for No-Bake Chocolate Peanut Butter Bars or my classic Vanilla Bean Fudge – they have that same comforting, easy-to-make vibe. Give this strawberry fudge a try; I promise you won’t be disappointed. I can’t wait to hear how yours turns out and what you think of it! Happy baking (or in this case, no-baking)!
Strawberry Fudge
Ingredients
Main Ingredients
- 4 cups granulated sugar
- 0.5 cup butter cut into pieces
- 0.5 cup evaporated milk
- 1 package white chocolate chips about 12 oz
- 0.5 cup strawberry frosting
- 0.5 tsp vanilla extract
Instructions
Preparation Steps
- Line an 8x8 inch pan with parchment paper or foil, leaving an overhang on the sides.
- In a large saucepan, combine the granulated sugar, butter, and evaporated milk. Cook over medium heat, stirring constantly, until the butter is melted and the mixture is smooth. Bring to a boil and cook for 5 minutes, stirring occasionally.
- Remove the saucepan from the heat. Stir in the white chocolate chips until melted and smooth. Then, stir in the strawberry frosting and vanilla extract until well combined.
- Pour the mixture into the prepared pan and spread evenly. If desired, swirl in extra strawberry frosting for a marbled effect.
- Let the fudge cool completely at room temperature for about 2-3 hours, or until firm.
- Once firm, lift the fudge out of the pan using the overhang and cut into squares.