There’s something magical about waking up to the sweet, spicy aroma of cinnamon rolls baking in the oven. I remember my grandma’s kitchen flooding with that warm scent every Sunday morning—it’s the smell that wrapped me in comfort like a cozy blanket. Now, this recipe has become my go-to whenever I want that cozy, sweet vibe without fussing over complicated doughs or fancy techniques. Compared to those overly complicated bakery versions, these cinnamon rolls strike the perfect balance: soft, pillowy, just the right hint of cinnamon without being overpowering. Plus, they’re surprisingly easy to whip up even on a busy morning. Honestly, I love how these cinnamon rolls melt in your mouth and pair beautifully with a hot cup of coffee or tea. It’s a little circle of joy that’s both nostalgic and downright irresistible.
What is cinnamon roll?
Cinnamon rolls are these delightful little spirals of dough, rolled up with a generous spread of cinnamon-sugar butter inside, then baked until golden and soft. The name pretty much spells out what you get: rolls that bring cinnamon front and center, often topped with a sweet glaze or cream cheese frosting for that oh-so-indulgent finish. Think of it as a sweet bread hug, with swirls that invite you to take that first heavenly bite. These rolls have roots in Scandinavian and European baking traditions, but every family (or region!) tweaks the recipe just a bit to make it their own. It’s essentially a simple yeasted dough that’s rolled out, spread, rolled up, sliced, and baked to perfection—sounds straightforward, but that swirl is where the magic happens. If you love comforting baked goods that warm your heart and your hands, this is absolutely one you’ll want to get to know well.
Why you’ll love this recipe?
What I love most about this cinnamon roll recipe is how it hits every note just right. The flavor is dreamy—it has that classic cinnamon sweetness but without being cloying or too sticky. The butter and brown sugar combo in the filling caramelizes slightly during baking, giving each bite a tender crackle of sugary goodness that’s absolutely swoon-worthy.
And here’s the best part: it’s really simple to make! I’ve gotten so many friends to try their hand at these rolls because the dough comes together quickly and rises just enough to be fluffy without taking half the day. You don’t need fancy stand mixers or a pantry full of obscure spices. The ingredients are basic, which means it’s super budget-friendly, perfect if you’ve already got flour, sugar, and cinnamon lying around. No unnecessary frills, just straightforward goodness.
Another reason I keep coming back to this recipe is how versatile it is. You can easily switch up the filling or glaze to suit your mood—try adding chopped nuts, swapping the cinnamon for pumpkin pie spice, or drizzle a tangy cream cheese frosting on top if you want to fancy it up a bit. It’s great for weekend breakfasts, a fun treat at brunch, or even a cozy dessert when you want something sweet but not heavy.
In fact, if you like soft, comforting baked treats, you might also appreciate my homemade sticky buns or nut-studded coffee cake, which have a similar vibe but bring their own unique twists. But these cinnamon rolls feel like that warm hug you didn’t know you needed. Also, my kids actually ask for these all the time—which, believe me, is the ultimate stamp of approval in this house!
How do you make cinnamon rolls?
Quick Overview
This recipe is a straightforward journey from flour and yeast to warm, fragrant cinnamon rolls that feel like a treat but don’t demand all day in the kitchen. You’ll mix dry and wet ingredients separately, combine gently, and let the dough rise just enough to be soft and airy. Then comes the fun part—rolling out the dough, spreading the cinnamon filling, slicing into perfect spirals, and baking until golden. The final touch is a simple glaze, either before or after baking depending on your sweet tooth. Trust me, the smell alone will have you sneaking bites before they even cool!
Ingredients
For the Main Dough:
- 3 ½ cups all-purpose flour (I’ve found that fresh, good-quality flour makes a noticeable difference)
- 2 ¼ tsp active dry yeast (or one packet, proofed for best rise)
- ⅓ cup granulated sugar (you can play with this for sweetness)
- 1 ¼ cups warm milk (about 110°F; I sometimes use almond milk, which actually made it creamier!)
- ⅓ cup unsalted butter, melted (room temp is best)
- 1 tsp salt
- 1 large egg (beaten)
For the Filling:
- ½ cup unsalted butter, softened (spreadable but not melted)
- 1 cup brown sugar (light or dark both work, each gives slightly different depth of flavor)
- 2 ½ tbsp ground cinnamon (freshly ground if you have it, it makes all the difference!)
For the Glaze:
- 1 ½ cups powdered sugar
- 2-3 tbsp whole milk (adjust for glaze consistency, thinner for drizzle, thicker for spreading)
- ½ tsp vanilla extract (or a dash of almond extract if you’re feeling fancy)
Step-by-Step Instructions
Step 1: Preheat & Prep Pan
Go ahead and preheat your oven to 350°F (175°C). Grab an 9×13-inch baking dish or a similar-sized pan and grease it lightly with butter or nonstick spray to make sure your cinnamon rolls come out without a hitch. I always line mine with parchment because sometimes I get a bit impatient and want to unearth every last bit of gooey goodness from the pan.
Step 2: Mix Dry Ingredients
In a large bowl, whisk together the flour, sugar, salt, and yeast. The order doesn’t have to be perfect, but mixing the yeast separately before combining helps it wake up faster. You’ll notice the yeast is kind of like a sleeping dragon—you want to make sure it’s happy and ready to puff up your dough later. If you want, proof the yeast in warm milk with a pinch of sugar for about 5-10 minutes until it gets foamy—that’s a lighting fast rise signal.
Step 3: Mix Wet Ingredients
In a separate bowl, combine the warm milk, melted butter, and beaten egg. I always check the milk temperature with my wrist like making baby formula—too hot will kill your yeast, too cold won’t activate it right. Once mixed, pour this into the dry ingredients and get ready for the dough magic.
Step 4: Combine
Mix the wet and dry ingredients until just combined. This is where my number one mistake happened so many times: overmixing. The dough will look sticky and shaggy but that’s exactly right. Resist the urge to keep stirring. If you have a stand mixer with a dough hook, it usually takes 5-7 minutes on low. If you’re mixing by hand, just get it to form a dough and call it a day before it gets too tough.
Step 5: Prepare Filling
While the dough’s rising, mix your softened butter with brown sugar and cinnamon in a bowl until creamy and spreadable. If you want to mix it up, toss in some chopped nuts or a pinch of nutmeg. This filling is your flavor bomb, so don’t be shy.
Step 6: Layer & Swirl
Once the dough has doubled in size (usually about an hour in a warm spot), punch it down gently and roll it out into a roughly 15×10 inch rectangle on a lightly floured surface. Spread your cinnamon-sugar filling evenly over the dough, making sure to get all the edges. Then, starting on a long side, roll the dough tightly into a log. Slice into 12 even rolls with a sharp knife or dental floss for clean cuts. The spiral should be tight and visible—if it looks loose, your filling might be too wet or your dough too sticky.
Step 7: Bake
Place the rolls in your prepared pan, leave a little room between them, and let them rise again for about 20-30 minutes. This second rise is key—it gives the rolls their pillowy fluff. Bake in your preheated oven for 25-30 minutes, or until they’re golden on top and cooked through. Do a gentle poke: if the dough springs back, you’re good. If it feels squishy or doughy, bake for another 5 minutes. Every oven is a little different, so keep an eye!
Step 8: Cool & Glaze
Don’t jump straight into the glaze right out of the oven. Let the rolls cool for 10-15 minutes to avoid the glaze melting into a runny puddle. Whisk your powdered sugar, milk, and vanilla until smooth, then drizzle or spread it over the warm rolls. I sometimes add a touch more milk if it looks too thick—this step puts the final sweet sparkle on top and makes the rolls irresistible.
Step 9: Slice & Serve
To serve, slice the rolls gently with a serrated knife so you keep the layers intact. They’re absolutely divine warm, just out of the oven, but my family also loves them the next day with a little butter melted on top or reheated in the microwave for a few seconds. Pair them with a strong coffee or a chai latte for the ultimate cozy experience.
What to Serve It With
For Breakfast: Nothing beats these cinnamon rolls paired with a fresh brewed cup of dark roasted coffee. We like to serve them with some crisp bacon or scrambled eggs for balance—because yes, a little salty alongside the sweet is life.
For Brunch: Dress these up on a platter alongside fresh berries, Greek yogurt, and a glass of sparkling orange juice or mimosa. It adds a sense of occasion without complicating the flavors.
As Dessert: Serve warm with a scoop of vanilla ice cream or a drizzle of caramel sauce. The warm-spiced rolls complement cold creamy textures so well, it’s a crowd pleaser every time.
For Cozy Snacks: Little hands love tearing these apart with hot cocoa or spicy chai. Perfect for after school or a slow, rainy afternoon cuddle session. We often add a sprinkle of flaky sea salt on the glaze for a little unexpected twist!
My family has this ritual of gathering around the kitchen table on Sunday mornings with these cinnamon rolls—we all know what to expect, and honestly, it’s one of those moments I look forward to all week. Sharing food like this is about more than just flavor; it’s about connection and comfort, and these rolls deliver both in spades.
Top Tips for Perfecting Your Cinnamon Rolls
Dough Prep: Always warm your milk just right—too hot and the yeast dies, too cold and it won’t activate properly. I’ve learned the hard way that patience makes a big difference for that perfect rise.
Mixing Advice: Be gentle when combining ingredients. Overmixing leads to tough rolls. The dough should feel a little sticky but should hold together well when kneaded or mixed by the hook.
Swirl Customization: When rolling, keep your log tight but not strained. If it’s too loose, the filling can leak and the spirals won’t be as defined. Try to press gently along the edges to seal the log.
Ingredient Swaps: Tried swapping white sugar for coconut sugar in the filling for a deeper, caramel-like taste—totally recommend it! Dairy-free friends, almond or oat milk work well, and coconut oil can replace butter if you tweak your temp a bit.
Baking Tips: Middle rack oven placement tends to produce the most even browning. If your rolls start browning too fast, tent loosely with foil. Use a toothpick or a cake tester to check for doneness, especially if your oven runs hot.
Glaze Variations: Feel like mixing it up? Add a little cream cheese to your glaze for tang and richness or switch vanilla for orange zest to brighten things up. A thick glaze clings better but a thinner drizzle looks prettier—choose your vibe!
One lesson I keep relearning: don’t rush the rising times. Letting the dough properly rest yields rolls that practically melt in your mouth. I also once forgot to grease my pan and ended up with a quasi candy stuck-on bottom—I don’t recommend that experience, but it did make me appreciate parchment paper!
Storing and Reheating Tips
Room Temperature: Store your cinnamon rolls in an airtight container or cover tightly with plastic wrap for up to 2 days. Left uncovered, they’ll dry out faster. Leftovers just begging for a quick reheat!
Refrigerator Storage: If you want to keep them fresh longer, refrigerate in a sealed container for 4-5 days. The rolls stay moist but cold can make the glaze a bit harder—just warm gently before serving.
Freezer Instructions: Freeze unglazed rolls wrapped tightly in plastic wrap and then foil for up to 3 months. Thaw overnight in the fridge, then warm in the oven for 10-15 minutes. Add glaze after heating for the best texture and flavor freshness.
Glaze Timing Advice: If you’re storing your rolls for later, wait to glaze them until right before serving. Glazing in advance often makes the topping runny, especially when reheating.
In my kitchen, I usually make a double batch and freeze half—then I can pull them out on a sleepy morning and have fresh cinnamon rolls in no time.
Frequently Asked Questions
Final Thoughts
I honestly can’t recommend these cinnamon rolls enough—they’re the kind of recipe that makes you feel like a kitchen champion every time you take them out of the oven. From the first warm bite to the last gooey swirl, they bring a little slice of happiness, no matter how hectic the day is. It’s the perfect recipe for new bakers and seasoned pros alike, with enough wiggle room for you to add your own spin or keep it classic.
If you enjoyed this cinnamon rolls recipe, you might also want to check out my recipes for sticky buns or homemade coffee cake—each one brings that perfect sweet comfort to your table. And hey, I’d love to hear how yours turns out! Did you add nuts, try a new glaze, or bake them into muffins? Drop a comment, rate the recipe, or share your own twist. Nothing makes me happier than knowing this slice of my kitchen has found a place in yours. Happy baking!
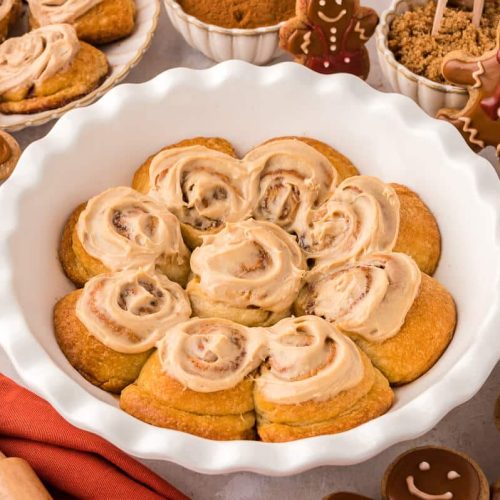
Cinnamon Rolls with Gingerbread Cream Cheese Frosting
Ingredients
Main Ingredients
- 1 package Pillsbury crescent rolls
- 0.25 cup salted butter melted
- 2 tbsp sugar
- 2 tbsp brown sugar
- 1.5 tsp cinnamon
- 0.5 cup cream cheese
- 0.25 cup vanilla Greek yogurt
- 0.25 cup brown sugar
- 1.2 tbsp fancy molasses
- 0.5 tsp cinnamon
- 0.5 tsp ginger
Instructions
Preparation Steps
- Preheat oven to 375°F.
- Pop open the can of crescent rolls and roll out flat. Pinch the seams together to make one large rectangle.
- Pour the melted butter over the dough, then sprinkle the sugars and cinnamon. Rub it all together evenly.
- Roll the dough into a log and cut into 9, 1-inch pieces.
- Spray a pie dish with non-stick spray and arrange the 9 pieces inside.
- Bake for 18-20 minutes until golden brown.
- While baking, mix together the cream cheese, vanilla Greek yogurt, brown sugar, molasses, cinnamon, and ginger to make the gingerbread frosting.
- When the rolls are done, let them cool for five minutes.
- Pour the gingerbread cream cheese frosting over the warm cinnamon rolls and serve.