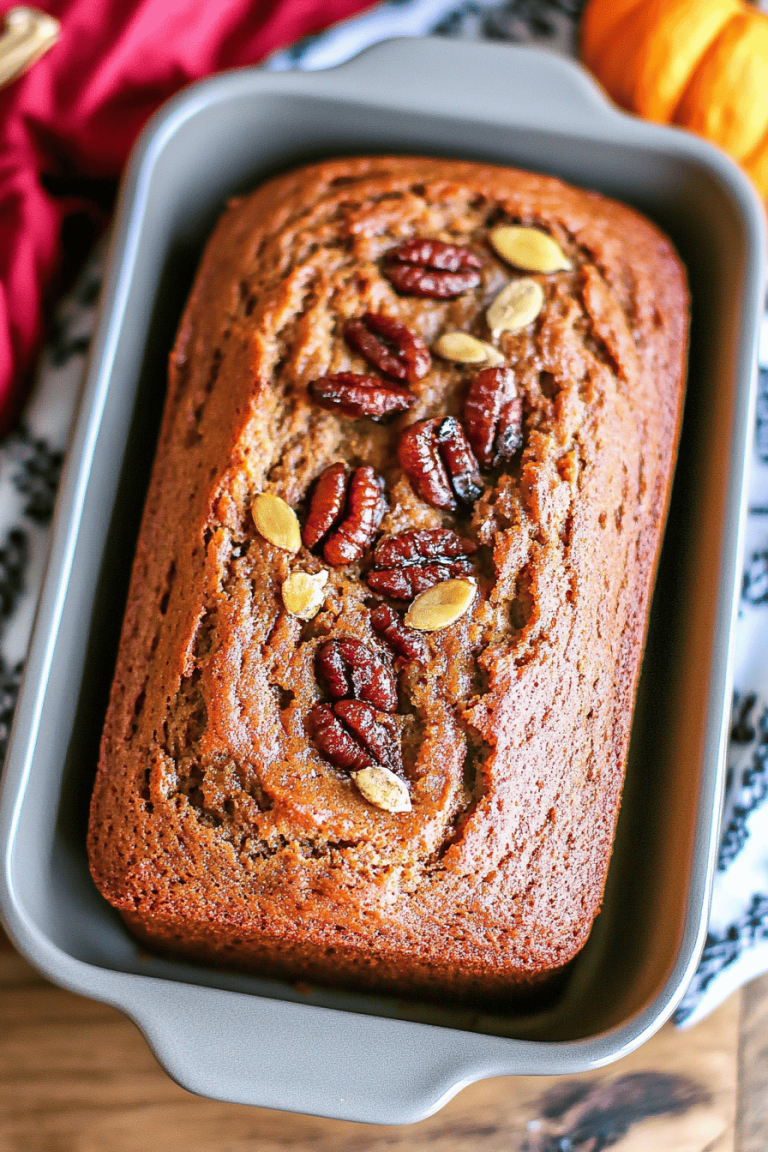
Oh, hello there! Come on in, grab a mug of something warm. You know, there are some recipes that just feel like a hug, aren’t there? For me, this sour cream Banana Bread is absolutely one of them. It’s the kind of thing I whip up when the weather turns a bit chilly, or when I’ve got a basket full of overripe bananas that are just begging for a second life. It’s not just a cake; it’s a memory. It reminds me of my grandma’s kitchen, the faint scent of cinnamon hanging in the air, and the sheer delight of sneaking a warm slice right off the cooling rack. Compared to a lot of other banana bread recipes out there, this one stands out. It’s incredibly moist, almost decadent, thanks to a secret ingredient that I’ll get to in a sec. If you’re looking for a banana bread that’s a step above the usual, one that’s guaranteed to be a hit with everyone from your pickiest toddler to your discerning dad, you’ve found it. This sour cream banana bread is truly something special.
What is sour cream banana bread?
So, what exactly makes this “sour cream” Banana Bread? Well, think of it as your classic, beloved banana bread, but with a luxurious upgrade. It’s essentially a quick bread – meaning no yeast, no complicated rising – that gets its incredible moistness and tender crumb from the addition of sour cream. It’s not like it tastes *sour*, not at all! Instead, that little bit of creaminess adds a subtle tang and richness that makes the whole loaf incredibly tender and prevents it from ever feeling dry. It’s like the secret handshake of banana bread. This recipe takes all the familiar, comforting flavors of ripe bananas, warm spices, and a hint of sweetness, but elevates them with a texture that’s just melt-in-your-mouth good. It’s that little extra something that makes people ask, “What did you put in this?” It’s approachable, familiar, yet surprisingly sophisticated in its deliciousness.
Why you’ll love this recipe?
Honestly, where do I even begin with why this sour cream banana bread is my absolute go-to? First off, the *flavor*. It’s perfectly sweet, with those deep, caramelized notes from the ripe bananas shining through, beautifully complemented by cinnamon and a touch of nutmeg. The sour cream doesn’t just add moisture; it adds a subtle depth to the flavor profile that’s just divine. You really can’t beat that combination.
Then there’s the *simplicity*. I know baking can sometimes feel like a chore, but this recipe is a lifesaver. You literally just mix your wet ingredients, mix your dry ingredients, and then gently combine them. No fancy techniques, no stand mixer required. I’ve made this dozens of times when I’ve only had about 15 minutes to spare before guests arrived, and it always turns out beautifully. It’s proof that you don’t need to be a master baker to create something truly impressive.
And let’s talk *cost-efficiency*. Bananas are usually pretty affordable, and most of the other ingredients are pantry staples. Sour cream is one of those ingredients that might seem like an extra, but trust me, a single tub goes a long way, and the difference it makes in baked goods is astronomical. It’s so much more budget-friendly than buying a fancy loaf from a bakery, and infinitely more satisfying because you made it yourself!
The *versatility* is another huge plus. While it’s incredible on its own, plain and simple, it’s also a fantastic canvas for other additions. Love chocolate chips? Throw ’em in! Craving nuts? Walnuts or pecans are fantastic here. You can even add a swirl of something extra, like a cinnamon-sugar mixture, for an extra layer of flavor and visual appeal. It’s a recipe that adapts to your mood and what you have on hand, which, as any busy home cook knows, is pure gold. It’s just an all-around winner, and the sheer joy on people’s faces when they take their first bite? Priceless.
How do I make sour cream banana bread?
Quick Overview
Making this incredible sour cream banana bread is surprisingly straightforward. You’ll start by mashing your ripe bananas, then whisking together the wet ingredients, including that all-important sour cream. Separately, you’ll combine the dry ingredients like flour, baking soda, and spices. Gently fold the wet into the dry until just combined – overmixing is the enemy of tender quick breads, so remember that! Pour it into your prepared loaf pan, bake until golden brown and a toothpick comes out clean, and that’s pretty much it. The result? A gloriously moist, flavorful, and comforting loaf of banana bread that will have everyone asking for the recipe.
Ingredients
For the Main Batter:
Overripe Bananas: You’ll want about 3 to 4 medium-sized bananas, the spottier and browner, the better! Those really ripe ones are packed with sugar and banana flavor, which is exactly what we need. Make sure to mash them really well – lumps are okay, but you want a mostly smooth consistency. If you don’t have enough ripe ones, you can toss a few unpeeled bananas on a baking sheet at 300°F (150°C) for about 15-20 minutes until they turn black and mushy. It works wonders!
All-Purpose Flour: About 1 and 3/4 cups. I usually use unbleached all-purpose flour. Make sure to spoon your flour into the measuring cup and level it off, rather than scooping directly from the bag, which can pack it too tightly and lead to a dry bread.
Granulated Sugar: 1/2 cup. You can adjust this slightly depending on how sweet your bananas are and your personal preference. Some people even use Brown Sugar for a deeper molasses note, but I find the combination with sour cream works best with granulated.
Large Eggs: 2. Make sure they’re at room temperature. This helps them incorporate better into the batter for a more uniform texture.
Sour Cream: 1/2 cup. Full-fat sour cream will give you the best texture and richness. This is the star player for moisture! Don’t use light or fat-free; it just won’t be the same.
Unsalted Butter: 1/2 cup (1 stick), melted and slightly cooled. Using melted butter makes it super easy to mix in and contributes to that lovely tender crumb. Make sure it’s not piping hot when you add it to the other wet ingredients.
Vanilla Extract: 1 teaspoon. A classic flavor enhancer that really rounds out the banana and spice notes.
Baking Soda: 1 teaspoon. This is our leavening agent, helping the bread rise and become light and airy. Make sure it’s fresh; old baking soda won’t give you much lift.
Ground Cinnamon: 1 teaspoon. For that warm, comforting spice. I always use Ceylon cinnamon for its milder flavor, but regular ground cinnamon works great too.
Salt: 1/4 teaspoon. Just a pinch to balance out the sweetness and enhance all the other flavors.
Optional: A pinch of nutmeg or a dash of allspice can add another layer of complexity if you’re feeling adventurous!
For the Filling (Optional but highly recommended!):
Brown Sugar: 2 tablespoons, packed. This creates a lovely caramel-like swirl.
Cinnamon: 1 teaspoon. To pair with the brown sugar.
For the Glaze (Optional):
Powdered Sugar: 1 cup. Sifted to avoid lumps.
Milk or Cream: 1-2 tablespoons. Just enough to reach your desired drizzling consistency. You can use water in a pinch, but milk makes it richer.
Vanilla Extract: 1/4 teaspoon. For a hint of extra flavor in the glaze.
Step-by-Step Instructions
Step 1: Preheat & Prep Pan
First things first, preheat your oven to 350°F (175°C). This is a pretty standard baking temperature, and getting it to the right heat before your batter is ready ensures even baking. Now, grab your trusty 9×5 inch loaf pan. Grease it really well with butter or non-stick cooking spray, then lightly dust it with flour. Or, even better, line it with parchment paper, leaving some overhang on the sides. This makes lifting the finished loaf out a breeze and saves you a ton of scrubbing. Seriously, parchment paper is a game-changer for me.
Step 2: Mix Dry Ingredients
In a medium-sized bowl, whisk together your flour, baking soda, cinnamon, salt, and any other dry spices you might be using (like nutmeg or allspice). Whisking them together thoroughly ensures that the leavening agent and spices are evenly distributed throughout the batter. This is important so you don’t get pockets of salt or baking soda, which can affect the taste and rise. Give it a good whisk for about 30 seconds until everything looks uniform.
Step 3: Mix Wet Ingredients
In a larger bowl, start by mashing your overripe bananas until they’re pretty smooth, leaving just a few small lumps for texture. Then, add the granulated sugar, room temperature eggs, the sour cream, melted and slightly cooled butter, and vanilla extract to the mashed bananas. Whisk everything together until it’s well combined. You’re looking for a smooth, cohesive mixture. Don’t worry if it looks a little lumpy from the bananas; that’s perfectly fine!
Step 4: Combine
Now for the magic moment: bringing it all together. Pour the dry ingredients into the bowl with the wet ingredients. Using a spatula or wooden spoon, gently fold the dry ingredients into the wet. Mix until you no longer see streaks of dry flour. Be careful NOT to overmix! Overmixing develops the gluten in the flour, which can result in a tough, dense bread. A few small lumps of flour are okay; they’ll bake out. Remember, we’re aiming for a tender crumb, so gentle folding is key.
Step 5: Prepare Filling
If you’re adding a swirl (and I really, really recommend you do!), now’s the time to prepare that simple filling. In a small bowl, combine the brown sugar and cinnamon. Give it a quick stir to mix them together. This is what will create those beautiful, flavorful ribbons throughout your bread.
Step 6: Layer & Swirl
Pour about half of the batter into your prepared loaf pan and spread it out evenly. Sprinkle about half of your cinnamon-sugar mixture over the top. Then, dollop the remaining batter over the first layer. Finally, sprinkle the rest of the cinnamon-sugar mixture on top. Now, take a butter knife or a skewer and gently swirl it through the batter a few times. Don’t overdo it, or you’ll just mix everything together. You want distinct swirls of the cinnamon-sugar filling.
Step 7: Bake
Place the loaf pan in the preheated oven. Bake for 50-65 minutes, or until a wooden skewer or toothpick inserted into the center of the loaf comes out clean, with no wet batter attached. The baking time can vary depending on your oven, so start checking around the 50-minute mark. If the top is browning too quickly, you can loosely tent it with aluminum foil for the remaining baking time. The smell that will fill your kitchen during this stage is absolutely divine!
Step 8: Cool & Glaze
Once baked, carefully remove the loaf pan from the oven. Let the banana bread cool in the pan on a wire rack for about 10-15 minutes. This allows it to set up a bit more. Then, use the parchment paper overhang (or carefully invert it) to lift the loaf out of the pan and place it directly on the wire rack to cool completely. Trying to glaze a warm loaf will just make the glaze melt and run off. For the glaze, whisk together the sifted powdered sugar, 1 tablespoon of milk, and vanilla extract until smooth. Add more milk, a teaspoon at a time, if needed to reach a drizzly consistency. Once the bread is completely cool, drizzle the glaze over the top, letting it drip down the sides.
Step 9: Slice & Serve
Once the glaze has set slightly (or if you skipped the glaze), your beautiful sour cream banana bread is ready to be sliced! For the cleanest slices, use a serrated knife. Cut yourself a generous slice – you deserve it! This bread is absolutely wonderful served at room temperature, but it’s also fantastic slightly warmed. Just pop a slice in the microwave for 10-15 seconds. Enjoy the moist, tender crumb and delicious flavor!
What to Serve It With
This sour cream banana bread is so versatile, it honestly works for almost any occasion. My family loves it year-round!
For Breakfast: My absolute favorite way to start the day is with a thick slice of this banana bread alongside a steaming mug of coffee. The richness of the bread and the warmth of the coffee are just perfect together. Sometimes, if I’m feeling fancy, I’ll add a dollop of Greek yogurt or a small smear of butter, but honestly, it’s so moist it doesn’t need anything else.
For Brunch: When we have friends over for brunch, this banana bread is always on the table. I like to slice it neatly and arrange it on a nice platter. It pairs wonderfully with a fruit salad, a frittata, or even some crispy bacon. For drinks, a mimosa or a fresh-squeezed orange juice complements its sweetness beautifully.
As Dessert: Yes, it’s a breakfast staple, but don’t underestimate its dessert potential! A warm slice, perhaps with a tiny scoop of vanilla bean ice cream or a drizzle of caramel sauce, makes for a comforting and satisfying after-dinner treat. It’s not overly sweet, so it won’t compete with other desserts, but it offers that lovely homemade comfort.
For Cozy Snacks: This is the ultimate “anytime” snack. Whether it’s an afternoon pick-me-up with a cup of tea or a late-night craving solver, this bread hits the spot. It’s comforting, satisfying, and tastes like pure happiness. My kids especially love it when they come home from school, and it’s always gone in a flash!
Top Tips for Perfecting Your Sour Cream Banana Bread
I’ve made this sour cream banana bread more times than I can count, and over the years, I’ve picked up a few tricks that I think really make a difference. Here are some of my best tips to ensure your loaf turns out perfectly every single time:
Banana Ripeness is Key: I cannot stress this enough! Those bananas that look past their prime, speckled with dark spots, are your best friends for this recipe. They are sweeter and have a more intense banana flavor. If you only have yellow bananas, you can speed up the ripening process by placing them in a paper bag for a day or two. Or, my secret weapon: bake them! Place whole, unpeeled bananas on a baking sheet and roast at 300°F (150°C) for about 15-20 minutes until the peels are black and the insides are soft and gooey. They mash up beautifully and the flavor is incredible. Don’t skip this step if your bananas aren’t super ripe!
Don’t Overmix the Batter: This is probably the most common mistake people make with quick breads, and it’s so important to get right. Once you add the dry ingredients to the wet, mix *just* until combined. A few small streaks of flour are perfectly fine. Overmixing develops the gluten in the flour, which will make your banana bread tough and rubbery instead of light and tender. I always switch to a spatula from my whisk at this stage and fold gently.
Swirl Like a Pro: For that beautiful cinnamon-sugar swirl, don’t go crazy with the knife or skewer. You just want to gently marble it through. Pour half the batter, sprinkle half the filling, pour the rest of the batter, and then sprinkle the rest of the filling on top. Then, make about 3-4 gentle passes with your knife through the batter. Too much swirling will just mix it all in and you won’t get distinct ribbons. It’s more about creating visual appeal than fully integrating it.
Ingredient Swaps and Additions: This recipe is pretty forgiving! If you’re out of granulated sugar, you can often substitute an equal amount of packed light brown sugar for a slightly deeper, caramelly flavor. For a dairy-free version, I’ve had success using full-fat plain coconut yogurt or even a thick, unsweetened plant-based yogurt in place of the sour cream, though the texture might be slightly different. If you love add-ins, chocolate chips (dark or semi-sweet are my favorites), chopped walnuts, or pecans are fantastic additions. Just toss them with a tablespoon of the flour before adding them to the batter to help prevent them from sinking to the bottom.
Baking Temperatures and Doneness: Ovens can be finicky! My oven runs a little hot, so sometimes I bake this at 325°F (160°C) if I’m worried about the top burning. The best way to check for doneness is the toothpick test. Insert a wooden skewer or toothpick into the center of the loaf. If it comes out clean or with a few moist crumbs attached, it’s done. If it has wet batter on it, bake for another 5-10 minutes and test again. Also, make sure your loaf pan is centered in the oven to ensure even cooking. Using a glass loaf pan might require a slightly lower temperature or shorter baking time, as glass conducts heat differently than metal.
Glaze Consistency is Key: The glaze should be thick enough to coat the back of a spoon but still thin enough to drizzle. If it’s too thick, add milk or cream a teaspoon at a time until it’s just right. If it’s too thin, add a little more sifted powdered sugar. Drizzling it onto a *completely cooled* loaf is crucial. If the bread is warm, the glaze will melt and become more of a sticky mess than a pretty topping. Patience is a virtue here!
Storing and Reheating Tips
This sour cream banana bread is so delicious, you’ll want to make sure you can store it properly to enjoy it later. Luckily, it keeps really well!
Room Temperature: Once completely cooled, you can store the banana bread at room temperature. I usually wrap it tightly in plastic wrap or place it in an airtight container. It stays fresh and moist for about 3-4 days. I try to finish it within this timeframe for the best texture and flavor. If it has a glaze, it’s best to let the glaze set completely before wrapping.
Refrigerator Storage: If you live in a very warm climate or want to extend its shelf life a bit longer, you can store it in the refrigerator. Again, make sure it’s completely cool and wrapped tightly in plastic wrap or in an airtight container. It should last for about a week. The texture might become a bit firmer from the cold, but it’s still perfectly good.
Freezer Instructions: For longer storage, freezing is your best bet. Wrap the completely cooled loaf (with or without glaze, though it’s often better to add the glaze after thawing if it’s a liquid glaze) tightly in a layer of plastic wrap, followed by a layer of aluminum foil, or place it in a freezer-safe bag. It will keep well in the freezer for up to 2-3 months. To thaw, unwrap it and let it sit on the counter at room temperature for a few hours. If you froze it without the glaze, you can whip up a fresh glaze once it’s thawed.
Glaze Timing Advice: If you’re planning on refrigerating or freezing your loaf, I often find it’s best to wait to add the glaze until just before serving. This prevents the glaze from becoming sticky or cracking in the fridge or freezer. If you’re storing it at room temperature and plan to eat it within a couple of days, glazing it before storing is perfectly fine. Just ensure the bread is completely cool first!
Frequently Asked Questions
Final Thoughts
So there you have it – my tried-and-true recipe for the most incredibly moist and flavorful sour cream banana bread. I really hope you give this one a try. It’s one of those recipes that just makes you feel good, from the simple act of baking it to the absolute joy of sharing it with loved ones. The fact that it comes together so easily, uses up those sad, overripe bananas, and results in something so delightfully delicious is why it’s a permanent fixture in my baking repertoire. It’s not just about the taste (though, oh my goodness, the taste!); it’s about the comfort, the nostalgia, and the pure satisfaction of creating something wonderful with your own two hands.
If you enjoy this recipe and are looking for other comforting bakes, you might want to check out my recipe for the perfect fluffy blueberry muffins or my no-fail chocolate chip cookie recipe – they’re all family favorites for a reason! Don’t forget to let me know how your sour cream banana bread turns out. I absolutely love hearing about your baking adventures and seeing your creations. Leave a comment below, or share your photos – I can’t wait to see them! Happy baking!
Sour Cream Banana Bread
Ingredients
Dry Ingredients
- 2.5 cups all-purpose flour
- 1.5 teaspoons baking soda
- 0.5 teaspoons salt
- 1 teaspoons ground cinnamon
Wet Ingredients
- 0.5 cup unsalted butter, softened
- 1 cup granulated sugar
- 2 large eggs
- 3 medium ripe bananas, mashed
- 0.5 cup sour cream
- 1 teaspoon vanilla extract
Instructions
Preparation Steps
- Preheat your oven to 350°F (175°C). Grease and flour a 9x5 inch loaf pan.
- In a large bowl, whisk together the flour, baking soda, salt, and cinnamon.
- In a separate bowl, cream together the softened butter and granulated sugar until light and fluffy.
- Beat in the eggs one at a time, then stir in the mashed bananas, sour cream, and vanilla extract until well combined.
- Gradually add the dry ingredients to the wet ingredients, mixing until just combined. Be careful not to overmix.
- Pour the batter into the prepared loaf pan and spread evenly.
- Bake for 55-65 minutes, or until a wooden skewer inserted into the center comes out clean.
- Let the banana bread cool in the pan for 10 minutes before transferring it to a wire rack to cool completely.