There’s just something about pumpkin pie that makes the whole kitchen feel like home. The smell drifts through the air, warm spices mixed with that cozy pumpkin sweetness, and suddenly you’re wrapped in a nostalgic hug from your childhood. I remember sneaking pieces as a kid when no one was looking—my family always thought I was too full for dessert, but pumpkin pie was my weakness. This recipe, honestly, might just beat your grandma’s (no offense, grandma!). It’s silky smooth, fragrant with cinnamon and nutmeg, but surprisingly easy to whip up even if your schedule is packed. If you’re used to the classic apple pie, this one’s a game-changer for fall—it feels like autumn on a plate, and it’s become the star dessert around my house by a mile.
What is pumpkin pie?
Think of pumpkin pie as the ultimate autumn comfort food that’s sweet, spicy, and incredibly satisfying. It’s essentially a custard pie made from pumpkin purée blended with sugar, eggs, and warming spices like cinnamon, ginger, and cloves, all baked inside a flaky pie crust that’s just waiting to be devoured. The pumpkin itself doesn’t overpower—the spices make every bite sing. The tradition of pumpkin pie dates back centuries and is closely tied to harvest celebrations and Thanksgiving dinners. But don’t let the fancy history intimidate you; it’s a down-to-earth dessert that anyone can make and enjoy. It’s perfect for cozy nights when you want something sweet without over-complicating your kitchen routine.
Why you’ll love this recipe?
What I love most about this pumpkin pie is how effortlessly it balances flavor and simplicity. The spices are just right—not too bold and definitely not bland—making every forkful feel like a warm blanket on a chilly day. If you’re like me and worried about baking disasters, this recipe’s foolproof method will quickly become your best friend. It doesn’t require a ton of weird ingredients; most pantry staples should be sitting right in your kitchen, which keeps it super budget-friendly. Plus, there’s so much versatility here—you can dress it up with whipped cream or toasted pecans, or keep it simple and just enjoy that silky pumpkin filling as is. I’ve tried many pies, but this one’s the go-to when I want that nostalgic fall vibe fast, without sacrificing taste. Also, if you like apple pie, you might want to swap it out for this one sometime—it’s a change-up that refreshes your pie game.
How do I make pumpkin pie?
Quick Overview
This pumpkin pie is a bit like your favorite cozy sweater—classic, comforting, and easy to throw on when you need it most. You start by preheating the oven and prepping your pie crust, then mix dry and wet ingredients separately before combining them to keep everything smooth. The secret is in the gentle mix so the custard turns silky without cracking. Pour it into the crust, bake until it’s just set, and cool it well before that all-important first slice. The technique isn’t fancy, but it’s been tested and perfected enough times to never fail at my dinner table.
Ingredients
For the Pie Crust: What is the recipe?
– 1 ¼ cups all-purpose flour (I love using unbleached for a bit more flavor)
– ½ tsp salt
– ½ cup (1 stick) unsalted butter, chilled and cubed
– 3–4 tbsp ice water (add gradually)
If you’re in a pinch, a high-quality store-bought crust works beautifully. Just make sure it’s thawed before filling.
For the Filling:
– 1 can (15 oz) pure pumpkin purée (not pumpkin pie filling)
– ¾ cup packed light brown sugar (you can swap half for maple syrup if you want a deeper sweetness)
– 2 large eggs plus 1 egg yolk (for richness)
– 1 cup whole milk or evaporated milk (I once tried almond milk and it made it surprisingly creamy)
– 1 tsp ground cinnamon
– ½ tsp ground ginger
– ¼ tsp ground nutmeg
– ⅛ tsp ground cloves (a little goes a long way)
– ½ tsp salt
For the Glaze:
– 2 tbsp heavy cream or milk
– 1 tbsp powdered sugar
– ⅛ tsp vanilla extract (optional)
Keep the glaze light and smooth; too thick and it overpowers the filling’s spice balance.
Step-by-Step Instructions
Step 1: Preheat & Prep Pan
Start by preheating your oven to 375°F (190°C). If you’re making the crust from scratch, gently press it into a 9-inch pie dish, then prick the bottom a few times with a fork to prevent puffing. If you’re using store-bought crust, make sure it’s fully thawed but chilled. Here’s a little trick: pop the crust in the fridge while you mix the filling—that way, it holds its shape better during baking.
Step 2: Mix Dry Ingredients
In a medium bowl, whisk together the brown sugar, spices (cinnamon, ginger, nutmeg, cloves), and salt until combined. The dry spices smell so incredible at this stage—it’s like autumn in a bowl. Mixing them first ensures the flavors are evenly distributed throughout.
Step 3: Mix Wet Ingredients
In a large bowl, beat the eggs and yolk until lightly combined, then add the pumpkin purée and milk. Whisk until smooth and glossy—if it looks grainy, just keep mixing for a bit longer. I find using a fork for a quick whisk works just fine here; no need to bust out fancy gadgets.
Step 4: Combine
Slowly add the dry ingredients to the wet, folding gently to combine. Try not to overmix here—just enough so you don’t see pockets of dry sugar or spices. The batter will feel thick but pourable, like a cozy custard ready to set in the oven.
Step 5: Prepare Filling
If you want to customize, now’s the time! A tablespoon of maple syrup adds warmth, or a pinch of extra nutmeg brightens it up. For a silky finish, give a last quick whisk to settle everything together—don’t obsess though; that’s how you get cracks later.
Step 6: Layer & Swirl
Pour the pumpkin filling into your chilled pie crust, smoothing it out with a spatula. This pie isn’t about fancy swirls, but if you’re feeling playful, a gentle swirl with a knife right on top before baking adds a homemade charm you’ll love showing off.
Step 7: Bake
Bake your pie in the center rack for about 50-60 minutes. You’ll know it’s done when the edges are firm but the middle still jiggles slightly—think of it like pudding that’ll set as it cools. Don’t worry if the center jiggles; that’s exactly how it should be. I like to tent the edges with foil after 30 minutes to prevent burning.
Step 8: Cool & Glaze
Let the pie cool completely at room temperature—this can take a couple of hours but trust me, it’s worth the wait. Once cool, whisk your glaze ingredients until smooth and drizzle gently over the pie. The glaze melts slightly into the surface, giving that perfect shiny finish without stealing the show.
Step 9: Slice & Serve
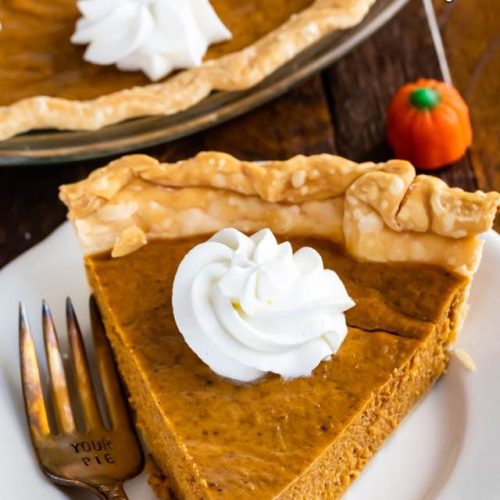
To get those clean slices, I dip my knife in hot water before each cut and wipe it off. Serve it chilled or room temperature, and if you’re feeling indulgent, add a dollop of whipped cream or a sprinkle of toasted pecans on top. My kids actually ask for seconds with the whipped cream—can’t argue with that!
What to Serve It With
For Breakfast: Pumpkin pie in the morning might sound wild, but trust me, a slice with a strong black coffee and a little cinnamon sprinkled on top feels like a dreamy autumn start. It’s like eating dessert first, with a wake-up jolt that compliments the spices perfectly.
For Brunch: Dress up your pumpkin pie plate with some fresh berries and a side of sparkling apple cider or chai tea. It’s elegant without trying too hard—a sweet centerpiece that’s guaranteed to impress your guests mid-morning.
As Dessert: Wrap it up with a scoop of vanilla bean ice cream or a dollop of lightly sweetened whipped cream. I’ve tried it with caramel drizzle too, and it turns into a decadent celebration worthy of any holiday table.
For Cozy Snacks: When you need an afternoon pick-me-up, pumpkin pie with a cup of hot cocoa or warm spiced cider hits the spot. Nothing fancy, just you, the pie, and those snuggly fall vibes. My family and I have made this our Sunday ritual—it never gets old.
Top Tips for Perfecting Your Pumpkin Pie
Pie Crust Prep: Chilling your crust before baking keeps it flaky and prevents sogginess. If you notice the edges browning too fast, foil them midway through baking. I’ve learned this the hard way when crust edges turned into hockey pucks!
Mixing Ingredients: Don’t overmix your filling batter. Overdoing it can cause cracks as the pie cools. I always stir just until the dry disappears and the mixture looks smooth, then stop.
Swirl Customization: If you want to add a cream cheese swirl for extra richness, dollop small spoonfuls on top and gently swirl with a knife. It creates a stunning marbled look without messing with the classic pumpkin flavor.
Ingredient Substitutions: If you prefer non-dairy milk, unsweetened almond or oat milk works surprisingly well, keeping the custard creamy but lighter. Brown sugar can be swapped for coconut sugar for a richer caramel flavor. Just reduce the quantity slightly as it’s sweeter.
Baking Wisdom: Always check your oven temperature with a thermometer—you’d be surprised how often mine runs hot. Position your pie in the center rack for even heat. If the top starts to brown too quickly, tent with foil.
Glaze Variations: A light dusting of cinnamon or nutmeg works if you don’t want a glaze. Or try a quick lemon glaze (powdered sugar + lemon juice) for a zingy contrast to the rich filling. I love switching it up depending on the season!
Storing and Reheating Tips
Room Temperature: Pumpkin pie can stay fresh at room temp for up to two days if covered loosely with foil or a pie dome. Just keep it away from direct sunlight or heat sources to avoid a melty mess.
Refrigerator Storage: Store your leftover pie in an airtight container or cover tightly with plastic wrap. It keeps for 4-5 days, although I warn you—that pie rarely lasts that long in my house (we’re usually sneaking slices late at night!).
Freezer Instructions: You can freeze pumpkin pie for up to two months. Wrap tightly in plastic wrap, then foil to prevent freezer burn. When you’re ready to eat, thaw overnight in the fridge. I don’t recommend freezing the glaze separately; add that after thawing for best results.
Glaze Timing Advice: If you’re storing longer or freezing, wait to glaze after thawing or just before serving. Glazing too early can cause it to seep in and get watery when warmed back up.
Frequently Asked Questions
Final Thoughts
Honestly, this pumpkin pie recipe is one I make over and over because it somehow nails that perfect mix of creamy, spiced, and nostalgic every single time. It’s the kind of pie that brings people to the kitchen—the smell alone sparks memories and smiles. If you’re ever feeling like pumpkin but want to skip anything complicated, this one’s a lifesaver, trust me. So go ahead, dive in, savor the aroma filling your home, and maybe share a slice or two (or not). I’d love to hear if you put your own spin on it, so don’t be shy about dropping me a comment or a rating. Happy baking and warm fall wishes from my kitchen to yours!
pumpkin pie
Ingredients
Main Ingredients
- 1 refrigerated pie crust pie crust
- 15 ounce pumpkin puree
- 14 ounce sweetened condensed milk
- 2 large eggs
- 0.5 teaspoon salt
- 2 teaspoons pumpkin pie spice
- whipped cream for serving
Instructions
Preparation Steps
- Preheat oven to 425°F.
- Place pie crust in 9-inch pie plate and crimp edges as desired. Chill until ready to fill.
- Whisk pumpkin puree, sweetened condensed milk, eggs, salt, and pumpkin pie spice together. Pour mixture into prepared pie crust. Place pie crust on baking sheet and cover edges with foil strips or a pie shield.
- Bake at 425°F for 10 minutes. Lower temperature to 350°F and bake an additional 30-40 minutes or until filling is almost set but still slightly jiggly in center.
- Remove pie from oven and let cool completely. Chill in refrigerator before serving.
- Store covered in refrigerator for up to 3 days or freeze up to one month.