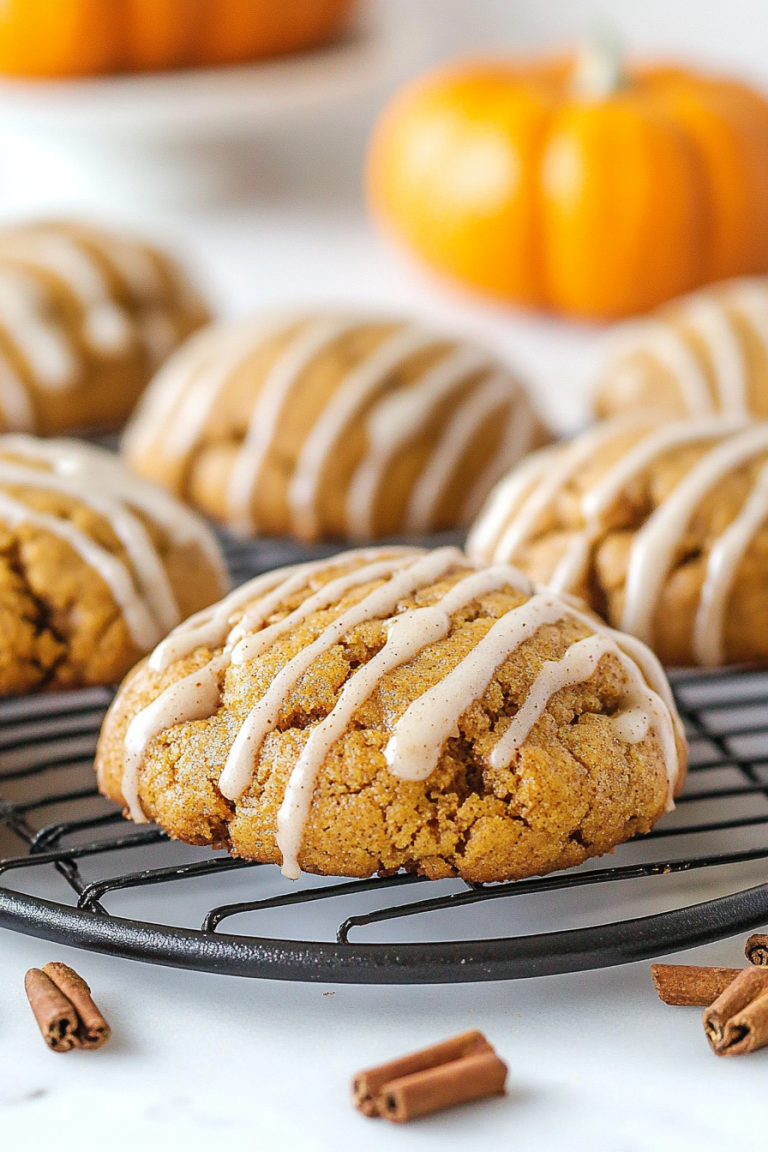
You know those days? The ones where a craving hits, a powerful, undeniable urge for something sweet, comforting, and just… *perfect*? That’s usually when I find myself reaching for this Pumpkin Pie cake recipe. It’s not just a dessert; it’s a feeling. It reminds me of crisp autumn afternoons, the smell of leaves crunching underfoot, and my mom’s kitchen filled with warmth. It’s that magical hybrid that takes all the best parts of a classic pumpkin pie – that luscious, spiced filling, the comforting texture – and gives it the easy-going, shareable nature of a cake. Honestly, if you’re a fan of pumpkin pie but sometimes find yourself wishing you didn’t have to fuss with a crust, or if you just want something that feels special without being complicated, this pumpkin pie cake is your new best friend. It’s like a warm, spiced hug, and who doesn’t need that?
What is pumpkin pie cake?
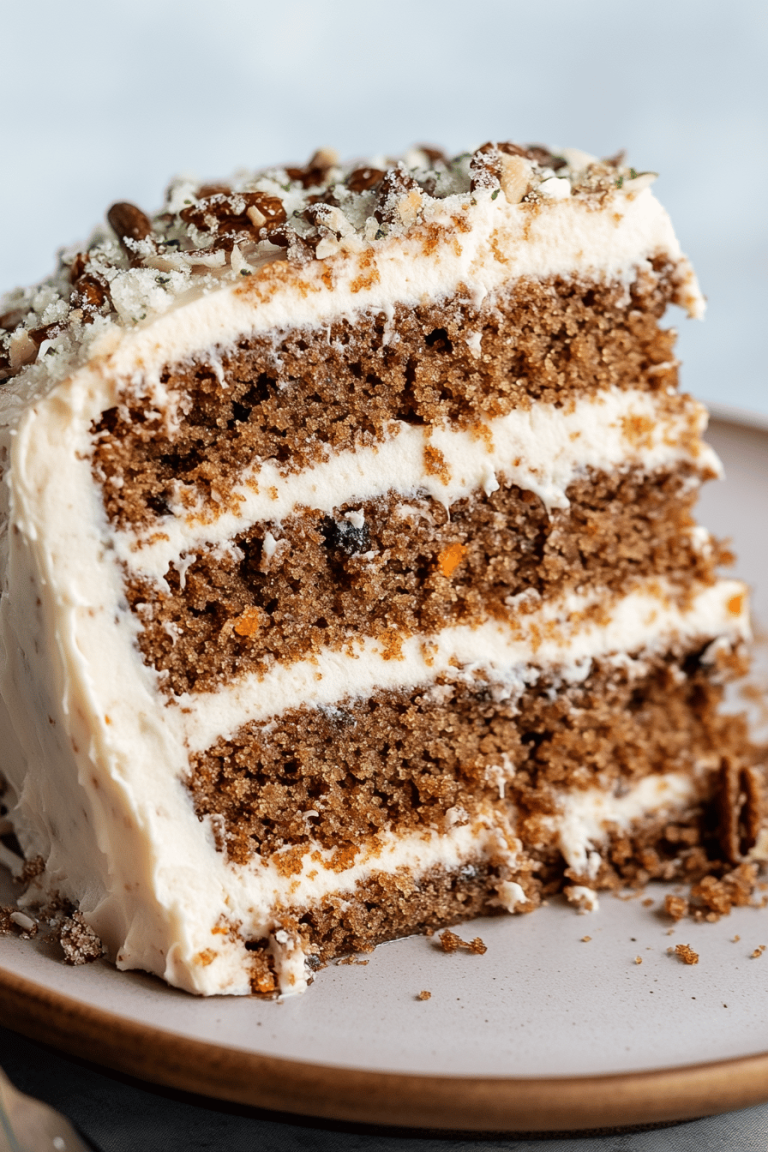
So, what exactly *is* this magical creation? Think of it as the most delicious shortcut you’ll ever take to pumpkin pie heaven. It’s essentially a moist, tender cake that’s infused with all the glorious flavors of pumpkin pie – cinnamon, nutmeg, cloves, ginger – and then layered or swirled with a creamy, cheesecake-like pumpkin filling. Some versions are more like a dense, cakey pie, while others lean more towards a cake with a distinct pumpkin swirl. My version? It’s the best of both worlds. It’s got the structure and ease of a cake, but that incredibly rich, smooth pumpkin goodness woven right through it. It’s not just a cake *flavored* like pumpkin pie; it truly captures the essence of a perfect slice, but in a format that’s way more forgiving and incredibly satisfying. It’s the kind of treat that makes everyone gather around, asking for seconds before the first plate is even cleared.
Why you’ll love this recipe?
Oh, where do I even begin with why this pumpkin pie cake is so special? First off, the flavor is just out of this world. It’s got that deep, warm spice blend that just screams autumn, perfectly balanced with the natural sweetness of pumpkin and a hint of tangy creaminess from the filling. It’s like a symphony of fall flavors in every bite! But what I *really* love about it is its sheer simplicity. Forget fiddling with pie crusts that can be so temperamental. This is a straightforward batter, a simple filling, and a beautiful swirl. Even if you’re not typically a baker, you can absolutely nail this. And the cost-efficiency? Amazing. It uses simple pantry staples, and a can of pumpkin puree is incredibly budget-friendly. It’s a gourmet-tasting dessert that won’t break the bank. Plus, it’s so versatile! Serve it warm with a dollop of Whipped cream, let it cool completely for a more cake-like texture, or even dress it up with a simple glaze. It’s perfect for a casual weeknight treat, a potluck, or even a holiday gathering where you want something a little different but still undeniably festive. It’s that reliable recipe that just always delivers, and honestly, it’s become a staple in my kitchen, especially when the weather starts to turn.
How do I make a pumpkin pie cake?
Quick Overview
Making this pumpkin pie cake is a breeze, I promise! You’ll whip up a simple, moist cake batter, prepare a quick and creamy pumpkin filling, then swirl them together in your baking pan. It bakes up beautifully, creating a stunning marbled effect that looks impressive but is surprisingly easy to achieve. The whole process from start to finish is pretty quick, making it a lifesaver on busy days when you still want something homemade and delicious. It’s the kind of recipe that feels like a treat to make because it’s so forgiving.
Ingredients
For the Main Batter:
You’ll need all-purpose flour – about 2 cups should do it. Make sure it’s fresh! I always sift mine, even though some people skip it; it just ensures a lighter cake. Then, some granulated sugar, about 1 ½ cups, for sweetness. A teaspoon of baking soda is crucial for lift, and a half teaspoon of salt to balance everything out. For that classic pumpkin pie flavor, we’ll add cinnamon (1 ½ teaspoons), nutmeg (½ teaspoon), and a pinch of cloves and ginger – maybe ¼ teaspoon each. And the wet ingredients: 2 large eggs, which help bind everything together. About ½ cup of melted unsalted butter, which gives it richness. And here’s a little secret I learned: using buttermilk, about ¾ cup, makes it incredibly moist and tender. If you don’t have buttermilk, you can make your own by adding a tablespoon of lemon juice or white vinegar to regular milk and letting it sit for 5 minutes.
For the Filling:
This is where the pure pumpkin magic happens! You’ll need one 15-ounce can of pumpkin puree – make sure it’s 100% pumpkin, not pumpkin pie filling. A block of cream cheese, softened, about 8 ounces, is what gives it that wonderfully creamy, slightly tangy texture that’s so reminiscent of cheesecake. Then, about ½ cup of granulated sugar to sweeten it, and one egg yolk to enrich it and help it set. A little vanilla extract (1 teaspoon) and a splash of milk (about 2 tablespoons) to smooth it all out. And of course, a bit more of those warm spices: ½ teaspoon cinnamon, ¼ teaspoon nutmeg, and a pinch of allspice.
For the Glaze:
This is totally optional but highly recommended for that extra touch of deliciousness. It’s a simple powdered sugar glaze. You’ll need about 1 cup of powdered sugar, sifted to avoid lumps. Then, a few tablespoons of milk or a little bit of lemon juice for tang, just enough to get a drizzly consistency. I sometimes add a tiny pinch of cinnamon here too, just to tie everything together.
Step-by-Step Instructions
Step 1: Preheat & Prep Pan
First things first, get your oven preheating to 350°F (175°C). While that’s warming up, grab an 8×8 inch baking pan. You can grease it well with butter or cooking spray, and then I like to line the bottom with parchment paper, leaving a little overhang on the sides. This makes it SO much easier to lift the finished cake out. Trust me, it’s a game-changer when it comes to getting it out of the pan cleanly.
Step 2: Mix Dry Ingredients
In a large bowl, whisk together your flour, granulated sugar, baking soda, salt, cinnamon, nutmeg, cloves, and ginger. Give it a good whisk to make sure everything is evenly distributed. This ensures all the flavors are mixed throughout the batter, not just in one clump. I usually whisk it for about 30 seconds to a minute. The texture should be light and airy.
Step 3: Mix Wet Ingredients
In a separate medium bowl, whisk together your eggs and melted butter until well combined. Then, slowly whisk in the buttermilk and vanilla extract. You want a smooth, emulsified mixture. If you’re using homemade buttermilk, don’t worry if it looks a little curdled; that’s normal and it will work just fine.
Step 4: Combine
Now, pour the wet ingredients into the bowl with the dry ingredients. Mix gently with a spatula or wooden spoon until *just* combined. It’s really important not to overmix here! A few streaks of flour are okay; they’ll disappear during baking. Overmixing develops the gluten too much and can lead to a tough cake, and we want this to be tender!
Step 5: Prepare Filling
In another medium bowl, beat together the softened cream cheese and sugar until smooth and creamy. Then, add the pumpkin puree, egg yolk, vanilla extract, and milk. Beat in the cinnamon, nutmeg, and allspice. Continue mixing until everything is thoroughly combined and the filling is a beautiful, consistent orange color. It should be thick and smooth.
Step 6: Layer & Swirl
Pour about half of the cake batter into your prepared baking pan and spread it evenly. Then, dollop spoonfuls of the pumpkin filling over the batter. Don’t worry about perfect placement! Spoon the remaining cake batter over the filling, again spreading as evenly as you can. Now for the fun part: take a knife or a skewer and gently swirl the batter and filling together. Don’t over-swirl; you want distinct ribbons of color, not a muddy mess. Just a few passes will do.
Step 7: Bake
Place the pan in your preheated oven. Bake for 30-35 minutes, or until a toothpick inserted into the center comes out clean or with just a few moist crumbs attached. The edges should be set and lightly golden brown. Ovens can vary, so start checking around the 30-minute mark. If the top is browning too quickly, you can loosely tent it with foil.
Step 8: Cool & Glaze
Once baked, let the cake cool in the pan for about 15-20 minutes before attempting to lift it out using the parchment paper overhang. Transfer it to a wire rack to cool completely. While it’s cooling, you can whisk together your glaze ingredients until smooth and drizzly. Once the cake is completely cool, drizzle the glaze over the top. You can do this while it’s still a little warm too, if you prefer a slightly melted glaze effect.
Step 9: Slice & Serve
Once the glaze has set, slice your pumpkin pie cake into squares. It’s delicious served warm, at room temperature, or even slightly chilled. A dollop of whipped cream or a scoop of vanilla ice cream is pure perfection with this!
What to Serve It With
This pumpkin pie cake is so wonderfully adaptable! For breakfast, I love a warm slice with a strong cup of coffee – it’s the perfect way to start a chilly morning. The cake itself is satisfying enough, but if you want to make it feel a bit more special, a dusting of powdered sugar is lovely. For a weekend brunch, I’ll serve it with a side of fresh berries – the tartness of the berries cuts through the richness of the cake beautifully. A sparkling cider or a mimosa also pairs wonderfully. As a dessert, it truly shines. A drizzle of caramel sauce or a scoop of vanilla bean ice cream takes it to the next level. It’s also fantastic alongside a scoop of cinnamon ice cream if you’re feeling adventurous! And for those cozy, late-night cravings? Just a simple slice, maybe with a glass of milk. My kids are obsessed with having it as a special after-school treat, often with a little whipped cream on top. It’s become our go-to for holiday gatherings too, especially when we want something a bit more casual than a traditional pie but still want that unmistakable autumn flavor.
Top Tips for Perfecting Your Pumpkin Pie Cake
I’ve made this pumpkin pie cake more times than I can count, and along the way, I’ve picked up a few tricks that I think really make a difference. For the batter, I always make sure my eggs and buttermilk are at room temperature. It helps them incorporate much more smoothly into the batter, preventing any weird pockets or a dense texture. Speaking of texture, *please* don’t overmix the batter once you combine the wet and dry ingredients. A few little lumps are better than a tough cake. You want to mix until *just* combined, and then stop. When you’re preparing the pumpkin filling, make sure your cream cheese is truly softened. I usually leave it out on the counter for at least an hour. This ensures it beats up nice and smooth, without any lumps. If you’re in a rush, you can microwave it in very short bursts, but be careful not to melt it. For the swirling, think of it as art! You don’t need to go crazy. A few gentle zigzags with a knife or a toothpick create lovely patterns without muddling the flavors or colors. I’ve found that over-swirling actually makes it look less appealing. If you want to jazz up the filling, you can add a tiny bit of orange zest for a brighter citrus note, or even a pinch of cardamom for a more complex spice profile. And for baking, always trust your toothpick test. Ovens really do differ, so relying on the time alone can be tricky. If your cake is browning too quickly on top, just loosely cover it with aluminum foil for the last 10-15 minutes of baking. This allows the inside to cook through without burning the top. For the glaze, I like to aim for a consistency that’s thick enough to coat the back of a spoon but still drizzles easily. If it’s too thick, add milk or lemon juice a teaspoon at a time. If it’s too thin, add a bit more powdered sugar. It’s all about that perfect drizzle!
Storing and Reheating Tips
This pumpkin pie cake is quite forgiving when it comes to storage, which is one of the things I love most about it. If you’ve got leftovers (which doesn’t happen often in my house!), you can store it covered at room temperature for up to two days. Make sure it’s completely cooled first, and cover it loosely with plastic wrap or foil to prevent it from drying out. If you think you’ll need more than two days, or if your kitchen is particularly warm, your refrigerator is your best bet. Once completely cooled, cover it tightly with plastic wrap or transfer it to an airtight container. It will keep well in the fridge for up to 4-5 days. The flavor actually tends to deepen and meld overnight, so some people even prefer it the next day! If you want to freeze it, I highly recommend doing so *before* you add the glaze. Wrap the cooled cake tightly in plastic wrap, then in aluminum foil, or place it in a freezer-safe airtight container. It should stay delicious in the freezer for up to 2-3 months. To thaw, transfer it from the freezer to the refrigerator overnight. If you froze it without glaze, you can add a fresh glaze once it’s thawed, or simply dust it with powdered sugar. Reheating is easy too: you can warm individual slices in the microwave for about 15-20 seconds for a cozy, just-baked feel, or gently warm it in a low oven for a few minutes. If you plan to store it unfrosted, it’s best to add the glaze just before serving, as the moisture can sometimes make it sticky.
Frequently Asked Questions
Final Thoughts
I really hope you give this pumpkin pie cake a try. It’s honestly one of those recipes that brings a smile to my face every time I make it, and even more so when I see how much everyone else enjoys it. It’s the perfect balance of comforting, spiced flavors and easy, fuss-free baking. It’s that delicious sweet treat that feels both nostalgic and wonderfully new. If you love pumpkin and you love cake (and who doesn’t?), this recipe is practically made for you. It’s incredibly forgiving, which means you can focus on enjoying the process and the delicious outcome. Don’t forget to share your creations with me – I’d love to see how yours turns out! Happy baking, and enjoy every single delicious bite!
pumpkin pie cake
Ingredients
Pumpkin Pie
- 3 can pure pumpkin puree (15 ounce each)
- 3 teaspoon cinnamon
- 1.5 teaspoon kosher salt
- 1.5 teaspoon ginger
- 1.5 teaspoon nutmeg
- 6 large eggs room temperature
- 3 can evaporated milk (12 ounce each)
- 2.25 cup granulated sugar
- 3 pre-made pie crusts
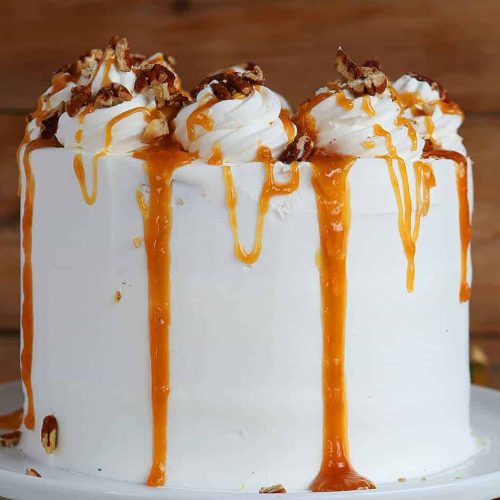
Whipped Cream & Garnish
- 2 cup whipping cream
- 2 tablespoon confectioners' sugar
- 2 teaspoon vanilla extract
- 0.5 cup chopped pecans for garnish
- 0.25 cup caramel for drizzling over cake
Instructions
Pumpkin Pie Preparation
- Preheat oven to 375°F.
- Mix sugar, cinnamon, salt, ginger, and nutmeg in a large bowl.
- Add in eggs and whisk until fully combined.
- Add in pumpkin puree and then evaporated milk. Mixture is ready when smooth and silky in appearance.
- Pour approximately 4 cups of the mixture into one pie crust in a 7-inch round springform pan. Repeat with the 2 remaining pie crusts and mixture.
- Bake at 375°F for 15 minutes, then reduce heat to 350°F and bake for 40-50 more minutes. The pumpkin pie is done when a knife inserted in the center is removed clean.
- Cool on a wire rack for 2 hours, then refrigerate until ready to assemble the cake.
Whipped Cream Preparation
- In a large bowl, whip the heavy cream until it starts to thicken.
- Beat in vanilla extract and confectioners' sugar until soft peaks form. Make sure not to over-beat.
- Chill the whipped cream until ready to assemble the cake.
Assembly
- Once the pumpkin pie layers are thoroughly chilled, gently remove them from their springform pans.
- Place one pie layer on a serving platter. Spread a generous layer of whipped cream over the top. Carefully place the next pie layer on top, followed by another layer of whipped cream. Repeat with the final pie layer.
- Frost the entire cake with the remaining whipped cream, creating a smooth finish. Garnish the top with chopped pecans and a drizzle of caramel. Serve immediately or keep refrigerated until ready to serve.