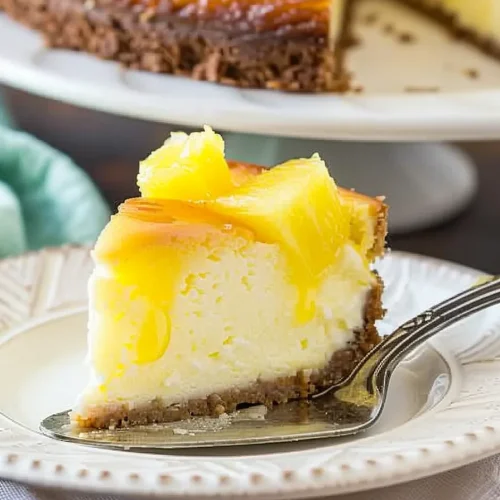
There are some recipes that just feel like sunshine in a pan, and this Pineapple cheesecake is absolutely one of them for me. It’s a little bit decadent, a little bit bright, and always, always a crowd-pleaser. I remember the first time I made this, it was for a summer potluck, and I was a nervous wreck. I wanted something special, something that tasted like a tropical vacation but didn’t require a culinary degree. Honestly, I was aiming for something that *looked* impressive but was secretly a breeze. And this? This pineapple cheesecake delivered. It’s become my go-to when I want to impress without stressing, and my family devours it every single time. It’s way more exciting than your average plain cheesecake, and the fruity zing of pineapple cuts through the richness so perfectly. If you’ve ever hesitated about making cheesecake from scratch, thinking it’s too fussy, trust me, this one is a game-changer.
What is Pineapple Cheesecake?
So, what exactly *is* this glorious creation? At its heart, it’s a classic baked cheesecake, meaning it’s rich, creamy, and has that wonderfully smooth texture we all adore. But here’s where the magic happens: we’re infusing it with the bright, tangy flavor of pineapple. It’s not just a topping; the pineapple is often incorporated right into the batter or layered throughout, giving you bursts of fruity goodness in every single bite. Think of it as a tropical twist on a beloved classic, turning a familiar favorite into something new and exciting. It’s the kind of dessert that feels both comforting and a little bit adventurous. It’s perfect for those moments when you want something sweet and indulgent, but you also crave a little zing to balance it all out. It’s essentially a hug for your taste buds with a little bit of sunshine sprinkled on top.
Why you’ll love this recipe?
What are some good reasons to make pineapple cheesecake?flavor is just out of this world. You get that deep, creamy cheesecake base that’s utterly luxurious, but then the pineapple comes in with its sweet and slightly tart notes, cutting through the richness and making everything taste so fresh and vibrant. It’s not an overpowering pineapple flavor, mind you, it’s more like a perfect harmony. My kids, who can be a bit picky with desserts, actually ask for this pineapple cheesecake specifically, which is saying something!
What is the second part of the puzzle?simplicity. I know, I know, “cheesecake” and “simple” don’t always go hand-in-hand, but this recipe is surprisingly straightforward. There are no complicated water baths or fancy techniques. I’ve streamlined it over the years so that even if you’re a beginner, you can achieve fantastic results. It truly is one of the easier cheesecakes I’ve tackled, and the payoff is huge.
And let’s talk about cost-efficiency. Most of the ingredients are pantry staples, and even the pineapple is usually pretty budget-friendly, especially if you use canned. It feels like such an extravagant dessert, but you can make it without breaking the bank.
Finally, its versatility is a big plus. You can serve this pineapple cheesecake for pretty much any occasion. It’s elegant enough for a dinner party, festive enough for a holiday gathering, and comforting enough for a cozy night in. I’ve even cut down smaller portions and served them as individual desserts with a dollop of Whipped cream. What I love most about this recipe is how it manages to be both sophisticated and incredibly approachable. It’s the dessert that always looks and tastes like you spent hours on it, even when you didn’t!
How to Make Pineapple Cheesecake
Quick Overview
Making this pineapple cheesecake is really about bringing together a few key components: a simple, buttery graham cracker crust, a rich and creamy cheesecake filling infused with that delightful pineapple flavor, and a luscious glaze to top it all off. You’ll mix your crust, press it into the pan, whip up the creamy filling with plenty of cream cheese and pineapple goodness, bake it until it’s just set, and then let it cool before adding the final touch. It sounds like a lot, but each step is quite manageable, and the result is a showstopper that tastes like it came straight from a fancy bakery.
Ingredients
For the Graham Cracker Crust:
2 cups graham cracker crumbs (about 14-16 full sheets) – I like to crush mine in a food processor for an even texture, but a zip-top bag and a rolling pin works just as well!
1/4 cup granulated sugar – This adds a touch of sweetness and helps the crust crisp up.
1/2 cup unsalted butter, melted – Make sure it’s good quality butter; it really makes a difference in flavor.
For the Creamy Pineapple Filling:
3 (8-ounce) packages cream cheese, softened – This is crucial! Room temperature cream cheese blends so much smoother, preventing lumps. I usually take mine out an hour or two before I plan to start.
1 1/4 cups granulated sugar – We need a good amount to balance the tang of the cream cheese and pineapple.
2 large eggs – These act as binders and add richness.
1 teaspoon vanilla extract – A must for any good cheesecake!
1/2 cup crushed pineapple, well-drained – Using crushed pineapple gives you those lovely little bursts of fruit. Make sure to drain it thoroughly to avoid a watery filling. I sometimes even pat it down with a paper towel.
1/4 cup sour cream – This adds extra creaminess and a slight tang. Full-fat is best here for richness.
For the Luscious Pineapple Glaze:
1 cup pineapple chunks (fresh or canned, well-drained) – For a chunkier glaze, but you can also use crushed if you prefer a smoother topping.
1/4 cup granulated sugar – Adjust to your sweetness preference.
1 tablespoon cornstarch – This is our thickener, ensuring a nice, glossy glaze.
2 tablespoons water or pineapple juice – To help dissolve the cornstarch and create the glaze base.
Step-by-Step Instructions
Step 1: Preheat & Prep Pan
First things first, get your oven preheated to 350°F (175°C). Now, grab a 9-inch springform pan. I always lightly grease mine with a little cooking spray or butter, and then I line the bottom with a circle of parchment paper. This is my secret weapon for getting the cheesecake out cleanly without damaging its beautiful sides. Trust me, a stuck cheesecake is a sad cheesecake!
Step 2: Mix Dry Ingredients
In a medium bowl, combine your graham cracker crumbs and the 1/4 cup of granulated sugar. Give it a good whisk or stir until everything is nicely incorporated. This simple step ensures even sweetness throughout your crust.
Step 3: Mix Wet Ingredients
Pour the melted butter into the dry ingredients. Stir with a fork or spatula until all the crumbs are moistened and the mixture looks like wet sand. This is what you want – it should hold together when you squeeze it.
Step 4: Combine
Spoon the graham cracker mixture into your prepared springform pan. Use the bottom of a glass or a flat measuring cup to firmly press the crumbs evenly across the bottom and about an inch up the sides of the pan. This creates a sturdy base for your cheesecake. Pop this into your preheated oven for about 8-10 minutes, just until it’s lightly golden. This pre-baking helps the crust set and prevents it from getting soggy. Once done, take it out and let it cool slightly while you work on the filling.
Step 5: Prepare Filling
In a large bowl, beat the softened cream cheese with an electric mixer (a stand mixer or hand mixer works great) on medium speed until it’s completely smooth and creamy. Seriously, no lumps allowed! Gradually add the 1 1/4 cups of granulated sugar and beat until just combined. Don’t overmix here; we don’t want to incorporate too much air, which can lead to cracks. Next, add the eggs, one at a time, beating on low speed after each addition until just blended. Scrape down the sides of the bowl as needed. Stir in the vanilla extract, the well-drained crushed pineapple, and the sour cream. Mix on low speed until everything is just incorporated and the filling is smooth and uniform. You should see those little flecks of pineapple throughout the creamy batter.
Step 6: Layer & Swirl
Pour the cheesecake filling over the slightly cooled crust. Now, here’s where you can get a little creative if you like, though this recipe is delicious without a swirl too! If you want a visual swirl, you can reserve a small portion of the filling and mix it with a little extra pineapple or even some food coloring. Then, dollop it onto the main filling and use a toothpick or skewer to gently swirl it around. I usually just spread the filling evenly and call it a day, as the pineapple chunks themselves add plenty of visual interest.
Step 7: Bake
Bake the cheesecake in the preheated oven at 350°F (175°C) for about 50-60 minutes. You’ll know it’s ready when the edges are set but the center still has a slight jiggle when you gently shake the pan. It’s important not to overbake, as this can lead to a dry cheesecake and cracks. Once it’s done, turn off the oven, crack open the oven door slightly (you can prop it with a wooden spoon), and let the cheesecake cool inside the oven for about an hour. This slow cooling process is key to preventing sudden temperature changes that cause cracks.
Step 8: Cool & Glaze
After the hour in the oven, carefully remove the cheesecake from the oven and let it cool completely on a wire rack. Once it’s at room temperature, cover it loosely with plastic wrap and refrigerate for at least 4-6 hours, or preferably overnight. This chilling time is essential for the cheesecake to firm up properly and for the flavors to meld. While the cheesecake is chilling, prepare the glaze. In a small saucepan, combine the pineapple chunks, 1/4 cup granulated sugar, cornstarch, and water (or pineapple juice). Cook over medium heat, stirring constantly, until the mixture thickens and becomes glossy. Let it cool completely before spreading it over the chilled cheesecake. This glaze adds a beautiful shine and an extra punch of pineapple flavor.
Step 9: Slice & Serve
Once the glaze is set, carefully run a thin knife around the edge of the cheesecake before releasing the springform pan sides. This ensures a clean release. Slice the pineapple cheesecake with a sharp knife dipped in hot water and wiped dry between each cut for the neatest slices. Serve chilled and enjoy the tropical goodness!
What to Serve It With
This pineapple cheesecake is a star all on its own, but I love pairing it with other dishes to create a complete meal experience.
For Breakfast: While it might seem like a dessert, a slice of this pineapple cheesecake can be a lovely treat on a special morning. I love serving it with a strong cup of coffee – the bitterness balances the sweetness beautifully. Sometimes, I’ll even pair it with some fresh berries on the side for a pop of color and a different texture. It’s a little indulgence that makes any morning feel like a vacation.
For Brunch: This is where the pineapple cheesecake really shines! It’s elegant enough to grace any brunch table. I often serve it alongside lighter fare like a fresh fruit salad, some fluffy scrambled eggs, or even savory dishes like ham and cheese croissants. For beverages, a mimosa or a sparkling cider complements the bright flavors perfectly. I like to plate it with a few mint leaves for a touch of green.
As Dessert: Of course, this is its natural habitat! After dinner, it’s pure heaven. It’s wonderful served on its own, but if you want to go the extra mile, a dollop of lightly sweetened whipped cream or a scoop of vanilla bean ice cream is divine. Some people also love a drizzle of caramel sauce, though I find the pineapple glaze is usually enough sweetness for me. For a more sophisticated feel, I might pair it with a Moscato or a dessert wine.
For Cozy Snacks: Sometimes, you just need a little something sweet to get you through the afternoon slump or a late-night craving. A modest slice of this pineapple cheesecake is perfect for that. It’s satisfying without being too heavy. I’ll often pair it with a glass of cold milk or a cup of herbal tea. It’s that comforting treat that feels like a special occasion, even on a Tuesday.
My family tradition is to have this pineapple cheesecake on birthdays and our summer vacation kick-off. It just screams celebration and happiness to us!
Top Tips for Perfecting Your Pineapple Cheesecake
Over the years, I’ve learned a few tricks and tidbits that help make this pineapple cheesecake consistently amazing.
Pineapple Prep: The key to a great pineapple cheesecake filling is making sure your pineapple is *really* well-drained. If you’re using canned, don’t just dump it out; press it with a fork or even wrap it in a paper towel to squeeze out as much liquid as possible. Excess moisture can lead to a watery cheesecake, and nobody wants that! For the glaze, draining is also important so it thickens up nicely.
Mixing Advice: When you’re mixing the cream cheese and sugar, take your time to get it perfectly smooth. Any lumps at this stage will likely remain in the final cheesecake. Also, remember to add the eggs one at a time and mix on low speed. Overmixing after adding the eggs can incorporate too much air, which can cause the cheesecake to puff up excessively and then crack as it cools.
Swirl Customization: While this recipe is delicious with the pineapple mixed directly in, if you do decide to do a swirl, don’t overdo it! A few gentle swirls are all you need to create a beautiful pattern. Too much swirling can muddy the colors and textures.
Ingredient Swaps: For the crust, if you’re not a fan of graham crackers, digestive biscuits or even vanilla wafers work wonderfully. You might need to adjust the butter slightly depending on the biscuit. If you want to make the filling a bit lighter, you can experiment with reducing the sugar by a couple of tablespoons, but be mindful that it might affect the texture slightly. I’ve also tried adding a little bit of lemon zest to the filling for an extra citrusy kick, and it’s lovely!
Baking Tips: The slow cooling process is vital. Don’t skip letting it cool in the oven with the door ajar. This gradual temperature change is the best way to prevent cracks. Also, every oven is a little different, so get to know yours. If your oven tends to run hot, you might want to reduce the baking temperature by 10-15 degrees and bake for a little longer. A slight jiggle in the center is your cue that it’s ready.
Glaze Variations: If you don’t want a cooked glaze, you can simply mix some softened cream cheese with powdered sugar and a little pineapple juice until it’s a spreadable consistency. Or, for a lighter touch, just serve the cheesecake with fresh pineapple slices and a dusting of powdered sugar. For a more tropical flair, a little shredded coconut sprinkled on top of the glaze is amazing!
Storing and Reheating Tips
Proper storage is key to keeping your pineapple cheesecake tasting its best.
Room Temperature: Once the cheesecake has been glazed and is fully cooled, it can generally be left at room temperature for up to 2 hours. After that, it’s best to refrigerate it, especially in warmer climates, as the dairy can spoil.
Refrigerator Storage: This is the most common and best way to store leftover cheesecake. Make sure it’s covered tightly with plastic wrap or stored in an airtight container. It should stay fresh and delicious in the refrigerator for about 3-4 days. The flavors actually tend to meld and deepen overnight, so day-old cheesecake is often even better!
Freezer Instructions: If you have a lot of cheesecake leftover (which is rare in my house!), you can freeze it. The best way is to freeze the unglazed cheesecake first. Wrap it tightly in a layer of plastic wrap, then a layer of aluminum foil. It can be frozen for up to 1-2 months. To thaw, remove it from the freezer, unwrap it, and let it defrost in the refrigerator overnight. Once thawed, you can add the glaze.
Glaze Timing Advice: I always apply the glaze *after* the cheesecake has been thoroughly chilled. If you apply a cooked glaze to a warm cheesecake, it can become messy. If you plan to freeze the cheesecake, I recommend freezing it *without* the glaze. Once it’s thawed and ready to serve, you can then make a fresh glaze or apply a pre-made one.
Frequently Asked Questions
Final Thoughts
I truly believe this pineapple cheesecake is a recipe that brings a little bit of sunshine into your life, no matter the season. It’s that perfect balance of creamy, rich cheesecake with bright, tropical pineapple flavor that just makes you happy. It’s surprisingly easy to make, which is a huge bonus when you want something impressive without all the fuss. I hope you give it a try and that it becomes a favorite in your home too. It’s one of those desserts that feels special enough for guests but comforting enough for a quiet evening. If you love this pineapple cheesecake, you might also enjoy my Lemon Raspberry Tart for another fruity delight, or my classic New York Style Cheesecake if you’re ever in the mood for pure, unadulterated creaminess.
I can’t wait to hear what you think! Please leave a comment below and let me know how your pineapple cheesecake turns out, or if you have any fun variations you tried. Happy baking!
Pineapple cheesecake
Ingredients
Main Ingredients
- 8 oz cream cheese softened
- 0.5 cup white sugar
- 2 cans (15 oz each) crushed pineapple drained
- 1.75 cup frozen whipped topping thawed
- 1 unit 9-inch prepared graham cracker crust
Instructions
Preparation Steps
- In a large bowl, blend the softened cream cheese and white sugar together until the mixture is smooth and creamy.
- Gently stir in one can of drained crushed pineapple and the thawed whipped topping. Mix until everything is well combined and the filling is light and fluffy.
- Transfer the cream cheese mixture into the prepared graham cracker crust. Spread it evenly with a spatula.
- Spread the second can of drained crushed pineapple over the top of the cheesecake filling, distributing it evenly.
- Cover the cheesecake with plastic wrap or a lid. Refrigerate for at least 2 hours to let it set and allow the flavors to meld together.