You know those recipes that just feel like a warm hug? The ones you reach for when you need a little bit of sweet comfort, or when you want to impress someone without spending hours in the kitchen? Well, this peppermint cookie bar recipe is exactly that for me. It’s like a little slice of Christmas morning, any time of year. I remember the first time I made these; it was a chaotic December evening, and I needed a quick, impressive dessert for a last-minute gathering. I honestly wasn’t sure how they’d turn out, but they were an instant hit! They’re a bit like a shortbread bar but with this delightful, subtle peppermint twist that just sings. Honestly, if you love a classic Chocolate Chip cookie but are looking for something a little more sophisticated and just as easy, these peppermint cookie bars are your new best friend.
What is a Peppermint cookie bar?
So, what exactly is this magical treat I keep raving about? Think of it as the ultimate bar cookie. It starts with a buttery, crumbly, melt-in-your-mouth shortbread-like base. But here’s where the magic happens: we infuse it with just the right amount of cool, refreshing peppermint. Then, we top it all off with a smooth, sweet peppermint glaze, and often, a sprinkle of festive crushed candy canes or even some dark chocolate drizzle. It’s essentially a shortcut to that beloved Christmas cookie flavor, but in a super convenient bar form that’s perfect for slicing and sharing. It’s not overwhelmingly minty; it’s more of a gentle whisper of peppermint that perfectly balances the richness of the butter and sugar. It’s a crowd-pleaser, for sure, and the best part? It looks way fancier than it actually is to make!
Why you’ll love this recipe?
Honestly, there are so many reasons why this peppermint cookie bar recipe has earned a permanent spot in my recipe binder. First off, the flavor is just divine. That sweet, buttery base paired with the cool peppermint is like a little party in your mouth. It’s festive without being *too* seasonal, which means I can make these whenever the craving strikes, and trust me, it strikes often! Then there’s the simplicity. I’ve tested this recipe on busy weeknights when I’ve only had an hour to spare, and it’s always come through. The ingredients are all pantry staples, too, so you don’t need a special trip to the store. Plus, these are incredibly budget-friendly. You get a whole pan of deliciousness for pennies on the dollar compared to buying fancy bakery treats. And the versatility! You can add chocolate chips to the batter, swirl in some jam, or go wild with different toppings. But what I truly adore about these peppermint cookie bars is how they make people feel. They bring a little bit of joy and nostalgia, and that’s priceless. They’re a bit like my Grandma’s Sugar Cookies, but in a format that’s way easier to transport and serve at potlucks!
How do I make Peppermint Cookie Bars?
Quick Overview
The process for these peppermint cookie bars is wonderfully straightforward. You’ll mix up a simple shortbread-like dough, press about two-thirds of it into a baking pan, add a luscious peppermint filling, then crumble the remaining dough over the top. After baking to golden perfection, a sweet peppermint glaze ties it all together. It’s a few steps, but each one is easy and forgiving. You’ll be amazed at how quickly this comes together, and the end result is so satisfying. It’s the kind of dessert that looks like you spent hours on it, but in reality, it’s a lifesaver for busy bakers!
Ingredients
For the Main Batter:
Butter: 1 cup (2 sticks), softened. Make sure it’s truly softened, not melted. This is key for that tender texture. I usually pull it out of the fridge about an hour before I start.
Granulated Sugar: 1 cup. Just regular granulated sugar works perfectly here to give it that classic cookie sweetness.
Egg Yolk: 1 large. This adds richness and helps bind everything together without making the bars too cakey. Don’t skip it!
Vanilla Extract: 1 teaspoon. Pure vanilla extract makes all the difference in depth of flavor.
Peppermint Extract: 1/2 teaspoon. This is where our signature flavor comes from! Start with 1/2 teaspoon; you can always add a tiny bit more if you’re a big peppermint fan, but I find this amount is just right for a subtle, delightful hint.
All-Purpose Flour: 2 1/2 cups. Spooned and leveled, please! Scooping directly from the bag can pack too much flour, leading to dry bars. I love using King Arthur’s AP flour, but any good quality brand will do.
Salt: 1/4 teaspoon. This little bit of salt balances the sweetness and brings out all the other flavors.
For the Filling (Optional, but highly recommended!):
cream cheese: 4 ounces, softened. This makes the filling wonderfully creamy and tangy, cutting through the sweetness perfectly. Make sure it’s softened to avoid lumps.
Powdered Sugar: 1/2 cup. Also known as confectioners’ sugar. Sifted is best to ensure a smooth filling.
Peppermint Extract: 1/4 teaspoon. Just a touch more to echo the flavor in the base.
Optional: Red or Green Food Coloring: A drop or two if you want to give it a festive hue!
For the Glaze:
Powdered Sugar: 1 cup. Again, sifted is your friend for a smooth glaze.
Milk or Cream: 1-2 tablespoons. Start with 1 tablespoon and add more, just a teaspoon at a time, until you reach your desired drizzling consistency. Milk works great, but a little heavy cream adds extra richness.
Peppermint Extract: 1/4 teaspoon. For that final pop of minty goodness.
Optional: Crushed Candy Canes or Sprinkles: For decoration!
Step-by-Step Instructions
Step 1: Preheat & Prep Pan
First things first, preheat your oven to 350°F (175°C). Then, grab an 8×8 inch baking pan. I like to line mine with parchment paper, leaving an overhang on the sides. This makes lifting the bars out super easy later, no sticking worries at all! Just grease the pan lightly before you add the parchment. This is a little trick I learned after one too many times of struggling to get bars out.
Step 2: Mix Dry Ingredients
In a medium bowl, whisk together the all-purpose flour and salt. Give it a good whisk to make sure they’re evenly distributed. This simple step ensures your bars have consistent flavor and texture throughout. Set this bowl aside for now.
Step 3: Mix Wet Ingredients
In a large bowl, cream together the softened butter and granulated sugar. Beat them with an electric mixer (or a whisk and some elbow grease!) until the mixture is light and fluffy. This usually takes about 2-3 minutes. Then, beat in the egg yolk, vanilla extract, and peppermint extract until everything is well combined. It might look a little separated at first, but keep mixing; it’ll come together.
Step 4: Combine
Now, gradually add the dry ingredients to the wet ingredients, mixing on low speed (or with a spatula) until just combined. Be careful not to overmix here! Overmixing develops the gluten in the flour, which can make your cookie bars tough. You want a tender, crumbly dough. It will seem like there’s not enough liquid, but trust the process!
Step 5: Prepare Filling
If you’re making the cream cheese filling (and I really think you should!), in a separate medium bowl, beat the softened cream cheese until smooth. Then, beat in the powdered sugar and peppermint extract until well combined and creamy. If you’re feeling festive, stir in a tiny drop of food coloring here. This filling adds a lovely creamy contrast to the shortbread base.
Step 6: Layer & Swirl
Take about two-thirds of your cookie dough and press it evenly into the bottom of your prepared baking pan. You can use your hands (lightly floured if it’s sticky) or the bottom of a measuring cup. Then, carefully spread the cream cheese filling evenly over the dough base. Now, take the remaining one-third of the cookie dough and crumble it over the top of the cream cheese layer. You can break off small pieces and just scatter them around. Don’t worry about perfect coverage; a rustic look is totally fine!
Step 7: Bake
Place the pan in your preheated oven and bake for 25-30 minutes, or until the edges are golden brown and the crumbled topping is set. The center might still look a little soft, but it will continue to cook as it cools. Keep an eye on it, as ovens can vary!
Step 8: Cool & Glaze
Once baked, let the bars cool completely in the pan on a wire rack. This is crucial! If you try to glaze them while they’re warm, the glaze will just melt off. Once they’re totally cool, whisk together the powdered sugar, 1 tablespoon of milk (or cream), and peppermint extract for the glaze. Add more milk, a teaspoon at a time, until it’s a pourable but not too thin consistency. Drizzle the glaze over the cooled bars. If you’re feeling fancy, sprinkle crushed candy canes or fun sprinkles on top of the wet glaze.
Step 9: Slice & Serve
Once the glaze has set (this usually takes about 15-20 minutes), use the parchment paper overhang to lift the entire block of bars out of the pan. Place it on a cutting board and slice into squares or bars. I find a sharp knife works best, and wiping the knife clean between cuts can help keep the slices neat. These are delicious at room temperature, but I also love them slightly chilled!
What to Serve It With
These peppermint cookie bars are so versatile, they fit into almost any occasion. For a casual breakfast, I love them with a strong cup of coffee; the sweetness of the bar is just enough to start the day. They make a delightful addition to a brunch spread, perhaps alongside some fresh fruit salad and quiches. Picture this: a beautiful brunch table with these bars as a sweet finale, maybe with a glass of mimosas or sparkling cider. As a dessert, they’re just heavenly. I often serve them after a hearty meal with a dollop of whipped cream or a scoop of vanilla bean ice cream. The contrast between the warm cookie bar and cold ice cream is pure bliss. And for those cozy snack times? They’re perfect with a glass of milk or a mug of hot chocolate. My kids, in particular, adore them with a big glass of cold milk; it reminds them of Christmas, and honestly, it makes me melt a little every time they say that!
Top Tips for Perfecting Your Peppermint Cookie Bars
After making these peppermint cookie bars more times than I can count, I’ve picked up a few tricks that I think really elevate them. For the dough, remember that softened butter is your best friend; it creams better and leads to a more tender bar. Also, don’t overmix the dough once you add the flour. Just mix until it comes together. A few streaks of flour are okay, as they’ll disappear during baking. If you find your dough is too crumbly to press into the pan, try adding a tiny splash of milk or another egg yolk. For the cream cheese filling, make sure the cream cheese is fully softened; nobody wants lumps in their sweet filling! I’ve learned that sifting the powdered sugar for both the filling and the glaze is a game-changer for achieving a silky-smooth texture. If you’re worried about the peppermint extract being too strong, start with a little less and taste the batter (before adding flour, of course!) or the filling. You can always add more, but you can’t take it away. For the swirling effect, don’t overdo it. A few gentle pulls with a knife or skewer will give you a beautiful marbled look without muddying the flavors. And for baking, pay attention to the edges; golden brown means done. If the top seems to be browning too quickly, you can loosely tent the pan with foil. The most important tip, though? Let them cool completely before glazing and slicing. Patience is a virtue, especially when it comes to perfectly set bars!
Storing and Reheating Tips
These peppermint cookie bars are surprisingly resilient when it comes to storage, which is one of the reasons I love them so much. If you have any leftovers (which is rare in my house!), you can store them at room temperature in an airtight container for up to 3 days. Just make sure they’re completely cooled. If you’ve glazed them, the glaze acts as a nice seal. For longer storage, up to a week, you can keep them in the refrigerator. Again, an airtight container is key. They tend to firm up a bit in the fridge, so I often let them sit at room temperature for about 15-20 minutes before serving if they’ve been chilled. Freezing is also an option! I like to cut them into individual bars and wrap each one tightly in plastic wrap, then place them in a freezer-safe bag or container. They’ll keep well in the freezer for about 2-3 months. To thaw, simply unwrap them and let them come to room temperature. I usually don’t reheat these, as they are best served at room temperature or slightly chilled, but if you absolutely wanted to warm them up, a few seconds in the microwave would do the trick, though it might make the glaze a bit melty. I find they retain their texture and flavor best when not reheated.
Frequently Asked Questions
Final Thoughts
So there you have it – my beloved peppermint cookie bars! They’re more than just a dessert to me; they’re a little bit of happy, a quick fix for a sweet craving, and a surefire way to bring a smile to anyone’s face. I truly hope you give them a try. They’re the perfect example of how simple ingredients can come together to create something truly special. If you love this recipe, you might also enjoy my classic chocolate shortbread or my festive gingerbread cookies! They share that same sense of comforting sweetness. I can’t wait to hear what you think of these peppermint cookie bars, or to see what fun twists you come up with. Please, leave a comment below and share your thoughts or your own kitchen adventures! Happy baking, my friends!
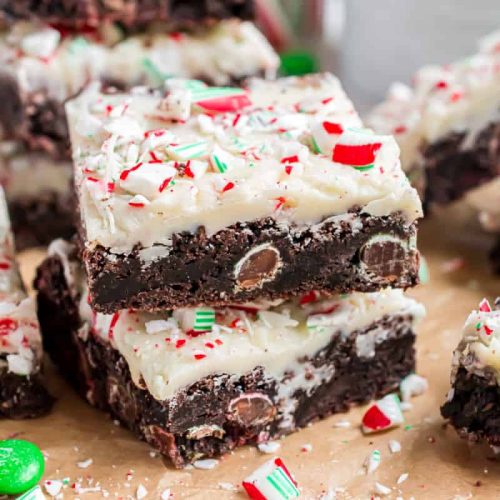
peppermint cookie bar
Ingredients
Cookie Bar Base
- 1 cup unsalted butter softened
- 1 cup granulated sugar
- 0.5 cup light brown sugar packed
- 0.5 teaspoon kosher salt
- 2 large eggs
- 1 teaspoon vanilla extract
- 2 cups all-purpose flour
- 0.5 cup unsweetened cocoa powder
- 1 teaspoon baking soda
- 15 Oreos crushed
- 1.5 cups red and green M&M's or chocolate chips
Peppermint Fudge Topping
- 1 can sweetened condensed milk 14 ounce
- 2 Tablespoons unsalted butter
- 12 ounce Ghirardelli white chocolate wafers
- 12 peppermint candy canes crushed
Instructions
Preparation Steps
- Preheat your oven to 375°F (190°C). Line a 15x10x1 inch baking sheet with parchment paper, allowing some overhang on the sides for easy removal.
- In a large bowl, using an electric mixer, beat the softened butter, granulated sugar, and light brown sugar until light and creamy. Scrape down the sides of the bowl as needed.
- Add the kosher salt, large eggs, and vanilla extract to the creamed mixture. Beat until well combined.
- In a separate bowl, whisk together the all-purpose flour, unsweetened cocoa powder, and baking soda. Gradually add the dry ingredients to the wet ingredients, mixing on low speed until just combined. Do not overmix.
- Fold in the crushed Oreos and red and green M&M's (or chocolate chips) into the cookie dough. The batter will be thick.
- Press the thick cookie dough evenly into the prepared 15x10x1 inch baking sheet. Bake for 15-20 minutes, or until the edges are set and the center is still slightly soft (it will continue to set as it cools). Remove from the oven.
- While the cookie bars are baking, prepare the white chocolate fudge topping. In a small saucepan over medium heat, combine the sweetened condensed milk and 2 tablespoons of unsalted butter. Stir constantly with a whisk until butter is melted and mixture is warm.
- Remove the saucepan from the heat and immediately add the Ghirardelli white chocolate wafers to the warm milk mixture. Stir continuously until the white chocolate is completely melted and the mixture is smooth and glossy (this should take about 2 minutes).
- Pour the warm white chocolate fudge over the still-warm baked cookie bars and spread evenly with an offset spatula. Immediately sprinkle generously with the crushed peppermint candy canes before the fudge sets.
- Allow the bars to cool completely and set at room temperature for about 30 minutes, or until the fudge is firm. Once set, lift the bars out of the pan using the parchment paper overhang, then cut into squares and enjoy!