Oh, you guys are going to LOVE these! I’ve been meaning to share this mini cannoli cups recipe with you for ages, and I finally got around to typing it all up. Honestly, thinking about them already makes me want to sneak into the kitchen and whip up a batch. They’re just… perfect. You know those days when you’re craving something sweet, something a little bit decadent, but the thought of rolling out dough and wrestling with hot cannoli forms just feels like way too much work? Yeah, me too. That’s where these little gems come in. They give you all that incredible cannoli flavor – that creamy, sweet filling, that hint of citrus zest – but in a format that’s ridiculously easy. Seriously, if you can stir ingredients together, you can make these. They remind me of my Nonna’s kitchen, the way it always smelled so warm and inviting, but these are my own little spin, a shortcut to happiness that I can pull off even on a Tuesday night. Forget a whole elaborate dessert; these mini cannoli cups are the answer to those sudden sweet cravings that hit without warning!
What are mini cannoli cups?
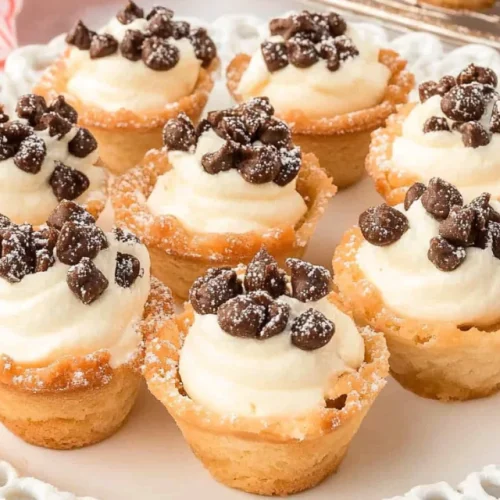
So, what exactly *are* mini cannoli cups, you ask? Think of them as your favorite classic cannoli, but in a way that’s totally approachable for any home baker. Instead of dealing with those fiddly tubes that you have to wrap dough around and fry, we’re using a simple muffin tin and a basic, no-fuss batter. The result is a wonderfully crisp, delicate pastry cup that holds that dreamy, sweet ricotta filling. It’s essentially all the joy of a traditional cannoli – the contrast between the crisp shell and the luscious filling, the whisper of vanilla and orange zest – without any of the stress. It’s the kind of dessert that looks elegant enough for a dinner party but is so incredibly easy to make that you’ll find yourself whipping them up just because. They’re like the little black dress of desserts: always appropriate, always stylish, and always a hit!
Why you’ll love this recipe?
There are so many reasons why I’ve fallen head over heels for these mini cannoli cups, and I just know you will too! First and foremost, the flavor is absolutely spot on. You get that delightful crispness from the baked shell, which isn’t overly sweet but has a wonderful texture, and then that unbelievably creamy, slightly sweet ricotta filling. It’s got just the right hint of citrus – I always use orange zest, it just sings! – and vanilla. It’s pure bliss in every bite. And let’s talk about simplicity. This is honestly a lifesaver on busy nights. You don’t need any special equipment beyond what you probably already have in your kitchen, and the steps are straightforward. My kids helped me make these the other day, and they had such a blast. It’s also surprisingly budget-friendly. Ricotta and basic pantry staples are much kinder to your wallet than some fancier dessert ingredients. Plus, the versatility! You can doll them up or keep them simple. Drizzle with a bit of chocolate, dust with powdered sugar, or add some colorful sprinkles for a fun touch. They’re perfect for little hands, elegant enough for guests, and just generally the happiest little treats. I’ve tried a lot of dessert recipes over the years, but this one is a real winner because it delivers big on flavor and charm without demanding a whole afternoon in the kitchen.
How do I make mini cannoli cups?
Quick Overview
The magic of these mini cannoli cups lies in their simplicity. We’ll start by whipping up a quick batter that bakes into delicate, crispy cups. While those are baking and cooling, we’ll prepare the luscious ricotta filling. Once everything is ready, it’s just a matter of filling those cups and adding your favorite finishing touches. It’s a straightforward process that yields incredibly impressive results. You get that satisfying crunch from the baked shell and the rich, creamy filling, all in one delightful bite.
Ingredients
For the Main Batter:
2 cups all-purpose flour (I always use unbleached, it seems to give a better texture)
1/4 cup granulated sugar
1 teaspoon baking powder
1/2 teaspoon salt
1/2 cup unsalted butter, softened (make sure it’s nice and soft, not melted)
1 large egg
1/2 cup milk (whole milk gives the best richness, but I’ve used 2% in a pinch and it was fine!)
1 teaspoon vanilla extract
For the Filling:
2 cups whole milk ricotta cheese, drained very well (this is crucial! Squeeze out as much liquid as you can)
1/2 cup powdered sugar (or a little more, to taste)
1 teaspoon orange zest (freshly grated is best, it makes a huge difference!)
1/2 teaspoon vanilla extract
For the Glaze (Optional, but I love it!):
1/2 cup powdered sugar
1-2 tablespoons milk or water (just enough to make it drizzleable)
A few drops of vanilla extract
Step-by-Step Instructions
Step 1: Preheat & Prep Pan
First things first, get your oven preheating to 350°F (175°C). Then, grab your mini muffin tin – or a regular muffin tin if you want slightly larger cups. I like to give mine a good spray with non-stick cooking spray. Really get into all the nooks and crannies. You don’t want any of these beauties sticking! You can also use mini paper liners if you prefer, but I find the baked shell gets a bit crispier directly in the tin.
Step 2: Mix Dry Ingredients
In a medium bowl, whisk together the flour, granulated sugar, baking powder, and salt. Give it a good stir so everything is evenly distributed. This is the foundation of our lovely little cups, so a good mix here ensures a consistent batter.
Step 3: Mix Wet Ingredients
In a separate bowl, cream together the softened butter and the 1/2 cup of granulated sugar until it’s light and fluffy. Then, beat in the egg until well combined. Stir in the milk and vanilla extract. Make sure it’s all nicely blended.
Step 4: Combine
Now, gradually add the dry ingredients to the wet ingredients, mixing on low speed (or stirring gently with a spatula) until just combined. Be careful not to overmix! Overmixing is the enemy of tender baked goods, so stop as soon as you don’t see any streaks of flour. The batter will be thick, almost like a soft cookie dough.
Step 5: Prepare Filling
While the batter is resting for a minute, let’s get that dreamy filling ready. In a bowl, combine the drained ricotta cheese, powdered sugar, orange zest, and vanilla extract. Stir it all together until it’s smooth and creamy. Taste it and add a bit more powdered sugar if you like it sweeter. The orange zest is key – it adds that authentic cannoli zing!
Step 6: Layer & Swirl
Spoon about a tablespoon of batter into each mini muffin cup, filling them about halfway. This is where the “cannoli” shape comes in! You want to press down slightly in the center of the batter in each cup to create a little well. Then, spoon about a teaspoon of the ricotta filling into the well. Don’t overfill, or it will bubble over! You can then gently spoon a little more batter over the top of the filling, or just leave it as is to create a lovely little pocket. My kids love just dropping a dollop of filling into the well and seeing it bake up.
Step 7: Bake
Pop those muffin tins into your preheated oven. Bake for about 15-18 minutes for mini muffins, or 20-25 minutes for regular muffins, until the edges are golden brown and a toothpick inserted into the cake part (not the filling!) comes out clean. They’ll puff up a bit while baking. The key is to get them golden and slightly firm.
Step 8: Cool & Glaze
Let the cups cool in the muffin tin for about 5-10 minutes. This is important so they don’t break when you try to get them out. Then, gently remove them and let them cool completely on a wire rack. While they’re cooling, you can whisk together the glaze ingredients until smooth. If you’re using the glaze, once the cups are totally cool, drizzle it over the top. I like to do it in a little zig-zag pattern.
Step 9: Slice & Serve
Once the glaze has set a bit (or if you skipped it!), your mini cannoli cups are ready to be devoured! You can serve them whole, or if you’ve filled them with enough batter to cover the filling, you can slice them in half horizontally if you want to show off that gorgeous filling. They’re best enjoyed the same day, but leftovers can be stored. Honestly, they never last long enough in my house to worry about leftovers!
What to Serve It With
These mini cannoli cups are so versatile, they fit into almost any occasion. For a simple breakfast treat, I love to serve them alongside a steaming mug of coffee. The slight sweetness and the citrus notes are a wonderful way to start the day. They look so pretty on a little plate! For brunch, they’re a real showstopper. Imagine a beautiful spread of pastries, and then these little delights nestled in. They’re perfect with a glass of Prosecco or a fresh mimosa. As a dessert, well, they’re a no-brainer! They are fantastic after a nice Italian dinner, or even just as a sweet treat to cap off any meal. My family loves them for a cozy snack, especially on movie nights. I’ll often just put a bowl out, and they disappear in minutes. Sometimes, I’ll even add a sprinkle of finely chopped pistachios or some mini chocolate chips to the filling for an extra layer of flavor and texture. They are also fantastic served with a dollop of Whipped cream or a fresh berry on top for a bit of color and freshness.
Top Tips for Perfecting Your Mini Cannoli Cups
After making these more times than I can count, I’ve picked up a few tricks that really make a difference. For the batter, the most important thing is not to overmix. Seriously, once you see the flour incorporated, stop! Overmixing develops the gluten too much and can make your cups tough instead of tender. When it comes to the filling, draining that ricotta is absolutely non-negotiable. If it’s watery, your filling will be runny, and that’s just sad. I usually let it drain in a fine-mesh sieve lined with cheesecloth for at least an hour, or even overnight in the fridge. For a different flavor profile, instead of orange zest, try lemon zest for a brighter taste, or even a pinch of cinnamon for a warm, cozy vibe. If you’re short on time and don’t have fresh oranges, a little bit of almond extract can also add a lovely hint of flavor to the filling. Baking time can vary a lot depending on your oven, so keep an eye on them. You want those edges nice and golden, but not burnt. If some bake faster than others, just pull them out. And for the glaze, remember it’s better to start with less liquid and add more as needed. You’re aiming for a consistency that’s thick enough to hold its shape but thin enough to drizzle easily. If it gets too thin, just whisk in a little more powdered sugar.
Storing and Reheating Tips
These mini cannoli cups are definitely best enjoyed the day they’re made, as the shells are at their crispiest then. However, if you happen to have any leftovers (which is rare in my house!), you can store them. For room temperature storage, keep them in an airtight container for up to 2 days. The shells might soften slightly, but they’ll still be delicious. If you’ve glazed them, make sure the glaze is fully set before covering. For refrigerator storage, you can keep them in an airtight container for up to 3 days. Again, expect the shells to be a bit softer. I generally don’t recommend reheating them, as it can make the shells soggy. The filling is perfectly fine served chilled or at room temperature. If you absolutely want them warm, you could try a few seconds in a toaster oven, but honestly, I find they’re best enjoyed as is. If you plan to freeze them, I’d recommend filling them *after* they’ve been baked and cooled. You can freeze the baked cups for up to a month. Thaw them at room temperature and then fill them just before serving for the best texture. For the glaze, it’s always best to add it right before serving, whether they are fresh or thawed. This keeps it looking pretty and fresh.
Frequently Asked Questions
Final Thoughts
Honestly, these mini cannoli cups are one of those recipes that just makes me happy. They’re proof that you don’t need to be a pastry chef to create something truly special and delicious. They capture all the essence of a beloved Italian treat in a format that’s accessible and incredibly rewarding. The contrast of the tender, crisp baked cup with that wonderfully creamy, zesty ricotta filling is just divine. They’re perfect for when you want to impress guests, celebrate a small occasion, or simply treat yourself to something wonderfully sweet. If you loved this recipe, I think you might also enjoy my Simple Italian Biscotti for another classic Italian bake, or perhaps my Lemon Ricotta Cookies for more ricotta goodness! Give these mini cannoli cups a try, and I promise, you won’t be disappointed. I can’t wait to hear what you think and see your beautiful creations! Happy baking, everyone!
Mini Cannoli Cups
Ingredients
Cannoli Filling
- 15 ounce whole milk ricotta cheese well-drained
- 0.75 cup powdered sugar sifted
- 1 teaspoon vanilla extract
- 0.5 cup mini chocolate chips
Other Ingredients
- 2 box frozen mini phyllo shells thawed, 15 count per box
- 0.25 cup chopped pistachios for garnish
- 2 tablespoon mini chocolate chips for garnish
Instructions
Preparation Steps
- In a large bowl, combine the well-drained ricotta cheese, sifted powdered sugar, and vanilla extract. Beat with an electric mixer until smooth and creamy. Fold in the 0.5 cup of mini chocolate chips.
- Spoon or pipe the cannoli filling into the thawed mini phyllo shells. A small spoon or a piping bag with a wide tip works well.
- Arrange the filled cannoli cups on a serving platter. Garnish each cup with a sprinkle of chopped pistachios and additional mini chocolate chips.
- Serve immediately or refrigerate for at least 30 minutes to allow the flavors to meld and the filling to firm up slightly. Enjoy!