Oh, hello there! Come on in, make yourself comfortable. I’ve got a mug of tea brewing, and I’ve been just dying to share this recipe with you. It’s my absolute go-to when I’m craving something bright, zesty, and utterly comforting, but don’t want to spend hours in the kitchen. We’re talking about my lemon Cream Pie. Now, I know what you might be thinking – “Lemon cream pie? Isn’t that a bit… fussy?” But trust me, this version is anything but! It’s got that perfect balance of tangy lemon and velvety cream, all nestled in a flaky crust that just melts in your mouth. It’s truly a sunshine-in-a-dish kind of dessert, and it always brings a smile to my face, especially when I remember the first time my grandma made it for me. It’s like a hug from the inside out, and honestly, it beats a complicated cake any day of the week when you need a sweet fix fast.
What is lemon cream pie?
So, what exactly *is* this magical thing I’m raving about? Think of it as the ultimate bright and refreshing dessert. It’s essentially a luscious, creamy custard filling infused with the vibrant, tangy flavor of fresh lemon, all poured into a buttery, golden crust. The “cream” part comes from the smooth, rich texture of the filling, which is usually thickened with egg yolks and a touch of flour or cornstarch, then often lightened with whipped cream. It’s not a meringue pie, which has that fluffy toasted topping, and it’s definitely not a lemon bar. This lemon Cream Pie is all about that smooth, dreamy filling and the delightful zing of lemon. It’s a classic for a reason, and this recipe I’m sharing is my perfected version that’s been a hit with everyone who’s tried it.
Why you’ll love this recipe?
Honestly, where do I even begin? There are so many reasons why this lemon cream pie has earned a permanent spot in my recipe binder, and why I just know you’re going to adore it too. First and foremost, the flavor. It’s an absolute explosion of bright, sunny lemon goodness that’s perfectly balanced by the sweet, creamy richness of the filling. It’s not too tart, not too sweet – it’s just right. It tastes like a burst of sunshine, and it’s incredibly refreshing, especially after a hearty meal. And then there’s the simplicity. I know “pie” can sound intimidating, but this recipe is surprisingly straightforward. Even if you’re a beginner baker, you can totally nail this. I’ve streamlined the steps so you get maximum flavor and perfect texture with minimal fuss. Plus, it’s surprisingly budget-friendly! The ingredients are all pantry staples, meaning you likely have most of what you need right now. It’s a fantastic way to create something truly special without breaking the bank. What I love most about this recipe, though, is its versatility. It’s perfect for a casual Sunday dinner, a fancy holiday gathering, or even just a sweet treat for yourself on a Tuesday. I’ve even made mini versions in muffin tins for parties, and they disappear in minutes! It’s just one of those reliable recipes that always delivers, and that’s priceless in my book.
How do I make lemon cream pie?
Quick Overview
Making this delightful lemon cream pie is a breeze, and I promise you’ll be enjoying every creamy, zesty bite before you know it. The process involves preparing a simple crust, making a wonderfully smooth lemon filling, and then letting it all come together beautifully. We’ll start by blind-baking the crust to ensure it’s perfectly crisp, then whip up the luscious lemon filling on the stovetop until it’s thick and glossy. Pouring that sunshine into the shell, chilling it until set, and then a final touch of something sweet. It’s designed to be straightforward, with clear steps to ensure success, even if you’re new to pie making. You’ll see just how simple it is to create a dessert that looks and tastes like it came from a fancy bakery!
Ingredients
For the Crust:
You’ll want to start with a good, reliable pie crust. You can absolutely use your favorite store-bought one if you’re short on time – no judgment here! But if you have a little extra time, my go-to is a simple butter crust. You’ll need about 2 ½ cups of all-purpose flour, 1 teaspoon of salt, and 1 cup (2 sticks) of unsalted butter, very cold and cut into cubes. A tablespoon of apple cider vinegar mixed with ice water (about ½ cup total) helps make it extra flaky. The key is to keep everything super cold!
For the Filling:
This is where the magic happens! You’ll need 6 large egg yolks (save the whites for another day – maybe some meringues!), 1 ½ cups of granulated sugar, ½ cup of cornstarch (this is essential for that silky smooth texture), ½ teaspoon of salt, 3 cups of whole milk (I find whole milk gives the richest flavor, but you can experiment!), ½ cup of fresh lemon juice (don’t even *think* about using that bottled stuff – it makes a world of difference!), and 2 tablespoons of unsalted butter. For that extra punch of lemon, I also love adding the zest of 2 large lemons.
For the Glaze (Optional, but Highly Recommended!):
This adds a beautiful sheen and a little extra flavor. You can simply whisk together 1 cup of powdered sugar with 2-3 tablespoons of fresh lemon juice until you have a smooth, pourable consistency. You can also add a tiny bit of milk if it’s too thick, or more powdered sugar if it’s too thin. It’s all about getting that perfect drizzling texture!
Step-by-Step Instructions
Step 1: Preheat & Prep Pan
First things first, let’s get that oven ready. Preheat it to 375°F (190°C). Now, take your beautiful Pie crust dough and gently press it into a 9-inch pie plate. Crimp the edges however you like – a classic fluted edge is always lovely, or you can just press it down with a fork for a simpler look. To prevent the crust from puffing up and getting soggy, we’re going to blind bake it. Line the crust with parchment paper or foil, and fill it with pie weights, dried beans, or even uncooked rice. This weighs it down while it bakes. Pop it in the preheated oven for about 15 minutes.
Step 2: Mix Dry Ingredients
While the crust is getting a head start, let’s get our filling ingredients ready. In a large, heavy-bottomed saucepan (this is important to prevent scorching!), whisk together the granulated sugar, cornstarch, and salt. Make sure these are really well combined. The cornstarch needs to be evenly distributed so it doesn’t clump up when we add the liquid. It’s a simple step, but it makes a huge difference in the final texture of your lemon cream pie filling!
Step 3: Mix Wet Ingredients
In a separate medium bowl, whisk together the egg yolks until they’re lightly beaten. Then, gradually whisk in the fresh lemon juice and the lemon zest. This is where all that lovely citrusy aroma starts to fill your kitchen! You want to make sure the lemon juice is incorporated well with the yolks. I always zest my lemons *before* juicing them, as it’s so much easier that way.
Step 4: Combine
Now, it’s time to bring it all together. Slowly and gradually, whisk the milk into the dry ingredients in the saucepan. Whisk until it’s smooth and there are no lumps. Then, place the saucepan over medium heat. Stirring constantly, bring the mixture to a gentle boil. It might seem like it’s taking forever, but be patient! Once it starts to bubble, continue to cook and stir for about 1 to 2 minutes, until it thickens up nicely. It should be quite thick, almost like a pudding. Remove the saucepan from the heat. Now, carefully, and this is important to avoid scrambling your yolks, temper the egg mixture. Ladle about half a cup of the hot milk mixture into the egg yolk mixture, whisking vigorously. Then, pour this tempered egg mixture back into the saucepan with the remaining milk mixture, whisking continuously. Return the saucepan to medium-low heat and cook, stirring constantly, for another 2 to 3 minutes, until the filling is thick and smooth. Don’t let it boil vigorously at this stage. Remove from heat, and stir in the 2 tablespoons of butter until it’s completely melted and incorporated. The butter adds a lovely richness and shine to the filling.
Step 5: Prepare Filling
The filling is already prepared in Step 4! Once it’s thickened and the butter is stirred in, you’ll have a beautifully smooth and glossy lemon custard. It should be thick enough to coat the back of a spoon. This is where the magic happens, transforming simple ingredients into something truly special. The aroma of fresh lemon at this stage is just incredible!
Step 6: Layer & Swirl
Okay, so by now, your pie crust should have had its initial bake. Take it out of the oven, and carefully remove the parchment paper and weights. If the bottom looks a little wet or puffy, you can gently press it down with the back of a spoon. Now, carefully pour that gorgeous, thick lemon filling into the partially baked crust. Spread it evenly. There’s no swirling in this recipe for the filling itself, but the smoothness of the filling against the crisp crust is a beautiful contrast on its own.
Step 7: Bake
Now, pop that pie back into the oven at 375°F (190°C). Bake for another 20-25 minutes, or until the filling is set around the edges and only slightly jiggly in the very center. It will continue to set as it cools. A little bit of jiggle is exactly what you want – it means it won’t be dry. You’ll notice the filling will have a beautiful golden hue from the egg yolks and lemon. If the crust edges start to brown too quickly, you can always loosely tent them with foil.
Step 8: Cool & Glaze
This is perhaps the hardest part: the waiting! Once the pie is out of the oven, let it cool completely on a wire rack. This can take a good 2-3 hours. Don’t rush this step! The filling needs to set properly. Once it’s completely cooled, you can then drizzle on your optional glaze. Whisk together the powdered sugar and lemon juice until it’s smooth and pourable. Drizzle it over the top of the cooled pie. It’ll set into a lovely, slightly crisp topping. This glaze is what gives it that extra little something and makes it look so professional!
Step 9: Slice & Serve
Once the glaze has set, your incredible lemon cream pie is ready to be sliced and enjoyed! For the cleanest slices, I highly recommend using a sharp knife dipped in hot water and wiped dry between each cut. Serve chilled or at room temperature. It’s truly a showstopper!
What to Serve It With
This lemon cream pie is so versatile, it fits into almost any meal or occasion! Here are a few of my favorite ways to enjoy it, and how I like to serve it up:
For Breakfast: Yes, you read that right! A thin slice of this zesty pie can be surprisingly delightful with a strong cup of coffee. It’s a much lighter option than a heavy pastry and gives you that little bit of sweetness to start the day. I usually just cut a small wedge and enjoy it with my morning brew, no fuss required.
For Brunch: This is where the lemon cream pie really shines! Serve it chilled on a pretty platter, perhaps garnished with a few fresh berries (raspberries or blueberries pair wonderfully) and a sprig of mint. It looks elegant and tastes divine. Pair it with a mimosa or a sparkling lemonade for a truly celebratory feel.
As Dessert: This is its classic role, and it excels here. After a rich dinner, this pie is the perfect palate cleanser. I often serve it simply on its own, allowing the bright lemon flavor to cut through any heaviness. If I’m feeling fancy, a dollop of freshly whipped cream on the side or a scattering of toasted slivered almonds adds a lovely touch.
For Cozy Snacks: Sometimes, you just need a little treat to lift your spirits. A slice of this lemon cream pie is perfect for an afternoon pick-me-up or a late-night craving. It’s satisfying without being too heavy, and the tartness is incredibly refreshing. I often cut it into small squares and serve them alongside a cup of herbal tea. It’s my little moment of calm in a busy day.
My family absolutely devours this pie. My son, who can be a picky eater, always asks for seconds, and my husband loves it with his Sunday morning coffee. It’s just one of those desserts that brings people together, and that’s really what cooking is all about, isn’t it?
Top Tips for Perfecting Your Lemon Cream Pie
I’ve made this lemon cream pie more times than I can count, and along the way, I’ve picked up a few tricks that I think are worth sharing. These little tips have helped me get that perfect texture and flavor every single time, and I hope they do the same for you!
Crust Prep: The secret to a fantastic crust, whether you make it from scratch or use store-bought, is keeping everything COLD. Cold butter, cold water, even cold hands (if you can!) all contribute to a flaky, tender crust. When you’re pressing it into the pie plate, don’t overwork the dough. Just gently press it into shape. And for blind baking, don’t skip the pie weights or beans! They’re crucial for preventing a puffy, sad crust. If you don’t have pie weights, dried beans or even large pasta work in a pinch.
Mixing Advice: When you’re making the filling, the most important thing is constant stirring, especially when it’s on the heat. This ensures even cooking and prevents lumps or scorching. Use a whisk and a good, heavy-bottomed saucepan – it distributes heat more evenly. And remember to temper those egg yolks! Gradually adding a little hot liquid to the yolks while whisking constantly gently raises their temperature, preventing them from scrambling when you add them back to the hot milk mixture. It’s a game-changer for a smooth filling.
Swirl Customization: While this recipe doesn’t have a swirl in the filling itself, the “swirl” comes from the beautiful contrast between the golden filling and the crisp crust. For the glaze, aim for a consistency that’s pourable but not too thin. If it’s too thick, add a tiny bit more lemon juice or milk, a teaspoon at a time. If it’s too thin, whisk in a little more powdered sugar. You want it to drizzle nicely without running off the edges too quickly.
Ingredient Swaps: I’ve found that using fresh lemon juice and zest is non-negotiable for the best flavor. Bottled juice just doesn’t have that bright, fresh tang. For the milk, whole milk is ideal for richness, but 2% can work in a pinch. You might find the filling is slightly less rich. I’ve also successfully used a combination of whole milk and half-and-half for an even more decadent filling, but that’s for special occasions!
Baking Tips: Keep an eye on your pie as it bakes. Ovens can be finicky! If you notice the crust edges browning too fast, loosely tent them with aluminum foil. For the doneness test, you want the filling to be mostly set but still have a slight wobble in the center. It will firm up completely as it cools. Overbaking can lead to a rubbery texture, so err on the side of slightly underbaked in the center!
Glaze Variations: If you’re not a fan of a powdered sugar glaze, you can skip it entirely, or dust the cooled pie with a little powdered sugar. Another option is to whip some heavy cream with a little powdered sugar and vanilla and serve that alongside. For a slightly different flavor, you could add a tiny drop of almond extract to the glaze for a subtle nutty hint.
Storing and Reheating Tips
Once your glorious lemon cream pie is made, the next important step is knowing how to store it to keep it tasting its best. I’ve tested a few methods, and here’s what I’ve found works well:
Room Temperature: Because of the custard filling, it’s generally best to store this pie in the refrigerator. However, if you plan to serve it within a few hours of it reaching room temperature after chilling, it’s usually okay to leave it out. Just be sure to cover it loosely with plastic wrap or a cake dome to protect it from dust and other kitchen airborne particles. Aim to consume it within 2-3 hours if left at room temperature.
Refrigerator Storage: This is my preferred method. Once the pie has cooled completely and the glaze has set, cover it loosely with plastic wrap or transfer it to an airtight container. It will stay fresh in the refrigerator for about 3-4 days. I find that the flavors actually meld and deepen a bit on the second day, which is lovely! Make sure it’s well-covered to prevent it from absorbing any odors from other foods in the fridge.
Freezer Instructions: While this pie is best enjoyed fresh, you *can* freeze it, but with a few caveats. It’s best to freeze the pie *before* you add the glaze. Wrap the completely cooled, un-glazed pie very tightly in a layer of plastic wrap, followed by a layer of aluminum foil. This double layer helps prevent freezer burn. Freeze for up to 1-2 months. To thaw, remove the foil and plastic wrap and let it thaw in the refrigerator overnight. Add the glaze once it’s fully thawed. The texture of the crust might be slightly softer after freezing, but it’s still quite enjoyable!
Glaze Timing Advice: If you’re planning to store the pie for more than a day, I recommend adding the glaze just before serving. Glaze can sometimes soften or become sticky if it sits for too long, especially in the refrigerator. If you’ve frozen the pie, definitely add the glaze after thawing.
Frequently Asked Questions
Final Thoughts
There you have it – my absolute favorite lemon cream pie recipe! I truly hope you give this a try. It’s one of those desserts that feels special and impressive, but is actually so manageable to make, even on a weeknight if you plan a little. The way the bright, tangy lemon cuts through the rich, creamy filling is just pure bliss. It’s the kind of pie that makes everyone ask for seconds, and then ask for the recipe! If you find yourself loving this, you might also enjoy my [Link to another recipe, e.g., “Classic Key Lime Pie”] or my [Link to another recipe, e.g., “No-Bake Cheesecake Recipe”]. They share that similar bright, refreshing vibe. I can’t wait to hear what you think! Let me know in the comments below how yours turned out, or if you have any special twists you like to add. Happy baking, and enjoy every delightful, zesty bite!
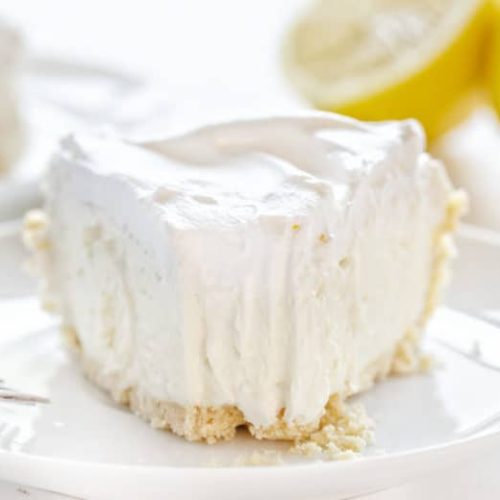
No Bake Lemon Cheesecake Cream Pie
Ingredients
Shortbread Pie Crust
- 6 ounces finely crushed shortbread cookies plus more for garnish
- 2 tablespoons butter melted
Lemon Cream Filling
- 24 ounces cream cheese softened to room temperature
- 1.3333333333333 cup confectioners sugar
- 0.25 cup lemon juice Juice of 1 lemon, about 1/4 cup
- 1 teaspoon lemon extract or more to taste (taste test as you go!)
- pinch kosher salt
- 2 cups whipped topping plus more for garnish
- lemon slices for garnish
Instructions
Shortbread Pie Crust
- In a large bowl, combine the shortbread cookie crumbs with the melted butter. Pour into a prepared 8 in pie dish and firmly press to the edges to form a pie crust.
Lemon Cream Filling
- In a large bowl, beat the cream cheese until it is light and fluffy.
- Add in the confectioners' sugar, lemon juice, lemon extract, and salt. Beat until everything is combined. (If you are adding food color, add it here.)
- Gently fold in the whipped topping.
- Pour filling mixture into prepared pie crust.
- Refrigerate for 2 - 6 hours. Top with remaining whipped topping, remaining, shortbread crumbs, and lemon.