Oh, you guys, I am SO excited to share this with you today! You know how some recipes just feel like coming home? This one is that for me. It’s my go-to whenever I need a little bit of magic in my life, or when I’m trying to impress someone without pulling my hair out. I remember the first time I pulled a perfectly frosted, impossibly tall cake out of the oven, and my kids’ eyes just lit up like Christmas trees. That’s the feeling I want you to have! This isn’t just any cake; it’s a celebration waiting to happen. If you’ve ever felt intimidated by the idea of layer cake baking, thinking it’s only for fancy pastry chefs, well, I’m here to tell you that you are SO wrong. This recipe is designed to be incredibly forgiving, ridiculously delicious, and frankly, it tastes a million times better than anything you’d get from a box. It’s a little bit like a perfectly executed vanilla bean cake, but with a depth of flavor and a moistness that’s just unparalleled. Get ready to fall in love with baking cakes again.
What is Heavenly Layer Cake?
So, what exactly are we talking about when I say “this layer cake”? Think of it as your ultimate comfort cake, elevated. It’s a beautifully tender, moist cake with a delicate crumb, designed to hold up perfectly when stacked. We’re not talking about those dense, dry cakes that make you want to reach for a gallon of milk. Nope. This cake is all about light, airy perfection. The flavor is a soft, sweet vanilla with hints of buttery richness, but it’s also a fantastic canvas for whatever frosting or fillings your heart desires. The “layer cake” part is key, of course. We bake it in rounds, then stack them high, creating that impressive visual that just screams “special occasion.” It’s essentially a blank canvas for your creativity, but the cake itself is so delicious, you could honestly eat it plain with just a dusting of powdered sugar and be utterly content. It’s that good.
Why you’ll love this recipe?
Honestly, where do I even begin? This cake is a total winner for so many reasons. First off, the flavor is just divine. It has that classic, comforting vanilla taste that everyone loves, but there’s a subtle complexity from a couple of secret ingredients that makes it truly stand out. It’s not overly sweet, which I personally appreciate, meaning you can really taste the quality of the ingredients. And then there’s the texture – oh my goodness, the texture! It’s unbelievably moist and tender, like a little cloud in your mouth. This is thanks to a few smart steps in the mixing process and a special ingredient that keeps it from drying out, even after a few days. Speaking of days, this cake is a lifesaver! It keeps beautifully, making it perfect for baking ahead for parties or holidays. Another big win? It’s surprisingly budget-friendly. You probably have most of the ingredients in your pantry right now! Plus, its versatility is off the charts. Whether you’re a fan of classic buttercream, a rich chocolate ganache, or even a fruity cream cheese frosting, this cake plays well with them all. I’ve even made a spiced version for fall that was incredible! What I love most about this recipe, though, is how approachable it is. It feels fancy, but it’s genuinely easy to make, even if you’re a beginner baker. It’s one of those recipes that makes you feel like a baking pro, and that’s a pretty fantastic feeling, wouldn’t you agree?
How do I make a dreamy layer cake?
Quick Overview
The whole process is surprisingly straightforward. We’ll mix up a light and airy batter, bake it into perfect rounds, and then assemble it with your favorite frosting and filling. The magic happens in how we combine the wet and dry ingredients, ensuring maximum tenderness and avoiding any tough bits. It’s truly a recipe that rewards careful, but not overly fussy, execution. You’ll be amazed at how quickly you can go from raw ingredients to a show-stopping dessert.
Ingredients
For the Main Batter:
Okay, let’s talk ingredients! For the star of the show, you’ll need: 2 and 3/4 cups all-purpose flour – sifted, always sifted for a lighter cake! 1 and 1/2 teaspoons baking powder and 1/2 teaspoon baking soda – these are our liftoff agents, making sure it’s nice and fluffy. 1/2 teaspoon fine sea salt – it balances the sweetness. 1 cup (2 sticks) unsalted butter, softened to room temperature – this is crucial for creaming. If it’s too cold, you won’t get that airy texture. 1 and 3/4 cups granulated sugar – for that perfect sweetness. 4 large eggs, at room temperature – helps bind everything together and adds richness. 1 teaspoon pure vanilla extract – don’t skimp on good quality vanilla, it makes a huge difference! 1 cup buttermilk, at room temperature – buttermilk is my secret weapon for moisture; it adds a lovely tang and tenderness. If you don’t have buttermilk, you can make a quick substitute by adding 1 tablespoon of white vinegar or lemon juice to 1 cup of milk and letting it sit for 5-10 minutes. 1/2 cup Sour cream, full-fat, at room temperature – this is another moisture-booster and adds a wonderful richness. Trust me on this one!
For the Filling:
This is where you can really get creative! For a classic, simple filling, I love a good vanilla bean buttercream. You’ll need 1 cup (2 sticks) unsalted butter, softened, 4 cups powdered sugar, sifted, 1/4 cup milk or cream, and 1 teaspoon vanilla extract. You can also whip up a quick chocolate ganache (equal parts heavy cream and good quality chocolate, heated and stirred until smooth) or a tangy lemon curd. My kids are obsessed with a strawberry jam filling – it’s so easy and adds a lovely fruity burst!
For the Glaze:
For a simple, elegant finish, a basic powdered sugar glaze is perfect. Whisk together 2 cups powdered sugar with 3-4 tablespoons of milk or lemon juice until you reach a pourable but not too thin consistency. You can add a splash of vanilla or a bit of citrus zest for extra flavor. For a richer finish, a simple chocolate glaze made with cocoa powder, powdered sugar, butter, and milk is also fantastic. The key is getting that consistency just right so it drizzles beautifully without running off the cake completely.
Step-by-Step Instructions
Step 1: Preheat & Prep Pan
First things first, get your oven preheated to 350°F (175°C). This is super important for even baking. Grab two 8-inch round cake pans. I like to grease them really well with butter or baking spray, then line the bottoms with parchment paper rounds. After that, I give the parchment and the sides of the pan a light dusting of flour, tapping out any excess. This triple threat method ensures your cakes will release like a dream, and nobody wants a cake stuck to the pan!
Step 2: Mix Dry Ingredients
In a medium bowl, whisk together your sifted flour, baking powder, baking soda, and salt. Whisking them well ensures that the leavening agents are evenly distributed, which means your cake will rise evenly. No one wants a lopsided cake, right? Set this bowl aside for now.
Step 3: Mix Wet Ingredients
In a large bowl, or the bowl of your stand mixer fitted with the paddle attachment, beat the softened butter and granulated sugar together on medium-high speed until the mixture is light, fluffy, and pale yellow. This usually takes about 3-5 minutes. This creaming process is crucial for incorporating air, which contributes to a tender crumb. Next, add the eggs one at a time, beating well after each addition. Make sure to scrape down the sides of the bowl occasionally. Beat in the vanilla extract. In a separate small bowl or jug, whisk together the buttermilk and sour cream until combined.
Step 4: Combine
Now for the magic! With the mixer on low speed, gradually add about half of the dry ingredients to the butter mixture. Mix until just combined. Then, add half of the buttermilk mixture and mix until just combined. Repeat with the remaining dry ingredients and then the remaining buttermilk mixture, ending with the dry ingredients. Be careful not to overmix at this stage! Overmixing develops the gluten in the flour, which can lead to a tough cake. We want tender, tender, tender!
Step 5: Prepare Filling
While your batter is resting, get your filling ready. If you’re going with the buttercream, beat the softened butter until creamy. Gradually add the sifted powdered sugar, alternating with the milk or cream, until you reach your desired consistency. Stir in the vanilla. If you’re using jam or curd, make sure it’s at a good spreading consistency. I find having the filling ready to go makes assembly much smoother.
Step 6: Layer & Swirl
Divide the batter evenly between your prepared cake pans. You can weigh them for accuracy, but eyeballing it usually works just fine. Smooth the tops with a spatula. Now, here’s a fun part if you want to get creative: if you have some leftover batter and want to add a swirl, you can color a small portion of the batter with food coloring or mix in some melted chocolate or cocoa powder. Dollop spoonfuls of the contrasting batter over the main batter in the pans and gently swirl with a toothpick or skewer. Don’t over-swirl, or the colors will just blend together into a muddy mess!
Step 7: Bake
Bake for 30-35 minutes, or until a wooden skewer or toothpick inserted into the center of the cakes comes out clean. Ovens can be a bit quirky, so start checking around the 28-minute mark. If the tops start to get too brown before the inside is cooked, you can loosely tent them with foil. Once baked, let the cakes cool in their pans on a wire rack for about 10-15 minutes before inverting them onto the rack to cool completely. This is super important – trying to frost a warm cake is a recipe for disaster!
Step 8: Cool & Glaze
Once the cakes are completely cool, it’s time for the fun part: decorating! Make sure they are truly, absolutely cool. If you can, let them chill in the fridge for about 30 minutes before frosting; this makes them much easier to handle and crumb-coat. Once cooled and ready, prepare your glaze. You want it to be thick enough to coat but thin enough to drizzle. Drizzle it over the top of your cake, letting it drip down the sides naturally. You can also use a spatula to smooth it out if you prefer a more uniform finish.
Step 9: Slice & Serve
For the cleanest slices, use a sharp knife and wipe it clean between each cut. Serve at room temperature for the best flavor and texture. It’s absolutely divine on its own, but a dollop of whipped cream or a scoop of your favorite ice cream takes it over the top! Seriously, prepare for happy sighs and maybe even a little dance.
What to Serve It With
This cake is so wonderfully versatile, it fits into almost any occasion! For breakfast, imagine a thin slice with a really good cup of coffee or a glass of freshly squeezed orange juice. The subtle sweetness of the cake is just the perfect complement to a leisurely morning. At brunch, I love to serve it with a small side of fresh berries – maybe some raspberries or blueberries – and a dollop of lightly sweetened Whipped cream. It looks elegant and feels so celebratory. When served as dessert, this cake truly shines. It’s fantastic on its own, of course, but you can elevate it with a scoop of vanilla bean ice cream, a drizzle of raspberry coulis, or even a sprinkle of toasted slivered almonds for a bit of crunch. My family also loves it as a cozy snack in the afternoon, perhaps with a glass of milk for the kids or a cup of herbal tea for me. It’s that perfect little treat when you’re craving something sweet but don’t want anything too heavy. I’ve also found that a thin layer of chocolate ganache as a frosting makes it feel super decadent, perfect for a date night dessert or a special anniversary. Honestly, it’s a crowd-pleaser no matter how you serve it!
Top Tips for Perfecting Your Layer Cake
Baking is a science, but it’s also an art, and with layer cakes, a few little tricks can make all the difference between “good” and “absolutely unforgettable.” First off, when it comes to your dry ingredients, *always* sift your flour. I know it sounds like an extra step, but it’s what guarantees that light, airy crumb we’re after. It removes any lumps and aerates the flour, making for a much more tender cake. When you’re mixing the batter, resist the urge to overmix once the flour is in! Seriously, this is probably the most common mistake people make, and it leads to a tough, dense cake. Mix until just combined, and then stop. You’ll learn to feel when it’s right. For the filling, I always recommend using room temperature butter for your buttercream. It creams much better and incorporates more air, making it light and fluffy instead of dense and greasy. And if you’re not a fan of plain vanilla, don’t be afraid to experiment with your swirl. A little bit of espresso powder in a portion of the batter can create a beautiful mocha swirl, or a few drops of almond extract can add a sophisticated nutty note. When it comes to baking, ovens can vary wildly. I highly recommend getting an oven thermometer to ensure your oven is actually at the temperature it says it is. And always, *always* start checking for doneness a few minutes before the recipe states. A toothpick inserted into the center should come out clean, but you don’t want to overbake it, or it’ll dry out quickly. For the glaze, patience is key! Let your cake cool completely before glazing. If it’s even a little warm, the glaze will melt and slide right off. For a beautiful drip effect, make sure your glaze is a good pouring consistency – not too thick, not too thin. I’ve messed this up so many times, so trust me on this! If your glaze is too thick, just stir in a tiny bit more liquid, a teaspoon at a time, until it’s perfect. And if you’re feeling fancy, a quick crumb coat of frosting before the final glaze can create a super smooth, professional-looking finish. It’s like giving your cake a tiny little hug before its big reveal!
Storing and Reheating Tips
One of the best things about this cake is how well it stores. If you find yourself with leftovers (which is rare in my house, but it happens!), you can keep it at room temperature for about 2-3 days, as long as it’s covered tightly. I like to use a cake dome or an airtight container. This is perfect if you’ve baked it for a party and want to have it ready to go. If you live in a very warm climate or have a cake with a cream cheese frosting, I’d recommend refrigerating it. Wrapped well in plastic wrap and then placed in an airtight container, it will stay fresh in the fridge for up to 5 days. When you want to serve it from the fridge, take it out about 30-60 minutes beforehand to let it come to room temperature; this really improves the texture and flavor. For longer storage, this cake freezes beautifully! Wrap it tightly in a couple of layers of plastic wrap, then a layer of aluminum foil, and pop it into a freezer-safe bag. It can stay frozen for up to 3 months. To thaw, unwrap it and let it sit at room temperature for a few hours. If you’ve frosted your cake, it’s usually best to freeze it unfrosted or with a sturdy buttercream that holds up well. If you have a delicate glaze, I’d recommend glazing it right before serving after it’s been thawed. Honestly, this cake is so forgiving, you can feel confident storing and reheating it without losing that amazing, fresh-baked quality.
Frequently Asked Questions
Final Thoughts
So there you have it – my ultimate guide to making a truly spectacular layer cake. I really hope this encourages you to get into the kitchen and try it. It’s more than just a recipe; it’s an experience, a chance to create something beautiful and delicious that brings joy to you and your loved ones. The smell of this cake baking in the oven is just pure happiness, and the first bite is always a little moment of bliss. Don’t be afraid to make it your own! Experiment with different frostings, fillings, or even add a touch of spice to the batter. The beauty of this cake is its adaptability. If you give this recipe a try, please, please, please let me know how it turns out! I’d love to see your creations and hear all about your favorite flavor combinations. Leave a comment below, or share a picture on social media and tag me – I can’t wait to see your beautiful cakes! Happy baking, everyone!
layer cake baking
Ingredients
Main Components
- 3 layers baked cake layers 8-inch diameter, completely cooled
- 6 cups buttercream frosting prepared to desired consistency
- 0.5 cup simple syrup optional, for added moisture
Instructions
Assembly Steps
- Prepare your cake layers by using a serrated knife or a cake leveler to trim any domed tops, making them perfectly flat. This ensures a stable and even cake structure.
- If using, lightly brush each cake layer with simple syrup. This step helps to keep the cake moist and enhances its flavor.
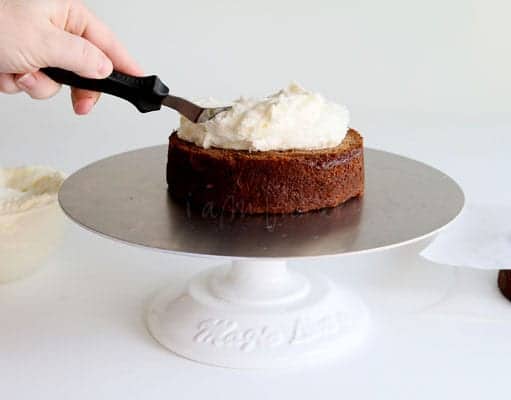
- Place the first cake layer on your serving plate or cake stand. Spread about 1 cup of buttercream frosting evenly over the top. Place the second layer on top and repeat with another 1 cup of frosting. Finally, top with the third cake layer.
- Apply a very thin layer of frosting over the entire cake, covering the top and sides. This is known as a 'crumb coat', designed to trap any loose crumbs. Don't strive for perfection at this stage.
- Refrigerate the cake for 15-20 minutes, or until the crumb coat is firm to the touch. This crucial step prevents crumbs from mixing into your final frosting layer.
- Once the crumb coat is firm, apply the remaining frosting in a generous, even layer to the top and sides of the cake. Use an offset spatula or bench scraper to smooth the frosting for a polished, professional finish. Decorate as desired.