I get a craving for something sweet, something truly nostalgic, and my mind immediately goes to this amazing thingKool Aid Pie. It’s not fancy, not by a long shot, but oh my goodness, it brings back so many memories. I remember my mom making this on scorching summer days when the last thing anyone wanted to do was turn on the oven. It was the ultimate treat, bright and shockingly delicious, and it always disappeared faster than ice cream on the Fourth of July. Honestly, it’s kind of like a no-bake cheesecake met a rainbow, and the result is pure, unadulterated happiness in dessert form. If you’ve ever made a Funfetti cake and loved the vibrant colors and sweet punch, you’re going to adore this Kool Aid Pie. It’s that kind of joyful, crowd-pleasing dessert that just makes everyone smile.
What is Kool Aid Pie?
So, what exactly *is* this magical Kool Aid Pie I keep raving about? Think of it as a wonderfully simple, no-bake dessert that uses the flavor packets from everyone’s favorite childhood drink to create a surprisingly sophisticated (and ridiculously tasty!) filling. It’s essentially a sweet, tangy, and creamy concoction nestled in a buttery, crumbly crust. The “Kool Aid” part gives it this incredible, vibrant color and a distinct fruity flavor that’s hard to pinpoint but utterly delightful. It’s not just about the taste, though; the visual appeal is a huge part of its charm. Imagine a dessert that looks like a party! It’s a brilliant concept that takes something so simple and turns it into something truly special. No complicated steps, no baking required, just pure, sweet, fruity goodness. It’s the kind of dessert that makes you feel like a kid again, no matter how old you are.
Why you’ll love this recipe?
There are so many reasons why this Kool Aid Pie has become a staple in my kitchen, and I just *know* you’re going to fall in love with it too. First off, the flavor is just out of this world. It’s this perfect balance of sweet and tart, with a bright, fruity punch that wakes up your taste buds. It’s not overwhelmingly sweet, which is something I really appreciate. Then there’s the texture – that creamy, smooth filling against the crunchy, buttery crust is just divine. What I love most, though, is how incredibly simple this is to make. Seriously, it’s a lifesaver on busy nights or when unexpected guests pop over. You can whip it up in practically no time, and the best part? No oven required! That means no preheating, no worrying about burning, and a cooler kitchen, especially during those hot summer months. Plus, it’s incredibly budget-friendly. The ingredients are all pantry staples or easily found at any grocery store, making it a fantastic option when you’re trying to stick to a budget but still want to serve something special.
This recipe is also super versatile. While I have my favorite flavors, you can literally use almost any Kool Aid flavor you can find to create different taste sensations and color combinations. Think cherry red for Valentine’s Day, blue raspberry for a summer picnic, or even a mix of grape and orange for a fun, layered effect. It’s perfect for parties, potlucks, or just a fun family dessert. It’s certainly a step up from just mixing up a pitcher of Kool Aid, but it keeps that same fun, accessible vibe. Honestly, it’s one of those recipes that just brings a smile to my face every time I make it, and seeing how much my family and friends enjoy it makes all the effort (which is minimal, by the way!) totally worth it. It’s a guaranteed hit, and that’s the best kind of recipe to have in your arsenal.
How do I make Kool Aid Pie?
Quick Overview
Making this Kool Aid Pie is surprisingly straightforward, and that’s its real magic. You’ll start by whipping up a simple, no-bake crust. Then, you’ll combine a few key ingredients to create a vibrantly colored and incredibly creamy filling that’s ready to be poured into that prepared crust. It’s a process that requires minimal effort but delivers maximum flavor and visual appeal. You’ll be amazed at how something so easy can taste so incredibly good. It’s the perfect “wow” dessert with hardly any fuss.
Ingredients
For the Crust:
You’ll need about 2 cups of graham cracker crumbs. You can buy them pre-crushed, or if you’re feeling energetic, just toss about 14-15 full graham crackers into a food processor or a zip-top bag and bash them with a rolling pin until they’re fine crumbs. The finer the crumbs, the better they’ll hold together. Then, you’ll need about 6 tablespoons of melted unsalted butter. This is what binds everything together. And a little touch of sweetness and structure comes from 2 tablespoons of granulated sugar. I find that unsalted butter gives me more control over the saltiness, but if all you have is salted, just go for it; it’s not a dealbreaker here.
For the Filling:
This is where the fun happens! You’ll need one 8-ounce package of cream cheese, softened to room temperature. This is crucial for a smooth, lump-free filling. Make sure it’s truly soft; I usually leave mine out on the counter for a couple of hours. Then comes the magic ingredient: one envelope of your favorite Kool Aid flavor powder. I’m partial to cherry or tropical punch for that classic bright red or pink color, but blue raspberry is a close second. You’ll also need one 14-ounce can of sweetened condensed milk. This is what gives the pie its incredible sweetness and creamy texture. Don’t use evaporated milk; it has to be sweetened condensed milk. And finally, about 1/2 cup of fresh lemon juice. This is key for two reasons: it adds a lovely tang that balances the sweetness, and it helps the filling set up perfectly. Don’t skip this, and definitely use fresh lemon juice; bottled stuff just doesn’t have the same zing.
For the Glaze (Optional, but Recommended!):
If you want that extra bit of shine and flavor, you can make a simple glaze. You’ll need about 1 cup of powdered sugar (also called confectioners’ sugar or icing sugar), about 1-2 tablespoons of milk (or water), and a little bit of that Kool Aid powder – maybe 1 teaspoon to give it color and flavor. You can also add a tiny splash of vanilla extract if you like. This glaze is super easy; you just whisk it all together until it’s smooth and drizzle-able. I like to make it just a little thicker than usual so it sits nicely on top.
Step-by-Step Instructions
Step 1: Preheat & Prep Pan
Even though this is a no-bake pie, we still need a crust! You’ll want a 9-inch pie plate for this. First, get your crust ingredients ready. Grab your graham cracker crumbs, melted butter, and sugar. Give them a good stir in a bowl until all the crumbs are moistened. It should feel like wet sand. Then, pour this mixture into your pie plate. Use the bottom of a glass or a measuring cup to press the crumbs firmly and evenly into the bottom and up the sides of the pie plate. The firmer you pack it, the less likely it is to crumble when you slice it. Once it’s pressed in, pop the pie plate into the freezer for about 10-15 minutes to let it firm up. This helps it hold its shape while the filling chills.
Step 2: Mix Dry Ingredients
Actually, for this recipe, there aren’t really separate dry ingredients to mix in the traditional sense before adding wet. The graham cracker crumbs, sugar for the crust, and the Kool Aid powder for the filling are handled as part of their respective steps. So, in this particular Kool Aid Pie, we’re essentially combining everything wet and semi-wet for the filling directly, with the Kool Aid powder being the ‘dry’ element that dissolves in.
Step 3: Mix Wet Ingredients
Now for the creamy goodness! In a large mixing bowl, beat the softened cream cheese until it’s smooth and creamy. You don’t want any lumps! Then, gradually add the sweetened condensed milk and beat it in until well combined. This is where your mixer really comes in handy. Next, stir in the Kool Aid powder until it’s fully incorporated and the mixture has a beautiful, vibrant color. You want every bit of that flavor and hue to be distributed evenly. Finally, gently fold in the fresh lemon juice. You’ll notice the mixture start to thicken up slightly as the lemon juice interacts with the dairy. Don’t overmix at this stage; just blend until it’s smooth and uniform.
Step 4: Combine
This step is more about combining the filling *ingredients* together rather than combining wet and dry in the traditional baking sense. Once your cream cheese, sweetened condensed milk, Kool Aid powder, and lemon juice are all mixed together in the bowl, your filling is essentially ready. The magic happens as the lemon juice works with the dairy to create a thick, spoonable mixture that will set up beautifully in the crust.
Step 5: Prepare Filling
Consider this step completed in Step 3! Your filling is prepared once you’ve beaten together the cream cheese, sweetened condensed milk, and Kool Aid powder, and then gently folded in the lemon juice until it’s thick, smooth, and vibrantly colored. It should have a consistency similar to thick pudding or mousse at this point, ready to be poured into your chilled graham cracker crust.
Step 6: Layer & Swirl
Now for the fun part that gives this pie its signature look! Take your chilled graham cracker crust out of the freezer. Carefully pour the prepared Kool Aid filling into the crust. Use a spatula to spread it out evenly. If you want to get fancy, you can create a swirl effect by adding a few dollops of plain Whipped cream or even a different colored Kool Aid mixture on top and gently swirling it with a toothpick or knife. However, for a classic Kool Aid Pie, just spreading it smooth is perfectly fine and still looks fantastic with its vibrant color.
Step 7: Bake
There’s no baking for this pie! That’s the beauty of it. Once your filling is in the crust, you’ll simply cover it tightly with plastic wrap and pop it into the refrigerator. You’ll need to let it chill for at least 4-6 hours, or preferably overnight, to allow the filling to set up completely. The chilling process is where the magic happens, firming up the filling so it slices cleanly.
Step 8: Cool & Glaze
This step is also part of the chilling process. Once the pie has chilled and is firm, you can add the optional glaze. Whisk together the powdered sugar, milk (or water), and a small amount of Kool Aid powder until you get a smooth, pourable consistency. Drizzle this over the chilled pie. It adds a lovely glossy finish and an extra touch of sweetness and flavor. Let the glaze set for about 10-15 minutes before slicing.
Step 9: Slice & Serve
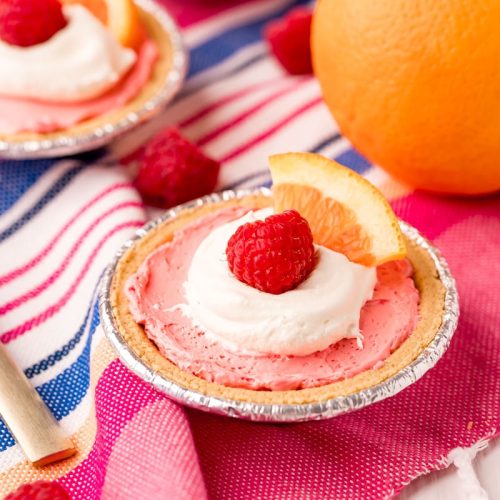
Once the pie is fully chilled and the glaze (if using) has set, it’s time to serve! For the cleanest slices, use a sharp knife that’s been dipped in hot water and wiped dry. This helps prevent the crust from crumbling and the filling from sticking. Serve chilled. It’s wonderful on its own, but I always love to add a dollop of whipped cream and maybe a few fresh berries on the side for extra flair and freshness. Enjoy every colorful, fruity bite!
What to Serve It With
This Kool Aid Pie is such a versatile dessert, perfect for so many occasions! For breakfast, though a bit unconventional, a small slice can be a fun treat alongside a strong cup of coffee. The bright flavors are surprisingly refreshing early in the day, and it’s definitely a conversation starter! Think of it as a sweet indulgence to kick off a weekend morning. For brunch, it’s absolutely stunning. I love serving it with a small sprig of mint or a few fresh berries on top. It adds a pop of color that complements the pie’s vibrancy. A crisp, chilled sparkling cider or a light rosé would be a perfect beverage pairing. It’s elegant enough for a gathering but still relaxed and fun.
As a dessert, it truly shines. After a hearty meal, it offers a light, fruity, and refreshing end. It pairs beautifully with a scoop of vanilla ice cream or a side of whipped cream for those who like a little extra indulgence. For cozy snacks, this pie is unbeatable. It’s the perfect treat for an afternoon pick-me-up with a glass of milk, or a late-night craving buster when you don’t want to turn on the oven. My kids absolutely love it with a big glass of cold milk, and it’s become our go-to after-school treat that doesn’t require any baking. It’s that kind of dessert that feels special without being complicated, making every day a little bit brighter.
Top Tips for Perfecting Your Kool Aid Pie
I’ve made this Kool Aid Pie more times than I can count, and over the years, I’ve picked up a few tricks that I think make a big difference. For the crust, make sure your graham cracker crumbs are really fine. If they’re too chunky, the crust can be crumbly. Pressing it firmly into the pie plate is also super important; I use the flat bottom of a measuring cup to get it nice and even. And popping that crust into the freezer for at least 15 minutes before filling really helps it firm up and hold its shape. For the filling, the cream cheese absolutely *must* be at room temperature. If it’s cold, you’ll end up with lumps, and nobody wants a lumpy pie! Beat it until it’s completely smooth before adding the other ingredients. When you add the lemon juice, mix gently. It thickens the mixture, but you don’t want to deflate all that creaminess you just whipped in.
My biggest tip for the Kool Aid flavor is to experiment! Start with one flavor, but don’t be afraid to mix and match. For example, cherry and lime can be amazing together, or strawberry and blue raspberry for a fun, layered effect. Just be mindful of the amount of powder; start with one packet and see how strong you like it. If you want an even more intense flavor, you can use a little more, but be careful not to overdo it, as it can become a bit too tart. For the glaze, I find that using milk instead of water gives it a richer flavor and a creamier texture. And if you want a really vibrant color in your glaze, use a little bit of the Kool Aid powder in it too! If you ever find your pie isn’t setting up quite right, it’s usually because the lemon juice wasn’t fresh or there wasn’t enough, or the cream cheese wasn’t soft enough. But honestly, even if it’s a little softer than usual, it’s still delicious! Just serve it with a spoon, like a glorious pudding.
I’ve learned that using good quality cream cheese makes a noticeable difference in the final texture. Also, don’t be tempted to use diet Kool Aid; the sugar in the regular packets is essential for the texture and sweetness. If you can’t find sweetened condensed milk, you really can’t substitute it with evaporated milk and sugar; the consistency and sweetness are totally different. I tried it once when I was in a pinch, and it was a disaster! The ratio of ingredients is quite specific for this no-bake pie to set properly. So, stick to the sweetened condensed milk. For that beautiful swirled look, if you decide to add something extra on top, like whipped cream or a contrasting color, do it right before chilling. The longer it sits, the less distinct your swirls will be. Enjoy playing around with it!
Storing and Reheating Tips
Storing this Kool Aid Pie is pretty simple, but doing it right will ensure you enjoy it at its best. Once it’s chilled and set, you can keep it covered tightly with plastic wrap in the refrigerator. It’s best enjoyed within 3-4 days. After that, the crust can start to get a little soft, and the flavors might not be as vibrant. I always make sure the plastic wrap is sealed right to the edge of the pie plate to prevent any air from getting in, which can dry out the filling or make it absorb other fridge odors. If you’ve already sliced it, just gently press the plastic wrap directly onto the cut surface of the remaining pie.
If you think you’ll need longer storage, freezing is an option! You can freeze the entire pie before slicing, or even individual slices. Wrap it really well, first in plastic wrap, and then in a layer of aluminum foil. This two-layer approach is key to preventing freezer burn. It should keep well in the freezer for about 1-2 months. To thaw, transfer the pie (or slices) from the freezer to the refrigerator and let it thaw overnight. It’s important to thaw it slowly in the fridge to help it retain its texture. If you’ve frozen it with the glaze on, that’s perfectly fine, but sometimes the glaze can become a little less shiny after thawing. You can always add a fresh drizzle of glaze once it’s thawed, if you like!
Regarding reheating, you generally don’t need to reheat this pie since it’s meant to be served cold. However, if you’ve thawed a frozen pie and it’s still a bit too cold and firm for your liking, you can let it sit at room temperature for about 15-20 minutes to soften up a touch before serving. The glaze, if applied before freezing, might need a little refresh. A quick whisk of some powdered sugar and a tiny bit of milk or water can revive it if it looks dull after thawing. Otherwise, this pie is all about that refreshing, chilled texture, so serving it cold is definitely the way to go!
Frequently Asked Questions
Final Thoughts
Honestly, this Kool Aid Pie is more than just a dessert to me; it’s a little slice of happy memories. It’s proof that you don’t need a ton of fancy ingredients or complicated techniques to create something truly delicious and memorable. The vibrant colors, the unique fruity flavor, and the simple, no-bake nature make it a winner every single time. It’s perfect for those moments when you need a quick fix of sweetness, a fun treat for the kids, or just a splash of joy in your day. It’s incredibly forgiving, wonderfully adaptable, and always a crowd-pleaser. If you’re looking for a dessert that’s easy, fun, and packed with nostalgic flavor, you absolutely have to give this Kool Aid Pie a try.
I really hope you get a chance to make this and love it as much as my family and I do. It’s a recipe that always brings smiles and often prompts stories of childhood summers. If you end up making it, I’d be thrilled to hear about your experience! What Kool Aid flavor did you choose? Did you add any fun twists? Please leave a comment below and share your thoughts, or even a rating! I can’t wait to see how your Kool Aid Pie turns out. Happy baking (or rather, happy no-baking)!
Kool Aid Pie
Ingredients
Main Ingredients
- 1 package Kool-Aid Any flavor, such as cherry or grape
- 1 can Sweetened Condensed Milk 14 ounce can
- 1 container Frozen Whipped Topping 8 ounce container, thawed
- 1 Prepared Graham Cracker Crust 9-inch
Instructions
Preparation Steps
- In a medium bowl, combine the Kool-Aid powder and sweetened condensed milk. Stir until the Kool-Aid is fully dissolved.
- Gently fold in the thawed whipped topping until the mixture is smooth and well combined.
- Pour the filling into the prepared graham cracker crust, spreading evenly.
- Cover the pie and refrigerate for at least 2 hours, or until firm. You can also freeze it for about 1 hour for a firmer texture.
- Slice and serve chilled. Enjoy your colorful and delicious Kool Aid Pie!