Oh, gingerbread cookies. Just the thought of them makes me feel all warm and fuzzy, doesn’t it? It’s more than just a cookie for me; it’s pure nostalgia baked into every bite. Every year, as soon as the air gets that first crisp hint of autumn, my kitchen transforms into a gingerbread wonderland. My kids, bless their hearts, start asking about them weeks in advance. “Mom, when are we making the gingerbread?” It’s that sweet, spicy aroma that fills the house, a scent that’s practically synonymous with the holidays for me. I remember being a little girl, my grandma’s apron dusted with flour, her patient hands guiding mine as we rolled out dough and cut out wonky stars. These gingerbread cookies are my way of keeping that magic alive, and honestly, they’re so good, they’ve completely replaced every other holiday cookie in our house. They’re not just festive; they’re utterly delicious and surprisingly simple to whip up, making them the perfect treat when you’re craving something special without a fuss.
What is gingerbread cookies?
So, what exactly *are* gingerbread cookies? Think of them as little spiced-up smiles. They’re a classic cookie, a beloved staple, especially around the cooler months and holidays. At their heart, they’re a simple dough made with flour, butter, sugar, and leavening, but the magic really happens with the spices. Ginger, cinnamon, cloves, and sometimes nutmeg all come together to create that signature warm, comforting flavor. The molasses is key too; it gives them a beautiful deep color and a rich, slightly chewy texture that’s just divine. You can make them thin and crispy for snapping, or a bit thicker and softer for a chewier bite. And the best part? They’re incredibly versatile – perfect for decorating, gifting, or just devouring straight from the cooling rack. They’re not just a cookie; they’re a feeling, a memory, a taste of home.
Why you’ll love this recipe?
Honestly, there are so many reasons why this gingerbread cookie recipe is my absolute go-to, and I have a feeling you’re going to love it just as much. First off, the flavor is just out of this world. It’s that perfect balance of sweet and spice that just warms you from the inside out. The ginger isn’t overpowering; it’s just enough to give it that characteristic zing, beautifully complemented by the sweet warmth of cinnamon and a hint of cloves. And the texture! I’ve tweaked this recipe over the years, and I’ve finally landed on one that gives you a cookie that’s wonderfully crisp around the edges but still delightfully chewy in the center. It’s the best of both worlds! Beyond the taste, the simplicity of this recipe is a lifesaver. On a busy afternoon, when everyone’s asking for a treat, I can have these in the oven in under 30 minutes. The ingredients are super common, things you likely already have in your pantry, which means no last-minute dash to the store. That’s a huge win in my book! And let’s talk about versatility. You can roll them out thin for intricate cut-outs, or just drop spoonfuls for rustic, no-fuss cookies. They’re fantastic plain, but they also hold up beautifully to frosting and decorating, making them perfect for holiday cookie platters or just adding a festive touch to your afternoon tea. What I love most, though, is the way the smell of these baking fills the house. It’s that cozy, inviting aroma that just signals comfort and joy. It’s the kind of recipe that becomes a family tradition, one that you’ll return to year after year, and maybe even pass down.
How do I make gingerbread cookies?
Quick Overview
Making these gingerbread cookies is a straightforward process that I’ve streamlined over years of baking. You’ll start by mixing your dry ingredients, then combine your wet ingredients, and finally bring them all together into a beautifully cohesive dough. After a short chill time, you’ll roll and cut your cookies, then bake them until they’re golden and fragrant. The final touch is a simple glaze, which adds a lovely sweetness and a pop of color. What makes this method special is how easily the dough comes together and how forgiving it is, ensuring even beginner bakers can achieve fantastic results. It’s designed for maximum flavor and minimal fuss!
Ingredients
For the Main Dough:
You’ll need all-purpose flour – about 3 cups should do the trick. Make sure it’s spooned and leveled, not scooped directly from the bag, to avoid dense cookies. Then, we add 1 teaspoon of baking soda for a little lift, a generous teaspoon of ground ginger (this is where the magic starts!), half a teaspoon of ground cinnamon, and a pinch of ground cloves – just a pinch, as they can be potent! Salt is crucial for balancing the sweetness, so about half a teaspoon. For richness, we use 1 cup (2 sticks) of unsalted butter, softened but not melted. Brown Sugar is my secret weapon here; 3/4 cup of packed dark brown sugar adds moisture and that deep molasses flavor. Then comes the star: 1/2 cup of unsulphured molasses. Make sure it’s unsulphured; it has a smoother flavor. And for binding and flavor, 1 large egg, lightly beaten, and 1 teaspoon of vanilla extract. If you find your dough is a little dry, a tablespoon or two of milk or even water can help, but usually, the molasses and butter do the trick!
For the Glaze:
This is super simple. You’ll want about 1 cup of powdered sugar, sifted to avoid lumps. Then, 1 to 2 tablespoons of milk (or water, or even lemon juice for a tangier flavor) to reach your desired drizzling consistency. A drop of vanilla extract is nice for extra flavor, and if you want to color it for decorating, a few drops of food coloring will work wonders. I like to keep some plain white and make a small batch of red or green for festive accents.
Step-by-Step Instructions
Step 1: Preheat & Prep Pan
First things first, let’s get our oven ready. Preheat it to 350°F (175°C). This is a pretty standard temperature for most cookies, and it works beautifully for gingerbread. While the oven is heating up, line a couple of baking sheets with parchment paper. This is a lifesaver for cleanup and ensures your cookies don’t stick. You can also use silicone baking mats if you have them. Make sure your baking sheets are cool before you place the dough on them; warm sheets can cause the cookies to spread too much right away.
Step 2: Mix Dry Ingredients
In a medium bowl, whisk together your flour, baking soda, ground ginger, cinnamon, cloves, and salt. Whisking them thoroughly at this stage ensures that all the spices and leavening agent are evenly distributed throughout the flour. This means every single cookie will have that perfect gingerbread flavor and rise. I usually give it a good minute or two of whisking to make sure there are no pockets of spice. You want a uniform, pale brown mixture.
Step 3: Mix Wet Ingredients
In a separate, larger bowl, cream together the softened butter and packed dark brown sugar. You can use an electric mixer for this, or just a good sturdy whisk and some elbow grease. Cream them until the mixture is light and fluffy. This process incorporates air, which helps with the cookie’s texture. Next, beat in the lightly beaten egg and vanilla extract until well combined. Then, gradually beat in the molasses until everything is smooth and evenly incorporated. The mixture will be a deep, rich brown color and smell absolutely divine already!
Step 4: Combine
Now it’s time to bring the wet and dry ingredients together. Gradually add the dry ingredients to the wet ingredients, mixing on low speed (if using a mixer) or stirring with a wooden spoon until just combined. Be careful not to overmix here! Overmixing develops the gluten in the flour too much, which can lead to tough cookies. You want to mix until you no longer see streaks of dry flour. The dough will be quite soft and sticky at this point, which is exactly what we want. If it seems impossibly sticky, you can chill it for about 15-20 minutes before rolling, but usually, it’s manageable.
Step 5: Prepare Filling
This step is more about preparation than mixing ingredients for this specific gingerbread cookie recipe. However, if you were making a filled gingerbread cookie, this is where you’d prepare your fruit or nut filling. For these cut-out style cookies, we’re going to skip a separate filling and focus on the dough. But if you’re feeling adventurous, you could always experiment with a jam swirl later on!
Step 6: Shape and Chill Dough
Divide the dough in half. Flatten each half into a disc, wrap it tightly in plastic wrap, and refrigerate for at least 1 hour, or up to 2 days. Chilling the dough is crucial! It firms up the butter, making the dough easier to roll out and preventing the cookies from spreading too much during baking. This step is non-negotiable for well-shaped gingerbread. Once chilled, lightly flour your work surface and a rolling pin. Roll out one disc of dough to about 1/4-inch thickness. Use your favorite cookie cutters to cut out shapes. Gather the scraps, re-roll, and cut again. Place the cut-out cookies onto your prepared baking sheets, leaving about an inch between them.
Step 7: Bake
Bake the cookies in the preheated oven for 8-10 minutes for smaller cookies, or 10-12 minutes for larger ones. You’re looking for the edges to be lightly golden brown and the centers to look set. They’ll continue to firm up as they cool. Be careful not to overbake, as they can go from perfect to too crisp very quickly! If you’re unsure, you can gently lift an edge with a spatula to check the bottom – it should be lightly browned. Keep an eye on them, as oven temperatures can vary.
Step 8: Cool & Glaze
Let the cookies cool on the baking sheets for 5 minutes before transferring them to a wire rack to cool completely. This step is important for them to set up properly. While they’re cooling, prepare your glaze by whisking together the powdered sugar and milk (or liquid of choice) until smooth. You want a consistency that’s thick enough to coat the cookie but thin enough to drizzle. Once the cookies are completely cool, you can either dip them, spread a layer of glaze on top, or use a piping bag or even a fork to create decorative drizzles. Let the glaze set completely before handling or stacking.
Step 9: Slice & Serve
Once the glaze is dry, your beautiful gingerbread cookies are ready to be enjoyed! They are perfect served at room temperature. For a beautiful presentation, arrange them on a festive platter. I love to serve these with a steaming mug of hot chocolate or a warm cup of spiced apple cider. They’re also fantastic with a cold glass of milk. The aroma alone is enough to make any occasion feel special, but the taste? Pure gingerbread bliss!
What to Serve It With
These gingerbread cookies are wonderfully versatile, and I love how they fit into so many different occasions and pairings. For a cozy morning start, they are absolutely delightful alongside a strong cup of coffee or a creamy latte. The slight bitterness of the coffee cuts through the sweetness of the cookie perfectly, and the warm spice notes just make the whole experience feel so comforting. I often set a few out with breakfast on a weekend when we’re not rushing. For a more elegant brunch setting, I like to arrange them on a tiered stand with fresh fruit and perhaps some mini quiches. They add a lovely touch of festive charm without being too overpowering. A sparkling cider or a mimosa pairs beautifully here. As a dessert, these gingerbread cookies truly shine. They’re wonderful on their own after a hearty meal, but they also make an incredible base for an ice cream sandwich – just imagine a scoop of vanilla bean or salted caramel ice cream between two chewy gingerbreads! For those moments when you’re just craving something sweet and comforting in the evening, a single gingerbread cookie with a glass of milk is pure, simple heaven. It’s like a warm hug in cookie form. My absolute favorite way, though, is to serve them warm from the oven, glazed but still slightly soft, with a dollop of whipped cream and a sprinkle of cinnamon. It’s ridiculously decadent and always a huge hit with family and friends.
Top Tips for Perfecting Your Gingerbread Cookies
Over the years, I’ve learned a few tricks that make all the difference when it comes to baking perfect gingerbread cookies. Let’s dive into some of my best tips:
Dough Consistency: This is probably the most important part. If your dough feels too sticky to handle, don’t be tempted to add too much extra flour. Instead, wrap it well and chill it thoroughly. A cold dough is a happy dough when it comes to rolling and cutting. Conversely, if it seems too dry after chilling (which can happen depending on humidity), add a tablespoon of milk or water at a time until it comes together. The goal is a dough that’s firm but pliable.
Don’t Overmix: I cannot stress this enough! When you combine the wet and dry ingredients, mix only until they’re *just* combined. Overmixing activates the gluten in the flour, which will result in tough, dense cookies rather than tender, chewy ones. It’s better to have a few tiny streaks of flour left and mix them in by hand. Similarly, when you re-roll scraps, be gentle. The dough might get a little warmer, so work quickly.
Rolling Technique: Aim for an even thickness, around 1/4 inch. If some cookies are thicker than others, they’ll bake at different rates. I like to use dough sheets or silicone mats to help me roll to a consistent thickness, or I’ll use my rolling pin with spacer rings. When you cut shapes, press straight down and lift up. Avoid twisting the cutter, as this can seal the edges and prevent them from rising evenly. For intricately cut cookies, chilling the cut shapes on the baking sheet for another 10-15 minutes before baking can help them hold their shape even better.
Baking Precision: Ovens can be tricky! I always recommend knowing your oven. Use an oven thermometer to ensure it’s at the correct temperature. I also find that rotating my baking sheets halfway through baking, and even switching their positions (top to bottom, front to back), helps ensure even baking. Watch the cookies closely in the last few minutes; they can go from perfectly done to overdone in a flash. The edges should be lightly golden, and the center should look set but not browned.
Glaze Consistency: The glaze is where you can really have fun! For drizzling, you want a consistency slightly thinner than toothpaste. If it’s too thick, your drizzles will be chunky and clumpy. If it’s too thin, it will run off the cookie. Start with a small amount of liquid and add more *very* gradually until you get the desired flow. For flooding large areas, you’ll want a thinner consistency, almost like pancake batter. If you want to create patterns, make a few different colors and let the first layer of glaze set slightly before adding contrasting designs.
Ingredient Quality: Use good quality spices! Fresh spices make a world of difference in both the aroma and flavor of your gingerbread. Also, ensure your molasses is good quality; it’s the backbone of the gingerbread flavor. Unsulfured molasses is generally preferred for baking as it has a milder, sweeter taste.
Storing and Reheating Tips
One of the best things about these gingerbread cookies is how well they store, meaning you can enjoy that delicious flavor for days! Here’s how I keep them tasting their best:
Room Temperature Storage: Once completely cooled and the glaze is fully set, I store my gingerbread cookies in an airtight container at room temperature. They’ll stay wonderfully fresh and retain their texture for about 3-4 days. If you’re worried about them getting too soft, you can place a small piece of parchment paper between layers of cookies. Honestly, they rarely last that long in my house!
Refrigerator Storage: While not typically necessary for this recipe, if you live in a very humid climate or want to extend their shelf life a bit longer (up to a week), you can store them in the refrigerator. Just be sure they are in an airtight container, as the cold can sometimes dry them out. The texture might become a bit firmer when chilled, but they’ll soften up again at room temperature.
Freezer Instructions: These gingerbread cookies freeze beautifully! This is my secret weapon for having holiday treats ready to go. Once the cookies are completely cooled and the glaze is set, I wrap them tightly in plastic wrap, then place them in a freezer-safe airtight container or a heavy-duty freezer bag. They can be stored in the freezer for up to 2-3 months. To thaw, simply remove them from the freezer and let them come to room temperature in their packaging for a few hours. This prevents condensation from forming on the glaze. I’ve found they retain their flavor and texture remarkably well.
Glaze Timing Advice: For the best results with glazing and storage, I always recommend glazing cookies right before you plan to eat them or serve them, especially if you’re planning to freeze them. If you’re storing them at room temperature or in the fridge, glazing them a day in advance is usually fine. However, if you’re freezing glazed cookies, be aware that sometimes the moisture from thawing can slightly affect the appearance of certain glazes. If you want picture-perfect glaze after freezing, you might consider glazing them after thawing, or using a royal icing which tends to be more stable when frozen.
Frequently Asked Questions
Final Thoughts
There you have it – my tried-and-true recipe for gingerbread cookies that I hope will become a favorite in your home too. It’s more than just a recipe; it’s a little bit of warmth, a dash of spice, and a whole lot of comfort baked into every single cookie. The way the house smells when these are baking is honestly one of my favorite things about the holiday season, and seeing the smiles they bring to faces, both big and small, is just priceless. They’re simple enough for a weeknight baking session but special enough to impress guests or become a treasured family tradition. If you love the cozy, spiced flavors of gingerbread, I really think you’ll adore this recipe. For those who can’t get enough of these festive flavors, you might also want to try my Spiced Molasses Cookies or my classic Sugar Cookies for Decorating. They’re all wonderful in their own way! I truly can’t wait to hear how your gingerbread cookies turn out. Don’t be shy about sharing your own tips, variations, or photos in the comments below – I love hearing from you! Happy baking, everyone!
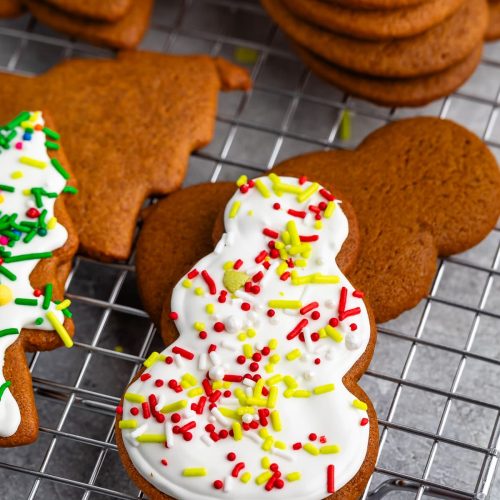
Soft Gingerbread Cookies
Ingredients
For the Cookies
- 1 cup unsalted butter softened
- 1 cup granulated sugar
- 1 cup molasses
- 1 large egg
- 2 tablespoons white vinegar
- 1.5 teaspoons baking soda
- 0.5 teaspoon salt
- 2 teaspoons ground ginger
- 1 teaspoon ground cinnamon
- 1 teaspoon ground cloves
- 5 cups All purpose flour Sifted
For the Frosting
- 3 tablespoons meringue powder
- 4 cups powdered sugar
- 1 teaspoon vanilla extract
- 5 tablespoons water
Instructions
Cookie Preparation
- Beat butter, sugar, and molasses in a stand mixer (or very large bowl with a hand mixer) until smooth. Mix in the egg, then add the vinegar, baking soda, salt, and spices. Mix until combined (mixture may look a bit curdled, that's normal.)
- Mix in flour, 1 cup at a time, until dough forms. Divide dough into two or three sections.
- Lay out a sheet of parchment paper or wax paper on your work surface. Add half the cookie dough and add a second sheet of paper on the top. Use a rolling pin to roll the dough to 0.25-inch thick, in between the pieces of parchment. Periodically, gently lift the parchment off the layer to make sure it's not sticking. Repeat with second half of dough.
- Chill the rolled out dough in the refrigerator for at least 1 hour.
- Preheat oven to 375°F. Line two cookie sheets with parchment or silicone baking mats. Cut shapes from chilled dough, placing on the prepared pans. Chill another 10 minutes before baking.
- Bake for 8-12 minutes, depending on cookie size. Re-roll any scraps of dough and re-chill and repeat.
- Cool cookies completely before frosting.
Frosting and Decorating
- While cookies are cooling, make the frosting. Add meringue powder, powdered sugar, vanilla, and water to the bowl of a stand mixer. Beat until peaks form and it's lost it's glossy sheen, about 7-10 minutes. Add a bit more water as needed for piping consistency.
- At this point you can color the frosting if you want, using food coloring. Frost cookies and top with sprinkles. Let set for at least an hour before stacking.