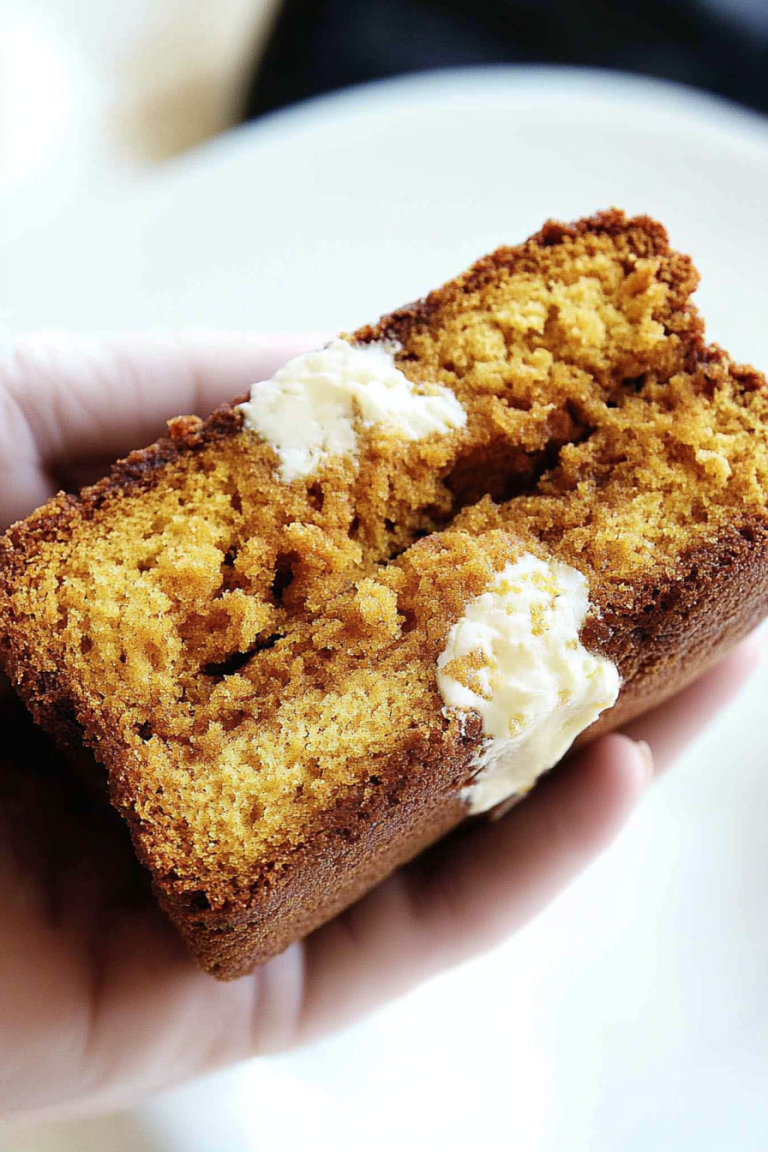
There’s something about the smell of chocolate and peppermint mingling in a warm kitchen that instantly takes me back to cozy winter afternoons spent with my family. This chocolate peppermint zucchini bread has become one of my absolute favorites to make—not just because it tastes incredible, but also because it’s a sneaky way to get veggies into a treat that feels totally indulgent. If you love classic zucchini bread but wish it had a fun twist, this recipe is exactly that. Think rich, fudgy chocolate ribbons dancing through moist, tender bread, all brightened up with a fresh hint of peppermint. It’s like your favorite holiday dessert threw a party with a slice of comfort food—and everyone’s invited. The best part? It’s unexpectedly simple and has become the evening snack everyone’s requesting around here, especially when the sugar cravings hit after dinner.
What is Chocolate Peppermint Swirl Zucchini Bread?
Think of this as traditional zucchini bread, but with a delicious chocolate peppermint makeover. Essentially, it’s a loaf cake infused with shredded zucchini to keep it moist and tender, layered with a luscious chocolate filling that’s swirled with a peppermint kick. The “swirl” part is what really makes it stand out—a gorgeous marbling of chocolate and minty goodness weaving through the bread, creating pockets of surprise in each slice. The name comes from these two star flavors coming together in a beautiful dance, offering a fresh take on a classic recipe your grandma might have made. It’s approachable, homey, and perfect for anyone who’s a little nervous about veggies in their sweets—it truly doesn’t feel like “health food” at all, just deliciously festive comfort.
Why you’ll love this recipe?
What I love most about this chocolate peppermint zucchini bread is the way it delivers so many layers of flavor without any fuss. First off, the taste hits all the right notes—there’s the deep, rich chocolate that melts into the tender crumb, paired with subtle bursts of cool peppermint that keep it from feeling too heavy or sweet. It’s like dessert and breakfast had a perfect little hybrid.
Then there’s the simplicity of the method. I promise you don’t need to be an experienced baker to nail this. The ingredients are straightforward (things you probably have in your pantry right now), and the steps come together in under an hour. This recipe is a lifesaver on busy nights when you want something comforting but don’t want to slave away in the kitchen.
Another thing: it’s surprisingly budget-friendly. Fresh zucchini, cocoa powder, and peppermint extract are small investments that turn an ordinary loaf into something special. Plus, zucchini bread has that magical staying power where it tastes even better the next day, so it feels like you’re stretching your efforts far beyond just one snack session.
Lastly, the versatility is something I can’t get enough of. I’ve sliced this up for a quick breakfast with a smear of cream cheese, paired it with afternoon tea, or served a slightly warmed slice alongside ice cream as a festive treat. If you’ve tried other zucchini recipes before, you’ll appreciate how this one adds that seasonal personality without feeling over the top. My kids actually ask for seconds when this is around, which is saying a lot because they usually spot the zucchini right away!
How do I make Zucchini Bread with Chocolate Peppermint Swirl?
Quick Overview
This recipe is all about layering simple flavors to make something extraordinary. You start by prepping your pan and gathering your ingredients, then mix the dry and wet components separately before combining them to form a smooth batter. After making the chocolate peppermint filling, it’s all about swirling those layers together for that signature marbled effect. A quick bake and a shiny peppermint glaze on top finish things off beautifully. The steps flow well and don’t require any fancy tools, so it’s easy to fit in even on a weeknight when you’re juggling a million things.
Ingredients
For the Main Batter:
- 2 cups all-purpose flour (I prefer to spoon and level for accuracy)
- 1 teaspoon baking soda
- ½ teaspoon baking powder
- ¼ teaspoon salt
- 1 tablespoon ground cinnamon (optional for added warmth)
- 1 cup granulated sugar (feel free to use coconut sugar for a nuttier flavor)
- ½ cup unsweetened applesauce (keeps the bread moist without extra oil)
- 2 large eggs, room temperature
- 1 teaspoon pure vanilla extract
- 1 ½ cups finely grated zucchini (best fresh, not waterlogged)
- ½ cup vegetable oil or melted coconut oil
For the Filling:
- ⅓ cup unsweetened cocoa powder (rich Dutch-processed works well here)
- ¼ cup powdered sugar
- ½ teaspoon peppermint extract (adjust to taste, it’s potent!)
- 2 tablespoons milk of choice (adds creaminess, almond milk also works)
For the Glaze:
- 1 cup powdered sugar
- 2-3 tablespoons milk
- ½ teaspoon peppermint extract
- Optional: crushed candy canes or chocolate shavings for garnish
Step-by-Step Instructions
Step 1: Preheat & Prep Pan
Start by heating your oven to 350°F (175°C). Grease a 9×5-inch loaf pan with butter or non-stick spray, and for extra insurance against sticking, line it with parchment paper so you can lift the bread out easily after baking. I always like to tap the pan a little to settle the oil evenly—small things that help when you’re ready to slice later.
Step 2: Mix Dry Ingredients
In a large bowl, whisk together the flour, baking soda, baking powder, salt, and cinnamon if you’re using it. Mixing these first ensures the leavening agents are evenly distributed so your bread rises consistently. The dry mix should look uniform with no clumps—if you see any lumps in the cocoa later on, give it a quick sift.
Step 3: Mix Wet Ingredients
In a separate bowl, beat the sugar, applesauce, oil, eggs, and vanilla together until smooth and glossy. This is where a bit of elbow grease really pays off—you want a fluffy mix that’ll integrate well with the dry ingredients. Then fold in the grated zucchini carefully so it’s well coated but without squeezing out all the natural moisture.
Step 4: Combine
Pour the wet mixture into the dry and gently fold with a spatula until just combined. Don’t overmix here—just a few folds until no visible streaks of flour remain. Overworking this batter will make your bread dense rather than tender. The batter should be thick but still easy to scoop.
Step 5: Prepare Filling
In a small bowl, whisk cocoa powder, powdered sugar, peppermint extract, and milk until you get a smooth, spreadable paste. It should be thick enough to hold but soft enough to swirl easily—if it’s too stiff, add a bit more milk, a teaspoon at a time.
Step 6: Layer & Swirl
Pour half of the zucchini batter into your prepared pan, then dollop spoonfuls of the chocolate peppermint filling over it. Top with the remaining batter and add more chocolate filling on top. Using a butter knife or skewer, swirl the filling gently through the batter in a figure-eight or circular motion to create a beautiful marbled pattern. Take it slow here—too much swirling will muddy the colors.
Step 7: Bake
Bake the loaf for 50–60 minutes, or until a toothpick inserted near the center comes out mostly clean (a few moist crumbs are okay). Every oven’s tricksy, so keep an eye around the 50-minute mark. If the top is getting too brown, tent loosely with foil.
Step 8: Cool & Glaze
Let the bread cool in the pan for about 15 minutes, then transfer to a wire rack to cool completely. While it’s cooling, mix the glaze ingredients until smooth. When the bread is cool to the touch but still slightly warm, drizzle the glaze over the top and sprinkle with crushed candy canes or chocolate shavings for that festive finish. If you glaze too soon, it might soak into the bread, so patience here pays off.
Step 9: Slice & Serve
Use a serrated knife to slice through the loaf, wiping the blade clean between cuts for neat slices. This bread tastes fantastic at room temperature or lightly warmed with a spread of butter or cream cheese. It’s nice with a cup of hot cocoa or peppermint tea, especially while curled up with a blanket on a chilly day.
What to Serve It With
For Breakfast: This chocolate peppermint zucchini bread pairs wonderfully with a robust morning coffee—think a dark roast or even a peppermint mocha for the full flavor fiesta. Slice it thick, toast gently, and add a smear of cream cheese or almond butter to start your day on a cozy note.
For Brunch: It earns a prime spot on a brunch spread alongside fresh fruit, whipped ricotta, and lightly whipped cream. Serve with sparkling water infused with lemon or a mild herbal tea to balance the sweetness and keep things light enough for daytime.
As Dessert: I love warming a slice and topping it with a dollop of vanilla bean ice cream or whipped cream, then scattering some crushed candy canes over the top for crunch and color. It’s a humble yet show-stopping end to holiday dinners or impromptu weekend feasts.
For Cozy Snacks: When my family gathers for movie night, a plate of this bread alongside mugs of steaming hot cocoa (extra marshmallows, please!) disappears in minutes. The peppermint and chocolate combo feels especially comforting when snow is falling outside or when you just need a little lift after a long day.
We’ve made it a tradition over the years to bring this loaf along to holiday exchanges and afternoon tea with friends. Somehow, it never fails to spark compliments and requests for the recipe—which always makes me smile. This one’s a keeper for sure.
Top Tips for Perfecting Your Chocolate Peppermint Swirl Zucchini Bread
Zucchini Prep: Always grate your zucchini finely and then sprinkle it with a little salt, letting it sit for 10 minutes before gently squeezing out any excess water using a clean kitchen towel. This step prevents the batter from becoming too soggy. Fresh zucchini works best—avoid anything limp or overly watery.
Mixing Advice: When folding wet and dry ingredients, go slow and steady. Overmixing develops gluten, leading to tough bread, which is the opposite of the tender crumb you want. The batter should still have some lumps—trust me, it bakes out beautifully.
Swirl Customization: Experiment with different swirl patterns! I like a loose figure-eight, but you can try zig-zags or even little spirals with a toothpick. Remember, less is more—too much swirling blends the layers into a muddy mess.
Ingredient Swaps: If you’re avoiding dairy, any unsweetened plant milk works fine both in the filling and glaze. I’ve swapped out vegetable oil for melted coconut oil and found the flavor richer but still light. For sweeteners, you can reduce the granulated sugar by ¼ cup or swap it with maple syrup, but if you do the latter, reduce the liquid slightly.
Baking Tips: Position your oven rack in the center to ensure even baking. Every oven varies, so checking doneness a few minutes before the timer is a good idea. If your bread colors quickly on top but is still underdone inside, tent with foil.
Glaze Variations: Want to mix things up? Try adding a teaspoon of melted dark chocolate to the glaze for a richer topping, or swap peppermint for orange extract during spring for a fresh twist. Ideally, your glaze should be pourable but thick enough to stick—add milk a teaspoon at a time to get the texture just right.
I learned these tricks after a few too many times of soggy loaves or dry edges. The difference that patience in prep and glaze timing makes is worth every minute.
Storing and Reheating Tips
Room Temperature: Store your cooled loaf in an airtight container or wrapped tightly in foil or plastic wrap. It stays fresh for up to 3 days and keeps that soft crumb just right. Keep it out of direct sunlight to avoid drying.
Refrigerator Storage: You can refrigerate the bread for up to a week, but bring it back to room temperature or warm it slightly before serving so the chocolate isn’t too firm. Use a sealed container to prevent it from picking up other fridge odors.
Freezer Instructions: Wrapped well in plastic wrap and then foil, this bread freezes beautifully for up to 3 months. Thaw overnight in the fridge or at room temp for a few hours. I even slice and freeze individually for quick snacks.
Glaze Timing Advice: If you’re freezing or refrigerating, I recommend glazing when you’re ready to serve for the freshest look and best texture. The glaze can get a little tacky or soft in the fridge or freezer, though it will still taste wonderful.
Frequently Asked Questions
Final Thoughts
This chocolate peppermint zucchini bread ticks so many boxes in my book: it’s soothing yet festive, familiar but with a fresh twist, and surprisingly comforting when you pull it fresh from the oven and all the house starts smelling like a magical winter wonderland. It’s truly a recipe I return to time and again, especially for those moments when I want something that feels like a treat but also sneaks in a little healthiness. Your kitchen will feel warm, your guests impressed, and your family asking for seconds—trust me, it’s worth every swirl, stir, and sprinkle.
If you love this one, I’d encourage you to try some of my other cozy loaf recipes too—they share that same vibe of comfort elevated with simple, thoughtful additions. Can’t wait to hear how yours turns out! Please drop a comment below, share your tweaks, or let me know how you serve it up. Happy baking, friends!
chocolate peppermint
Ingredients
Main Ingredients
- 1.75 cups all-purpose flour
- 0.5 cup unsweetened dark chocolate cocoa powder
- 0.5 teaspoons kosher salt
- 1 teaspoon baking soda
- 0.5 teaspoon baking powder
- 0.5 cup brewed coffee (cooled)
- 0.5 cup whole milk
- 0.5 cup unsalted butter (softened)
- 1.5 cups granulated sugar
- 2 large eggs
- 16 ounces cream cheese, softened two 8-ounce packages
- 0.67 cup granulated sugar
- pinch of salt
- 2 large eggs
- 0.25 cup sour cream
- 0.33 cup heavy whipping cream
- 0.5 teaspoon peppermint extract
- 0.5 cup Andes Peppermint Crunch baking chips
- 1 cup unsalted butter (softened)
- 5 cups powdered sugar
- 0.5 cup heavy whipping cream
- 1 cup Andes Peppermint Crunch baking chips
Instructions
Preparation Steps
- Preheat the oven to 350°F (175°C). Grease and line two 9-inch round baking pans with parchment paper.
- In a small bowl, whisk together all-purpose flour, cocoa powder, kosher salt, baking soda, and baking powder. Set aside.
- In a measuring cup, combine cooled brewed coffee and whole milk; set aside.
- In the mixer, beat softened butter and granulated sugar for 5 minutes until smooth. Add eggs one at a time, beating well after each addition.
- Alternately add the dry ingredients and the coffee-milk mixture to the butter mixture, beginning and ending with dry ingredients. Mix until just combined.
- Divide the batter evenly between the prepared pans and bake for 25 minutes. Remove from oven and cool on a wire rack.
- For the cheesecake layer: Preheat oven to 325°F (165°C). Prepare a 9-inch springform pan with parchment paper on the bottom.
- Beat softened cream cheese and granulated sugar for 2-3 minutes until creamy. Add salt and eggs one at a time, mixing well after each addition.
- Beat in sour cream, heavy whipping cream, and peppermint extract until light and fluffy. Fold in peppermint baking chips gently.
- Pour cheesecake batter into springform pan. Place the pan in a roasting pan filled with 1 inch of hot water on the lowest oven rack to create a water bath.
- Bake cheesecake for 45 minutes. Turn off oven and let cheesecake sit inside for an additional 30 minutes. Remove and cool completely.
- Freeze cheesecake layer for several hours or overnight for best results. If using within 24 hours, refrigerate instead.
- For the frosting: Beat butter for 3 minutes until creamy. Gradually add powdered sugar and heavy cream, beating until fluffy. Fold in peppermint baking chips.
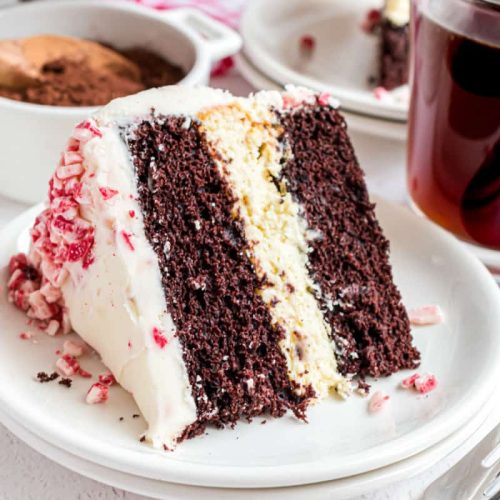
- To assemble: On a cake plate, place one chocolate cake layer. Top with the frozen cheesecake layer, then add the second chocolate cake layer.
- Apply a thin crumb coat layer of frosting around the cake. Refrigerate for 30 minutes to 1 hour.
- Remove from refrigerator and finish frosting the cake evenly. Keep cake refrigerated until ready to serve.
- Allow the cake to sit at room temperature for about 15 minutes before slicing. Enjoy your chocolate peppermint cheesecake cake!