There’s something so warm and cozy about a batch of freshly baked butterscotch cookies wafting through the kitchen—the kind of smell that turns any ordinary afternoon into a cherished moment. I was reminded of this just last week when my kids begged me to make these again for the third time that month. Honestly, these aren’t your typical chocolate chip cookies; the rich, caramel-like sweetness from the butterscotch chips gives them this deep, nostalgic flavor that dances on your tongue. They’re soft on the inside with just the right amount of chew, and that little hint of brown butter I sneak in makes all the difference. If you’re used to classic drop cookies, this recipe will surprise you with its buttery, golden charm that feels a bit like a cuddle in cookie form. Trust me, once you try these butterscotch cookies, they’ll quickly become your kitchen favorite too.
What is Butterscotch Cookies?
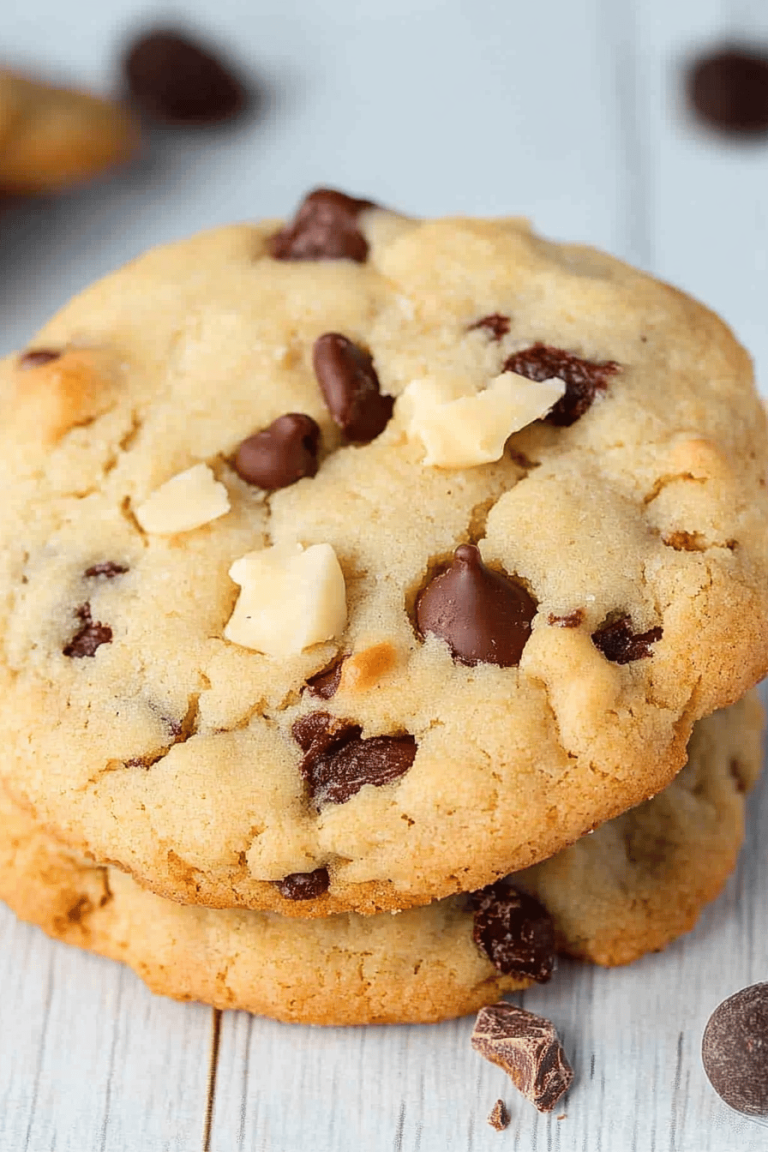
Think of butterscotch cookies like a buttery cousin to your classic chocolate chip cookie, but instead of chocolate, we’re playing with that smoky, caramel-y butterscotch magic. It’s essentially a drop cookie loaded with sweet butterscotch chips—those little golden nuggets that melt perfectly inside and transform the cookie into something extraordinary. The name “butterscotch” comes from the smooth blend of butter and brown sugar that give these cookies their iconic, rich flavor. They’re not overly sweet but have this lovely deep, creamy note that feels both indulgent and comforting. It’s like a warm, sweet hug in cookie form—relatable, simple, and downright irresistible for home bakers of all skill levels.
Why you’ll love this recipe?
What I love most about these butterscotch cookies is the way they balance sweet and savory notes without feeling heavy or too sugary. The brown butter brings out a touch of nuttiness that keeps every bite interesting. Plus, the recipe is incredibly forgiving, so even if you’re a bit rushed or juggling a million things, you can whip these up in no time. The ingredients are everyday pantry staples—nothing fancy or expensive—making these cookies budget-friendly, which is always a win when you’re feeding a family or baking for a crowd.
Another thing? They’re so versatile. I’ve served them at brunch alongside my favorite coffee, packed them in lunchboxes for a sweet surprise, and even crumbled them over vanilla ice cream for an impromptu dessert that’s gotten rave reviews. If you adore other buttery cookies like snickerdoodles or brown butter pecan treats, this butterscotch recipe offers a fresh twist with that mellow caramel goodness. Honestly, I’ve made these countless times and never grow tired of that comforting warmth—no cake or cupcake quite fills the butterscotch cookie void when I’m craving something tender but rich.
How do you make Butterscotch Cookies?
Quick Overview
Making these butterscotch cookies is like catching lightning in a bottle—simple ingredients, a quick mix, and a bit of patience while they bake into golden little pockets of joy. I always start by browning the butter because that’s where the magic begins; it adds a depth you just can’t get from plain melted butter. The dough comes together quickly, and folding in those butterscotch chips is the fun part—I always sneak a few for myself. Baking time is just long enough to get that perfect chewy center with crispy edges. Honestly, even on my busiest days, this recipe is a lifesaver because it requires minimal fuss but so much flavor.
Ingredients
For the Main Batter:
- 1 cup (2 sticks) unsalted butter, browned for that nutty sweetness
- 1 cup packed light brown sugar, for deep caramel notes
- 1/2 cup granulated sugar, to balance sweetness
- 2 large eggs, room temperature for smooth mixing
- 1 teaspoon vanilla extract, always use real—no shortcuts!
- 2 1/2 cups all-purpose flour, sifted to keep the cookies light
- 1 teaspoon baking soda, for a slight lift
- 1/2 teaspoon salt, to enhance the butterscotch flavor
For the Filling:
- 1 1/2 cups butterscotch chips—quality matters here; avoid those cheap ones that turn gritty
- Optional: 1/2 cup chopped pecans or walnuts for added crunch and warmth
For the Glaze:
- 1 cup powdered sugar
- 2 tablespoons unsalted butter, melted
- 1-2 tablespoons heavy cream or milk for drizzling consistency
- 1/2 teaspoon vanilla extract for extra aroma
Step-by-Step Instructions
Step 1: Preheat & Prep Pan
Preheat your oven to 350°F (175°C). Line two large baking sheets with parchment paper or a silicone baking mat—this helps the cookies bake evenly and prevents sticking, which is my little baking hack that always saves me cleanup time.
Step 2: Mix Dry Ingredients
In a medium bowl, whisk together the sifted flour, baking soda, and salt until evenly combined. This is key—sifting lifts the flour and ensures your cookies won’t turn out dense or doughy in spots.
Step 3: Mix Wet Ingredients
Once your butter has browned and cooled slightly, pour it into a large bowl and add both sugars. Stir until creamy and smooth, then beat in the eggs one at a time, followed by vanilla. You’ll notice the batter gets velvety and thick—this is the texture you want.
Step 4: Combine
Gradually fold the dry ingredients into the wet, stirring gently just until combined. Overmixing here is the cardinal sin—it’ll make your cookies tough instead of tender. I usually stop folding once I don’t see any pockets of flour left, then I fold in the butterscotch chips (and nuts if using) last to evenly distribute the goodies.
Step 5: Prepare Filling
This step is easy since the filling is pretty much the butterscotch chips and nuts. If you want to play around, try melting the chips a bit and swirling them into the dough for extra pockets of melty sweetness.
Step 6: Layer & Swirl
I typically just spoon dollops of dough onto the sheet about 2 inches apart—you want enough room because these babies spread a little. If you’re feeling fancy, swirl a bit of melted butterscotch or brown sugar syrup on top, then swirl gently with a toothpick for a marbled effect that wows guests.
Step 7: Bake
Bake for 10–12 minutes or until the edges turn golden but the centers still look slightly soft. Oven temps vary, so I always check at 9 minutes and keep a close eye. The center firming up just a bit means the chewiness will be perfect once cooled.
Step 8: Cool & Glaze
Let the cookies cool on the baking sheet for about 5 minutes before moving to a wire rack. For the glaze, whisk together powdered sugar, melted butter, cream, and vanilla until silky. Drizzle over the cooled cookies with a spoon or pipe it if you want those pretty zigzags—and don’t glaze when they’re hot, or the sugar’ll melt and look sad.
Step 9: Slice & Serve
These are drop cookies, so no slicing needed. Serve warm with a glass of milk or a strong cup of coffee for that perfect afternoon treat. I like to stack them on a pretty plate when guests come over—always earns me compliments!
What to Serve It With
For Breakfast: Nothing beats a warm butterscotch cookie with your morning latte or black coffee. I love breaking one into my yogurt bowl for a sweet, crunchy topping—my kids go nuts for this.
For Brunch: Plate these cookies alongside a fresh fruit salad and some fluffy scrambled eggs for a playful twist on brunch. A sparkling mimosa on the side helps balance the sweetness.
As Dessert: These butterscotch cookies are dreamy paired with a scoop of vanilla bean ice cream or drizzled with a little salted caramel sauce for an indulgent finale. Add a handful of toasted pecans to round it out.
For Cozy Snacks: When the afternoon slump hits, I grab one or two with a cup of tea or hot chocolate. Bonus points if it’s chilly outside—there’s nothing like that butterscotch aroma filling the room to warm you up.
My family has a tradition where the first batch off the tray gets dunked in milk immediately—my three-year-old insists it tastes better that way, and honestly, I can’t argue. These cookies have become our little cozy ritual when we want to slow down and indulge, together.
Top Tips for Perfecting Your Butterscotch Cookies
Brown Butter Magic: Never skip browning the butter—even a little burnt butter ruins the taste. I learned this by accident, and wow, it makes the butterscotch flavor sing.
Mixing Advice: Stir just enough to combine flour—overmixing toughens the dough and loses that chewy texture we crave. Use a spatula with folding strokes, and resist the urge to keep stirring.
Butterscotch Chips Quality: I once used cheap butterscotch chips and the cookies tasted waxy—go for a brand with natural ingredients to get that smooth melt and real flavor punch.
Swirl Technique: If you want those fancy swirls, let the melted butterscotch cool slightly so it thickens but is still pourable. Swirling it gently with a toothpick or skewer creates those gorgeous marbled tops without sinking the chips.
Ingredient Swaps: I’ve swapped half the flour with whole wheat pastry flour for a nuttier taste and my family loved it. Almond milk works beautifully to boost moisture if you’re dairy-averse. Just use it instead of cream in the glaze.
Baking Tips: Place racks in the middle of your oven for even baking, and rotate pans halfway through if your oven has hot spots to avoid uneven browning. Try not to open the oven door too early—cookies can collapse if cooled too quickly.
Glaze Variations: For a fun twist, add a pinch of sea salt or a drop of bourbon to the glaze. If you’re in a rush, a simple dusting of powdered sugar works just as well to add pretty finishing touches.
One thing I learned the hard way: glaze cookies too soon and you end up with a sad glaze puddle—waiting until they’re fully cool is absolutely worth it.
Storing and Reheating Tips
Room Temperature: Store your butterscotch cookies in an airtight container for up to 3 days. Layering them between sheets of parchment paper keeps them from sticking and preserves their chewy texture.
Refrigerator Storage: If you want to keep them longer, pop the cookies in a sealed container in the fridge for up to a week. They get a little firmer but warm quickly in the microwave to bring back that fresh-baked softness.
Freezer Instructions: Freezing is a game-changer—wrap cookies individually in plastic wrap, then place in a freezer-safe bag. They keep for up to three months, and I find thawing them at room temp for 10 minutes before enjoying brings back their original charm beautifully.
Glaze Timing Advice: If you plan to store cookies, it’s best to add the glaze right before serving so it stays glossy and fresh. If you want the glazed look ahead of time, glaze just a handful and keep the rest plain for best results.
Trust me, I’m the queen of keeping treats fresh for when friends drop by unexpectedly. Following these tips means you can always have that warm-butterscotch-cookie vibe on hand without the last-minute stress.
Frequently Asked Questions
Final Thoughts
There’s just something about these butterscotch cookies that makes me smile every single time I bake them—the smell, the first bite, the way my kids rush for seconds. They’re not fancy, and I think that’s why we love them so much: they remind me of cozy kitchen moments with my family, the kind you want to recreate again and again. If you find yourself falling for the rich, buttery warmth of these cookies, you might also enjoy digging into my brown butter chocolate chip cookies or classic chewy snickerdoodles—they’re all in the same comfort-food family, just with a little twist.
So grab your ingredients, preheat that oven, and let the smell of butterscotch fill your home. Can’t wait to hear how yours turn out—don’t forget to drop a comment or rating below and share your own little tweaks. Happy baking!
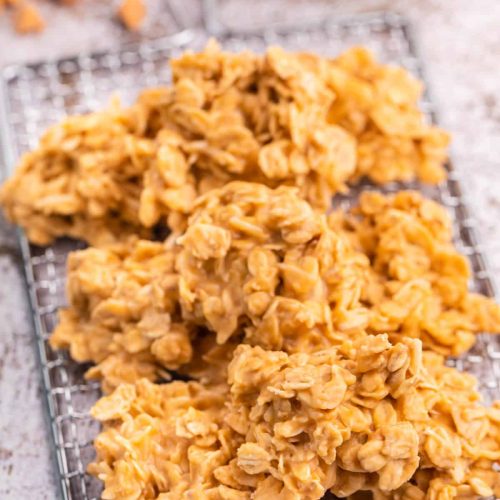
No-Bake Butterscotch Cookies
Ingredients
Main Ingredients
- 1.5 cup granulated sugar
- 0.5 cup salted butter
- 0.67 cup evaporated milk
- 1 cup butterscotch chips
- 3.5 cup old-fashioned oats
- 0.5 cup shredded sweetened coconut
Instructions
Preparation Steps
- Add sugar, butter, and evaporated milk to a saucepan. Bring to a boil over medium-high heat. Boil for 1 minute, stirring constantly.
- Remove from heat and stir in butterscotch chips until melted. Stir in oats and shredded coconut.
- Let the mixture cool for 5 minutes. Drop by teaspoonfuls onto wax paper. Let cool for 2 to 3 hours before serving.