I remember the moment my kitchen filled with that unforgettable aroma—the sweet warmth of cinnamon, the tart pop of berries swelling beneath a golden crust. There’s just something magical about an apple berry pie that reminds me of cozy afternoons with my grandma, her pie cooling by the window, and me sneaking bites when she wasn’t looking. This pie isn’t just dessert; it’s a warm hug on a plate that’s surprisingly easy to pull off any day, not just on holidays. If you love classic apple pie but crave something a little more vibrant and tangy, this apple berry pie has your name written all over it. The burst of juicy berries mixed with tender apples makes every bite exciting, while the flaky crust adds that homey crunch — it’s like the lovechild of apple crumble and berry cobbler. Honestly, once you make this, you’ll be wondering why you ever stuck to plain old apple pie alone.
What is Apple Berry Pie?
Think of apple berry pie as the best of two worlds—crisp, tender apples paired with a medley of fresh berries, all wrapped up in buttery, flaky pie crust. It’s essentially a fruit pie, but the twist here is the mix of tart and sweet flavors from both apples and berries that add depth and complexity. The name itself spells out the magic combo: apples for that classic comfort flavor and berries to brighten the whole experience. It’s the kind of pie that feels as inviting as grandma’s kitchen but fresh enough to impress a crowd. If you’ve only ever done apple pie or berry pie separately, this recipe gently nudges you to embrace both at once, and honestly, it’s a revelation.
Why you’ll love this recipe?
What I love most about this apple berry pie is how it hits every note you want in a dessert without making you work overtime. First off, the flavor—it’s a cozy, warmly spiced apple base with bursts of juicy berries that add that zing and freshness you didn’t know you needed. It’s like a little surprise in every bite. The cinnamon, a hint of nutmeg, and a touch of lemon juice balance everything perfectly so it never tastes too sweet or one-dimensional.
It’s also ridiculously simple. I know pie sounds fancy, but this one’s forgiving. You don’t need to fuss with homemade crust if you’re short on time—store-bought works just fine, and yes, I’ve tested it. It still turns out fantastic. The filling comes together quickly, and assembling the pie feels satisfying, like magic you create with your own hands. Plus, the ingredients are budget-friendly — apples and berries are usually easy to come by, especially if you shop the seasons and local markets. Buying frozen berries in winter has saved my sanity more than once!
Versatility is another win here. Eat it warm from the oven with a scoop of vanilla ice cream for dessert, or enjoy a slice cold with a cup of morning coffee for breakfast. I’ve served this pie at casual family dinners and nicer brunches—both occasions get rave reviews. It’s also a great way to sneak extra berries into your diet if you’re like me and always trying to add more fruit to meals. You can even tweak the filling based on what you have on hand; blackberries, raspberries, or even a handful of cranberries work beautifully.
Compared to other pies, this one feels more dynamic and less predictable. If you’ve ever made a simple apple pie and ended up feeling like it needed a little extra something? This recipe is your secret weapon. My kids literally ask for seconds—and one holiday, the pie disappeared before I even set the dinner table. True story.
How do I make Apple Berry Pie?
Quick Overview
In just a few straightforward steps, you’ll mix a simple spiced apple and berry filling, layer it into a buttery crust, and bake it until golden and bubbly. One thing I always do is toss my fruit in cornstarch and sugar to ensure the filling gels nicely without being watery—a mistake I learned the hard way. This method is forgiving, fun, and the result is that picture-perfect pie that smells like heaven and tastes even better. Plus, you don’t have to be a seasoned baker to pull it off—just a bit of love and some trust in the process.
Ingredients
For the Pie Crust: What is the recipe?
- 2 pie crusts (store-bought or homemade)—I usually use my grandma’s classic recipe, but a good-quality pre-made crust saves time
- 1 tablespoon unsalted butter, for dotting
For the Filling:
- 4 large crisp apples (Granny Smith or Honeycrisp work beautifully), peeled, cored, and thinly sliced
- 2 cups mixed berries (fresh or frozen blackberries, raspberries, or blueberries)
- ¾ cup granulated sugar (adjust to taste if your berries are extra sweet)
- 1 tablespoon lemon juice (brightens and balances the sweetness)
- 2 teaspoons ground cinnamon
- ¼ teaspoon freshly grated nutmeg (optional but amazing)
- 2 tablespoons cornstarch (helps thicken juices perfectly)
- Pinch of salt
For the Glaze:
- 1 large egg, beaten (for egg wash to get that perfect golden crust)
- 2 tablespoons coarse sugar or turbinado sugar, for sprinkling on top
Step-by-Step Instructions
Step 1: Preheat & Prep Pan
Preheat your oven to 400°F (200°C). Take your choice pie dish—9-inch is my favorite size—and if it’s not non-stick, lightly butter it to keep the crust from sticking. Rolling out the bottom crust carefully into the pan comes next; it should fit snugly without stretching or tearing. I like to chill my crust a bit first if it’s homemade—it makes handling easier and keeps things from shrinking in the oven.
Step 2: Mix Dry Ingredients
In a large bowl, combine the sugar, cinnamon, nutmeg, cornstarch, and a pinch of salt. Mixing these well upfront means the spices get evenly spread throughout the filling, so you don’t get awkward bursts of sweetness or spice in one bite. Plus, that cornstarch is your best friend here—trust me on this one.
Step 3: Mix Wet Ingredients
Toss your sliced apples and berries with lemon juice in another bowl. This little step keeps them from browning and adds a bit of zing. The wet lemon juice also cuts through the sweetness, giving the filling a bright contrast that takes it from good to memorable.
Step 4: Combine
Pour the dry sugar and spice mixture over the fruit and gently toss until everything is evenly coated. Be gentle to avoid crushing the berries, but make sure every slice of apple has a little cinnamon-sugar love. This part always makes me breathe in a little deeper—the smell is intoxicating already!
Step 5: Prepare Filling
Let the filling sit for 5-10 minutes so the sugar starts drawing out juices, but don’t let it get soggy. The cornstarch will thicken those juices during baking, so the filling stays just right. If you want to mix it up, try sprinkling a handful of chopped nuts (walnuts or pecans) for a bit of crunch.
Step 6: Layer & Swirl
Pour the filling into your crust-lined pie dish, spreading it evenly. Dot the top with small pieces of butter—it makes the filling richer and keeps it moist while baking. Lay the top crust over the filling. I usually pinch the edges closed for that classic look, then cut a few slits in the top crust to let steam escape. For fun, you can weave a lattice top or swirl a little cinnamon-sugar in the crust for an extra touch.
Step 7: Bake
Brush the beaten egg all over the crust’s surface—it gives you that shiny, golden brown finish. Then sprinkle the coarse sugar on top for a little sparkle and crunch. Bake at 400°F for 20 minutes, then reduce heat to 350°F (175°C) for another 30-40 minutes until the crust is deep golden and your filling is bubbling nicely. The bubbling is the best signal—it means all those juices are happy and thickening. If your crust browns too fast, cover the edges with foil halfway through baking.
Step 8: Cool & Glaze
Once out of the oven, give your pie a good solid 2 hours to cool. This time lets the juices set so when you slice it, the filling doesn’t run everywhere. I know waiting feels impossible, but trust me—it’s worth it. After cooling, you can add a light dusting of powdered sugar or an extra glaze if you like.
Step 9: Slice & Serve
Use a sharp serrated knife to slice, wiping it clean between cuts to keep slices neat. Serve your apple berry pie warm or room temperature—it’s delicious both ways. If you’re feeling indulgent, a scoop of vanilla ice cream or a dollop of whipped cream turns this into an unforgettable treat. Even simple whipped cream with a sprinkle of cinnamon makes the perfect crown.
What to Serve It With
For Breakfast: This pie pairs beautifully with a freshly brewed cup of dark roast coffee or chai tea. A slice alongside a dollop of Greek yogurt makes for a delightful morning indulgence—almost like dessert for breakfast, but way healthier!
For Brunch: Dress it up with a drizzle of honey and fresh mint leaves on top, served with sparkling water or a mimosa for a festive touch. Sharing it on a wooden board with fresh fruit and nuts makes a great centerpiece for any brunch table.
As Dessert: Nothing beats this with a scoop of creamy vanilla or cinnamon ice cream melting into the warm filling. You can also serve it with a drizzle of caramel sauce or a spoonful of crème fraîche for a luxurious finish that always gets compliments.
For Cozy Snacks: I love wrapping leftover slices in foil and popping them in the microwave for a quick, comforting snack with a cup of tea or hot chocolate. Sometimes, I even sprinkle a little extra cinnamon on top to perk it up.
This pie has become a staple at our family gatherings, where everyone flashes a smile just seeing it come out of the oven. It’s versatile, approachable, and reminds me of simpler times even when life’s buzzing like crazy.
Top Tips for Perfecting Your Apple Berry Pie
Apple Prep: Always go for firm, crisp apples like Granny Smith or Honeycrisp to keep your filling from turning mushy. Peel them if you prefer a smooth texture or leave skins on for a bit of rustic charm and extra nutrients—just make sure they’re washed well!
Mixing Advice: When combining your dry ingredients, make sure they’re well blended to prevent clumps in the filling. And when mixing the wet with the dry, fold gently to avoid breaking the berries and turning your filling into a swampy mess. Trust me, this was a rookie mistake I’ve made more than once.
Swirl Customization: If you enjoy a visually stunning pie, try a lattice crust or crisscross cinnamon sugar on your top crust. Even running a fork lightly over the crust edges before baking gives a little decorative touch that feels fancy but takes zero extra skill.
Ingredient Swaps: No berries on hand? Sliced peaches or pears also shine here. For a natural sugar reduction, swap half the granulated sugar for maple syrup or honey—just reduce the liquid elsewhere to keep the filling thick. Coconut sugar adds a nice caramel hint too!
Baking Tips: Position your pie on the middle rack for even browning, but I keep a baking sheet underneath to catch any drips—because juicy fruit loves to bubble over! If you notice your crust browning too fast, tent with foil mid-bake.
Glaze Variations: Instead of egg wash, mix milk or cream with a little maple syrup for a softer glaze. For dairy-free, a light brush of melted coconut oil with a sprinkling of sugar works wonders too. Experiment and see what you like best!
After a few batches, I learned letting the filling rest before baking really cuts down on watery pies. Also, newbie bakers, don’t fret if your crust cracks here or there—it still tastes divine. Baking’s all about love and practice, after all.
Storing and Reheating Tips
Room Temperature: You can keep this pie covered loosely with foil or a clean towel for up to 2 days. The filling stays juicy, and the crust keeps a nice balance of crisp and tender.
Refrigerator Storage: For longer freshness, pop your pie in an airtight container or cover well with plastic wrap. It lasts nicely for 4-5 days, though the crust might soften a bit. I actually like it cold too, almost a fruit tart vibe.
Freezer Instructions: This pie freezes beautifully! Wrap it tightly in plastic wrap and then foil, so it doesn’t absorb freezer smells. Freeze for up to 3 months. When ready, thaw overnight in the fridge, then warm gently in the oven to revive that flaky crust and bubbly filling.
Glaze Timing Advice: If you plan to store or freeze, keep the egg wash glaze off during baking and add it right before serving for the freshest, shiniest look. For everyday eating, though, bake with the glaze on—it forms a beautiful crust that’s just irresistible.
Frequently Asked Questions
Final Thoughts
This apple berry pie isn’t just a recipe—it’s a warm memory you get to create again and again. It brings together the comfort of classic apple pie with a lively twist of berries, making each slice feel fresh and exciting. From easy prep to flexible ingredient swaps, it’s become my go-to for both weeknight treats and special gatherings. The smell alone will pull everyone into your kitchen, and the smiles at the table will make you want to bake it again tomorrow. So go ahead, roll up your sleeves, and share the love—can’t wait to hear how yours turns out! And hey, don’t forget to come back and share your ratings, tweaks, or family twists. Happy baking, friend!
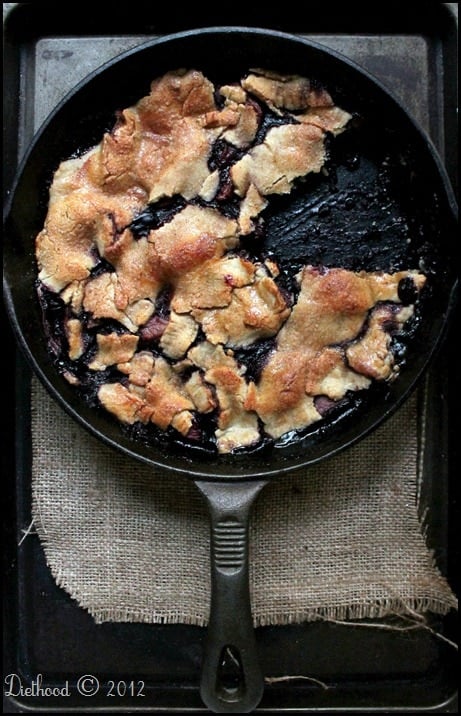
apple berry pie
Ingredients
Main Ingredients
- 2.5 cups all-purpose flour
- 0.25 teaspoons salt
- 2 sticks unsalted butter cold, cut into pieces
- 0.25 cups cold water
- 2 tablespoons cornstarch
- 0.5 teaspoons ground cinnamon
- 0.5 teaspoons ground nutmeg
- 0.25 cups granulated sugar
- 0.25 teaspoons salt
- 5 medium Golden Delicious apples peeled, cored, and cut into 0.25 inch wedges
- 2 tablespoons butter softened
- 12 oz frozen mixed berries thawed
- 1 pie crust rolled pie crust store-bought or homemade
- 1 large egg beaten for egg wash
- 0.5 teaspoons ground cinnamon for topping
- 0.5 teaspoons granulated sugar for topping
Instructions
Preparation Steps
- In the bowl of a food processor, pulse together flour and salt.
- Add cold butter pieces and pulse until mixture resembles coarse crumbs.
- With machine running, slowly add cold water until dough forms.
- Divide dough into two equal balls, flatten into disks, wrap with plastic wrap, and chill at least 1 hour.
- Preheat oven to 400°F (204°C).
- In a large bowl, whisk cornstarch, cinnamon, nutmeg, sugar, and salt. Add apples and toss to coat; set aside.
- Melt butter in a large skillet over medium heat. Mix in berries and cook for 4 minutes, then add apples and cook 2 more minutes. Remove from heat.
- Roll out one chilled dough disk and lay it over the fruit filling in the skillet, tucking the edges in.
- Brush the top crust with beaten egg wash.
- Combine cinnamon and sugar, then sprinkle it over the top crust.
- Bake in preheated oven for 25-30 minutes, until crust is golden brown and fruit is bubbling.