You know those days? The ones where you desperately need chocolate, the kind of deep, soul-satisfying chocolate that only a truly rich baked good can deliver? I used to run to the store for those pre-made fudgy things, but honestly, they never hit the spot. That’s how this recipe for the most Decadent Brownies: What are some good recipes? came to be. It started as a desperate attempt to replicate my grandma’s famous bakery brownies, and after maybe a dozen scorched batches and a few too many melty chocolate chips stuck to my fingers, I nailed it. These aren’t cakey, folks. These are that perfect intersection of fudgy center, chewy edge, and that beautiful, shiny, crackly top that screams “I spent hours on this,” even though you really didn’t. If you’ve ever felt intimidated by making brownies from scratch, thinking it’s too complicated, let me stop you right there. This recipe is so straightforward, I’ve made it successfully while half-asleep waiting for the kids’ bus. Forget those boxed mixes; this is the real deal, and it’s about to become your new go-to.
What is this decadent brownie recipe?
So, what exactly makes these brownies so incredibly special? Think of them as the platonic ideal of a brownie—the perfect balance of texture and intense chocolate flavor. It’s essentially a highly fudgy, flour-light recipe that relies heavily on good quality melted chocolate and butter, which gives it that dense, moist crumb that melts in your mouth. We’re leaning into the classic method, but with a couple of little tweaks that I’ve picked up over the years, mainly concerning how we incorporate the sugar and eggs to guarantee that coveted, thin, paper-like crust on top. It’s not a quick bread or a cake; it’s unapologetically rich. The name isn’t just for show; these Decadent Brownies: What are some good recipes? genuinely feel like a luxury dessert you’d pay top dollar for at a fancy café. They’re simple in concept—melt, mix, bake—but the resulting texture is just miles beyond what you usually expect from a home baker. It’s the kind of treat that makes people stop talking mid-sentence when they take the first bite.
Why you’ll love this recipe?
Honestly, where do I even start? I’ve tested this recipe against every other brownie variation out there—blondies, cheesecake swirls, espresso-infused batches—and I always come back to this fundamental recipe because it just works, every single time. First and foremost, the flavor is just unparalleled. We’re using both cocoa powder for that dark, earthy background note and melted bittersweet chocolate for the deep, primary cocoa punch. When you pull these out of the oven, the smell alone is worth the effort; it fills the entire house with this warm, dark chocolate aroma that’s just intoxicating. You know how some brownies dry out after a day? Not these. What I love most about this specific ratio is the staying power; they are *even better* on day two, which is a lifesaver when I bake a batch on Sunday hoping to have treats for the week.
Secondly, the simplicity factor is huge for me. I know we all get intimidated by recipes that require tempering eggs or complicated folding techniques, but this recipe skips all that fuss. It’s a one-bowl wonder if you’re willing to do the whisking by hand! The key to achieving that perfect texture—that chewy edge giving way to a gooey center—lies in how we handle the eggs and sugar. We beat them vigorously until they lighten up, trapping air which contributes to that beautiful crackly top, something that usually only happens with double-boiler methods. And let’s talk budget: while using good chocolate matters, the rest of the ingredients are pure pantry staples. You don’t need specialty flours or obscure extracts. This is a budget-friendly way to create something truly memorable. If you’re someone who usually defaults to making cookies, I challenge you to try these Decadent Brownies. They take just as little time, but the payoff feels infinitely more rewarding when you see that perfect, glistening surface.
How to Make Decadent Brownies
Quick Overview
The process for these fudgy beauties is surprisingly quick. We start by gently melting the chocolate and butter together—don’t rush this part; low and slow is the name of the game to avoid scorching that beautiful dark chocolate. While that cools just slightly, we whip the eggs and sugar until they are pale and ribbony. This aeration step is non-negotiable for that shiny top! Then, we fold in the dry ingredients until *just* combined, ensuring we don’t activate too much gluten, which would lead to cakeiness. A quick spread into a prepared pan, and they’re ready for the oven. Expect about 30-35 minutes of baking time, but the real secret is letting them cool completely before slicing. Trust me on this; patience is the final, crucial ingredient for slicing those perfect, non-crumbly squares.
Ingredients
For the Main Batter:
1 cup (2 sticks, or 226g) unsalted butter, cut into pieces. Make sure this is good quality butter; it’s the backbone of the flavor!
8 ounces (about 1 1/3 cups) high-quality bittersweet chocolate (60-70% cacao), roughly chopped. Don’t use chips if you can help it; bars melt smoother.
1 3/4 cups granulated white sugar. This is important for texture and structure, don’t reduce it too much.
1/2 cup packed light brown sugar. This brings in that essential chewy depth.
4 large eggs, preferably room temperature. Room temperature eggs incorporate better!
1 tablespoon pure vanilla extract. Use the good stuff; the flavor really pops.
1 cup all-purpose flour. Measured lightly, don’t scoop aggressively from the bag.
1/2 cup unsweetened cocoa powder, preferably Dutch-processed for deeper color.
1 teaspoon coarse sea salt. Don’t skip this; it balances the sweetness.
For the Filling (Optional but Recommended for Extra Fudginess):
1/2 cup semi-sweet chocolate chips or chopped disks. These melt beautifully throughout.
1/2 cup chopped pecans or walnuts. Toasting them lightly beforehand really wakes up the flavor.
For the Glaze (A Thin, Shiny Top Coat):
4 ounces milk chocolate or semi-sweet chocolate, finely chopped.
2 tablespoons unsalted butter.
1 teaspoon corn syrup (this is the secret to that glass-like sheen!).
Step-by-Step Instructions
Step 1: Preheat & Prep Pan
First things first: get your oven set to 350°F (175°C). Grab an 8×8 or 9×9 inch metal baking pan. I prefer a metal pan over glass because it conducts heat more evenly. To prep, line the pan with parchment paper, leaving an overhang on two opposite sides. This parchment sling is your best friend for easy removal later! Lightly grease the exposed sides of the pan—a little spritz of non-stick spray works great here.
Step 2: Mix Dry Ingredients
In a medium bowl, whisk together the flour, cocoa powder, and salt. Whisk it really well—like, really well—for about 30 seconds. This helps aerate the cocoa and breaks up any clumps, ensuring you don’t get pockets of unsweetened powder later. Set this bowl aside for now.
Step 3: Mix Wet Ingredients
In a large, heatproof bowl (or the bowl of a stand mixer), combine the butter and the chopped bittersweet chocolate. Set this over a saucepan of simmering water—a double boiler setup, but you don’t need a fancy setup. Just make sure the water doesn’t touch the bottom of your bowl. Stir occasionally until completely smooth and glossy. Remove from the heat and let it cool for about five minutes; it should still be warm, but not hot enough to scramble the eggs.
Step 4: Combine
To the slightly cooled chocolate mixture, add both the granulated and brown sugars. Whisk them together until they are fully incorporated. Now, add the eggs one at a time, beating well after each addition. This is the most crucial part for the shiny top: Beat vigorously for a full 60 to 90 seconds after the last egg is added. The mixture should look noticeably lighter, thicker, and more voluminous. Stir in the vanilla extract.
Gently fold in your reserved dry ingredients using a rubber spatula. Use a light hand here! Fold only until you see no more streaks of white flour remaining. Overmixing at this stage is the number one way to lose fudginess. Once barely combined, fold in your optional chocolate chips and nuts.
Step 5: Prepare Filling
If you are opting for the extra layer of chocolate chips and nuts, take about half of your batter and gently fold in the extra 1/2 cup of chips and nuts directly into the main bowl. If you prefer pockets of plain fudgy batter alternating with pockets of nutty chocolate, just scatter the chips and nuts over the top of the batter in the pan later (see Step 6).
Step 6: Layer & Swirl
Pour half of the batter into your prepared pan and smooth it out gently. If you are using the mixed filling from Step 5, just spread it evenly. If you skipped Step 5, sprinkle half of your extra chips/nuts over this first layer. Pour the remaining batter over the top. Use a knife or a skewer to gently swirl the top layer if you want a marbled effect. Don’t over-swirl! A few gentle figure-eights are all you need to create visual interest.
Step 7: Bake
Bake for 30 to 35 minutes. Now, here’s the doneness test I live by: insert a toothpick into the center. If it comes out with wet, gooey batter clinging to it, keep baking. If it comes out clean, you’ve gone too far and you’ve got cakey brownies! You are looking for the toothpick to come out with moist, fudgy crumbs attached. The edges should look set, but the center will still look slightly soft. Every oven is different, so start checking at 28 minutes.
Step 8: Cool & Glaze
This is the hardest part, but you must let them cool! Let the pan cool on a wire rack for at least 30 minutes before attempting the glaze. For the glaze, combine the milk chocolate, butter, and corn syrup in a small saucepan over low heat. Stir until completely smooth and silky. Remove from heat and let it sit for about 5 minutes to thicken slightly. Pour the warm glaze over the *slightly* warm brownies (not piping hot, or it will melt right in, and not completely cold, or the glaze will seize up). Spread quickly and let it set completely at room temperature for at least an hour before cutting.
Step 9: Slice & Serve
Once the glaze is totally set—it should feel firm to the touch—use the parchment paper slings to lift the whole slab out onto a cutting board. Use a large, sharp knife that has been briefly dipped in hot water and wiped clean between cuts. This prevents the glaze from cracking. Slice into 16 squares. Serve them slightly cool for that dense, chewy bite, or warm them briefly in the microwave if you’re going for that molten chocolate experience. They disappear in minutes at my house.
What to Serve It With
These Decadent Brownies are absolute stars on their own, but I’ve developed a few ways my family likes to enjoy them depending on the occasion. For a casual morning grab-and-go, they are fantastic paired with a strong, black cup of coffee. The bitterness of the coffee cuts through the richness beautifully, making it feel less like a dessert and more like a sophisticated breakfast treat. My oldest insists on them being cut into thin strips for his lunchbox—he claims they are the perfect mid-afternoon slump-buster!
When we have friends over for brunch, I elevate the presentation. I’ll cut them into smaller squares and plate them beside a dollop of fresh, slightly tart raspberry coulis—the acidity from the berries really brightens the deep chocolate flavor. A side of freshly whipped cream, lightly sweetened with a touch of maple syrup, is always a winner here too. It looks elegant but takes zero extra effort.
As a proper dessert, obviously, they need ice cream! But skip the standard vanilla. I highly recommend a scoop of salted caramel ice cream or maybe even a coffee flavor. I’ll warm my square in the microwave for about 15 seconds until the edges just start to soften, drizzle a tiny bit more melted chocolate over the top, and pop that cold ice cream right next to it. The temperature contrast is just divine. For those cozy, late-night cravings, though, nothing beats eating one straight from the fridge—it makes them unbelievably dense and chewy, almost like a firm chocolate fudge. Seriously, try one cold versus room temperature; it’s like eating two different desserts!
Top Tips for Perfecting Your Decadent Brownies
I’ve learned a few crucial lessons over the years making this recipe, mostly involving trying to cut corners and being immediately punished by the result! Here are the hard-earned nuggets of wisdom that guarantee success:
Ingredient Quality Matters More Than You Think: Since the chocolate is the star, use the best bittersweet bar you can afford. If you use waxy chocolate chips, the final texture will suffer, often becoming grainy or overly hard when cooled. Aim for 60-70% cacao for that deep, non-sugary chocolate hit.
The Egg/Sugar Whisk is Non-Negotiable: I can’t stress this enough. You are not just mixing; you are building structure. Whisk the eggs and both sugars together until the mixture thickens, pales slightly, and leaves a visible ribbon when you lift the whisk. This takes 3-5 minutes by hand or about 2 minutes with a mixer. This trapped air is what creates that signature shiny, crackly top. If you skimp here, you’ll get a dull, flat surface.
Do Not Overmix the Flour: Once the dry ingredients hit the wet, switch to a spatula and fold gently. Stop mixing the second you see the last dry streak disappear. A few small lumps of cocoa powder are preferable to a tough, rubbery brownie caused by over-developing the gluten in the flour.
The Baking Window is Tiny: These go from fudgy perfection to slightly dry in about three minutes. Learn your oven! Start checking at 28 minutes. If the toothpick comes out completely clean, pull them out immediately and let them cool—they will continue to cook slightly outside the oven. If you prefer them slightly gooier (like lava cake texture), pull them when the toothpick has wet, gooey batter clinging to it.
Parchment Paper is Your Friend: I used to skip the parchment sling because I thought it was fussy, but trying to pry a cooled, sticky brownie slab out of an 8×8 pan is a baking nightmare. Always line it with an overhang so you can just lift the whole thing out for easy, clean slicing once it’s cool.
Glaze Consistency Fixes: If your glaze seems too thick after melting, add a tiny splash (maybe half a teaspoon at a time) of warm milk or heavy cream. If it seems too thin to set properly, let it cool for another five minutes before pouring. The corn syrup really helps lock in that shine, so don’t skip it!
Storing and Reheating Tips
The way you store these Decadent Brownies actually changes their texture, which is kind of fun because you can tailor the experience to your mood! For immediate enjoyment, I usually leave them right on the counter. At room temperature, tightly covered with plastic wrap or placed in an airtight container, they stay perfectly soft and chewy for about three to four days. Keep them out of direct sunlight, of course. I find the glaze holds up best at room temperature.
If you need them to last longer, the refrigerator is your next stop. Place them in a truly airtight container—I like using glass containers for this—and they will happily last up to a week. Be warned: chilling them makes them extremely dense and firm. They become almost like a dense chocolate truffle. If you prefer the softer, chewier texture when eating them straight from the fridge, let them sit out on the counter for about 20 minutes before serving to allow them to come closer to room temperature.
For long-term storage, freezing is the way to go. I only freeze them *without* the glaze, as the glaze can sometimes sweat a little upon thawing. Wrap individual squares tightly in plastic wrap, then wrap the whole stack again in aluminum foil or place them in a heavy-duty freezer bag. They freeze beautifully for up to three months. To thaw, just move them from the freezer to the counter (still wrapped!) overnight. They’ll come back to life perfectly.
If you do decide to glaze them first, freezing is still possible, but the glaze might become slightly dull. If you freeze them glazed, wrap them very carefully to avoid crushing the top. Thaw them in the refrigerator first, then let them sit on the counter for an hour. Never microwave a glazed brownie for reheating, as the chocolate in the glaze will separate weirdly.
Frequently Asked Questions
Final Thoughts
Baking has always been my therapy, and there is something truly grounding about whipping up a batch of truly Decadent Brownies when the world feels a bit too chaotic. This recipe isn’t just about following steps; it’s about achieving that perfect, almost impossible texture that separates the good brownies from the legendary ones. That shiny, delicate top that cracks when you press it, giving way to that dense, impossibly fudgy interior—it’s pure magic, and it comes from paying attention to those small details, like whisking those eggs long enough and, crucially, letting them cool completely before slicing.
I hope this recipe brings as much joy to your kitchen as it has to mine. I know it’s the first thing people ask me to bring to potlucks, and they always disappear first! If you try this out, please don’t keep the results to yourself. I desperately want to know what kind of crazy additions you end up putting in the batter—maybe you tried espresso powder? Or perhaps a swirl of dulce de leche? Leave a comment below and let me know how your batch turned out, and don’t forget to rate it so others can find their new favorite chocolate fix! Happy baking, friends!
Decadent Brownies
Ingredients
Main Ingredients
- 0.5 cup unsalted butter melted
- 0.33 cup granulated sugar
- 0.5 cup light brown sugar packed
- 1 large egg
- 1 teaspoon vanilla extract
- 0.5 teaspoon baking soda
- 0.5 teaspoon salt
- 1.5 cups all-purpose flour
- 1.5 cups semi-sweet chocolate chips
- 24 pieces Oreos any flavor
- 4 ounces unsweetened baking chocolate coarsely chopped
- 0.75 cup unsalted butter
- 1.75 cups granulated sugar
- 3 large eggs
- 1 teaspoon vanilla extract
- 0.5 teaspoon salt
- 2 tablespoons unsweetened cocoa powder
- 1 cup all-purpose flour
Instructions
Preparation Steps
- Preheat oven to 350°F. Line a 9x13 inch pan with foil or parchment paper and spray with cooking spray.
- Make the cookie dough: Stir melted butter with granulated and brown sugars until combined. Mix in egg, vanilla extract, baking soda, and salt. Stir in flour and then chocolate chips.
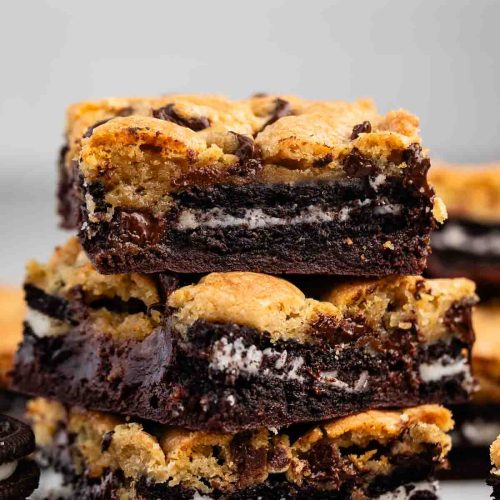
- Press the cookie dough evenly into the bottom of the prepared pan. Arrange Oreos over the cookie dough layer evenly.
- Make the brownie batter: Melt baking chocolate and butter in a microwave-safe bowl, stirring every 30 seconds until smooth. Stir in sugar. Add eggs, vanilla extract, and cocoa powder; mix well. Carefully stir in flour.
- Spread the brownie batter over the Oreos evenly in the pan.
- Bake for 30 to 40 minutes until the top looks set and the center is no longer jiggly. Let cool before slicing into bars.