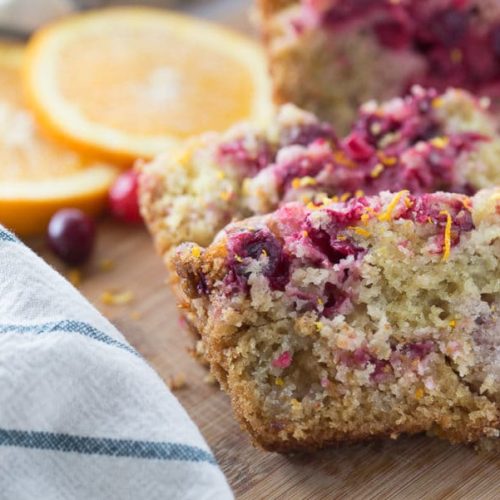
Oh, this cranberry orange bread. It’s one of those recipes that just feels like a hug from the inside out. I remember the first time I made it, it was a crisp autumn afternoon, the kind where the air just *smells* like woodsmoke and fallen leaves. I was trying to use up some oranges and a bag of cranberries I’d impulse-bought at the farmer’s market, and honestly, I wasn’t sure if the combination would even work. But boy, did it ever! The aroma that filled my kitchen – that bright, zesty citrus mingling with the tart burst of cranberries – was absolutely intoxicating. It reminded me so much of my grandmother’s kitchen, always filled with the scent of something wonderful baking. This isn’t just any quick bread; it’s a flavor explosion, a perfect balance of sweet and tart, moist and tender. If you’ve ever loved a good lemon poppy seed muffin or a spiced apple loaf, you’re going to fall head over heels for this cranberry orange bread. It’s truly special, and so incredibly easy to whip up, even on a weeknight.
What is Cranberry Orange Bread?
So, what exactly *is* cranberry orange bread? At its heart, it’s a quick bread, meaning it uses chemical leaveners like baking soda or baking powder instead of yeast, which makes it super fast to put together. Think of it as a delightful cousin to Banana Bread or zucchini bread, but with a flavor profile that screams holidays and cozy mornings. The “cranberry orange” part is where the magic happens. You’ve got the bright, slightly floral notes of fresh orange zest and juice, which cuts through the richness and sweetness of the bread beautifully. Then, you have those wonderfully tart cranberries that pop with every bite, providing little bursts of juicy goodness. It’s essentially a celebration of citrus and berries baked into a tender, moist loaf that’s perfect for slicing and savoring. It’s not overly sweet, which is exactly how I like my quick breads, allowing the natural flavors of the fruit to really shine through. It’s a simple concept, but the execution is pure deliciousness.
Why you’ll love this recipe?
I love cranberry orange bread, and I know you will too. I love itflavor is just out of this world. That vibrant orange zest is like sunshine in bread form, and when you pair it with the tangy cranberries, it’s a flavor combination that just sings. It’s not cloyingly sweet; instead, it’s perfectly balanced, with a delightful tartness that keeps you coming back for more. And the simplicity! This recipe is a lifesaver. You can have it mixed up and in the oven in under 15 minutes. No fancy techniques, no proofing dough – just straightforward mixing and baking. It’s the kind of thing I can whip up even when I’m short on time or feeling a bit lazy, and it always delivers. Plus, it’s incredibly cost-efficientWhat I really adore about this recipe is the ingredients. They are pretty pantry-staple friendly,versatility. It’s fantastic on its own, of course, but I also love to toast a slice and slather it with a little butter or cream cheese – it’s divine. It makes a wonderful breakfast treat, a perfect afternoon pick-me-up, or even a light dessert. If you’re a fan of my Lemon Loaf or my blueberry muffins, you’re going to absolutely adore the tangy sweetness of this one. It’s the kind of baked good that makes any day feel a little bit brighter, a little bit more special.
How to Make Cranberry Orange Bread
Quick Overview
This recipe is all about bringing together simple ingredients to create something truly special with minimal fuss. You’ll whisk together your dry ingredients, mix your wet ingredients separately, then combine them gently. A quick swirl of orange and cranberry goodness is folded in, and then it’s off to the oven. The result? A beautifully golden, incredibly moist loaf bursting with bright, festive flavors. It’s designed for ease, so don’t be intimidated – this is foolproof baking at its finest. Even if you’re new to baking, you can nail this one.
Ingredients
For the Main Batter:
We want a tender, moist crumb that holds up to the fruit.
* 2 cups all-purpose flour: Sifted, this gives a lighter texture, but honestly, I often just whisk it well if I’m in a hurry.
* 1 ½ teaspoons baking powder: Essential for that lovely lift. Make sure it’s fresh!
* ½ teaspoon salt: Balances the sweetness and enhances all the other flavors.
* ¾ cup granulated sugar: For that perfect touch of sweetness. You can reduce it slightly if you prefer, but this is my sweet spot.
* ½ cup unsalted butter, softened: Crucial for richness and tenderness. Make sure it’s truly soft, not melted. I usually leave mine out on the counter for about an hour.
* 2 large eggs: Room temperature is best for incorporation.
* 1 teaspoon vanilla extract: A must for depth of flavor.
* ½ cup fresh orange juice: From about 1-2 oranges. Freshly squeezed is *always* best here – it makes such a difference!
* Zest of 1 large orange: Don’t skip this! It’s where so much of that bright, wonderful citrus aroma comes from. Use a microplane for the finest zest.
* ½ cup milk (any kind works!): I’ve tested this with whole milk, almond milk, and even oat milk, and they all work beautifully. It adds extra moisture.
For the Filling:
This is where the flavor really pops!
* 1 cup fresh or frozen cranberries: If using frozen, no need to thaw. They’ll break down beautifully.
* 2 tablespoons granulated sugar: To help soften the cranberries and balance their tartness.
* 1 tablespoon all-purpose flour: This helps prevent the cranberries from sinking to the bottom of the loaf.
* 1 tablespoon orange juice: Just a little extra to help coat the cranberries.
For the Glaze:
This adds that extra touch of elegance and flavor.
* ¾ cup powdered sugar: Sifted, to ensure a smooth glaze.
* 2-3 tablespoons fresh orange juice: Start with 2, and add more slowly until you reach your desired consistency.
* Optional: A tiny pinch of salt to balance the sweetness.
Step-by-Step Instructions
Step 1: Preheat & Prep Pan
First things first, let’s get your oven ready. Preheat it to 350°F (175°C). While that’s heating up, grab a standard 9×5 inch loaf pan. Grease it really well with butter or cooking spray, and then dust it lightly with flour. You can also line it with parchment paper, leaving a little overhang on the sides, which makes lifting the loaf out a breeze. A well-prepped pan is key to preventing sticking!
Step 2: Mix Dry Ingredients
In a medium bowl, whisk together the 2 cups of all-purpose flour, 1 ½ teaspoons of baking powder, and ½ teaspoon of salt. If you have a sifter, use it for an extra light texture, but a good whisking works just fine. This ensures everything is evenly distributed, so you don’t get any surprise pockets of leavener or salt.
Step 3: Mix Wet Ingredients
In a large bowl, cream together the ½ cup of softened unsalted butter and ¾ cup of granulated sugar until light and fluffy. This usually takes about 2-3 minutes with an electric mixer, or a bit longer by hand. Beat in the 2 large eggs, one at a time, mixing well after each addition. Stir in the 1 teaspoon of vanilla extract, the ½ cup of fresh orange juice, and the zest of 1 orange. This is where that amazing citrus smell starts to fill your kitchen!
Step 4: Combine
Now, it’s time to bring the wet and dry ingredients together. Add about half of the dry ingredients to the wet ingredients and mix on low speed (or with a spatula) until just combined. Then, add the ½ cup of milk and mix again until incorporated. Finally, add the remaining dry ingredients and mix until *just* combined. It’s super important not to overmix here! A few small lumps are perfectly fine. Overmixing develops the gluten too much, which can make your bread tough.
Step 5: Prepare Filling
In a small bowl, toss the 1 cup of cranberries (fresh or frozen) with 2 tablespoons of granulated sugar, 1 tablespoon of flour, and 1 tablespoon of orange juice. The flour is our little secret to keeping those juicy berries from sinking right to the bottom. Give it a good stir to coat everything.
Step 6: Layer & Swirl
Pour about half of the batter into your prepared loaf pan and spread it evenly. Sprinkle about half of the cranberry mixture over the batter. Then, spoon the remaining batter on top, and finish with the rest of the cranberries. You can use a knife or skewer to gently swirl the cranberries into the batter a bit, creating those beautiful marbled pockets of fruit. Don’t over-swirl, though; we want distinct bursts of flavor!
Step 7: Bake
Pop that pan into your preheated oven. Bake for 50-60 minutes, or until a wooden skewer or toothpick inserted into the center comes out clean, with just a few moist crumbs attached (no wet batter!). Ovens can vary, so keep an eye on it after about 45 minutes. If the top starts to brown too quickly, you can loosely tent it with aluminum foil.
Step 8: Cool & Glaze
Once it’s done, carefully remove the loaf pan from the oven and let the bread cool in the pan for about 10-15 minutes. This helps it set. Then, invert it onto a wire rack to cool completely. It’s *really* important to let it cool before glazing, otherwise, the glaze will just melt right off. While it’s cooling, whisk together ¾ cup of sifted powdered sugar and 2-3 tablespoons of orange juice until you have a smooth, pourable glaze. Add the juice a tablespoon at a time until it’s the consistency you like. Once the bread is completely cool, drizzle that glorious glaze all over the top!
Step 9: Slice & Serve
Once the glaze has set a bit (which happens pretty quickly!), your Cranberry orange bread is ready to be sliced. I find a serrated knife works best for clean cuts. Enjoy it at room temperature for the best flavor and texture. It’s truly delicious just as it is!
What to Serve It With
This cranberry orange bread is so wonderfully versatile, it fits into almost any meal or occasion! For a cozy Breakfast, I love a thick slice toasted and served with a smear of butter or my homemade strawberry jam. It pairs perfectly with a hot cup of coffee or a glass of fresh orange juice. For a lovely Brunch spread, I’ll slice it a little thinner and arrange it on a pretty platter, perhaps alongside some fresh fruit salad, yogurt parfaits, and maybe some mini quiches. It adds a beautiful pop of color and flavor. As a light Dessert, it’s fantastic served slightly warm, perhaps with a dollop of whipped cream or a scoop of vanilla bean ice cream. The contrast between the warm bread and cool cream is heavenly. And for those Cozy Snacks, it’s just perfect with a mug of tea on a chilly afternoon. My family also loves it as a quick grab-and-go snack when we’re rushing out the door. It’s that kind of reliable, delicious treat that just makes your day a little bit better, no matter how you enjoy it.
Top Tips for Perfecting Your Cranberry Orange Bread
I’ve made this cranberry orange bread more times than I can count, and along the way, I’ve picked up a few tricks that I think really make a difference. When it comes to the cranberries, whether you use fresh or frozen, the key is to toss them with a little flour, sugar, and orange juice before folding them in. This not only helps distribute them evenly but also adds a lovely sweetness that complements their tartness beautifully. I’ve learned that when mixing the batter, it’s really crucial to not overmix. Just combine until the dry ingredients are *barely* incorporated into the wet. A few streaks of flour are fine – they’ll disappear in the oven. Overmixing develops the gluten too much, leading to a tough, dense loaf, and we definitely don’t want that! For the orange flavor, I can’t stress enough how important fresh orange zest is. Bottled zest just doesn’t have that same vibrant, fragrant punch. Use a microplane if you have one – it gets all those essential oils without scraping up the bitter white pith. And if you’re feeling adventurous with your swirls, you can actually add a little more orange zest directly into the batter itself before you add the dry ingredients – it just amplifies that gorgeous citrusy aroma. For baking, every oven is a little different. My tip is to start checking for doneness a bit earlier than the recipe states. A toothpick should come out with a few moist crumbs, but no wet batter. If the top is browning too quickly, a loose tent of aluminum foil is your best friend. And when it comes to the glaze, patience is key! Make sure the bread is *completely* cool before drizzling. If it’s warm, the glaze will melt and become a sticky mess instead of a pretty topping. I’ve messed this up before, so trust me on this one! If you want a thicker glaze, just use less orange juice; for a thinner one, add a little more, a teaspoon at a time, until it pours nicely. Finally, I’ve experimented with a few ingredient swaps. If you’re out of regular milk, any plant-based milk works wonderfully, and I’ve even used buttermilk in a pinch for an extra tender crumb. For a touch more sweetness in the batter, you could add another tablespoon or two of sugar, but I find this recipe’s balance is just right, especially with the glaze.
Storing and Reheating Tips
This cranberry orange bread is wonderful fresh, but it’s also quite forgiving when it comes to storage, which is one of the things I love about it. At room temperature, it stays fresh for about 2-3 days. I usually store it in an airtight container or wrapped tightly in plastic wrap on the counter. It’s important to make sure it’s completely cool before wrapping, otherwise, condensation can make it soggy. If you live in a warmer climate or just want it to last a bit longer, refrigeration is your best bet. Wrapped well in plastic wrap and then foil, or kept in an airtight container, it can last for up to a week in the fridge. The texture might firm up a bit in the fridge, but it’s easily revived. For freezing, this bread is a dream! I like to wrap the cooled loaf tightly in plastic wrap, then in a layer of aluminum foil, and tuck it into a freezer-safe bag. It should keep well for up to 3 months. To thaw, simply unwrap it and let it come to room temperature on the counter for a few hours. If you want to reheat it, you can pop a slice in a toaster oven or a regular oven at around 300°F (150°C) for a few minutes until warmed through and fragrant. And remember, if you’re freezing it, I’d recommend adding the glaze *after* it’s been thawed and warmed, just to keep it looking its best. Some people even like to freeze slices un-glazed and then glaze them individually once thawed!
Frequently Asked Questions
Final Thoughts
So there you have it – my absolute favorite cranberry orange bread recipe. It’s a labor of love, but honestly, it’s so simple to make, it feels more like a joy than a chore. The combination of bright, zesty orange and tart, juicy cranberries baked into a wonderfully tender loaf is just unbeatable. It’s the kind of recipe that fills your home with an incredible aroma and brings smiles to everyone who takes a bite. It’s perfect for those moments when you want something homemade and comforting, but don’t have hours to spend in the kitchen. If you love this flavor combination, you might also enjoy my Spiced Orange Scones or my Cranberry Bliss Bars – they’re in a similar vein of bright, fruity goodness! I truly hope you give this cranberry orange bread a try. I can’t wait to hear what you think and how it turns out for you. Happy baking, and enjoy every delicious slice!
Cranberry Orange Bread
Ingredients
Main Ingredients
- 4 cups fresh or frozen cranberries cut in half
- 2.25 cup sugar 2 cups for batter + 0.25 cup to put on top of the cranberries
- 4 cups flour
- 2 tsp baking soda
- 1.5 tsp salt
- 2 Tbs grated orange rind
- 0.667 cup vegetable oil
- 2 eggs
- 1 cup orange juice
- 1 cup water
- 2 cups pecans or walnuts chopped
Instructions
Preparation Steps
- Preheat your oven to 350 degrees F and spray mini loaf pans with non-stick spray.
- Slice cranberries in half. Top with 1/4 cup sugar then set aside.
- Mix together flour, baking soda, and salt. Set aside.
- In a separate bowl, combine 2 cups sugar, orange rind, and vegetable oil.
- Add eggs and combine until smooth.
- Slowly add the flour mixture, orange juice, and water to the sugar mixture, mixing until just combined.
- Once all mixed together, gently fold in the chopped nuts and the sugared cranberries.
- Divide batter into 8 greased mini loaf pans.
- Bake at 350 degrees F for 35-45 minutes, or until a toothpick inserted into the center comes out clean.