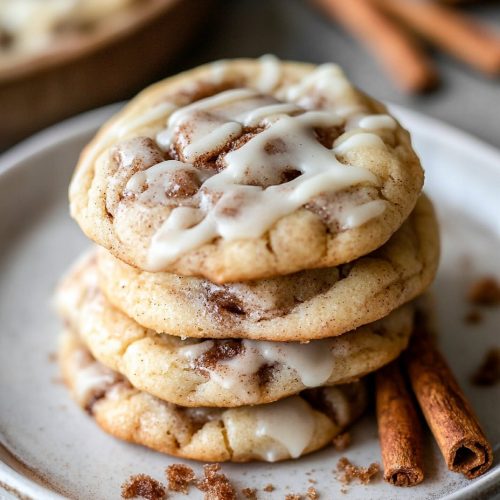
There are some recipes that just feel like a warm hug. You know the ones – the kind that bring back a flood of happy memories, fill your kitchen with the most incredible aroma, and are always a guaranteed hit with everyone. For me, that recipe is definitely for cinnamon roll cookies. Seriously, if you’re a fan of cinnamon rolls (and who isn’t, right?), then get ready to fall head over heels for these. They capture all the gooey, spiced, comforting goodness of a classic cinnamon roll but in a perfectly portioned cookie form. I first stumbled upon a variation of this cinnamon roll cookies recipe years ago, probably when I was trying to impress guests at a last-minute potluck and didn’t have the time for a full-blown cinnamon roll bake. Little did I know, it would become one of my most requested treats! It’s that perfect balance of soft, chewy cookie with that irresistible cinnamon-sugar swirl and a hint of creamy glaze. Honestly, the smell alone as they bake is enough to make you giddy with anticipation.
What are cinnamon roll cookies?
So, what exactly are cinnamon roll cookies? Think of them as a delightful mashup. They’re essentially a soft, buttery cookie base that’s been swirled with a decadent cinnamon-sugar filling, just like you’d find in a traditional cinnamon roll. Then, they’re finished off with a drizzle of sweet, simple glaze. It’s not a cutout cookie, and it’s not really a drop cookie either. The magic happens in the layering and swirling. You spread a layer of dough, then a layer of the cinnamon filling, and then you roll it all up before slicing it into cookies. This technique ensures that every single bite is packed with that signature cinnamon swirl. It’s a brilliant way to get all the beloved flavors and textures of a cinnamon roll without the fuss of proofing dough or the long baking time. It’s the ultimate treat for when that cinnamon craving hits, but you want something a little quicker and easier.
Why you’ll love this recipe?
Honestly, there are so many reasons why I think this cinnamon roll cookies recipe is a total winner, and I’m betting you’ll agree. First off, the flavor. Oh, the flavor! You get that rich, buttery cookie texture that’s perfectly soft and chewy in the center with just a hint of crisp around the edges. Then there’s the filling – a generous swirl of warm cinnamon, Brown Sugar, and a touch of spice that just sings. And don’t even get me started on the glaze! It’s the perfect sweet counterpoint to all that spice. It’s incredibly satisfying.
But beyond the amazing taste, the simplicity of this recipe is a huge draw. It’s surprisingly easy to whip up, even if you’re not an experienced baker. The steps are straightforward, and the results are consistently fantastic. I’ve found that this recipe is a lifesaver on busy nights when I need a quick dessert or a treat for school lunches. It’s also incredibly cost-effective! Most of the ingredients are pantry staples, so you likely won’t need to make a special trip to the store. Plus, it’s so versatile. You can easily adjust the amount of cinnamon or add a pinch of nutmeg to the filling, or even try different types of nuts if you like. I’ve even experimented with adding a tiny bit of orange zest to the glaze, and it was divine! What I love most about these cinnamon roll cookies is that they truly feel like a special treat, but they don’t require hours of work. They’re the kind of cookie that makes people ask, “How did you *do* that?!” and then they’re shocked when you tell them how simple it was. It’s a win-win situation, really. They’re way more exciting than your average Chocolate Chip cookie, but just as approachable.
How do you make cinnamon roll cookies?
Quick Overview
Making these cinnamon roll cookies is a straightforward process that involves preparing a simple cookie dough, mixing up a sweet cinnamon filling, layering them, rolling, slicing, and baking. The key is not to overwork the dough and to ensure your filling is spread evenly for that beautiful swirl. It’s a fun process that feels a bit like making actual cinnamon rolls, but condensed into a cookie format. You’ll be amazed at how quickly these come together, making them perfect for unexpected guests or those sudden sweet cravings.
Ingredients
For the Main Batter:
1 cup (2 sticks) unsalted butter, softened: Make sure your butter is truly softened, not melted. This is crucial for a tender cookie. I always set mine out on the counter about an hour before I plan to start baking.
1 ½ cups granulated sugar: This gives the cookies their sweetness and helps with texture.
2 large eggs: Room temperature eggs incorporate better into the batter.
1 teaspoon vanilla extract: Pure vanilla extract makes a world of difference in flavor.
3 cups all-purpose flour: Spooned and leveled, not scooped directly from the bag. This prevents dry cookies.
1 teaspoon baking soda: This gives the cookies a little lift.
½ teaspoon salt: Balances the sweetness and enhances all the flavors.
For the Filling:
½ cup (1 stick) unsalted butter, melted: Melted butter is best here for easy spreading.
¾ cup packed light brown sugar: The brown sugar adds a lovely depth of flavor and moisture.
2 tablespoons ground cinnamon: Be generous with the cinnamon! This is where the magic happens.
½ teaspoon ground nutmeg (optional): A little nutmeg adds a warm, cozy note that complements the cinnamon beautifully. I love it, but it’s totally fine if you skip it.
For the Glaze:
1 ½ cups powdered sugar: Sifted to avoid lumps.
2-3 tablespoons milk (or cream): Start with 2 tablespoons and add more until you reach your desired drizzling consistency. Whole milk or half-and-half will give the richest flavor.
½ teaspoon vanilla extract: For that extra touch of flavor.
Step-by-Step Instructions
Step 1: Preheat & Prep Pan
Get your oven preheated to 350°F (175°C). Line your baking sheets with parchment paper. This is a step I *never* skip! It prevents sticking and makes cleanup a breeze. If you don’t have parchment paper, you can lightly grease your baking sheets, but parchment is definitely my preference for even baking and easy removal.
Step 2: Mix Dry Ingredients
In a medium bowl, whisk together the all-purpose flour, baking soda, and salt. Whisking them together ensures that the baking soda and salt are evenly distributed throughout the flour, which is key for consistent cookie texture. Just a quick whisk until everything looks uniform is all you need.
Step 3: Mix Wet Ingredients
In a large bowl, cream together the softened butter and granulated sugar until light and fluffy. This usually takes about 2-3 minutes with an electric mixer. Then, beat in the eggs one at a time, followed by the vanilla extract. Make sure to scrape down the sides of the bowl periodically to ensure everything is well combined.
Step 4: Combine
Gradually add the dry ingredients to the wet ingredients, mixing on low speed until just combined. Be careful not to overmix here! Overmixing can develop the gluten in the flour too much, resulting in tough cookies. We’re going for tender, so mix only until you no longer see streaks of dry flour. The dough will be soft and a little sticky.
Step 5: Prepare Filling
In a small bowl, combine the melted butter, packed light brown sugar, ground cinnamon, and optional nutmeg. Stir until it forms a thick, spreadable paste. This mixture is what gives you those beautiful cinnamon swirls. If it seems a little too dry, you can add a tiny bit more melted butter, but you don’t want it to be too runny either.
Step 6: Layer & Swirl
Turn the cookie dough out onto a lightly floured surface or a large piece of parchment paper. Gently press or roll it into a rectangle, about 10×12 inches and about ¼ inch thick. Don’t worry if it’s not a perfect rectangle; rustic is beautiful! Spread the cinnamon-sugar filling evenly over the dough, leaving about a ½-inch border along one of the long edges. This border will help seal the roll. Starting from the long edge opposite the border, tightly roll up the dough, jelly-roll style. Pinch the seam to seal it. Wrap the log tightly in plastic wrap and chill in the refrigerator for at least 30 minutes (or up to 2 days). This chilling step is crucial; it firms up the dough and makes it much easier to slice without the swirls getting smushed.
Step 7: Bake
Once chilled, unwrap the dough log and slice it into ½-inch thick rounds. Place the rounds onto your prepared baking sheets, leaving about 2 inches between them. Bake for 10-12 minutes, or until the edges are lightly golden and the centers are still slightly soft. They will continue to bake a bit as they cool. I usually check them around the 10-minute mark. If they look done, they are! Overbaked cookies can be dry.
Step 8: Cool & Glaze
Let the cookies cool on the baking sheets for 5 minutes before transferring them to a wire rack to cool completely. While the cookies are cooling, whisk together the powdered sugar, 2 tablespoons of milk, and vanilla extract in a small bowl. Add more milk, a teaspoon at a time, until you reach a thick but pourable consistency. Once the cookies are completely cool, drizzle the glaze over them. I like to use a spoon or a piping bag for a neat drizzle, but a simple fork works just fine too. Drizzle generously!
Step 9: Slice & Serve
Once the glaze has set a little, your delicious cinnamon roll cookies are ready to be enjoyed! You can slice them with a sharp knife for a clean cut, or even use a pizza cutter. They are best served fresh, but they also keep wonderfully. The contrast of the soft cookie, warm spice, and sweet glaze is just pure bliss. Enjoy every single bite!
What to Serve It With
These cinnamon roll cookies are so versatile, they fit in perfectly no matter the occasion! For a cozy breakfast, I love pairing them with a hot cup of coffee or a steaming mug of tea. The warmth and richness of the coffee cuts through the sweetness beautifully. They’re honestly almost as good as a freshly baked cinnamon roll on a sleepy Saturday morning.
When it comes to brunch, these cookies add a touch of elegance without any extra effort. I like to arrange them on a pretty platter alongside some fresh fruit and yogurt parfaits. A mimosa or a glass of fresh-squeezed orange juice is the perfect beverage pairing. They look so inviting and are always a hit with guests.
As a dessert, they are simply divine. Serve them warm, perhaps with a scoop of vanilla bean ice cream for an extra decadent treat. A dusting of powdered sugar can also elevate their look for a more formal dessert setting. They’re also fantastic after dinner with a glass of milk – a grown-up version of a childhood favorite!
And for those spontaneous, cozy snack times? These cinnamon roll cookies are your best friend. They’re perfectly sized for an afternoon pick-me-up. I often find myself grabbing one (or two!) with a glass of cold milk while I’m catching up on emails or curled up with a good book. My family absolutely devours them any time of day, so it’s hard to keep a batch around for long! The key is they always feel special, even when they’re just a quick snack.
Top Tips for Perfecting Your Cinnamon Roll Cookies
I’ve made these cinnamon roll cookies more times than I can count, and over the years, I’ve picked up a few little tricks that really help ensure they turn out perfectly every single time. First off, when you’re rolling out the dough for the cinnamon swirl, don’t get too stressed about perfection. A little rustic charm is actually part of their appeal! Just aim for an even thickness so they bake uniformly. I also find that using a ruler can help you get a nice, consistent rectangle for both the dough and the filling spread, which leads to more even swirls.
Speaking of the filling, make sure your butter is fully melted but not piping hot when you mix it with the brown sugar and cinnamon. This ensures a smooth paste that spreads easily without melting the dough underneath. If your dough seems too soft to roll cleanly, don’t hesitate to pop it back in the fridge for another 10-15 minutes. Patience here really pays off when it comes to slicing. And for slicing, use a very sharp knife or even a serrated knife. A dull knife will squish the beautiful swirls you worked so hard to create. I learned that lesson the hard way early on!
When it comes to the swirl customization, don’t be afraid to play around. If you love cinnamon, feel free to add an extra teaspoon or two to the filling. A tiny pinch of cardamom can add a lovely floral note, or a whisper of ginger can give it a little zing. For the glaze, the consistency is key. You want it thick enough to coat but thin enough to drizzle. If it’s too thick, add milk a *tiny* bit at a time. If it’s too thin, whisk in a little more powdered sugar. This is where you can really personalize your cookies! I also recommend tasting your glaze before you add it to the cookies – you can always adjust the sweetness or vanilla. For baking, I always err on the side of underbaking slightly. They’ll firm up as they cool, and this ensures you don’t end up with dry, crumbly cookies. Remember, oven temperatures can vary, so keeping an eye on them during the last few minutes is always a good idea. Trust me on this one – perfectly soft and chewy is the ultimate goal!
Storing and Reheating Tips
These cinnamon roll cookies are truly best when they’re fresh, but they do store remarkably well, which is one of the reasons I love them so much. If you find yourself with leftovers (a rare occurrence in my house!), you can keep them at room temperature for about 2-3 days. Just make sure they are in an airtight container. This will help maintain their softness and prevent them from drying out. I usually just pop them into a good quality plastic container or a zip-top bag.
If you need them to last a bit longer, the refrigerator is your best bet. Store them in an airtight container in the fridge for up to a week. I’ve found that their texture holds up really well this way. When you’re ready to enjoy one from the fridge, you can eat it cold (it’s still delicious!) or let it sit out at room temperature for about 15-20 minutes to soften up a bit.
For longer storage, these cookies freeze beautifully. Lay them in a single layer on a baking sheet and freeze until firm, then transfer them to a freezer-safe bag or container. They should keep well in the freezer for about 2-3 months. When you’re ready to thaw them, just transfer them from the freezer to the refrigerator overnight. They’ll be good as new in the morning!
Now, about the glaze timing: for the best results, I always recommend glazing the cookies *after* they have completely cooled. If you glaze them while they’re still warm, the glaze will melt and become a sticky mess. If you plan on freezing the cookies *before* glazing, that’s totally fine! Just freeze them plain, and then thaw them completely and glaze them just before serving for the freshest taste and appearance.
Frequently Asked Questions
Final Thoughts
Honestly, this cinnamon roll cookies recipe is one that I keep coming back to again and again, and I really hope it becomes a favorite in your kitchen too. It’s that perfect intersection of familiar comfort and delightful surprise. The way the soft cookie dough embraces that warm, spiced cinnamon swirl is just pure magic. It’s the kind of treat that makes you pause, take a deep breath, and savor the moment. Whether you’re looking for a new go-to cookie for your baking repertoire, a crowd-pleaser for a party, or just a little something sweet to brighten your day, these cookies deliver every single time.
If you love these, you might also enjoy my recipes for [link to another related recipe, e.g., chewy chocolate chip cookies] or my [link to another related recipe, e.g., fudgy brownies]. They offer that same sense of homemade goodness and simple joy. I can’t wait to hear what you think about these cinnamon roll cookies! Please leave a comment below and let me know how yours turned out, or if you tried any fun variations. Your feedback truly makes my day!
Happy baking!
Cinnamon Roll Cookies
Ingredients
Cookie Dough
- 1 cup unsalted butter softened
- 1.5 cup granulated sugar
- 2 large eggs
- 1 teaspoon vanilla extract
- 3 cup all-purpose flour
- 1 teaspoon baking soda
- 0.5 teaspoon salt
Cinnamon Swirl
- 0.5 cup unsalted butter melted
- 1 cup packed brown sugar
- 2 tablespoon ground cinnamon
Cream Cheese Glaze
- 4 ounce cream cheese softened
- 0.25 cup unsalted butter softened
- 1 cup powdered sugar
- 1 teaspoon vanilla extract
- 1 tablespoon milk or more, to reach desired consistency
Instructions
Cookie Dough Preparation
- In a large bowl, cream together the softened butter and granulated sugar until light and fluffy.
- Beat in the eggs one at a time, then stir in the vanilla extract.
- In a separate bowl, whisk together the flour, baking soda, and salt.
- Gradually add the dry ingredients to the wet ingredients, mixing until just combined. Do not overmix.
Forming the Swirl
- Divide the cookie dough in half. On a piece of parchment paper, flatten one half of the dough into a rectangle approximately 10x8 inches.
- In a small bowl, combine the melted butter, brown sugar, and cinnamon for the swirl. Spread this mixture evenly over the flattened dough.
- Carefully roll up the dough rectangle lengthwise, like a cinnamon roll, using the parchment paper to help guide it.
- Wrap the rolled dough tightly in plastic wrap and freeze for about 30 minutes, or until firm enough to slice.
- Once firm, slice the roll into 0.5-inch thick rounds.
- Repeat with the second half of the cookie dough.
Baking the Cookies
- Preheat oven to 350°F (175°C). Line baking sheets with parchment paper.
- Place the cookie slices onto the prepared baking sheets, leaving about 2 inches between them.
- Bake for 10-12 minutes, or until the edges are lightly golden brown and the centers are still slightly soft.
- Let the cookies cool on the baking sheets for a few minutes before transferring them to a wire rack to cool completely.
Cream Cheese Glaze
- In a medium bowl, beat together the softened cream cheese and softened butter until smooth.
- Gradually beat in the powdered sugar until well combined. Stir in the vanilla extract and milk until you reach a smooth, drizzly consistency.
Finishing Touches
- Once the cookies have cooled, drizzle the cream cheese glaze over them.
- Let the glaze set before serving.