Oh, you guys. I have *got* to tell you about something that’s been making my kitchen smell absolutely divine lately, and more importantly, has been disappearing from the cookie jar at lightning speed. It’s my Chocolate Peppermint Grahams. Now, I know what you might be thinking – “Grahams? Like the childhood crackers?” Yes, and no! Think of these as the grown-up, utterly decadent, holiday-magic version of those simple childhood snacks. I’m talking about rich, dark chocolate goodness mingling with a cool, refreshing kiss of peppermint, all wrapped up in that familiar, comforting graham cracker texture. They’re seriously addictive, and the best part? They’re ridiculously easy to whip up, even when life feels like it’s moving at warp speed. If you’re a fan of those classic candy canes or a good chocolate-mint combination, get ready, because these Chocolate Peppermint Grahams are about to become your new obsession. They’re like a hug in cookie form, and trust me, you’ll want to make a double batch because they vanish faster than you can say “Jingle Bells!”
What is chocolate peppermint grahams?
So, what exactly are these magical Chocolate Peppermint Grahams? At their heart, they’re a delightful twist on the traditional graham cracker, but with a serious flavor upgrade. Imagine taking that slightly sweet, subtly honeyed base of a graham cracker and infusing it with the deep, satisfying richness of dark chocolate, then adding a bright, invigorating burst of peppermint. It’s like the perfect fusion of a classic comfort food and a festive holiday treat. The name itself, “Chocolate Peppermint Grahams,” perfectly captures what you’re getting: the familiar, beloved texture and slight sweetness of a graham cracker, elevated with the irresistible pairing of chocolate and peppermint. I like to think of them as little edible moments of joy, perfect for those times when you want something sweet and special without the fuss of a complicated dessert. They’re essentially a delightful, no-bake-required indulgence that feels both nostalgic and incredibly sophisticated.
Why you’ll love this recipe?
Honestly, there are so many reasons why this recipe has earned a permanent spot in my recipe collection, and I just know you’re going to fall in love with it too. First off, the flavor combination is just… sublime. The deep, slightly bitter notes of the dark chocolate play so beautifully with the cool, crisp sweetness of the peppermint. It’s a classic pairing for a reason, and here, it’s perfectly balanced. You get that satisfying crumb of the graham cracker, the rich melt of the chocolate, and that refreshing peppermint zing all in one bite. It’s incredibly moreish.
But beyond the incredible taste, the simplicity is a real game-changer. I’ve made this recipe countless times, and it never fails to impress, even though it barely requires any effort. It’s one of those lifesavers on busy weeknights when everyone’s suddenly asking for a treat, or when you need a last-minute something to bring to a potluck. You don’t even need to turn on the oven! This is a huge win in my book, especially during the warmer months, or when my oven is already stuffed with something else.
And let’s talk about cost-efficiency. The ingredients are pretty standard pantry staples, making this a really budget-friendly way to create something truly special. You’re not using fancy, expensive ingredients, yet the result feels incredibly gourmet.
Plus, these Chocolate Peppermint Grahams are so versatile. They’re not just for the holidays, though they are absolutely perfect for that time of year. They make a wonderful addition to a dessert board, a thoughtful homemade gift, or just a little pick-me-up for your afternoon coffee. I’ve found that they’re particularly good when you’re craving something sweet at 10 pm but don’t want to bake a whole cake. These are my go-to for that! It’s the perfect balance of satisfying your sweet tooth without feeling overly heavy. What I love most about this recipe, though, is the pure joy it brings. It’s simple, it’s delicious, and it always gets rave reviews. It truly is a little bite of holiday heaven, no matter the season.
How do I make chocolate peppermint grahams?
Quick Overview
Making these Chocolate Peppermint Grahams is surprisingly straightforward, which is a big part of why I adore them. You’re essentially taking crushed graham crackers, binding them together with a rich chocolate mixture, infusing it with peppermint, and then letting it all set. There’s no baking involved, which means less mess and less time spent waiting around! The key is getting the right consistency for the chocolate mixture so that everything holds together beautifully and sets up firm. It’s a simple process of melting, mixing, pressing, and chilling, resulting in a delightful treat that tastes like it took hours to make. You’ll be amazed at how quickly you can go from basic ingredients to a beautiful batch of these flavorful squares.
Ingredients
For the Chocolate Base: For the Chocolate Base: For the Chocolate Base: For the Chocolate Base: For the Chocolate Base: For the Chocolate Base: For
Graham Cracker Crumbs: About 2 cups. I usually buy full graham cracker sheets and crush them myself in a food processor or by zipping them in a plastic bag with a rolling pin. This gives you the freshest flavor and the perfect crumb size. You can use pre-crushed crumbs, but the homemade ones always have a little something extra. I always make sure to get the honey-flavored ones; they add a subtle sweetness that complements the chocolate and peppermint so well.
Unsalted Butter: 1/2 cup (1 stick), melted. Using unsalted butter lets you control the saltiness of the final product. Make sure it’s fully melted and slightly cooled before you add it to the crumbs.
Granulated Sugar: 1/4 cup. This adds just a touch of sweetness and helps bind everything together. You don’t need a lot because the graham crackers and chocolate already provide sweetness.
Unsweetened Cocoa Powder: 1/3 cup. This is where you get that deep, rich chocolate flavor. I prefer a good quality unsweetened cocoa powder – it makes a noticeable difference. Dutch-processed cocoa can give a smoother, less bitter chocolate taste if you prefer that.
Salt: 1/4 teaspoon. Just a pinch of salt helps to enhance all the other flavors and balance the sweetness. It’s a must!
Pure Vanilla Extract: 1 teaspoon. Vanilla is a flavor enhancer; it just rounds out all the other tastes and makes everything more complex and delicious.
Peppermint Extract: 1/2 to 1 teaspoon, to taste. This is where you get that signature minty kick! Start with 1/2 teaspoon and taste, then add more if you like a stronger peppermint flavor. Be careful, though; a little goes a long way, and you don’t want it to be overpowering. I usually lean towards a slightly more subtle peppermint, so I stick around 3/4 of a teaspoon.
Optional: Chocolate Chips or Chopped Chocolate: 1/2 cup. For an extra layer of chocolatey goodness and texture, you can stir in some chocolate chips (mini ones work great!) or finely chopped dark chocolate into the mixture before pressing. It makes them even more indulgent.
Optional: Red and Green Sprinkles or Crushed Candy Canes: For decoration. These are especially fun around the holidays!
Step-by-Step Instructions
Step 1: Prepare Your Pan
Get an 8×8 inch baking pan ready. You’ll want to line it with parchment paper, leaving some overhang on the sides. This makes it super easy to lift the whole slab out once it’s set. I usually leave about a 2-inch overhang on two opposite sides. Lightly grease the parchment paper and the exposed sides of the pan with a little bit of butter or cooking spray. This ensures nothing sticks, and you get those perfect, clean edges.
Step 2: Crush the Graham Crackers
If you’re not using pre-crushed crumbs, it’s time to get your graham crackers into crumb form. I love using my food processor for this; it’s quick and gives a nice, consistent texture. Just pulse until you have fine crumbs. Alternatively, you can place the graham crackers in a sturdy zip-top bag and crush them with a rolling pin. You want them to be fine enough to bind well but not so fine that they turn into paste. Aim for a texture similar to coarse sand.
Step 3: Combine Dry Ingredients
In a medium mixing bowl, combine your graham cracker crumbs, granulated sugar, unsweetened cocoa powder, and salt. Whisk them together really well until everything is evenly distributed. This ensures that the flavor is consistent throughout the entire slab.
Step 4: Melt the Butter and Add Wet Ingredients
Melt the butter in a small saucepan over low heat or in a microwave-safe bowl. Once melted, let it cool slightly for a minute or two. Pour the melted butter into the bowl with the dry ingredients. Add the pure vanilla extract and the peppermint extract. Stir everything together with a spatula or wooden spoon until it’s well combined and the mixture starts to clump together. It should look like wet sand.
Step 5: Stir in Optional Add-ins
If you’re using chocolate chips or chopped chocolate, now’s the time to stir them in. Just fold them gently into the mixture. They’ll add little pockets of melted chocolate goodness throughout your Chocolate Peppermint Grahams.
Step 6: Press into Pan
Transfer the mixture into your prepared baking pan. Use the back of your spatula or a flat-bottomed glass to press the mixture down evenly and firmly into the pan. This is a crucial step for ensuring your Chocolate Peppermint Grahams hold their shape. You want a nice, compact, and even layer. If you’re adding sprinkles or crushed candy canes, press them gently into the top layer now.
Step 7: Chill to Set
This is the “no-bake” magic! Cover the pan tightly with plastic wrap or aluminum foil and place it in the refrigerator for at least 1 to 2 hours, or until firm. You can also speed this up by popping it in the freezer for about 30-45 minutes, but be sure to keep an eye on it so it doesn’t freeze solid.
Step 8: Slice and Serve
Once the Chocolate Peppermint Grahams are firm, lift them out of the pan using the parchment paper overhang. Place the slab on a cutting board. Use a sharp knife to cut them into squares or bars. I usually aim for about 16 squares (4×4 grid) for an 8×8 pan, but you can cut them smaller for bite-sized treats or larger for more substantial pieces. The peppermint will be lovely and fragrant!
What to Serve It With
These Chocolate Peppermint Grahams are so wonderfully versatile, they don’t really *need* anything else, but here are a few ideas for how to enjoy them:
For Breakfast: While they might seem like a dessert, I’ve definitely had them with my morning coffee! Their mild sweetness and comforting texture make them a surprisingly good companion to a hot cup of java. I like to break off a corner and dip it in. It’s a little treat to start the day!
For Brunch: On a brunch spread, these can be cut into smaller, elegant squares and arranged artfully on a platter. They add a touch of homemade charm and a delightful flavor contrast to more savory brunch items. They pair wonderfully with mimosas or a good cup of tea.
As Dessert: This is probably the most obvious, but they shine here! Serve them alongside a scoop of vanilla bean ice cream for an extra decadent treat, or as part of a dessert charcuterie board with fresh berries and other cookies. They’re a fantastic palate cleanser after a rich meal, and the minty-chocolate combo is always a crowd-pleaser.
For Cozy Snacks: My favorite time to have these is with a glass of cold milk – just like the good old days, but with a grown-up flavor twist. They’re also perfect for an afternoon slump pick-me-up, or when you’re just craving something sweet and satisfying while curled up with a good book. I’ve even used them to top a bowl of hot chocolate, letting them soften slightly. So comforting!
Personally, my family loves them with hot chocolate, especially on movie nights. The kids always beg for “the peppermint squares,” and I can’t blame them! They’re just universally appealing and bring a smile to everyone’s face.
Top Tips for Perfecting Your Chocolate Peppermint Grahams
I’ve made these Chocolate Peppermint Grahams enough times to know a few tricks that can help ensure yours turn out absolutely perfect, every single time. These are the little lessons I’ve learned along the way!
Graham Cracker Prep: Getting the right crumb texture is key. If you crush them too finely, they can become a bit pasty. If they’re too chunky, they might not bind well. I find that pulsing in a food processor until it resembles coarse sand is the sweet spot. If you’re doing it by hand, make sure to break them down well but leave some smaller pieces for texture. And always use fresh graham crackers – stale ones can make the final product taste a bit off.
Mixing Advice: When you’re combining the wet and dry ingredients, mix just until everything is moistened. Overmixing can sometimes lead to a tougher texture. You’re not developing gluten here, so there’s no need to go overboard. The goal is just to get everything incorporated so it presses together smoothly.
Pressing Power: This is probably the most critical step for structural integrity. Press the mixture into the pan *firmly* and *evenly*. I use the bottom of a measuring cup or a glass for this. Go around the edges and the center multiple times to ensure there are no loose spots or air pockets. A well-pressed layer will slice cleanly and won’t crumble apart.
Chill Time is Crucial: Don’t skimp on the chilling time! This allows the butter to firm up and bind all the ingredients together. If you try to cut them too soon, they’ll be messy and difficult to handle. I usually aim for at least 1.5 to 2 hours in the fridge, or until they’re quite firm to the touch. If you’re short on time, the freezer works, but keep an eye on them.
Peppermint Precision: Peppermint extract can be potent. Start with the lower amount (1/2 teaspoon) and taste the mixture before pressing it into the pan. You can always add a tiny bit more if you want a stronger mint flavor. It’s much easier to add than to take away! Also, make sure you’re using *pure* peppermint extract, not imitation, for the best flavor.
Sharp Knife for Clean Cuts: When it’s time to slice, use a sharp, thin knife. You might want to run the knife under hot water and dry it between cuts, especially if the mixture is very firm, to get those super clean edges. This prevents dragging and crumbling.
Ingredient Swaps (with caution!): While this recipe is fantastic as is, I’ve experimented a bit. If you can’t find standard graham crackers, vanilla wafers can work, but they’ll be sweeter. For a darker chocolate flavor, you could reduce the graham cracker crumbs slightly and add a bit more cocoa, but be mindful of the binding power. I haven’t personally tried gluten-free versions, but I imagine a good gluten-free graham cracker substitute would work, though the texture might vary slightly.
By following these tips, you’ll be well on your way to creating perfectly delicious and visually appealing Chocolate Peppermint Grahams that everyone will rave about!
Storing and Reheating Tips
Keeping these Chocolate Peppermint Grahams fresh and delicious is super simple, which is another reason why I love them so much. They hold up really well, making them perfect for making ahead of time.
Room Temperature: Once they are fully set, you can store them in an airtight container at room temperature for up to 3-4 days. They do best in a cool, dry place, away from direct sunlight or heat, which could cause them to soften or the chocolate to melt slightly. I usually layer them between sheets of parchment paper if I’m stacking them to prevent them from sticking together.
Refrigerator Storage: If your kitchen tends to be warm, or if you just want them to stay extra firm, you can store them in the refrigerator. Again, an airtight container is key. They’ll stay fresh and delicious in the fridge for up to a week. Be aware that the peppermint flavor might become a bit more pronounced the longer they are stored, which I personally find to be a good thing!
Freezer Instructions: For longer storage, these Chocolate Peppermint Grahams freeze beautifully! Cut them into squares and wrap them tightly in plastic wrap, then place them in a freezer-safe bag or container. They can be stored in the freezer for up to 2-3 months. To thaw, simply remove them from the freezer and let them come to room temperature, either on the counter for about 30 minutes or in the refrigerator for a couple of hours. They’ll be like they were freshly made!
Glaze Timing Advice: If you decide to add a drizzle of melted chocolate or a simple glaze on top after they’ve set, it’s best to store them at room temperature or in the refrigerator afterwards. The glaze will set up nicely with the chilling process. If you plan to freeze them, I’d recommend adding any glaze *after* they have thawed, as the texture of a pre-applied glaze can sometimes change slightly after freezing and thawing.
I’ve found that the key to maintaining quality is always using an airtight container. This prevents them from drying out or absorbing any unwanted odors from other foods. And if they start to feel a little too soft for your liking, just pop them back in the fridge for a bit to firm up!
Frequently Asked Questions
Final Thoughts
There you have it, my friends – my beloved Chocolate Peppermint Grahams! I truly hope you give this recipe a try. It’s one of those simple pleasures that brings a surprising amount of joy, both in the making and the eating. It’s the perfect blend of familiar comfort and festive flavor, and the fact that it’s so easy to make without even turning on the oven is a huge bonus in my busy kitchen. Whether you’re looking for a holiday treat, a homemade gift, or just a little something sweet to brighten your day, these Chocolate Peppermint Grahams are sure to hit the spot.
If you love this flavor combination, you might also enjoy exploring other chocolate and mint recipes, or perhaps some no-bake treats that are just as easy to whip up. I’m always sharing new favorites, so keep an eye out!
I can’t wait to hear what you think if you make them! Please feel free to leave a comment below with your thoughts, your own favorite variations, or any questions you might have. And if you snap a picture, be sure to tag me on social media – I’d love to see your creations! Happy baking… or should I say, happy chilling!
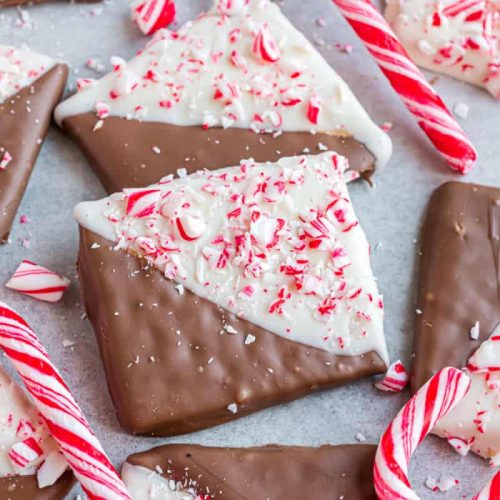
Chocolate Peppermint Grahams
Ingredients
Main Ingredients
- 11 ounce package milk chocolate (melted)
- 11 ounce package white chocolate (melted)
- 4 peppermint candy canes (crushed)
- 24 graham cracker squares (or 12 full size crackers)
Instructions
Preparation Steps
- Melt milk chocolate in microwave safe bowl for 30 seconds. Stir and heat again at 30 second intervals, stirring between until smooth (about a total of 90 seconds).
- Dip one end of the graham cracker into milk chocolate, lay on parchment paper. Repeat with all grahams.
- Allow to set.
- Melt white chocolate in microwave in the same manner as step 1. Dip other end of cracker in white chocolate and immediately sprinkle with crushed candy canes. Allow to set.