You know those moments? The ones where only something truly decadent will do, but you also don’t have hours to spend in the kitchen? Yeah, I live for those. And that’s exactly why this Chocolate Peanut Butter pie recipe has become my absolute lifeline. It’s the kind of dessert that stops you in your tracks, the kind that has my family practically begging for it on a weeknight. Seriously, my kids will do extra chores just to have a slice waiting for them. It’s so rich and satisfying, it feels like a major indulgence, but the secret is, it’s surprisingly simple to whip up. If you’ve ever dreamed of a dessert that combines that heavenly duo of chocolate and peanut butter in a way that’s both elegant and incredibly comforting, then you are going to adore this. It’s even better, in my humble opinion, than those fancy layered cakes you see in bakeries – no offense to cakes, but this pie has a special place in my heart (and my stomach!).
What is chocolate peanut butter pie?
Okay, so what exactly *is* this magical chocolate Peanut Butter Pie? At its heart, it’s a dreamy, creamy concoction that brings together the best of both worlds: rich, velvety chocolate and smooth, slightly salty peanut butter. Think of it as a no-bake wonder if you’re making the classic version with a cookie crust, or a perfectly baked masterpiece if you’re going for a more traditional pie crust. This recipe leans towards a rich, baked custard-style filling that sets up beautifully, almost like a dense, fudgy mousse. The beauty of it is that it’s not overly sweet; the peanut butter adds a savory depth that balances the chocolate perfectly. It’s got that satisfying “give” when you slice into it, and the aroma? Oh, the aroma! It fills your kitchen with a comforting warmth that just screams “treat yourself.” It’s simple, elegant, and utterly irresistible.
Why you’ll love this recipe?
There are so many reasons why this chocolate Peanut Butter pie has earned a permanent spot in my recipe repertoire, and I’m willing to bet it’ll do the same for you. First off, the flavor profile is just out of this world. You get that intense, dark chocolate richness that’s perfectly complemented by the unmistakable nutty goodness of peanut butter. It’s not just a sweet treat; it’s complex, satisfying, and utterly addictive. Then there’s the simplicity. I know, I know, “pie” can sometimes sound intimidating, but trust me, this one is a lifesaver. It doesn’t require a lot of fussy techniques or hard-to-find ingredients. Most of what you need is probably already in your pantry! And speaking of ingredients, it’s surprisingly cost-efficient. You don’t need a whole shopping spree to make this happen, which is always a win in my book. What I love most about this particular chocolate peanut butter pie is its versatility. You can easily adapt it for different occasions or moods. Want to make it for a potluck? Easy. Craving a solo indulgence with a cup of coffee? Absolutely. It’s the kind of dessert that brings smiles all around. It’s truly a crowd-pleaser, but also incredibly personal and comforting. It’s the dessert equivalent of a warm hug!
How do I make chocolate peanut butter pie?
Quick Overview
Making this chocolate Peanut Butter pie is surprisingly straightforward, even if you’re not a seasoned baker. We’re talking about a simple crust (or even a pre-made one to save time!), a rich, luscious filling that comes together in one bowl, and a quick bake to perfection. The whole process, from start to finish, is designed to be manageable and rewarding, so you get that incredible homemade taste without all the stress. It’s the kind of recipe that makes you feel like a baking superstar, even on your busiest days.
Ingredients
For the Crust:
I’ve found that a classic graham cracker crust is just divine here. It adds a hint of sweetness and a delightful crunch that contrasts beautifully with the creamy filling. You’ll need about 1 ½ cups of graham cracker crumbs (that’s usually around 10-12 full graham crackers, blitzed in a food processor or put in a bag and smashed with a rolling pin – my kids love helping with the smashing!). To that, I add about 6 tablespoons of melted unsalted butter and 2 tablespoons of granulated sugar. Mix it all together until the crumbs are evenly moistened, like wet sand. Press this mixture firmly into the bottom and up the sides of a 9-inch pie plate. I always like to bake my crust for about 8-10 minutes at 350°F (175°C) just to give it a little extra crispness and prevent it from getting soggy. Let it cool completely while you prepare the filling.
For the Filling:
This is where the magic really happens! You’ll need 1 cup of creamy Peanut Butter (the regular kind, not the natural stuff that separates, unless you’re feeling brave!). Make sure it’s at room temperature so it’s easy to mix. You’ll also need 1 cup of granulated sugar, a pinch of salt to really make those flavors pop, 3 tablespoons of unsweetened cocoa powder for that deep chocolatey flavor, 2 large eggs, ½ cup of milk (whole milk works best for richness, but 2% is fine), and 1 teaspoon of vanilla extract. For an extra luscious texture, I sometimes add 2 tablespoons of melted unsalted butter, but it’s not strictly necessary. Just whisk everything together in a large bowl until it’s smooth and well combined. You want it to be a rich, chocolatey-peanut butter swirl of goodness!
For the Glaze:
This is optional but highly recommended for that extra touch of decadence. For a simple chocolate glaze, I usually combine ½ cup of semi-sweet chocolate chips with 2 tablespoons of unsalted butter. You can melt this gently over a double boiler or in the microwave in 30-second intervals, stirring in between, until smooth. If it seems too thick, a tiny splash of milk or cream can help loosen it up. Some people like to add a little swirl of peanut butter into this glaze too, which is absolutely divine. Alternatively, a dusting of powdered sugar or a dollop of whipped cream is also fantastic.
Step-by-Step Instructions
Step 1: Preheat & Prep Pan
First things first, preheat your oven to 350°F (175°C). While the oven heats up, grab your 9-inch pie plate. If you’re making your own crust from scratch, now’s the time to prepare it. Combine your graham cracker crumbs, melted butter, and sugar, then press it firmly into the pie plate. Bake this crust for about 8-10 minutes until it’s lightly golden and fragrant. Once it’s done, take it out and let it cool completely on a wire rack. This step is super important to prevent a soggy bottom!
Step 2: Mix Dry Ingredients
In a large mixing bowl, combine the granulated sugar, pinch of salt, and unsweetened cocoa powder. Give these dry ingredients a good whisk together. This helps to break up any lumps in the cocoa powder and ensures that everything is evenly distributed before we start adding the wet ingredients. You want a nice, uniform base for your rich filling.
Step 3: Mix Wet Ingredients
Now, add the creamy peanut butter to the bowl with the dry ingredients. Then, crack in your two large eggs. Pour in the milk and the vanilla extract. If you’re using the optional melted butter for extra richness, add that now too. It might look a bit clumpy at first, but don’t worry!
Step 4: Combine
Using a whisk or an electric mixer on low speed, start combining everything. Mix until the batter is smooth and there are no streaks of dry ingredients remaining. You’re looking for a thick, luscious, almost fudgy texture. Be careful not to overmix, as that can sometimes make the pie a bit tough. Just mix until everything is well incorporated and you have a beautiful, homogenous mixture.
Step 5: Prepare Filling
At this point, your filling is technically ready to go! It should be thick and gloriously chocolatey-peanut buttery. Take a moment to just admire its potential. If you’re feeling adventurous, you could swirl in a tablespoon or two of extra peanut butter or even some mini chocolate chips right into the filling for added texture and flavor bursts, but honestly, it’s amazing just as it is.
Step 6: Layer & Swirl
Pour the chocolate peanut butter filling into your cooled, pre-baked pie crust. Smooth the top gently with a spatula. If you decided to add extra peanut butter or chocolate chips, now’s the time to gently swirl them in with a knife or toothpick for a marbled effect. It’s not about perfect swirls; it’s about adding little pockets of extra deliciousness. The goal is a beautiful, even layer that promises pure indulgence with every bite.
Step 7: Bake
Now for the bake! Carefully place your pie in the preheated oven. You’ll want to bake it for about 40-50 minutes. The pie is ready when the edges are set, but the center is still slightly jiggly. It will continue to set up as it cools. A good way to test is to insert a knife near the center; it should come out mostly clean. Don’t overbake it, or you’ll end up with a dry pie, and nobody wants that!
Step 8: Cool & Glaze
This is perhaps the hardest part – the waiting! Once the pie is out of the oven, let it cool on a wire rack for at least 2-3 hours, or until completely cool. I often pop mine in the refrigerator for an extra hour to ensure it’s perfectly chilled and firm. Once it’s cooled, you can add your glaze. Drizzle the melted chocolate mixture evenly over the top. Let the glaze set for about 15-20 minutes before slicing.
Step 9: Slice & Serve
The moment of truth! Use a sharp knife to cut clean slices. For the best results, dip your knife in hot water and wipe it dry between each cut. This helps to get those perfect, clean edges. Serve chilled or at room temperature. A little dollop of whipped cream or a sprinkle of chopped peanuts on top never hurt anyone!
What to Serve It With
This chocolate peanut butter pie is a star on its own, but pairing it with the right accompaniments can elevate the whole experience. For a cozy breakfast treat, I absolutely love having a small slice with a strong, hot cup of black coffee. It’s surprisingly good in the morning, a little indulgence to start the day right. The bitterness of the coffee cuts through the richness beautifully. For a more elegant brunch, I like to serve it with a tiny dollop of raspberry coulis on the side – the tartness of the berries is a fantastic counterpoint to the sweet pie. It also looks stunning on a brunch spread. As a dessert, it’s obviously a winner. I often serve it with a scoop of vanilla bean ice cream or some freshly whipped cream. A few fresh berries scattered around the plate add a touch of color and freshness. And for those really casual, cozy snack moments? Just a fork and a glass of cold milk are all you need. My family tradition is to have this on movie nights, and it’s always a huge hit. Seriously, this pie is so versatile, it fits into any occasion, from casual family gatherings to more formal dinner parties.
Top Tips for Perfecting Your Chocolate Peanut Butter Pie
Over the years, I’ve learned a few tricks that really make this chocolate peanut butter pie sing. For the crust, remember that pressing it firmly into the pan is key – especially up the sides! A loose crust is a crumbly crust. Baking it for those 8-10 minutes before filling gives it that extra structural integrity and prevents it from getting soggy, which is my biggest pet peeve with pies. When it comes to the filling, using room-temperature peanut butter is non-negotiable for a smooth, lump-free mixture. If your peanut butter is too cold, it’ll be a struggle to incorporate everything properly. I’ve also found that the type of cocoa powder you use makes a difference; a good quality unsweetened cocoa powder will give you a richer, deeper chocolate flavor. Don’t be tempted to overmix the batter once the wet and dry ingredients are combined, or you might end up with a tougher texture. Just mix until it’s smooth! If you’re feeling fancy and want to swirl in some extra peanut butter or chocolate chips, do it gently; you don’t want to overwork the batter. When it comes to baking, ovens can be finicky. Keep an eye on it during the last 10 minutes of baking. If the crust edges start to brown too quickly, you can loosely tent them with foil. And for that perfect, un-jiggly center, remember that the pie will continue to set as it cools. Don’t be afraid to underbake it slightly! For the glaze, if it seems too thick, a tiny bit of hot water or milk stirred in can usually fix it. If it’s too thin, a few more chocolate chips can help thicken it up. Practice makes perfect with glazes, so don’t get discouraged if your first attempt isn’t Pinterest-perfect!
Storing and Reheating Tips
Storing this pie is pretty straightforward, but there are a few things I’ve learned to keep it tasting its best. If you have any leftovers (which is rare in my house!), they are perfectly fine stored at room temperature for up to two days, as long as it’s not excessively hot. Just make sure to cover it loosely with plastic wrap or foil. For longer storage, the refrigerator is your best friend. I usually keep my chocolate peanut butter pie in an airtight container in the fridge for up to 4-5 days. It’s delicious chilled, and sometimes I even think the flavors meld even more overnight! If you plan to freeze it, I recommend freezing the pie *before* adding the glaze. Wrap the cooled, un-glazed pie very tightly in several layers of plastic wrap, then add a layer of aluminum foil. It should keep well in the freezer for about 2-3 months. To thaw, transfer the frozen pie to the refrigerator overnight. Once thawed, you can add your glaze or simply dust it with powdered sugar. If you do happen to freeze a glazed pie, the glaze might soften a bit upon thawing, but it will still taste fantastic. For reheating, I generally don’t reheat this pie as it’s best served chilled or at room temperature. But if you absolutely must, a very short stint in a low oven (around 250°F/120°C for 5-10 minutes) might warm it slightly, but be careful not to dry it out.
Frequently Asked Questions
Final Thoughts
Honestly, this chocolate peanut butter pie is more than just a recipe to me; it’s a little piece of happiness. It’s the kind of dessert that brings people together, that sparks joy with every bite. The way the rich chocolate and creamy peanut butter meld together is just pure magic, and the fact that you can achieve such decadent results with relative ease is something I truly cherish. It’s proof that you don’t need complicated techniques to create something truly special. If you’re a chocolate and peanut butter lover (and who isn’t, really?), you absolutely have to give this a try. It’s become a staple in my home for a reason, and I’m so excited for you to experience it too. For those of you who loved this, you might also enjoy my fudgy brownie recipe or my peanut butter cookie dough dip for more delicious treats! I can’t wait to hear what you think! Please feel free to leave a comment below and share your own chocolate peanut butter pie triumphs or any fun variations you come up with. Happy baking!
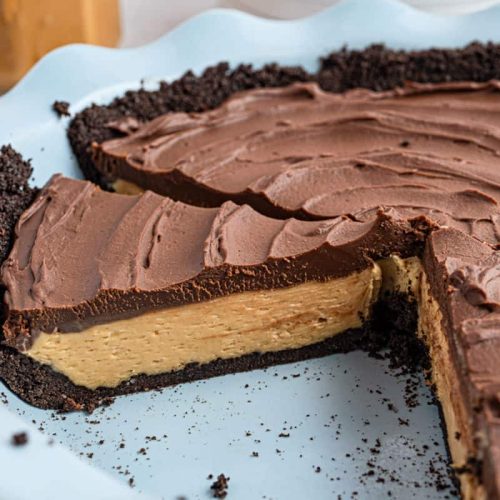
Chocolate Peanut Butter Pie
Ingredients
Crust
- 2.5 cups chocolate cookie crumbs
- 0.33 cup butter, melted
Filling
- 1 package cream cheese, softened
- 1 cup peanut butter
- 1 cup powdered sugar
- 2 cups whipped topping, thawed
- 0.5 cup chocolate chips, melted
Toppings (Optional)
- 0.5 cup chocolate syrup
- 0.5 cup chopped peanuts
Instructions
Preparation Steps
- In a bowl, combine the chocolate cookie crumbs and melted butter. Press the mixture into the bottom and up the sides of a 9-inch pie plate.
- In a separate bowl, beat together the softened cream cheese and peanut butter until smooth.
- Gradually beat in the powdered sugar until well combined.
- Gently fold in the thawed whipped topping until just combined.
- Pour the filling into the prepared crust and spread evenly.
- Drizzle the melted chocolate chips over the top of the filling.
- Chill the pie for at least 4 hours, or until firm.
- Before serving, drizzle with chocolate syrup and sprinkle with chopped peanuts, if desired.