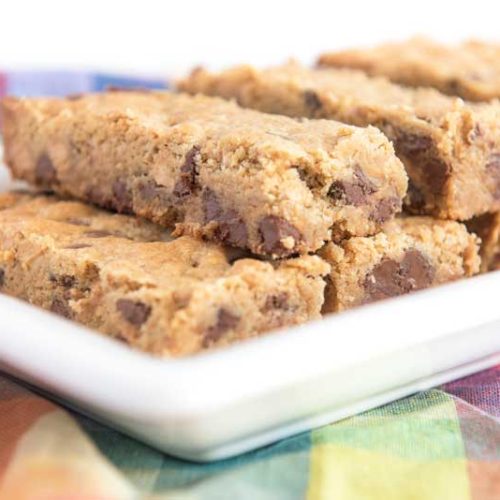
Oh, chocolate chip cookies. Is there anything more universally loved? They’re the stuff of childhood memories, cozy afternoons, and basically, pure happiness. But let’s be real, sometimes you want that classic chocolate chip cookie flavor, that gooey, slightly crisp edge, that chewy center, but you don’t have the time or the inclination to scoop and roll dough one by one. That’s where these chocolate chip cookie bars come in. They are my absolute go-to when that cookie craving hits, especially on a busy weeknight or when I need to whip up a crowd-pleasing treat without fuss. Honestly, they’re a lifesaver! They give you all the magic of a traditional chocolate chip cookie, but in a glorious, easy-to-cut bar form. Forget the cookie sheets, the messy rolling – these are pure, unadulterated joy in bar form. They’re so good, my kids ask for them all the time, and I’m pretty sure they disappear from the pan faster than I can cut them.
What are chocolate chip cookie bars?
Think of these chocolate chip cookie bars as the best of both worlds. They’re essentially a perfectly baked chocolate chip cookie dough that’s spread into a pan instead of being formed into individual cookies. The result is a thick, chewy, incredibly flavorful bar that delivers all the deliciousness you expect from a classic chocolate chip cookie – the rich brown sugar and butter notes, the melty pockets of chocolate, the slightly crisp edges. It’s like a giant, shareable, super-easy chocolate chip cookie that’s just begging to be devoured. No need to fuss over shaping, no worrying about cookies spreading too much or too little. It’s the comforting, familiar taste of a homemade chocolate chip cookie, but with a simplified, no-stress approach. They’re less about the perfection of individual cookie shapes and more about the sheer, delicious abundance of cookie goodness.
Why you’ll love this recipe?
Honestly, where do I even begin with why you’ll adore these Chocolate Chip cookie bars? First off, the FLAVOR. It’s everything you dream of in a chocolate chip cookie. The brown sugar gives them that deep, caramel-like sweetness, and the vanilla is prominent without being overpowering. And the chocolate chips? They get all melty and gooey, creating those irresistible pockets of pure bliss. But what I truly adore is the SIMPLICITY. You literally mix up a cookie dough, press it into a pan, and bake. That’s it! It’s so much faster than individual cookies, and cleanup is a breeze. Plus, they’re incredibly COST-EFFICIENT. You likely have most of the ingredients in your pantry already, making it an affordable way to satisfy a serious sweet tooth. And their VERSATILITY is unmatched! I love them warm, straight from the oven, with a glass of milk. They’re also fantastic at room temperature for potlucks or parties. They’re robust enough to travel well, making them perfect for bake sales or sending to college students. What really sets this recipe apart for me, though, is that they manage to be both incredibly easy and ridiculously delicious. I’ve tested a million cookie recipes, and while I love a classic dropped cookie, these bars just hit different. They’re a guaranteed win every single time.
How do I make chocolate chip cookie bars?
Quick Overview
Making these chocolate chip cookie bars is astonishingly simple. You’ll basically combine your wet and dry ingredients to create a thick, decadent Cookie Dough, press it into a baking pan, sprinkle with a few extra chocolate chips if you’re feeling extra, and bake until golden brown. That’s it! This method ensures a uniformly chewy texture throughout, and the easy pan preparation means less mess and more time enjoying your treat. It’s a foolproof way to get that perfect chocolate chip cookie experience without any of the fuss.
Ingredients
For the Main Batter:
2 1/4 cups all-purpose flour (I always use unbleached for a slightly better texture)
1 teaspoon baking soda
1/2 teaspoon salt (just a pinch to balance the sweetness)
1 cup (2 sticks) unsalted butter, softened (make sure it’s truly softened, not melted!)
3/4 cup granulated sugar
3/4 cup packed light Brown Sugar (this is key for that chewy, caramel flavor!)
2 large eggs (room temperature is best, but don’t stress if they’re not)
2 teaspoons pure vanilla extract (use the good stuff, it makes a difference!)
2 cups (about 12 oz) semi-sweet chocolate chips (or a mix of your favorites! Dark, milk, chunks – go wild)
For the Filling:
This recipe doesn’t really have a separate “filling” in the traditional sense, as the chocolate chips are mixed directly into the dough. However, I always like to reserve about 1/2 cup of the chocolate chips to sprinkle on top just before baking for extra gooeyness and visual appeal.
For the Glaze:
(Optional, but highly recommended!)
1 cup powdered sugar
2-3 tablespoons milk (or a dairy-free alternative like almond milk for a slightly creamier finish)
1/2 teaspoon vanilla extract (or a different extract for flavor variation, like almond or mint!)
Step-by-Step Instructions
Step 1: Preheat & Prep Pan
First things first, get your oven preheating to 350°F (175°C). Then, grab an 8×8 inch or 9×9 inch baking pan. You want to make sure your bars don’t stick, so I highly recommend lining it with parchment paper. Leave a little overhang on the sides – this makes it super easy to lift the whole block of cookie bars right out of the pan once they’re baked. You can grease the pan lightly before lining, just to be extra safe.
Step 2: Mix Dry Ingredients
In a medium bowl, whisk together your flour, baking soda, and salt. Just give them a good whisk until everything is evenly distributed. This ensures the leavening agents and salt are spread out, so you don’t get any weird pockets of saltiness or uneven rising. Set this bowl aside for now.
Step 3: Mix Wet Ingredients
In a large bowl (or the bowl of your stand mixer), cream together the softened butter, granulated sugar, and packed brown sugar. Beat them until the mixture is light and fluffy – this usually takes about 2-3 minutes. This creaming process is important because it incorporates air, which helps make your bars tender. Then, beat in the eggs, one at a time, until each is fully incorporated. Finally, stir in the vanilla extract. You should have a smooth, creamy mixture.
Step 4: Combine
Now it’s time to bring those wet and dry ingredients together. Gradually add the dry ingredients to the wet ingredients, mixing on low speed (or stirring with a spatula) until *just* combined. Be careful not to overmix here! Overmixing develops the gluten in the flour too much, which can make your bars tough. You want to stop as soon as you no longer see streaks of flour. Fold in your chocolate chips until they’re evenly distributed throughout the dough. The dough will be thick and a little sticky.
Step 5: Prepare Filling
As I mentioned, there isn’t a separate filling for this recipe. But, for that extra pop of chocolate, take about half a cup of your reserved chocolate chips and set them aside. These will be sprinkled over the dough before baking.
Step 6: Layer & Swirl
Spoon the cookie dough into your prepared baking pan. It will be thick, so you’ll need to use a spatula or your hands (lightly greased or wet works wonders here) to press it evenly into the bottom of the pan, making sure to get it into all the corners. You want a nice, even layer for consistent baking. Once it’s pressed down, take your reserved chocolate chips and sprinkle them evenly over the top of the dough. You can give them a gentle press into the dough if you like.
Step 7: Bake
Place the pan in your preheated oven. Bake for about 25-35 minutes. The exact time will depend on your oven and the size of your pan. You’re looking for the edges to be golden brown, and the center to be set but still slightly soft. A toothpick inserted into the center should come out with moist crumbs attached, not wet batter. I usually start checking around the 25-minute mark. It’s better to slightly underbake these than overbake, as they’ll continue to set as they cool.
Step 8: Cool & Glaze
Once baked, remove the pan from the oven and let it cool in the pan on a wire rack for at least 20-30 minutes. This is crucial for them to set up properly. While they’re cooling, you can whisk together the glaze ingredients. In a small bowl, combine the powdered sugar, 2 tablespoons of milk, and vanilla extract. Whisk until smooth. If it’s too thick, add a little more milk, a teaspoon at a time, until you reach your desired drizzling consistency. Once the cookie bars are mostly cooled, drizzle the glaze over the top. Let the glaze set for another 10-15 minutes before slicing.
Step 9: Slice & Serve
Once the glaze has set and the bars are completely cooled (or still slightly warm if you prefer!), use the parchment paper overhang to lift the whole block out of the pan onto a cutting board. Use a sharp knife to cut them into squares or rectangles. I usually get about 16 bars from an 8×8 inch pan. Serve them up and watch them disappear!
What to Serve It With
These chocolate chip cookie bars are so wonderfully versatile, they fit into pretty much any meal or occasion. For Breakfast, I love them cut into smaller squares and served alongside a hot mug of coffee. It’s that perfect little sweet treat to start the day without being too heavy. Sometimes, I’ll even crumble a bit over some yogurt! For Brunch, they step up their game. I like to arrange them on a tiered stand with fresh berries and a dollop of whipped cream or mascarpone for a touch of elegance. A mimosa or a sparkling cider pairs beautifully. As Dessert, well, they’re stars on their own, especially when served warm with a scoop of vanilla bean ice cream. The contrast of the warm, chewy bar and the cold, creamy ice cream is pure heaven. You can also drizzle them with a little extra caramel sauce. For Cozy Snacks, they’re my absolute favorite. I’ll cut myself a generous piece, curl up on the couch with a good book, and pair it with a tall glass of cold milk – just like when I was a kid. My family also loves them packed into lunchboxes for a surprise treat, or brought to after-school activities. They’re just universally loved and always a welcome sight.
Top Tips for Perfecting Your Chocolate Chip Cookie Bars
After making these bars more times than I can count, I’ve picked up a few tricks that I think really elevate them. First, when it comes to the BUTTER, make sure it’s truly softened, not melted. Melted butter can make your bars spread too much and become greasy. Softened butter creates that perfect, slightly cakey yet chewy texture. For MIXING, I can’t stress enough: don’t overmix the dough once you add the flour. Seriously, just mix until you *barely* see any streaks of flour left. Overmixing is the number one culprit for tough cookies or bars. When it comes to the CHOCOLATE CHIPS, I find using a good quality chocolate makes a big difference in flavor. A mix of semi-sweet and dark chocolate chips is divine! If you want to get fancy with the swirl, you can reserve about a quarter of the dough, mix that portion with some cocoa powder, and then dollop and swirl that into the main dough before pressing into the pan. For BAKING, know your oven! Every oven is different. The baking time is a guideline. I always start checking for doneness around the 25-minute mark. You want the edges golden brown and the center to look set but still slightly gooey. They will firm up as they cool. If you find your oven tends to bake hot, you might want to loosely tent the pan with foil towards the end of baking to prevent the tops from getting too dark. For the GLAZE, consistency is key. If it’s too thick, add milk a teaspoon at a time. If it’s too thin, whisk in a bit more powdered sugar. I love to add a tiny pinch of salt to the glaze too; it really balances the sweetness and brings out the chocolate flavor. Don’t be afraid to experiment with extract flavors too – almond extract or even a hint of espresso powder in the dough can be amazing!
Storing and Reheating Tips
These chocolate chip cookie bars are wonderfully forgiving when it comes to storage. At ROOM TEMPERATURE, they’ll stay fresh in an airtight container for about 3-4 days. I usually just pop them in a good quality container or even a zip-top bag once they’ve cooled completely. They’re great for snacks throughout the week! If you’re planning to keep them longer, REFRIGERATOR STORAGE is your best bet. They’ll last for up to a week in the fridge, still maintaining that lovely chewy texture. Make sure they’re in an airtight container to prevent them from drying out or absorbing other odors. When you want to eat them from the fridge, you can enjoy them cold, or let them sit at room temperature for about 15-20 minutes to soften up a bit. For FREEZER INSTRUCTIONS, these bars are fantastic! Once completely cooled and the glaze is set, cut them into individual squares. Wrap each square tightly in plastic wrap, then place them in a freezer-safe bag or container. They’ll keep well for up to 2-3 months. To thaw, just remove them from the freezer and let them come to room temperature. If you want to reheat them slightly, you can pop a frozen square into a toaster oven for a few minutes until warmed through – pure magic! For the GLAZE TIMING, I always recommend letting the bars cool significantly before applying the glaze, especially if you plan on freezing them. If you glaze them and then freeze, the glaze can sometimes become a little sticky or soft upon thawing. It’s often best to freeze the bars plain and then glaze them once they’ve thawed and are ready to be served.
Frequently Asked Questions
Final Thoughts
So there you have it – my absolute favorite chocolate chip cookie bars. I truly believe this recipe is a game-changer for anyone who loves the taste of homemade chocolate chip cookies but craves a little more convenience. They’re perfect for potlucks, bake sales, after-school snacks, or just for satisfying that sweet craving that hits late at night. The balance of chewy, gooey, and slightly crisp edges is just spot on, and the simple process makes them a joy to bake. If you love these, you might also enjoy my chewy oatmeal raisin bars or my gooey blondies – they’re all about that easy, delicious bar form! Give these chocolate chip cookie bars a try, and I promise you won’t be disappointed. I can’t wait to hear how yours turn out in the comments below! Happy baking!
Peanut Butter Chocolate Chip Cookie Bars
Ingredients
Main Ingredients
- 1.5 cup flour
- 0.25 teaspoon salt
- 0.5 teaspoon baking soda
- 0.75 cup brown sugar
- 0.75 cup peanut butter
- 0.5 cup butter or margarine, softened
- 0.5 cup sugar
- 1 large egg
- 1 teaspoon vanilla extract
- 12 ounce chocolate chips
- 12 ounce peanut butter chips
Instructions
Preparation Steps
- Preheat oven to 350 degrees Fahrenheit.
- Grease a 9 by 13 inch baking pan.
- Whisk together flour, salt, and baking soda in a bowl, set aside.1.5 cup flour
- In a stand mixer mix brown sugar, peanut butter, butter and sugar until smooth.1.5 cup flour
- Add in egg and vanilla extract and mix on medium speed until just combined.1.5 cup flour
- Reduce mixer speed to low and add in flour mixture.1.5 cup flour
- Remove from mixer and mix in chocolate and peanut butter chips by hand.1.5 cup flour
- Spread batter in pan and bake 25 to 30 minutes until golden and center is done.
- Cool on a rack and slice into 16 bars once cool.