You know, there are some recipes that just stick with you. They’re more than just food; they’re memories, comfort, and pure joy all rolled into one. For me, that’s exactly what these chicken roll ups are. They remind me of chilly evenings when I was a kid, the smell of something warm and savory wafting from the kitchen, making my little brother and me race to the dinner table. These aren’t your fancy, complicated restaurant affairs. These are the real deal – honest, delicious, and surprisingly simple. They’re like a warm hug on a plate, and frankly, they’re my secret weapon for those nights when the “what’s for dinner?” question feels like a looming dread. If you’ve ever craved something that feels both a bit special and wonderfully homey, you’re going to fall head over heels for these chicken roll ups.
What is chicken roll up?
So, what exactly are these magical things I keep raving about? Think of them as little parcels of happiness. Essentially, we’re talking about tender chicken breasts, pounded thin and then rolled up around a delicious, savory filling. The beauty of them lies in their versatility. You can stuff them with almost anything your heart desires – creamy cheese, sautéed veggies, a sprinkle of herbs, even a bit of cured meat. Once they’re rolled, they’re usually seared to get a beautiful golden-brown crust and then often finished in a luscious sauce or baked until they’re perfectly cooked through. It’s like a classic Chicken Breast decided to get dressed up for a party, and trust me, it’s a party I always want to be invited to. They’re definitely not just a plain old chicken breast; they’re elevated, flavorful, and just so much more interesting to eat!
Why you’ll love this recipe?
Oh, where do I even begin? There are so many reasons why this recipe has earned a permanent spot in my weekly rotation. First and foremost, the flavor is just out of this world. We’re talking tender, juicy chicken that practically melts in your mouth, encasing a filling that adds layers of creamy, savory goodness. The combination is just… chef’s kiss! Then there’s the sheer simplicity of it all. Despite how fancy they look and taste, these chicken roll ups are remarkably easy to put together. Seriously, I’ve whipped these up on a Tuesday night after a long day, and they’ve been on the table in under an hour. Plus, they’re surprisingly budget-friendly. Chicken breasts are usually a great value, and the fillings can be as simple or as extravagant as you like, making this a dish that’s kind to your wallet without skimping on flavor. What I love most about these chicken roll ups, though, is their incredible versatility. They’re perfect for a weeknight family dinner, but they also feel special enough to serve to guests. You can customize the filling endlessly – think spinach and feta, mushroom and Swiss, or even a sun-dried tomato and basil. They pair wonderfully with so many sides, from a simple salad to roasted vegetables or creamy mashed potatoes. It’s truly a recipe that keeps on giving!
How do I make chicken roll ups?
Quick Overview
The magic happens by pounding chicken breasts thin, spreading them with a flavorful filling, rolling them up tightly, searing them for a golden crust, and then finishing them off in the oven until they’re perfectly cooked. The whole process is straightforward, focusing on building flavor at each step. It’s the kind of meal that looks impressive but is actually very manageable, even for newer cooks. You’ll end up with tender, juicy chicken that’s bursting with flavor from the filling, all wrapped up in a beautiful package. Trust me, the aroma alone will have everyone gathered in the kitchen!
Ingredients
For the Chicken:
4 boneless, skinless chicken breasts (about 1.5 – 2 lbs total)
Salt and freshly ground black pepper, to taste
1 tablespoon Olive oil (for searing)
For the Filling:
8 ounces cream cheese, softened (I love using full-fat for extra creaminess!)
1/2 cup shredded Parmesan cheese
1/4 cup finely chopped fresh parsley (or 1 tablespoon dried)
2 cloves garlic, minced
1/4 teaspoon red pepper flakes (optional, for a little kick!)
Salt and freshly ground black pepper, to taste
For the Sauce (Optional but highly recommended!):
1 tablespoon butter
1 shallot, finely minced
1/2 cup dry white wine (or chicken broth)
1 cup chicken broth
1/4 cup heavy cream (or half-and-half for a lighter option)
1 tablespoon fresh lemon juice
Salt and freshly ground black pepper, to taste
Step-by-Step Instructions
Step 1: Preheat & Prep Pan
First things first, let’s get your oven ready. Preheat it to 375°F (190°C). Now, grab a large, oven-safe skillet – one that you can use on the stovetop and then transfer directly into the oven. If you don’t have an oven-safe skillet, no worries! You can sear the chicken in any skillet and then transfer the roll-ups to a baking dish. Place the skillet over medium-high heat to get it nice and hot.
Step 2: Mix Dry Ingredients
While the pan heats up, let’s get our chicken prepped. Place each chicken breast on a clean cutting board. Cover them with a piece of plastic wrap or parchment paper. Now, using a meat mallet or the flat side of a heavy pan, gently but firmly pound each chicken breast to an even thickness of about 1/4 inch. This helps them cook evenly and makes them easier to roll. Don’t go crazy and smash them to smithereens; we just want them nice and pliable. Once pounded, season both sides generously with salt and freshly ground black pepper. This is a crucial step for flavor!
Step 3: Mix Wet Ingredients
Now, let’s whip up that delicious filling. In a medium bowl, combine the softened cream cheese, shredded Parmesan cheese, chopped parsley, minced garlic, and red pepper flakes (if you’re using them). Stir everything together until it’s well combined and forms a creamy, spreadable mixture. Taste it and add a little more salt and pepper if you think it needs it. I always like to give it a little taste test here – it’s the little things, right?
Step 4: Combine
This is where the magic starts to happen! Lay one pounded chicken breast flat on your work surface. Spoon about 2 tablespoons of the cream cheese mixture onto one end of the chicken breast, spreading it evenly towards the other end, but leaving about a 1/2 inch border along the edges. Don’t overstuff it, or it’ll ooze out everywhere when you roll. Starting from the filled end, carefully but snugly roll up the chicken breast. Try to keep the filling tucked inside as you roll. Once rolled, you can secure it with a toothpick if you’re worried about it unrolling, but usually, a tight roll is enough. Repeat this with the remaining chicken breasts and filling.
Step 5: Prepare Filling
Okay, so the filling is already made in Step 3! This step is really just a placeholder to make sure you have that delicious creamy mixture ready to go before you start assembling the chicken roll ups. Remember, the key is to have it softened and thoroughly mixed so it spreads easily and evenly.
Step 6: Layer & Swirl
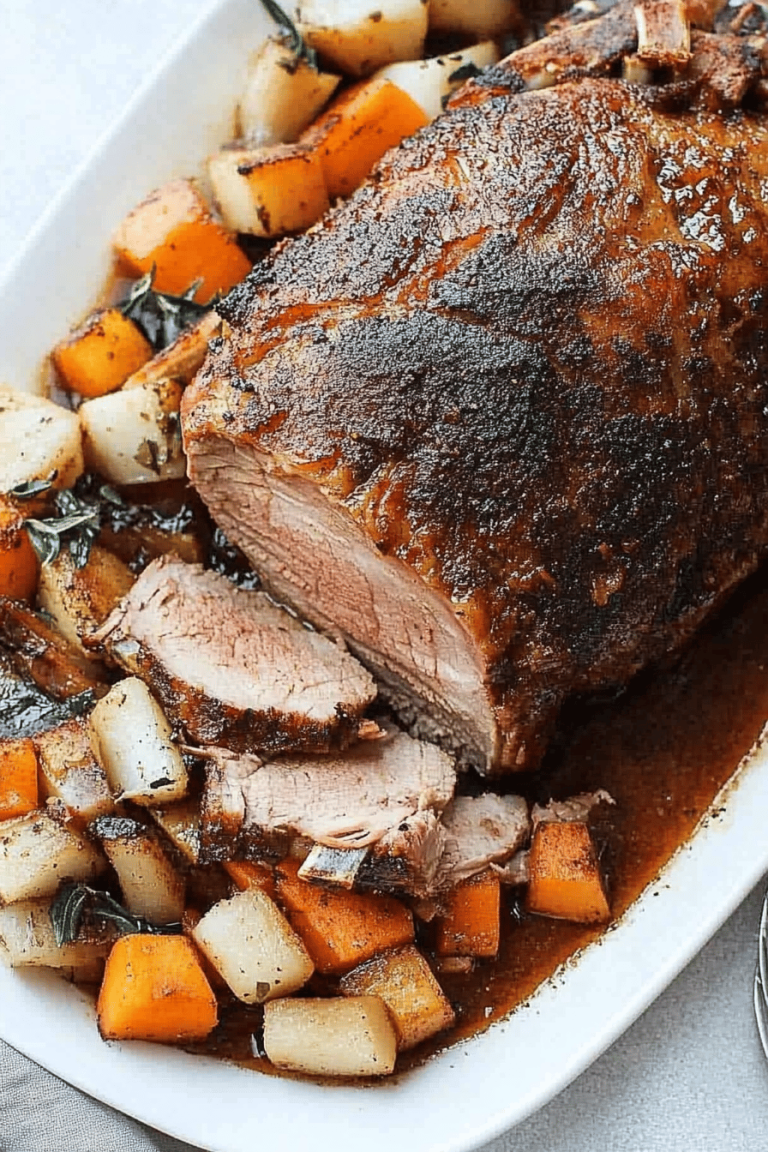
Now, let’s get those beautiful chicken roll ups seared to perfection. Drizzle the tablespoon of olive oil into your preheated oven-safe skillet. Once the oil is shimmering (but not smoking!), carefully place the chicken roll ups, seam-side down if you can manage it, into the hot skillet. Sear them for about 2-3 minutes per side, until they’re beautifully golden brown. This step is all about building that gorgeous crust and locking in the juices. It doesn’t need to be cooked through at this stage; we’re just getting some lovely color.
Step 7: Bake
Once your chicken roll ups have a nice golden-brown sear on all sides, carefully transfer the skillet to your preheated oven. Bake for about 20-25 minutes, or until the chicken is cooked through and the internal temperature reaches 165°F (74°C) on an instant-read thermometer. The cooking time will vary slightly depending on the thickness of your chicken. I usually check one to make sure it’s done. If you’re not using an oven-safe skillet, transfer the seared roll ups to a lightly greased baking dish before putting them in the oven.
Step 8: Cool & Glaze
While the chicken is baking, let’s make that optional but totally worth-it sauce. In the same skillet (if you used an oven-safe one, otherwise, use a small saucepan), melt the butter over medium heat. Add the minced shallot and sauté until softened and fragrant, about 2-3 minutes. Pour in the white wine (or chicken broth) and scrape up any browned bits from the bottom of the pan – that’s where all the flavor is! Let it simmer and reduce slightly for a couple of minutes. Then, add the chicken broth and bring to a simmer. Cook for about 5-7 minutes, allowing the sauce to reduce and thicken slightly. Stir in the heavy cream and lemon juice. Season with salt and pepper to taste. Once the chicken is done baking, remove it from the oven and let it rest in the skillet for about 5 minutes. Then, you can either spoon the sauce over the chicken in the skillet or remove the chicken to a plate and pour the sauce over it. It’s so decadent and really elevates the whole dish!
Step 9: Slice & Serve
After resting, you can slice the chicken roll ups into thick rounds or serve them whole. I personally love slicing them because it shows off that beautiful creamy filling. Serve them hot, drizzled with that luscious sauce. The aroma is just incredible, and they look so appealing!
What to Serve It With
These chicken roll ups are so wonderfully adaptable, they fit into almost any meal. For breakfast, though a bit unconventional, a small piece with a side of scrambled eggs and a sprinkle of chives is surprisingly delightful and keeps you full for hours. For a more elegant brunch, I love serving them sliced over a bed of creamy polenta or alongside a vibrant asparagus salad with a lemon vinaigrette. The richness of the roll ups is perfectly balanced by the freshness of the salad. As a dessert, well, they aren’t exactly sweet, but for a savory craving after dinner, a small, perfectly seasoned chicken roll up can be incredibly satisfying, especially if you’ve paired them with something lighter earlier. For the ultimate cozy snack, I like to have a warm piece with a side of garlic mashed potatoes or some crusty bread to sop up any leftover sauce. My family always requests these with roasted broccoli, and it’s a combination that never fails to please everyone.
Top Tips for Perfecting Your Chicken Roll Ups
I’ve made these chicken roll ups more times than I can count, and over the years, I’ve picked up a few tricks that really make a difference. For the chicken, making sure it’s pounded to an even thickness is key. If one part is super thin and another is thick, you’ll end up with some parts overcooked and dry while others are still raw. I’ve learned to use the edge of a rolling pin or even the heel of my hand to gently even out any thick spots after the initial pounding. When it comes to the filling, don’t be afraid to add extra herbs or spices! A pinch of nutmeg in the cream cheese filling adds a lovely warmth, or some finely chopped sun-dried tomatoes bring a lovely tang. I once accidentally added a tablespoon of Dijon mustard to the filling, and it was surprisingly delicious – a little zesty kick! For rolling, the tighter you roll, the less likely it is to unspool in the pan. If you’re having trouble, a toothpick can be your best friend, just remember to remove them before serving! When searing, make sure your pan is hot but not smoking. You want a beautiful golden crust, not burnt bits. And for the sauce, don’t skip deglazing the pan after searing the chicken – those brown bits are pure gold and add so much depth of flavor to the sauce. If your sauce isn’t thickening enough, a quick slurry of cornstarch and water (about 1 teaspoon cornstarch mixed with 2 teaspoons water) can work wonders. Just stir it in and let it simmer for a minute or two.
Storing and Reheating Tips
Leftovers are a beautiful thing, especially with these chicken roll ups! If you happen to have any (which is rare in my house!), you can store them at room temperature for no more than two hours. For longer storage, I always put them in an airtight container in the refrigerator. They’ll stay good in the fridge for about 3-4 days. The sauce can be stored separately if you prefer, or with the chicken, depending on how moist you want it upon reheating. If you plan to freeze them, I’d recommend doing so *before* adding the sauce. Wrap each roll up tightly in plastic wrap, then place them in a freezer-safe bag or container. They can last in the freezer for up to 2-3 months. To reheat, if they’re chilled, the best method is to pop them back into a moderately hot oven (around 350°F or 175°C) for about 15-20 minutes until warmed through. You can also gently reheat them on the stovetop in a skillet with a little bit of broth or water to prevent them from drying out. If they were frozen, thaw them in the refrigerator overnight before reheating. If you’ve frozen them with sauce, it’s best to reheat them gently on the stovetop over low heat, stirring occasionally.
Frequently Asked Questions
Final Thoughts
So there you have it – my beloved chicken roll ups! I truly hope you give this recipe a try. It’s one of those dishes that feels a little bit fancy but is so achievable, making it perfect for weeknights or when you want to impress someone without spending hours in the kitchen. The tender chicken, the creamy, flavorful filling, and that luscious sauce (if you choose to make it!) all come together to create a meal that’s truly comforting and satisfying. If you’re a fan of this recipe, you might also enjoy my recipe for [link to a creamy chicken casserole] or my easy [link to a lemon herb roasted chicken] – they have that same cozy, home-cooked vibe. I can’t wait to hear how your chicken roll ups turn out! Please leave a comment below and let me know about your experience, or share any delicious filling variations you come up with. Happy cooking!
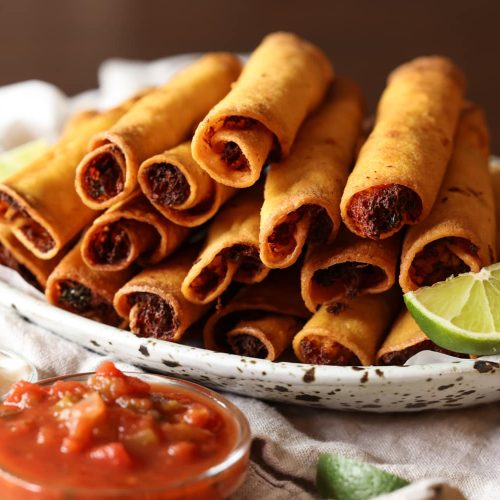
Cheesy Chicken Taquitos (Roll Ups)
Ingredients
Filling Ingredients
- 3 cups shredded cooked chicken
- 6 ounces cream cheese room temperature
- 1.5 cups Monterey Jack or Mexican blend cheese grated
- 0.25 cup cilantro chopped
- 0.5 cup salsa
- 0.33 cup sour cream
- 1 teaspoon kosher salt
- 0.5 teaspoon cumin
- 0.5 teaspoon garlic powder
- 0.5 teaspoon ground black pepper
Assembly & Frying
- 24 count corn tortillas 6-inch size
- 0.5 inch Vegetable oil for frying
Instructions
Preparation Steps
- In a large bowl, mix together shredded chicken, cream cheese, grated cheese, cilantro, salsa, sour cream, salt, cumin, garlic powder, and black pepper until well combined.
- Wrap your tortillas, 6 at a time, in a damp paper towel and microwave for 15 – 30 seconds until warmed and pliable. Keep them wrapped until you fill each to prevent cracking.
- Fill a large skillet with about 1/2-inch of vegetable oil and heat over medium heat to 350°F (175°C).
- Add about 2 tablespoons of the chicken filling to the center of a warmed tortilla, spreading it slightly, leaving room at the edge. Roll the tortilla up tightly and use metal tongs to place it seam side down in the hot oil. Secure with toothpicks if necessary.
- Cook until golden brown on both sides, about 2–3 minutes per side. Remove the taquitos from the oil, place them on paper towels to drain excess oil, and carefully remove any toothpicks.
- Repeat the filling, rolling, and frying process until all tortillas have been used.