You know, there are some desserts that just feel like a warm hug. For me, that’s always been anything cherry. There’s something about that sweet-tart burst of flavor that just takes me back to Grandma’s kitchen, the scent of baking filling our little house. But let’s be honest, sometimes a full-on double-crust pie feels like a bit of a production, right? Especially when you’re craving that cherry goodness but don’t have a whole afternoon to dedicate to rolling dough and crimping edges. That’s where this cherry slab pie comes in. It’s my absolute go-to when I need something show-stoppingly delicious without all the fuss. Think of it as the easy-going, super crowd-pleasing cousin to the traditional pie. Seriously, this cherry slab pie is a lifesaver on busy nights and a guaranteed hit at any potluck or family gathering. If you love cherry pie but want a simpler way to enjoy it, you’ve come to the right place!
What is a cherry slab pie?
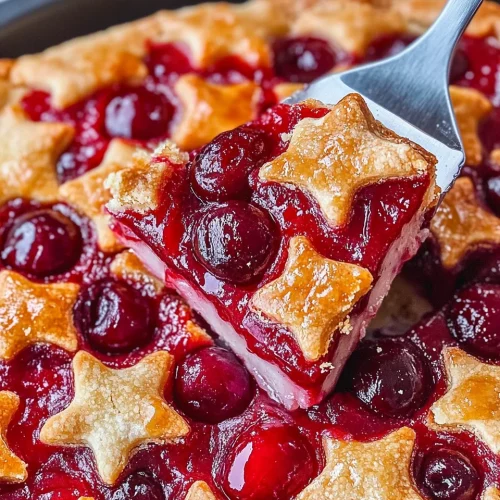
So, what exactly is a cherry slab pie? It’s pretty much what it sounds like! Instead of a round pie pan, we bake it in a rectangular baking sheet, usually a rimmed half-sheet pan. This means you get a much larger surface area of that glorious cherry filling and a beautiful, flaky crust that’s easier to slice and serve to a crowd. It’s essentially a giant, deconstructed pie that’s way less intimidating. The crust is often a simple, press-in type, meaning you don’t have to worry about rolling it out perfectly. It just needs to cover the bottom and go up the sides a bit. This makes it incredibly forgiving, even if you’re not a seasoned baker. It’s the perfect dessert for when you want that homemade pie taste and feel without the stress. Think of it as the ultimate convenience dessert that doesn’t skimp on flavor or visual appeal.
Why you’ll love this recipe?
Okay, let me tell you why this cherry slab pie is practically magic. First off, the FLAVOR. It’s just divine. The cherries, whether you use fresh or frozen, cook down into this syrupy, slightly tangy, incredibly rich filling that’s perfectly balanced. It’s not overly sweet, which I really appreciate. Then there’s the SIMPLICITY. I cannot stress this enough – this is SO easy. The crust comes together in minutes, and there’s no fiddly rolling or shaping. You just press it into the pan. It’s honestly one of the easiest crusts I’ve ever worked with. And for the filling? Just dump and stir! It’s truly a lifesaver when you’re short on time or energy. PLUS, it’s incredibly COST-EFFECTIVE. Cherries can sometimes be a bit pricier, but by making a slab pie, you’re stretching those precious fruits further and making a dessert that feeds a lot more people for less. What I love most about this recipe is its VERSATILITY. You can serve it warm, cold, as a dessert, or even as a special breakfast treat (don’t knock it ’til you try it!). It’s perfect for parties because you can slice it into so many squares, making sure everyone gets a piece. When I compare it to other fruit desserts, like a crumble or a cobbler, the slab pie really hits that sweet spot of being familiar and comforting, yet somehow more elegant and satisfying. It’s the ultimate crowd-pleaser that I know will disappear faster than you can say “more pie, please!”
How do I make a cherry slab pie?
Quick Overview
This cherry slab pie is all about ease and incredible flavor. We’ll start by pressing a simple, buttery crust right into a baking sheet. Then, we’ll whip up a quick, luscious cherry filling and pour it over the crust. A quick swirl on top and into the oven it goes! The result is a beautiful, golden-brown dessert with a tender crust and a bubbling, bright red cherry filling that smells absolutely heavenly. It’s forgiving, fast, and foolproof, making it perfect for both beginners and experienced bakers looking for a simpler approach to a classic.
Ingredients
For the main battery (crust):
3 cups all-purpose flour
1 cup granulated sugar
1 teaspoon baking powder
1/2 teaspoon salt
1 cup (2 sticks) unsalted butter, cold and cubed
1 large egg
1/4 cup milk (whole or 2%)
1 teaspoon vanilla extract
Tip: Make sure your butter is really cold! It’s key to getting that flaky texture. I usually cube it and pop it back in the fridge for about 15 minutes before I start mixing.
For the Filling:
6 cups pitted cherries, fresh or frozen (if frozen, don’t thaw)
1 cup granulated sugar (adjust to your sweetness preference)
1/4 cup cornstarch (or 1/3 cup tapioca starch)
2 tablespoons lemon juice (freshly squeezed is best!)
1 teaspoon almond extract (optional, but SO good)
1/4 teaspoon salt
Note: If using fresh cherries, you’ll want to make sure they’re nice and ripe for the best flavor. For frozen, I find it works best to just toss them in straight from the freezer; they’ll thaw and release their juices as they bake.
For the Glaze:
1/2 cup powdered sugar
1-2 tablespoons milk or lemon juice
1/4 teaspoon vanilla extract (or a tiny splash of almond extract if you used it in the filling)
Tip: You want the glaze to be pourable but not too thin. Start with 1 tablespoon of liquid and add more only if needed. It should drip nicely down the sides.
Step-by-Step Instructions
Step 1: Preheat & Prep Pan
First things first, get your oven preheating to 375°F (190°C). You’ll need a standard 10×15 inch rimmed baking sheet. I like to line mine with parchment paper, leaving an overhang on the longer sides. This makes lifting the whole pie out of the pan so much easier later. Just press the parchment into the bottom and up the sides, smoothing out any wrinkles as best you can. This makes cleanup a breeze, which is always a win in my book!
Step 2: Mix Dry Ingredients
In a large bowl, whisk together the flour, sugar, baking powder, and salt. Make sure they’re well combined. This is where you’ll cut in your cold butter. I like to use a pastry blender or even just my fingertips for this. You want to work the butter into the flour mixture until it resembles coarse crumbs with some pea-sized pieces of butter still visible. Don’t overwork it; those little butter pieces are important for flakiness.
Step 3: Mix Wet Ingredients
In a separate small bowl, whisk together the egg, milk, and vanilla extract. You can add the almond extract here too, if you’re using it. Just give it a quick whisk until everything is combined.
Step 4: Combine
Pour the wet ingredients into the dry ingredients. Now, gently mix everything together with a fork or spatula until just combined. The dough will be a bit shaggy and might not look like it’s all coming together, and that’s okay! The goal here is not to overmix, which can make the crust tough. It should form a dough that you can press into the pan.
Step 5: Prepare Filling
While the dough chills slightly (or while you’re pressing it into the pan), let’s get the filling ready. In a large bowl, gently toss your pitted cherries (fresh or frozen) with the sugar, cornstarch, lemon juice, almond extract (if using), and salt. Stir until the cherries are evenly coated. You’ll notice the cornstarch and sugar starting to create a nice thick syrup as they mix with the cherry juices. This is exactly what you want!
Step 6: Layer & Swirl
Now, take your dough and evenly press it into the prepared baking sheet. You can use your hands or the bottom of a measuring cup. Make sure it goes all the way to the edges and slightly up the sides to create a little dam for the filling. Don’t worry about perfection here; rustic is good! Pour the cherry filling evenly over the pressed crust. If you like, you can even reserve about 1/4 cup of the dough, roll it into thin ropes, and create a simple lattice pattern on top, but it’s absolutely delicious without it too!
Step 7: Bake
Pop the baking sheet into your preheated oven. Bake for about 40-50 minutes, or until the crust is golden brown and the cherry filling is bubbly and thickened. If the crust edges start to get too dark before the center is done, you can always loosely tent the edges with foil. Keep an eye on it, as oven temperatures can vary!
Step 8: Cool & Glaze
Once it’s baked to perfection, carefully remove the slab pie from the oven. Let it cool on a wire rack for at least 1-2 hours. This is crucial for the filling to set properly. While it’s cooling, whisk together the powdered sugar, 1 tablespoon of milk or lemon juice, and vanilla extract for the glaze. Add more liquid, a tiny bit at a time, until you reach a pourable consistency. Once the pie has cooled considerably, drizzle the glaze over the top. It will set slightly as it cools further.
Step 9: Slice & Serve
Once the glaze has set a bit, it’s time to slice and serve! Use the parchment paper overhang to carefully lift the pie out of the baking sheet and onto a cutting board. Cut it into squares or rectangles. It’s delicious served warm or at room temperature. A dollop of whipped cream or a scoop of vanilla ice cream is always a welcome addition!
What to Serve It With
This cherry slab pie is so wonderfully versatile, it fits in almost anywhere! For a delightful BREAKFAST, I love to serve it warm with a strong cup of coffee. The sweetness of the pie is surprisingly good with that morning jolt. For BRUNCH, I usually slice it into smaller, elegant squares and serve it alongside some fresh berries and perhaps a light yogurt parfait. A mimosa or a sparkling rosé pairs beautifully here. As a classic DESSERT, it’s obviously a star. After dinner, I like to serve it with a scoop of good quality vanilla bean ice cream or a dollop of freshly Whipped cream. It’s also fantastic with a small glass of dessert wine. And for COZY SNACKS? This is where it truly shines for me. A warm slice, perhaps enjoyed while curled up on the couch with a good book and a glass of milk, is pure comfort. My family also loves it with a light drizzle of extra cream or a sprinkle of toasted slivered almonds for added texture. I’ve even served it at casual backyard BBQs, and it’s always a huge hit. The beauty is, no matter the occasion, this cherry slab pie brings smiles!
Top Tips for Perfecting Your Cherry Slab Pie
I’ve made this cherry slab pie more times than I can count, and along the way, I’ve picked up a few tricks that really make a difference. Let’s talk about the crust first. My biggest piece of advice is to not overwork the dough. Seriously, as soon as it comes together, stop mixing. Those little pieces of cold butter are what create steam in the oven, leading to that lovely flaky texture. If you mix it too much, you’ll end up with a tough crust, and nobody wants that! For the filling, if you’re using fresh cherries, make sure they’re really ripe. The riper they are, the more flavor they’ll have, and the less sugar you’ll need. If you’re using frozen, resist the urge to thaw them! They release their juices as they bake, and thawing can make the filling a bit too watery. I’ve learned this the hard way! Another thing with the filling is the cornstarch. Make sure it’s evenly distributed before it hits the heat; otherwise, you might end up with gummy pockets. You can even whisk the cornstarch into the sugar before adding it to the cherries. For the baking, ovens really do vary. I usually bake mine on the middle rack, but if you notice the bottom crust isn’t quite browning as much as you’d like, try moving it to a slightly lower rack for the last 10-15 minutes. And speaking of doneness, look for that bubbling filling and a deeply golden crust. If the edges are browning too quickly, a little tent of foil is your best friend. For the glaze, consistency is key. You want it to drizzle nicely, not run off the pie completely. I always start with the smaller amount of liquid and add more only if needed. It’s easier to thin it out than to thicken it up! I’ve also experimented with different extracts – a touch of orange zest in the filling is lovely, or a hint of cardamom can add a wonderful warmth. Don’t be afraid to play around with it once you’ve mastered the basics!
Storing and Reheating Tips
Keeping your delicious cherry slab pie fresh is pretty straightforward, and I’ve tested a few methods to make sure it stays tasty. If you happen to have any leftovers (which is rare in my house!), you can absolutely leave it at ROOM TEMPERATURE for up to two days. Just make sure to cover it loosely with plastic wrap or foil to keep dust and anything else out. The crust tends to stay a bit crisper this way for the first day. For longer storage, the REFRIGERATOR is your best bet. I like to store it in an airtight container, or I’ll just cover the baking sheet tightly with plastic wrap. It will stay good in the fridge for about 4-5 days. The crust might soften slightly over time, but it’s still wonderfully moist and flavorful. If you want to FREEZE it, I highly recommend doing so before you add the glaze. Let the pie cool completely, then wrap it tightly in a double layer of plastic wrap, followed by a layer of aluminum foil. It can be frozen for up to 2-3 months. To thaw, simply transfer it from the freezer to the refrigerator overnight. Once thawed, you can reheat it gently in a 300°F (150°C) oven for about 10-15 minutes to crisp up the crust a bit, then add your glaze. If you’ve already glazed it, you can still freeze it, but the glaze might become a little less pristine upon thawing. Reheating after refrigeration is simple: a warm slice is heavenly, so pop it in a 300°F (150°C) oven for about 10 minutes until warmed through.
Frequently Asked Questions
Final Thoughts
So there you have it – my absolute favorite cherry slab Pie Recipe! I really hope you give this one a try. It’s one of those recipes that feels special enough for company but is also wonderfully comforting and easy enough for any day of the week. The combination of that tender, buttery crust and the vibrant, sweet-tart cherry filling is just pure bliss. It’s a dessert that brings people together, sparking conversations and creating sweet memories. If you’re a cherry lover, or even if you just appreciate a really fantastic, fuss-free dessert, this slab pie is for you. It’s the perfect way to enjoy a classic flavor in a modern, simple format. I can’t wait to hear how yours turns out! If you try it, please leave a comment below and let me know what you think, or share your own favorite variations. Happy baking, friends!
cherry slab pie
Ingredients
For the Pie Crust
- 2.5 cups all-purpose flour
- 1 teaspoon salt
- 1 cup unsalted butter very cold, cut into 1/2-inch cubes (2 sticks)
- 0.5 cup ice water plus more if needed
For the Cherry Filling
- 6 cups fresh or frozen pitted cherries if using frozen, do not thaw
- 1 cup granulated sugar
- 0.25 cup cornstarch
- 1 tablespoon fresh lemon juice
- 0.5 teaspoon almond extract
- 1 pinch salt
For Egg Wash and Topping
- 1 large egg
- 1 tablespoon water
- 2 tablespoons granulated sugar for sprinkling
Instructions
Preparation Steps
- Make the pie crust: In a large bowl, whisk together the all-purpose flour and 1 teaspoon of salt. Add the cold, cubed butter and cut it into the flour using a pastry blender or your fingertips until the mixture resembles coarse crumbs with some pea-sized pieces of butter remaining.
- Gradually add the ice water, 1 tablespoon at a time, mixing gently until the dough just comes together. Be careful not to overmix. Divide the dough in half, flatten each half into a disc, wrap tightly in plastic, and refrigerate for at least 30 minutes, or up to 2 days.
- Prepare the filling: In a large bowl, combine the pitted cherries, 1 cup of granulated sugar, cornstarch, fresh lemon juice, almond extract, and a pinch of salt. Mix gently until the cherries are evenly coated. Set aside.
- Preheat oven to 400°F (200°C). Lightly grease a 10x15-inch or 12x18-inch baking sheet (half-sheet pan).
- On a lightly floured surface, roll out one disc of dough into a large rectangle, approximately 12x18 inches, to fit your prepared baking sheet. Carefully transfer the dough to the baking sheet.
- Pour the cherry filling evenly over the bottom crust, spreading it to the edges.
- Roll out the second disc of dough into a rectangle of similar size. You can place it directly over the filling, or cut it into strips for a lattice top. Carefully place the top crust over the filling.
- Trim any excess dough from the edges, leaving about a 1/2-inch overhang. Fold the overhang under and crimp the edges to seal the top and bottom crusts together. If using a solid top crust, cut several slits in the top for steam to escape.
- In a small bowl, whisk the large egg with 1 tablespoon of water to create an egg wash. Brush the top crust evenly with the egg wash, then sprinkle with 2 tablespoons of granulated sugar.
- Bake for 20 minutes at 400°F (200°C). Reduce oven temperature to 375°F (190°C) and continue baking for another 35-40 minutes, or until the crust is golden brown and the filling is bubbly. If the crust starts to brown too quickly, loosely tent the pie with aluminum foil.
- Remove from the oven and let cool completely on a wire rack for at least 2-3 hours before slicing and serving. This allows the filling to set properly.