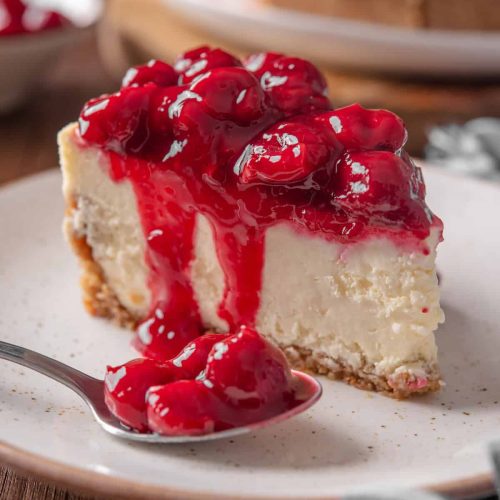
Oh, this cherry Cheesecake Recipe! It’s one of those things that just feels like a warm hug. I remember the first time I ever tried to make something like this, it was a disaster. Let’s just say the crust crumbled, the filling wouldn’t set, and the cherries looked like they’d been through a war. But over the years, through a lot of trial and error (and maybe a few tears!), I’ve landed on this version. It’s the one I pull out for special occasions, for comforting a friend, or honestly, just when I need a little something sweet and utterly delicious. It’s not quite a New York-style cheesecake, and it’s definitely not a no-bake situation. Think of it as its own glorious thing, a perfect balance of creamy, tangy, and sweet, with that burst of cherry goodness. If you’ve ever loved a classic cheesecake but wanted a little more flair, this cherry cheesecake recipe is your new best friend. It’s honestly simpler than you might think, and the result? Pure bliss.
What is a cherry cheesecake?
So, what exactly are we talking about when I say “cherry cheesecake”? Well, it’s a beautiful, creamy, baked cheesecake that’s studded with, and often topped with, bright, tart cherries. It’s not quite as dense as some of the super-traditional New York cheesecakes, nor is it as light as a chiffon. Instead, it hits this sweet spot where it’s rich and decadent without being heavy. The base is typically a graham cracker crust – that classic, buttery, crumbly foundation that everyone adores. Then, the filling is this dreamy mixture of cream cheese, sugar, eggs, and a touch of vanilla, creating a smooth, velvety texture. The cherries, oh the cherries! They can be swirled right into the batter, baked on top, or both, adding that gorgeous pop of color and a delightful contrast to the richness of the cheesecake. It’s basically a love letter to classic cheesecake, with a vibrant, fruity twist that just makes it sing. It’s the kind of dessert that makes people stop, close their eyes, and savor every single bite. It’s sophisticated enough for guests but comforting enough for a quiet night in.
Why you’ll love this recipe?
There are so many reasons why this cherry cheesecake recipe has become a staple in my kitchen, and I just know you’re going to feel the same way. First off, the **flavor**. It’s just incredible. The tang of the cream cheese is perfectly balanced by the sweetness, and when you get a bite with a warm, slightly softened cherry, it’s pure heaven. It’s not cloyingly sweet, which I really appreciate. The crust is that perfect buttery, crumbly goodness that holds everything together like a dream. And let’s talk about **simplicity**. I know cheesecake can sound intimidating, but this recipe is honestly pretty straightforward. Once you get the hang of the water bath (which isn’t as scary as it sounds, I promise!), the rest is smooth sailing. It’s not an all-day affair, and you don’t need any fancy equipment. What really makes me happy about this recipe is its **cost-effectiveness**. Cream cheese and cherries are generally budget-friendly, especially when you buy them in season or can find good deals. You get a seriously impressive dessert without breaking the bank. Plus, the **versatility** is fantastic. You can serve this cold, at room temperature, or even slightly warm. It’s perfect for a formal dinner party, a casual barbecue, or just when you’re craving something a little special. What I love most about this particular cherry cheesecake recipe is that it consistently turns out beautifully. I’ve made it dozens of times, and it never fails to impress. It’s that reliable go-to that always makes me look like a baking superstar, even on nights when I feel like I barely have time to boil water. It’s truly a crowd-pleaser, and my family always asks for it – my kids even argue over who gets the last slice!
How do I make a Cherry Cheesecake?
Quick Overview
This cherry cheesecake recipe is all about creating a luscious, creamy filling nestled in a buttery graham cracker crust, all topped with a vibrant cherry topping. We’ll start by preparing a simple crust, then whip up a smooth cream cheese filling, bake it gently in a water bath to ensure even cooking, and finish it off with a delicious cherry topping. The key to that perfect, crack-free surface is patience and gentle heat. Don’t be intimidated by the water bath; it’s the secret weapon for the silkiest texture. This method ensures your cheesecake cooks evenly and avoids those dreaded cracks that can happen with too-high heat. The end result is a dessert that’s both elegant and incredibly satisfying.
Ingredients
For the Graham Cracker Crust:
You’ll need about 1 ½ cups of graham cracker crumbs. You can buy them pre-crushed or just pulse whole graham crackers in a food processor until they’re fine crumbs – about 10-12 full crackers usually do the trick. To that, we’ll add about 6 tablespoons of melted unsalted butter. Make sure the butter is fully melted. And just a pinch of granulated sugar, maybe 2 tablespoons, to give it a little sweetness and help it bind. Sometimes I add a tiny pinch of salt too, just to enhance all those flavors. Make sure your crumbs and butter are well combined before pressing them into the pan.
For the cream cheese Filling:
This is where the magic happens! You’ll need three 8-ounce packages of full-fat cream cheese. Make absolutely sure it’s full-fat; that’s crucial for the texture. And importantly, it needs to be softened to room temperature. Cold cream cheese will give you lumps, and nobody wants that! You’ll also need 1 ¼ cups of granulated sugar, a ¼ cup of all-purpose flour (this helps prevent cracking!), and a pinch of salt. For that beautiful vanilla flavor, we’ll use 1 teaspoon of pure vanilla extract. And the final touch for richness and creaminess: 3 large eggs, also at room temperature. Some people add sour cream or heavy cream here for extra richness, but I find this combination to be just perfect.
For the Cherry Topping:
For a bright, fresh topping, you’ll need about 3 cups of fresh or frozen pitted cherries. If you’re using frozen, no need to thaw them completely; just make sure they’re not a solid ice block. We’ll also need ½ cup of granulated sugar, 2 tablespoons of cornstarch to thicken things up, and 2 tablespoons of fresh lemon juice to really make those cherry flavors pop and add a nice tang. A tablespoon of water can help get the cornstarch dissolved smoothly.
Step-by-Step Instructions
Step 1: Preheat & Prep Pan
First things first, let’s get our oven ready. Preheat it to 350°F (175°C). Now, grab a 9-inch springform pan. This is essential for easy removal later. You want to prep this pan really well, especially if you’re using the water bath method (which I highly recommend for the smoothest cheesecake). Wrap the outside of the springform pan tightly in a couple of layers of heavy-duty aluminum foil. This creates a watertight seal to prevent any water from seeping into the crust during baking.
Step 2: Mix Dry Ingredients
In a medium bowl, combine your graham cracker crumbs, granulated sugar, and that pinch of salt (if you’re using it). Give them a good stir with a fork or a whisk to make sure everything is evenly distributed. This step might seem small, but it helps ensure consistent flavor throughout the crust.
Step 3: Mix Wet Ingredients
Now, pour the melted butter into the dry ingredients. Use a fork or your hands to mix until the crumbs are evenly moistened and resemble wet sand. You want it to hold together when you squeeze a bit in your hand.
Step 4: Combine
Press this mixture firmly and evenly into the bottom and about an inch up the sides of your prepared springform pan. I like to use the bottom of a glass or a flat measuring cup to get it really compact. A firm crust helps hold the cheesecake together. Bake the crust for about 8-10 minutes, until it’s lightly golden and fragrant. This pre-baking step helps set the crust and prevents it from becoming soggy. Once baked, remove it from the oven and let it cool slightly while you prepare the filling.
Step 5: Prepare Filling
In a large bowl, beat the softened cream cheese with an electric mixer on medium speed until it’s completely smooth and creamy. Make sure there are no lumps – this is key! Gradually add the granulated sugar and the all-purpose flour, beating until just combined. Don’t overmix at this stage. Then, mix in the vanilla extract and the pinch of salt. Finally, add the eggs, one at a time, beating on low speed just until each egg is incorporated. Be careful not to overbeat once the eggs are in, as this can introduce too much air, which can lead to cracking. Scrape down the sides and bottom of the bowl as needed to ensure everything is well combined and smooth.
Step 6: Layer & Swirl
Pour about half of the cream cheese filling over the pre-baked crust. Spoon about half of the prepared cherry topping (we’ll make this next!) over the filling. Then, pour the remaining cream cheese filling on top, and finish with the rest of the cherry topping. Now for the fun part! Use a knife or a skewer to gently swirl the cherry topping into the cream cheese filling. Don’t over-swirl; you want distinct ribbons of cherry, not a completely uniform pink.
Step 7: Bake
Carefully place your foil-wrapped springform pan into a larger baking pan, like a roasting pan. Pour enough hot water into the larger pan to come about halfway up the sides of the springform pan. This is your water bath, and it creates a steamy, gentle environment for the cheesecake to bake, ensuring a smooth, creamy texture and preventing cracks. Bake for 50-65 minutes, or until the edges are set and the center is still slightly wobbly (like Jell-O) when you gently nudge the pan.
Step 8: Cool & Glaze
Once baked, turn off the oven, crack the oven door open slightly, and let the cheesecake cool in the oven for about an hour. This gradual cooling process is another important step to prevent cracking. After an hour, remove the cheesecake from the water bath and let it cool completely on a wire rack. Once it’s at room temperature, cover it loosely with plastic wrap and refrigerate for at least 6 hours, or preferably overnight. For the glaze, in a small saucepan, whisk together the cherries, sugar, cornstarch, lemon juice, and water. Cook over medium heat, stirring constantly, until the mixture thickens and becomes glossy. Let it cool completely before spooning it over the chilled cheesecake.
Step 9: Slice & Serve
To slice, use a thin, sharp knife dipped in hot water and wiped dry between each cut. This will give you clean, beautiful slices. Serve chilled. It’s already perfect on its own, but a dollop of whipped cream or a few extra fresh cherries never hurt anyone!
What to Serve It With
This cherry cheesecake is so versatile, it honestly shines on its own. But if you’re looking to create a whole spread, here are some of my favorite pairings!
For Breakfast: While it’s more of a dessert, a small sliver of this cheesecake with a strong cup of coffee is my secret indulgence on a slow weekend morning. It feels wonderfully decadent! For a slightly more brunch-appropriate pairing, a light, fruity granola or some fresh berries on the side can lighten it up beautifully.
For Brunch: If you’re hosting a brunch, this cheesecake is a showstopper. Serve it alongside a fresh fruit salad – think melon, berries, and kiwi – to offer a lighter counterpoint. A mimosa or a glass of chilled sparkling rosé would be absolutely perfect with the creamy, tangy flavors of the cheesecake.
As Dessert: This is its natural habitat! After a hearty meal, a slice of cherry cheesecake is pure perfection. It pairs wonderfully with coffee or a digestif. For an extra touch, a drizzle of chocolate sauce or a scoop of vanilla bean ice cream can elevate it even further. My family loves it with a side of fresh raspberries for an extra pop of tartness.
For Cozy Snacks: Sometimes, you just need a treat. A small wedge with a cup of tea on a chilly afternoon is incredibly comforting. It’s also surprisingly good with a glass of milk for a more nostalgic, childhood-reminiscent treat. My kids sometimes ask for just a tiny piece after school, and I can’t ever say no!
Top Tips for Perfecting Your Cherry Cheesecake
Over the years, I’ve learned a few tricks that really make a difference in getting that perfect cheesecake every single time. Trust me, these little tips are game-changers!
Cream Cheese Prep: I can’t stress this enough: your cream cheese MUST be at room temperature. I mean it. I’ve tried rushing it by microwaving it, and it never turns out quite right – it gets a weird texture. Let it sit out for a good couple of hours. It should feel soft and yielding when you press it. This ensures a super smooth, lump-free filling.
Mixing Advice: When you’re mixing the filling, especially after adding the eggs, be gentle. Overmixing incorporates too much air, which causes the cheesecake to puff up dramatically in the oven and then sink and crack as it cools. Mix on low speed, and just until things are combined. Scrape down the bowl often to make sure everything is incorporated without overworking the batter.
Water Bath Wisdom: The water bath is your best friend for a creamy, crack-free cheesecake. Make sure your foil wrapping is super secure! I use heavy-duty foil and two layers. The steam created by the water gently cooks the cheesecake, preventing it from drying out or cooking too quickly, which is what leads to cracks. Don’t skip this step! If you’re nervous about water seeping in, you can even put your foil-wrapped springform pan inside a sturdy roasting bag before placing it in the water bath.
Gradual Cooling is Key: Another common mistake is taking the cheesecake out of the oven and immediately trying to cool it down rapidly. This temperature shock can cause cracks. That’s why we do the hour in the turned-off oven with the door ajar, and then cooling it completely on the rack before refrigerating. Patience here pays off big time for that smooth finish.
Ingredient Swaps: For the crust, if you don’t have graham crackers, digestive biscuits or even vanilla wafers work well! Just adjust the sugar slightly if they are sweeter. For the cherries, if fresh aren’t available, frozen are great. Just be sure to drain them a bit more if they release a lot of liquid. If you want a less tart topping, you can reduce the lemon juice slightly.
Glaze Consistency: If your cherry topping seems too thin, you can mix a bit more cornstarch with a tablespoon of water and stir it in while it’s simmering. If it’s too thick, a splash more water or cherry juice can thin it out. You want a nice, thick but pourable consistency.
Storing and Reheating Tips
Proper storage is key to keeping your delicious cherry cheesecake tasting its best. I’ve found these methods work wonderfully.
Room Temperature: Honestly, I don’t recommend leaving it out for too long. If it’s been sitting out for a couple of hours after serving, that’s usually fine, especially if your house is on the cooler side. But for anything longer than that, it’s best to get it into the fridge to maintain its texture and prevent spoilage.
Refrigerator Storage: This is the most common and best way to store leftover cheesecake. Once it’s completely cooled and has been refrigerated for at least 6 hours (ideally overnight), you can cover it tightly with plastic wrap or place it in an airtight container. It will stay delicious in the refrigerator for up to 4-5 days. The flavor often even gets better on the second day as the flavors meld together.
Freezer Instructions: If you need to store it for longer, freezing is a great option. It’s best to freeze the cheesecake *before* adding the final cherry glaze, if possible. Wrap the chilled, unglazed cheesecake very tightly in a couple of layers of plastic wrap, then a layer of aluminum foil. It can be stored in the freezer for up to 1-2 months. To thaw, remove the foil and plastic wrap and let it thaw slowly in the refrigerator overnight. Once thawed, you can add your freshly made glaze.
Glaze Timing Advice: For refrigerator storage, I usually add the glaze right before serving or the day I plan to serve it. If I’m freezing it, I’ll make the glaze fresh when I thaw the cheesecake. This keeps the glaze from making the cheesecake too soggy.
Frequently Asked Questions
Final Thoughts
Honestly, making this cherry cheesecake recipe feels like a little act of love. It’s a dessert that’s both beautiful and incredibly satisfying, and the process itself is so rewarding. The creamy filling, the buttery crust, and those bursts of sweet-tart cherries just come together in perfect harmony. It’s the kind of dessert that makes people ask for the recipe, and that’s always the biggest compliment, right? Whether you’re celebrating a special occasion or just want to treat yourself, I truly believe this recipe is worth the effort. It’s adaptable, delicious, and brings a smile to everyone’s face. If you love classic cheesecake but want a vibrant, fruity twist, this is for you. Don’t be afraid to give it a try – I know you’ll love the results!
I can’t wait to hear how yours turns out! Please leave a comment below and let me know your thoughts, any variations you tried, or even if you have your own cherished cheesecake memories to share. Happy baking!
Cherry Cheesecake
Ingredients
Crust Ingredients
- 1.75 cups Graham Cracker Crumbs about 15 full crackers
- 0.333333 cup butter melted
- 0.25 cup granulated sugar
- 0.5 teaspoon kosher salt
Cheesecake Filling Ingredients
- 32 ounces cream cheese room temperature, 4 (8-ounce) packages
- 1 cup granulated sugar
- 0.5 cup sour cream room temperature
- 2 teaspoons vanilla
- 3 eggs room temperature
Topping
- 2.5 cups homemade cherry pie filling or use store-bought
Instructions
Preparation Steps
- Preheat oven to 350°F. Double-wrap the bottom of the 9-inch springform pan with foil, sealing it tightly to prevent water from getting into the pan.
- In a large bowl mix the graham cracker crumbs, melted butter, granulated sugar, and salt together evenly.
- Press the mixture into the bottom and up the sides of a 9-inch springform pan.
- Bake the crust for 8-10 minutes, or until lightly golden. Set the crust aside to cool slightly while you make the cheesecake filling.
- In the bowl of your stand mixer fitted with the paddle attachment, mix the cream cheese and sugar on medium speed until smooth, scraping the sides of the bowl as necessary.
- Turn the mixer to low and add the sour cream and vanilla; mix well, scraping the sides of the bowl to ensure everything is mixed evenly.
- Add in the eggs one at a time, mixing on low speed after each addition just until mixed. Do not over-mix.
- Pour the filling over the crust and spread evenly. If the crust is still warm, this is ok.
- Make a water bath: Place the springform pan into a larger, roasting pan. Pour very hot water into the larger pan around the springform pan, until it’s about 3/4 inch deep, careful to make sure the water level doesn’t come up higher than the foil.
- Bake for 60-70 minutes or until the center is almost set. The center will still jiggle while the edges will be set.
- Carefully run a knife around the rim of the pan to loosen the cheesecake.
- Allow the cheesecake to cool at room temperature for at least an hour, then cover and transfer into the refrigerator for 6 hours or overnight.
- Top with cherry pie filling when ready to serve.
- Release the sides of the springform pan before slicing.