Oh my goodness, where do I even begin with these cheesy onion rings? If you’ve been following my little corner of the internet for a while, you know I have a soft spot for anything fried and fabulous. But these? These are in a league of their own. I remember the first time I stumbled upon a recipe that hinted at this level of deliciousness. It was a rainy Tuesday, I was craving something comforting and indulgent, and my fridge was looking a bit sad. I dug through my pantry, unearthed some forgotten onions and a sprinkle of cheese, and decided to get creative. What emerged from my oven (yes, oven – I’ll get to that!) was pure magic. These cheesy onion rings are so ridiculously good, so crispy on the outside and impossibly tender and flavorful on the inside, that they’ve become a regular feature in my kitchen. They’re honestly better than any takeout version I’ve ever had, and that’s saying something!
What are Cheesy Onions Rings?
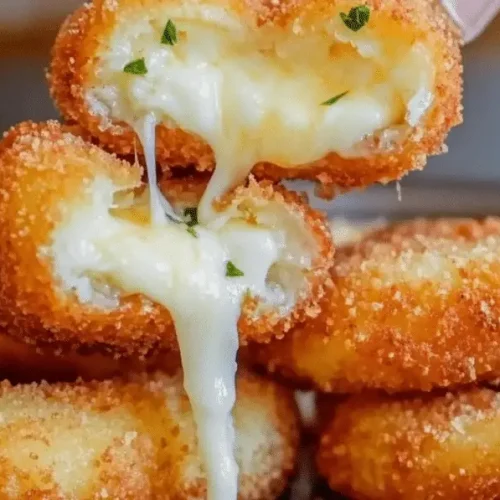
So, what exactly are these wondrous cheesy onion rings? Think of your classic, beloved onion rings – that satisfying crunch, that sweet, mellow onion flavor. Now, imagine infusing that with a gooey, slightly sharp, absolutely irresistible cheesy goodness. That’s what we’re talking about! These aren’t just onion rings with cheese sprinkled on top. Oh no, this recipe involves weaving that cheese *into* the batter, creating these incredible pockets of molten joy that cling to every bite. The name itself, “cheesy onion rings,” really does say it all, but it doesn’t quite capture the sheer delight that happens when you bite into one. It’s comfort food elevated, a simple concept made extraordinary with a few key additions. It’s the perfect blend of familiar and surprising, and I promise, once you try them, you’ll understand.
Why you’ll love this recipe?
There are so many reasons why I’m absolutely obsessed with this cheesy onion ring recipe, and I have a feeling you will be too! Firstly, the flavor. Oh, the flavor! You get that initial satisfying crunch, then the sweet, slightly caramelized onion, and then BAM – that burst of melted cheese. It’s a symphony of textures and tastes that just works so beautifully together. And the best part? They’re surprisingly simple to make. I know “fried” often conjures up images of complicated processes and messy kitchens, but this recipe is remarkably straightforward. I’ve actually adapted it over the years to be mostly baked, which makes it so much more approachable for a weeknight treat. Plus, let’s talk about cost-efficiency. Onions and cheese are staples, and the other ingredients are pantry finds. This means you can whip up a batch of pure joy without breaking the bank. What I love most about this is how versatile they are. They’re fantastic as an appetizer, a side dish for burgers, or even a fun snack when you’re just craving something delicious. They’re like the ultimate crowd-pleaser. If you’re a fan of my Crispy Baked Zucchini Fries. or my Garlic Parmesan Potato Wedges., you are going to absolutely adore these cheesy onion rings. They hit all those same comforting, savory notes but with their own unique charm.
How to Make Cheesy Onion Rings
Quick Overview
In a nutshell, we’re going to make a simple, flavorful batter, then toss our sliced onions into it, ensuring they’re fully coated. We’ll then add our secret cheesy weapon and bake them until they’re golden brown and impossibly crispy. The magic happens in the combination of textures and the way the cheese melts and crisps up. It’s a fuss-free approach that delivers maximum flavor with minimum effort, perfect for when you need a delicious treat without all the usual kitchen drama.
Ingredients
For the Main Batter:
1 cup all-purpose flour (I always use unbleached – I find it gives a slightly better texture)
1/2 cup cornstarch (this is key for that extra crispiness!)
1 teaspoon baking powder
1/2 teaspoon salt
1/4 teaspoon black pepper
1/4 teaspoon garlic powder
1 cup milk (whole milk is my preference for richness, but 2% works too)
1 large egg, lightly beaten
For the Filling:
1 1/2 cups shredded sharp cheddar cheese (or a blend of cheddar and Monterey Jack for extra meltiness – I’ve even tossed in some pepper jack for a little kick!)
1 large yellow or sweet onion, sliced into 1/4-inch thick rings (the sweeter, the better in my opinion)
For the Glaze:
1/4 cup melted butter (unsalted is best)
1 tablespoon chopped fresh parsley (optional, for a touch of freshness and color)
Step-by-Step Instructions
Step 1: Preheat & Prep Pan
First things first, let’s get our oven fired up to 400°F (200°C). You’ll want to grab a large baking sheet and line it with parchment paper. This is my little trick for ensuring easy cleanup and preventing any sticking. If you don’t have parchment, a lightly greased baking sheet will do, but parchment is truly a lifesaver!
Step 2: Mix Dry Ingredients
In a large bowl, whisk together the flour, cornstarch, baking powder, salt, black pepper, and garlic powder. Give it a good stir to make sure everything is evenly distributed. You want a nice, uniform mixture before we add the wet ingredients.
Step 3: Mix Wet Ingredients
In a separate, medium-sized bowl, whisk together the milk and the lightly beaten egg. Just a quick whisk until they’re combined. The egg helps bind everything together and gives the batter a nice richness.
Step 4: Combine
Now, pour the wet ingredients into the bowl with the dry ingredients. Whisk gently until just combined. A few small lumps are totally okay – in fact, it’s better if you don’t overmix! Overmixing can lead to tougher onion rings, and we definitely don’t want that. We’re aiming for a batter that’s about the consistency of pancake batter, maybe just a touch thicker.
Step 5: Prepare Filling
This is where the magic happens! Gently separate your sliced onion rings. You want nice, individual rings. Now, take about half of your shredded cheese and sprinkle it into your batter. Stir it in just enough to distribute it. This ensures that cheesy goodness is incorporated throughout the batter, not just sitting on top.
Step 6: Layer & Swirl
This step requires a little finesse. Take a baking sheet lined with parchment paper. Arrange your onion rings in a single layer as much as possible. Now, spoon the cheesy batter over the onion rings, making sure each ring gets a good coating. Don’t worry about perfection here; a little unevenness adds character! Then, sprinkle the remaining shredded cheese over the top of the battered onion rings. This will create those delightfully crispy, cheesy bits that bake onto the rings.
Step 7: Bake
Pop the baking sheet into your preheated oven. We’re going to bake these for about 20-25 minutes. About halfway through, around the 10-12 minute mark, I like to carefully flip them. This helps ensure they get golden brown and crispy on all sides. Keep an eye on them, as ovens can vary!
Step 8: Cool & Glaze
Once they’re beautifully golden brown and irresistibly crispy, remove them from the oven. While they’re still hot, brush them with the melted butter. This adds another layer of flavor and helps them stay wonderfully crisp. Sprinkle with fresh parsley if you’re using it. Let them cool for just a few minutes before serving. They’re best enjoyed warm!
Step 9: Slice & Serve
These cheesy onion rings are typically served whole, allowing that glorious cheesy coating to shine. They’re best eaten right after they come out of the oven, while they’re still warm and the cheese is perfectly gooey and slightly crisp. I usually just arrange them on a platter, but you could also serve them in individual bowls. The key is to get them to your happy eaters as quickly as possible!
What to Serve It With
These cheesy onion rings are incredibly versatile and can honestly fit into almost any meal. For breakfast, they’re a surprisingly fun and savory addition, especially alongside some scrambled eggs or a simple breakfast sausage. Imagine a little platter of these alongside your morning coffee – it’s a treat! For a more elegant brunch, they make a fantastic appetizer or side dish that feels a bit special. Serve them with a dollop of sour cream or a tangy aioli for an extra touch of indulgence. As dessert? Hear me out! While they’re savory, the sweetness of the onion and the richness of the cheese can be surprisingly satisfying after a meal, especially if you’re not a huge fan of super sweet desserts. They’re perfect for those moments you want something comforting and decadent but not overtly sugary. And of course, for cozy snacks, they are unparalleled. They’re my go-to when we’re having a movie night or just want a little something to nibble on. They pair wonderfully with a cold beverage, whether it’s a craft beer, a glass of white wine, or even just a fizzy soda. My family loves them piled high on a plate next to burgers and fries, but honestly, they’re so good I could eat them all by themselves!
Top Tips for Perfecting Your Cheesy Onion Rings
Over the years, I’ve learned a few tricks that really elevate these cheesy onion rings from good to absolutely phenomenal. So, let’s dive into some of my top tips! First, for the onion prep: I always try to use a yellow or sweet onion because their natural sweetness really comes through and balances the savory cheese. Make sure to slice them about 1/4-inch thick. Too thin and they might burn, too thick and they might not cook through properly. When mixing the batter, remember what I said about not overmixing! It’s so important for that tender texture. You want a few small lumps; it means you haven’t developed the gluten too much. For swirl customization, while this recipe focuses on a simple batter, if you wanted to get fancy, you could divide the batter and color half with a tiny bit of paprika or turmeric for visual appeal before swirling, though I usually keep it simple. Ingredient swaps are fun too! If you’re not a fan of cheddar, try Gruyere for a nuttier flavor or even a sharp provolone. And for a little heat, a pinch of cayenne pepper in the batter is fantastic. Baking tips are crucial: make sure your oven is fully preheated. Using parchment paper is a game-changer for easy cleanup and even crisping. If your rings are crowding the pan, they’ll steam instead of crisping, so do them in batches if needed. Don’t be afraid to let them get golden brown – that’s where the best flavor is! For glaze variations, while melted butter is my go-to, you could mix in a little smoked paprika or a tiny pinch of garlic powder into the butter for an extra flavor boost.
Storing and Reheating Tips
Now, if by some miracle you have leftovers (it rarely happens in my house!), here’s how I like to store and reheat them. At room temperature, they’re best enjoyed within a couple of hours. If you need to store them for longer, I’d move them to the refrigerator. Pop them into an airtight container, and they should stay good for about 2-3 days. When it comes to reheating, the key is to bring back that glorious crispiness. The microwave is generally a no-go for fried foods, as it makes them soggy. Instead, I highly recommend popping them back into a 350°F (175°C) oven for about 5-7 minutes, or until they’re heated through and crispy again. If you’re in a real rush, a toaster oven works wonders too! For freezer instructions, I’d cool them completely, then flash-freeze them on a baking sheet before transferring them to a freezer-safe bag or container. They can last in the freezer for about 2-3 months. Thaw them overnight in the refrigerator before reheating in the oven. Regarding glaze timing, I always add the butter glaze *after* baking and immediately before serving for maximum impact. If you’re storing them, it’s best to reheat and then add the glaze fresh.
Frequently Asked Questions
Final Thoughts
Honestly, making these cheesy onion rings brings me so much joy, and I truly hope they bring you the same amount of happiness. They’re the perfect example of how a few simple ingredients can transform into something truly spectacular. The combination of that crispy coating, the sweet onion, and the savory, gooey cheese is just irresistible. They’re proof that you don’t need to be a gourmet chef to create amazing food. I love that they can be a fun appetizer for a gathering, a comforting side dish for a casual meal, or just a delightful treat for yourself. If you’re a fan of savory snacks and baked goodness, you absolutely have to give these a try. And if you’ve loved my other baked vegetable recipes like my Parmesan Roasted Broccoli, you’re going to find these incredibly satisfying. I can’t wait to hear what you think! Please, let me know in the comments below how yours turn out, or if you’ve discovered any fun variations. Happy baking (and eating)!
Cheesy Onion Rings
Ingredients
Main Ingredients
- 2 large onions sliced into 0.5 cm rings
- 1 cup all-purpose flour
- 0.5 cup grated Parmesan cheese
- 0.5 cup bread crumbs
- 1 teaspoon paprika
- 0.5 teaspoon garlic powder
- 0.25 teaspoon salt
- 0.25 teaspoon black pepper
- 2 large eggs beaten
- 0.5 cup milk
- 4 cup vegetable oil for frying
Instructions
Preparation Steps
- In a shallow dish, whisk together the flour, Parmesan cheese, bread crumbs, paprika, garlic powder, salt, and pepper.
- In another shallow dish, whisk together the eggs and milk.
- Dip each onion ring first into the egg mixture, letting excess drip off, then dredge it in the flour mixture, ensuring it's well coated. Place coated rings on a plate.
- Heat the vegetable oil in a large, heavy-bottomed pot or Dutch oven over medium-high heat to 375°F (190°C).
- Carefully fry the onion rings in batches, without overcrowding the pot, for 2-3 minutes per side, until golden brown and crispy. Use a slotted spoon to remove them from the oil.
- Drain the fried onion rings on a wire rack set over a baking sheet or on paper towels.
- Serve immediately with your favorite dipping sauce.