There are some recipes that just feel like a warm hug. This one? This is my go-to when I need a serious chocolate fix, or when unexpected guests pop over and I want to impress them with minimal fuss. Honestly, these candy bar brownies are less of a recipe and more of a dessert revelation. They’re fudgy, gooey, packed with chocolatey goodness, and have that little something extra that makes people ask, “What *is* in these?” If you love a classic brownie, but crave that delightful surprise of candy bar bits melting into every bite, then you are in for a treat. Forget your plain old brownies; we’re talking about elevating them to a whole new level of delicious. This is for anyone who believes more chocolate, and more textures, is always better. Trust me, once you try these candy bar brownies, your regular brownie recipe might just gather dust.
What are candy bar brownies?
So, what exactly are these magical things I’m calling candy bar brownies? Think of your absolute favorite fudgy brownie. Now, imagine chopping up your favorite candy bars – the ones with the caramel, the nougat, maybe a bit of crunch – and folding them right into that brownie batter. As they bake, the chocolate in the candy bars melts and swirls into the brownie, creating these pockets of pure, unadulterated deliciousness. The caramel gets wonderfully gooey, the nougat adds a chewy surprise, and if you’ve got something with nuts or crispies, you get a fantastic textural contrast. It’s essentially taking a classic treat and giving it a decadent, surprise party! They’re like a treasure hunt in every bite, and the sweet, rich aroma that fills your kitchen while they bake is just intoxicating. It’s brownies, but with a thrilling, delicious upgrade.
Why you’ll love this recipe?
Oh, where do I even begin with why I adore this recipe? First off, the flavor is just out of this world. You get the deep, rich chocolate of the brownie itself, then the bursts of gooey caramel, chewy nougat, and whatever other delightful bits are hiding in your chosen candy bars. It’s a symphony of sweet, salty, and chocolatey notes that dance on your tongue. And the texture! You have the tender, fudgy brownie base contrasted with those melty, chewy, and sometimes crunchy elements from the candy. It’s a textural masterpiece.
What I also love is how surprisingly simple this is. Despite tasting like you spent hours in a professional bakery, it comes together really quickly. It’s one of those recipes that’s perfect for a weeknight when you need a serious sweet fix but don’t have a lot of time. Plus, it’s incredibly cost-efficient! You can often use up leftover candy bar bits or buy a few of your favorites without breaking the bank. And let’s talk versatility! You can customize these candy bar brownies to your heart’s content. My kids have very specific candy bar requests (usually anything with peanut butter!), but you can go with classic Snickers, Reese’s Peanut Butter Cups, Twix, you name it. It’s a forgiving recipe, too. I’ve even tossed in some chocolate chips for good measure on occasion. If you’re a fan of my classic chewy chocolate chip cookies, I think you’ll really appreciate the textural interplay here. It’s that same sense of comfort and indulgence, just in a different, brownie-shaped package.
How do I make candy bar brownies?
Quick Overview
Making these incredible candy bar brownies is a straightforward process that will have you enjoying a slice of heaven in no time. We start by whipping up a rich, fudgy brownie batter from scratch, then we fold in chopped candy bars for those delightful surprises. Everything gets baked together until perfectly gooey and set, then cooled before a simple glaze is added for that extra touch of indulgence. It’s truly one of the easiest ways to create an impressive dessert that tastes like it came from a gourmet bakery.
Ingredients
For the Main Batter:
1 cup (2 sticks) unsalted butter, melted. Using good quality butter really makes a difference here; it adds such a lovely richness.
2 cups granulated sugar. This is essential for that classic sweet brownie flavor and fudgy texture.
4 large eggs, at room temperature. Room temperature eggs incorporate more easily and create a smoother batter.
1 teaspoon vanilla extract. Don’t skip this! It enhances all the chocolate flavors.
1 cup all-purpose flour. Just enough to bind everything together without making the brownies cakey.
3/4 cup unsweetened cocoa powder. I always opt for Dutch-process cocoa powder for a deeper, darker chocolate flavor.
1/2 teaspoon baking powder. This helps with a little lift, but we still want them super fudgy!
1/4 teaspoon salt. Balances the sweetness and brings out the chocolate notes.
1 cup semi-sweet chocolate chips. I like to add these for extra chocolatey pockets, but you can omit if you’re strictly a candy bar person.
For the Filling:
2 cups chopped your favorite candy bars. This is where the magic happens! Think Snickers, Reese’s Peanut Butter Cups, Twix, or a mix. Chop them into bite-sized pieces so they distribute evenly. Smaller pieces tend to melt more into the batter, while larger chunks give more distinct “surprises.”
For the Glaze (Optional, but highly recommended!):
1 cup powdered sugar. Sifted to avoid lumps.
2 tablespoons milk (or heavy cream for extra richness). Start with less and add more until you reach your desired consistency.
1/2 teaspoon vanilla extract. For a touch of sweetness and aroma.
Step-by-Step Instructions
Step 1: Preheat & Prep Pan
First things first, let’s get our oven ready. Preheat it to 350 degrees Fahrenheit (175 degrees Celsius). Now, grab a 9×13 inch baking pan. You want to prepare it so your beautiful brownies don’t stick. I usually grease it generously with butter or cooking spray, and then line it with parchment paper, leaving some overhang on the sides. This parchment paper sling is a lifesaver for lifting the brownies out cleanly later!
Step 2: Mix Dry Ingredients
In a medium bowl, whisk together the flour, cocoa powder, baking powder, and salt. Give it a good whisk to make sure everything is well combined and there are no clumps of cocoa. This ensures an even distribution of leavening and flavor throughout your brownies. Set this bowl aside for now.
Step 3: Mix Wet Ingredients
In a large bowl, combine the melted butter and granulated sugar. Whisk them together until they’re well incorporated and the mixture looks smooth. Then, crack in your eggs, one at a time, whisking well after each addition. Finally, stir in the vanilla extract. The mixture should look glossy and slightly thickened.
Step 4: Combine
Now, it’s time to bring our wet and dry ingredients together. Gradually add the dry ingredients from Step 2 to the wet ingredients in the large bowl. Gently fold them together with a spatula or wooden spoon until *just* combined. Be careful not to overmix! Overmixing can develop the gluten in the flour, leading to tougher brownies, and we want them wonderfully fudgy.
Step 5: Prepare Filling
If you haven’t already, chop up your favorite candy bars. I like to get them into roughly 1/2-inch pieces. This size ensures you get a good mix of candy in every bite without them completely disappearing or making the batter too heavy. If you’re using chocolate chips, have them ready to go.
Step 6: Layer & Swirl
Pour about half of the brownie batter into your prepared baking pan and spread it evenly. Sprinkle about half of your chopped candy bars and chocolate chips over this layer. Then, dollop the remaining brownie batter over the candy. Finally, scatter the rest of the candy bar pieces and chocolate chips on top. You can use a knife or skewer to gently swirl the candy and batter together a little bit. Don’t go crazy, just a few swirls to create nice patterns and ensure pockets of candy throughout.
Step 7: Bake
Pop that pan into your preheated oven. Bake for 25-35 minutes. The baking time can vary depending on your oven and how gooey you like your brownies. A toothpick inserted into the center should come out with moist crumbs attached, not wet batter. If it comes out completely clean, they might be a little overbaked for that perfect fudgy texture, but still delicious!
Step 8: Cool & Glaze
This is a crucial step for achieving that perfect texture! Let the brownies cool completely in the pan on a wire rack. Seriously, resist the urge to cut into them while they’re warm – I know it’s hard! Once they’re cooled, you can mix up the glaze. In a small bowl, whisk together the powdered sugar, milk, and vanilla extract until smooth and drizzle-able. If it’s too thick, add a tiny bit more milk; if it’s too thin, add more powdered sugar. Drizzle this over the cooled brownies and let the glaze set a bit. This adds an extra layer of sweetness and a beautiful finish.
Step 9: Slice & Serve
Once the glaze has set (or if you skipped the glaze), use the parchment paper overhang to carefully lift the brownies out of the pan onto a cutting board. Use a sharp knife to cut them into squares. For really clean cuts, you can wipe your knife between slices. Serve them at room temperature for the best fudgy, gooey experience. Enjoy every single bite!
What to Serve It With
These candy bar brownies are so versatile, they fit in everywhere! For a casual breakfast treat alongside a steaming mug of coffee, they’re a delightful indulgence. I sometimes cut them into smaller squares and serve them as part of a weekend brunch spread, maybe with some fresh fruit salad and yogurt. They’re fantastic as a dessert, of course, especially after a hearty meal. I love serving them slightly warmed with a scoop of vanilla bean ice cream melting into the gooey center – pure bliss! And for those cozy snack times, when you just need something sweet to curl up with on the couch, a square (or two!) of these brownies with a glass of cold milk is absolute comfort food. My family has a tradition of making these around the holidays, using up leftover Halloween or Christmas candy. It’s become a beloved part of our celebrations, and the kids always look forward to it!
Top Tips for Perfecting Your Candy Bar Brownies
Over the years of making these, I’ve picked up a few tricks that really elevate them from good to absolutely spectacular. For the candy bars, I always recommend chopping them into fairly uniform, bite-sized pieces. If they’re too large, you risk having them burn or preventing the brownie from setting properly. If they’re too small, they can just melt away and you lose that delightful chewy surprise. I also find that a mix of candy bars is fantastic. My personal favorite is a combination of Snickers for the caramel and nougat, and Reese’s Peanut Butter Cups for that irresistible peanut butter chocolate combo. But feel free to experiment! If your candy bars are very sticky, like caramel ones, a quick trick is to pop them in the freezer for about 15-20 minutes before chopping; it makes them much easier to cut.
When it comes to mixing the batter, remember: do NOT overmix! I’ve definitely made that mistake before, and the result is a denser, chewier brownie, which isn’t bad, but it’s not the super fudgy texture we’re aiming for here. Mix until you *just* see no more streaks of flour. For the swirl, I keep it simple. Just a few gentle passes with a knife or skewer through the top layer of batter and candy is enough to create beautiful patterns and ensure good distribution. Over-swirling can make the colors blend too much, and we want those distinct candy pockets to be visible!
If you’re debating whether to add the glaze or not, I always say go for it! It adds a lovely finishing touch and a little extra sweetness that complements the rich brownie base perfectly. If you want a thicker glaze, use less milk; for a thinner glaze, add a bit more milk. And a little tip for baking: ovens can be notoriously different. Keep an eye on your brownies towards the end of the baking time. A toothpick with moist crumbs is your best friend for ensuring they’re perfectly fudgy. Remember, they’ll continue to bake a little bit even after you take them out of the oven, so pulling them out slightly before they look *completely* done is the key to that signature gooey center.
Storing and Reheating Tips
These candy bar brownies are pretty forgiving when it comes to storing them. If you happen to have any leftovers (which is rare in my house!), you can store them at room temperature in an airtight container for about 2-3 days. I find they’re still wonderfully moist and delicious within that timeframe. Just make sure they’re completely cool before sealing them up. If you’ve glazed them, wait until the glaze has fully set before covering them, or you might end up with a sticky mess inside your container.
For longer storage, the refrigerator is your friend. Keep them in an airtight container, and they’ll stay fresh for up to a week. The texture might become a bit firmer in the fridge, but that’s easily remedied. When you’re ready to enjoy them, I highly recommend warming them up slightly. A quick 10-15 seconds in the microwave does wonders to bring back that gooey, fudgy texture. You can also gently reheat them in a low oven (around 250°F or 120°C) for about 5-10 minutes. If you plan to freeze them, I’d suggest doing so before glazing. Wrap individual brownie squares tightly in plastic wrap, then place them in a freezer-safe bag or container. They’ll keep well in the freezer for up to 2-3 months. Thaw them overnight in the refrigerator, then bring them to room temperature or warm them up as desired. Honestly, they are so good, they rarely last long enough for me to need to worry about freezing!
Frequently Asked Questions
Final Thoughts
So there you have it – my absolute favorite candy bar brownies! I truly hope you give these a try. They are such a joy to make and even more of a joy to eat. The combination of fudgy brownie and melty candy bar pieces is simply irresistible, and the fact that they come together so easily makes them a winner in my book, especially on those busy days when a chocolate craving hits hard. They’re perfect for potlucks, birthday parties, or just because you deserve a little something sweet. If you love these, you might also enjoy my recipe for gooey chocolate lava cakes, or my ultimate fudgy chocolate chip cookies! They share that same commitment to rich, decadent chocolate flavor.
I can’t wait to hear how your candy bar brownies turn out! If you try them, please leave a comment below and let me know what candy bars you used and how you liked them. Sharing your own variations and tips is what makes this community so wonderful. Happy baking, and enjoy every delicious bite!
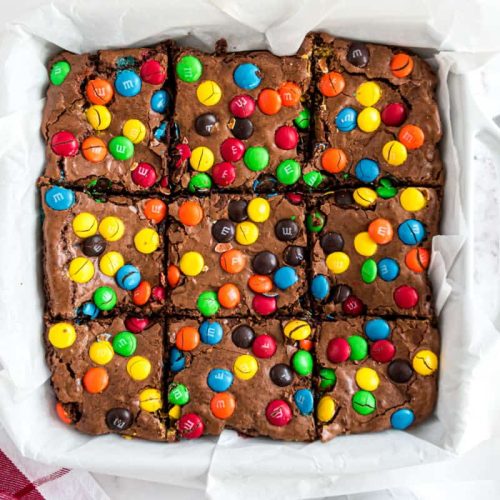
M&M’s Brownies
Ingredients
Main Ingredients
- 1 cup unsalted butter
- 1 cup semi-sweet chocolate morsels (divided)
- 2 cup granulated sugar
- 4 large eggs
- 1 teaspoon vanilla extract
- 0.75 cup unsweetened cocoa powder
- 1 cup all-purpose flour
- 0.5 teaspoon kosher salt
- 0.5 teaspoon baking powder
- 1 cup M&M's candies (divided)
Instructions
Preparation Steps
- Preheat oven to 350 degrees F. Line a 9-inch square baking dish with parchment paper. Set aside.
- In a medium sized saucepan, melt butter over medium heat. Remove from heat and add in 0.5 cup of the semi-sweet chocolate morsels with the sugar. Stir until combined and morsels are melted.
- Add in eggs, one at a time, stirring after each addition.
- Add in vanilla extract.
- Add cocoa powder, flour, salt, and baking powder. Using big stroked, stir JUST until combined and no longer see dry ingredients.
- Fold in remaining semi-sweet morsels and 0.5 cup of the M&M's candies. Pour batter into the prepared baking dish.
- Sprinkle the top with the remaining M&M's candies.
- Bake for 38 minutes. Remove from oven and cool COMPLETELY before cutting.