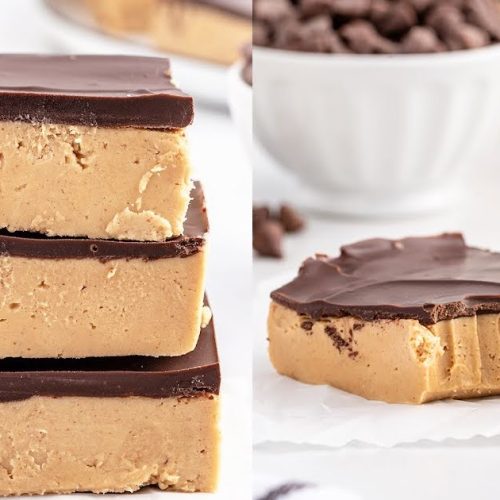
Oh, friends, gather ’round, because I’ve got a recipe that is pure, unadulterated joy in bar form. If you’ve ever craved that perfect blend of sweet, salty, and utterly decadent, then get ready for these Buckeye Bars. My grandma used to make something similar when I was little, and the memory of those little Peanut Butter balls dipped in chocolate still makes my heart sing. They were always the first thing to disappear from the holiday cookie platter, and honestly, I’ve spent years trying to capture that magic. These Buckeye Bars are my version, and let me tell you, they’re a showstopper. They’re like the beloved peanut butter cup, but in a bakeable, shareable, and frankly, even more irresistible format. If you’ve ever fallen head-over-heels for a classic no-bake cookie or a rich fudge, these are going to be your new best friend. We’re talking about a gooey, peanut buttery base topped with a smooth, luscious chocolate coating. It’s seriously that good, and the best part? They’re surprisingly straightforward to whip up, even on a weeknight when you just need a little sweet escape. I’m so excited for you to try this buckeye bars recipe!
What Are Buckeye Bars?
So, what exactly are these magical Buckeye Bars? Think of them as a delightful mashup of your favorite candy and a comforting baked treat. The name “buckeye” comes from the state nut of Ohio, and these bars really do live up to their namesake with that irresistible Peanut Butter and chocolate combination. Essentially, they’re a soft, chewy, peanut-butter-forward base that gets baked to perfection, and then, the crowning glory – a rich, glossy chocolate topping that hardens just enough to give you that satisfying snap. It’s not a dense cake, nor is it a crumbly cookie; it’s something wonderfully in between, a texture that’s all its own. The beauty of this recipe lies in its simplicity and the powerful flavor punch it packs. It’s the kind of dessert that makes people ask, “What IS this?” with a look of pure delight. If you’ve ever dreamed of a dessert that delivers intense peanut butter flavor without being overwhelmingly sweet, you’ve found your match. They’re like a hug for your taste buds!
Why you’ll love this recipe?
Honestly, there are so many reasons why I keep coming back to this buckeye bars recipe, and I just know you’re going to fall in love with it too. First off, let’s talk about the FLAVOR. Oh my goodness. It’s that classic, deeply satisfying peanut butter and chocolate marriage, but amplified. The base is soft and chewy with a prominent peanut butter taste that isn’t cloying, and the chocolate topping adds that perfect bittersweet contrast. It’s a flavor combination that just never gets old. Then there’s the SIMPLICITY. I’ve tried my fair share of complicated dessert recipes, and what I love most about these buckeye bars is that they deliver *major* deliciousness with surprisingly little fuss. You don’t need any fancy equipment, and the steps are so easy to follow, even if you’re not a seasoned baker. This recipe is also incredibly COST-EFFECTIVE. Most of the ingredients are pantry staples, which means you can whip up a batch without breaking the bank. It’s a lifesaver for potlucks or when you need to bring a crowd-pleasing dessert on a budget. And VERSATILITY? Absolutely! While they’re fantastic on their own, I’ve found so many ways to enjoy them. Serve them warm for a gooey treat, chilled for a firmer bite, or even crumbled over ice cream. They’re perfect for bake sales, holiday gatherings, or just because you deserve a little something sweet after a long day. I’ve even seen friends dip them in white chocolate for a different look, and they were a huge hit! Compared to a traditional Peanut Butter Cookie that can sometimes turn out dry, these bars are consistently moist and chewy. This is the recipe that always gets rave reviews at my house, and I’m confident it will at yours too.
How do
Quick Overview
Making these buckeye bars is wonderfully straightforward. You’ll mix up a quick, moist Peanut Butter batter, spread it into a baking pan, and bake it until it’s set. Once it’s cooled slightly, you’ll pour a luscious chocolate topping over the top, letting it spread and set. It’s a two-step process, really: bake the peanut butter base, then top it with chocolate. The magic happens as it cools and those two irresistible flavors meld together. It’s the kind of dessert that looks impressive but is surprisingly achievable, even for novice bakers. Trust me, you’ll be amazed at how quickly you can create something so delicious.
Ingredients
For the Main Batter:
1 cup (2 sticks) unsalted butter, softened: Make sure your butter is truly softened, not melted. It makes a huge difference in the texture of the base. I always leave mine out on the counter for about an hour before I start. Good quality butter really does shine here.
2 cups granulated sugar: Just your regular granulated sugar will do perfectly. This provides the sweetness and helps with the texture.
1 cup creamy Peanut Butter: Use your favorite creamy peanut butter. Natural peanut butter can sometimes separate, so a classic creamy variety usually works best for consistent results. Avoid chunky for this recipe; we want that smooth peanut butter base.
2 large eggs: These bind everything together and add richness. Make sure they’re at room temperature; they incorporate much better that way.
1 teaspoon vanilla extract: A little bit of vanilla rounds out the flavors beautifully. Pure vanilla extract is always my go-to.
2 cups all-purpose flour: Standard all-purpose flour works great. I haven’t experimented much with gluten-free flours here, but I’ll touch on that later!
1 teaspoon baking soda: This gives a slight lift and tenderness to the bars.
1/2 teaspoon salt: Balances the sweetness and enhances the peanut butter flavor.
For the Filling:
This recipe actually has the peanut butter *in* the base, so no separate filling is needed! The magic is all in that glorious peanut butter layer.
For the Glaze:
1 cup (2 sticks) unsalted butter, melted: We’ll use melted butter here to get that smooth, luscious chocolate topping.
2 cups semi-sweet chocolate chips: I find semi-sweet gives a nice balance of sweetness and richness. You can use milk chocolate if you prefer it sweeter, or dark chocolate for a more intense flavor.
1/4 cup creamy peanut butter: Just a little extra to add to the chocolate for that signature buckeye flavor and to ensure a smooth, spreadable consistency.
Step-by-Step Instructions
Step 1: Preheat & Prep Pan
First things first, let’s get the oven ready. Preheat your oven to 350 degrees F (175 degrees C). Now, grab a 9×13 inch baking pan. You can grease it lightly with butter or cooking spray, but I often find it easiest to line it with parchment paper, leaving an overhang on the sides. This makes lifting the bars out so much simpler later on, and clean-up is a breeze!
Step 2: Mix Dry Ingredients
In a medium bowl, whisk together your all-purpose flour, baking soda, and salt. Just give them a good whisk to make sure the baking soda and salt are evenly distributed throughout the flour. This ensures your bars rise evenly and have that perfect texture. Set this bowl aside for now.
Step 3: Mix Wet Ingredients
In a large bowl (the one you’ll mix everything in), cream together the softened butter and granulated sugar until light and fluffy. This is best done with an electric mixer, but you can absolutely do it by hand if you’re feeling ambitious! Then, beat in the creamy peanut butter until it’s well combined. Add the eggs one at a time, beating well after each addition, and then stir in the vanilla extract.
Step 4: Combine
Now, it’s time to bring the wet and dry ingredients together. Gradually add the flour mixture to the wet ingredients, mixing on low speed (or stirring by hand) until just combined. Be careful not to overmix here! Overmixing can lead to tough bars, and we want these to be tender and chewy. You should have a thick, but spreadable batter.
Step 5: Prepare Filling
Since this is a buckeye bars recipe, the peanut butter is the star of the show in the base! So, we don’t need a separate filling layer. The batter you just made *is* your delicious peanut butter filling. You can even lick the beaters… I won’t tell!
Step 6: Layer & Swirl
Spread the peanut butter batter evenly into your prepared 9×13 inch baking pan. Use a spatula to get it all into the corners. You want a nice, even layer so the bars bake uniformly. Smooth the top as best you can.
Step 7: Bake
Pop the pan into your preheated oven. Bake for 25-30 minutes, or until a toothpick inserted into the center comes out with moist crumbs attached (not wet batter). The edges should be lightly golden brown. Keep an eye on it, as ovens can vary!
Step 8: Cool & Glaze
Once baked, take the pan out of the oven and let it cool in the pan on a wire rack for about 10-15 minutes. While the base is cooling, prepare the glaze. In a microwave-safe bowl, combine the melted butter, semi-sweet chocolate chips, and the 1/4 cup of peanut butter. Microwave in 30-second intervals, stirring well after each, until the chocolate is completely melted and smooth. You want a glossy, pourable consistency. If it seems too thick, you can add another tablespoon of butter or a tiny splash of milk. Pour the chocolate mixture evenly over the slightly cooled peanut butter base. Use an offset spatula or the back of a spoon to spread it all the way to the edges. Let the bars cool completely at room temperature until the chocolate is set.
Step 9: Slice & Serve
Once the chocolate topping is completely set and firm, you can lift the bars out of the pan using the parchment paper overhang. Place them on a cutting board. Use a sharp knife to slice them into squares or rectangles. For the cleanest cuts, especially with the chocolate topping, you can dip your knife in hot water and wipe it dry between cuts. These are delicious served at room temperature, but I sometimes like them chilled for a firmer bite, especially on a hot day.
What to Serve It With
These buckeye bars are so versatile, they’re pretty much perfect on their own, but here are a few ideas for how to serve them and make them even more special!
For Breakfast: Okay, hear me out – while technically a dessert bar, a small piece with a strong cup of coffee is an absolutely divine way to start the day. The peanut butter and chocolate are surprisingly energizing! You could even crumble a bit on top of yogurt or oatmeal for a decadent twist.
For Brunch: These bars are a fantastic addition to any brunch spread. Arrange them on a pretty platter with other pastries and fruit. They’re a guaranteed crowd-pleaser and look so inviting. Pair them with a mimosa or a nice cup of tea.
As Dessert: This is their natural habitat, right? Serve them as is, or for an extra indulgence, a warm buckeye bar with a scoop of vanilla bean ice cream is pure heaven. They’re also wonderful alongside a rich chocolate cake or a berry compote for a contrast in flavors.
For Cozy Snacks: My family loves these for an afternoon pick-me-up. They’re perfect with a tall glass of cold milk, and they honestly disappear so quickly when they’re around. They’re also fantastic for packing in lunchboxes (if they make it that long!).
My kids always ask for these when we have friends over, and they disappear in minutes. They’re also a big hit at school bake sales, and I always get asked for the recipe. I love serving them slightly chilled; the chocolate has a nice firm snap that way.
Top Tips for Perfecting Your Buckeye Bars
Over the years, I’ve picked up a few tricks that really make these buckeye bars sing. Here are my best tips to help you achieve perfection:
Zucchini Prep: Wait, what? Oh, sorry! I got confused with another recipe I was writing. No zucchini here! My apologies, my brain is sometimes a recipe graveyard. Let’s stick to the buckeye bars!
Peanut Butter Choice: For the base, I really recommend using a commercial creamy peanut butter like Jif or Skippy. They have a stabilized oil content that prevents separation and gives you that consistent, smooth texture that’s crucial for this recipe. Natural peanut butters can be too oily and might make your bars crumbly or greasy. Save the natural stuff for toast!
Mixing Advice: The absolute key to a tender, chewy bar is not to overmix the batter once you add the flour. Mix on low speed or fold it in gently until you just see no more dry streaks. Overworking the gluten in the flour develops it too much, leading to a tougher bar. We want soft and fudgy, not chewy like taffy.
Achieving the Perfect Glaze: When you’re melting the chocolate and peanut butter for the topping, be patient. Microwave in short bursts and stir thoroughly. If you overheat chocolate, it can seize up. Aim for a smooth, glossy, pourable consistency. If it seems too thick, add another tablespoon of butter or a tiny splash of milk to loosen it. For spreading, an offset spatula is your best friend for getting an even layer without tearing into the base. And remember, let it cool completely!
Baking Tips: Don’t overbake! You want the center to be just set with a few moist crumbs clinging to the toothpick. Baking it too long will result in dry, cakey bars. Ovens really do vary, so start checking around the 22-minute mark. The edges should look set and slightly golden, but the center shouldn’t look wet.
Ingredient Swaps: While this recipe is fantastic as is, if you’re feeling adventurous: try using milk chocolate chips for a sweeter topping, or dark chocolate chips for a more intense cocoa flavor. You could even stir in a pinch of espresso powder into the chocolate glaze to deepen the chocolate flavor. For a slight twist in the base, a little sprinkle of flaky sea salt on top of the chocolate just before it sets is divine!
Cooling is Key: Resist the urge to slice into these immediately after pouring the glaze. They need time to cool and set properly. If you try to cut them while they’re warm, the chocolate will smear, and the base will be too soft. Patience is rewarded, my friends!
Storing and Reheating Tips
These buckeye bars are so wonderfully forgiving when it comes to storage, which is another reason I love them. They’re great for making ahead of time, which is always a win in my book!
Room Temperature: Once the chocolate topping is fully set, you can store the bars at room temperature. Keep them in an airtight container. They’ll stay fresh and delicious for about 3-4 days. Make sure they’re completely cooled before sealing the container, otherwise, you might get condensation, which can make them a bit soggy.
Refrigerator Storage: If your kitchen is particularly warm, or you just prefer a firmer bar, you can store them in the refrigerator. Again, an airtight container is best. They’ll hold up well in the fridge for about a week. When you take them out, I recommend letting them sit at room temperature for about 15-20 minutes to soften up slightly, or they can be a bit too hard straight from the fridge.
Freezer Instructions: These buckeye bars freeze beautifully! Once they are completely cooled and the chocolate is set, you can cut them into individual portions. Wrap each bar tightly in plastic wrap, then place them in a freezer-safe bag or container. They’ll keep well in the freezer for up to 2-3 months. To thaw, simply unwrap them and let them come to room temperature on a plate, or thaw them in the refrigerator overnight for a firmer treat. They usually taste just as good as fresh!
Glaze Timing Advice: For best results, always let the chocolate glaze set completely before storing, whether at room temperature, in the fridge, or in the freezer. If you’re freezing them, wrapping them individually before going into the freezer bag helps prevent the chocolate from sticking to other bars.
Frequently Asked Questions
Final Thoughts
There you have it, my friends! My absolute favorite buckeye bars recipe. I truly believe this is the best way to capture that nostalgic, comforting flavor that we all love. It’s a recipe that’s been tested in my kitchen countless times, from busy weeknights to holiday cookie swaps, and it *never* disappoints. The combination of the soft, chewy peanut butter base and the rich, smooth chocolate topping is just pure bliss. It’s a dessert that’s both familiar and exciting, and it always brings a smile to people’s faces. If you’re a fan of peanut butter and chocolate, you simply *must* give this a try. It’s proof that you don’t need complicated steps to achieve incredible flavor. I hope you love making these as much as I love sharing them. For more delicious treats, you might want to check out my Chewy Chocolate Chip Cookie recipe or my decadent Brownie Bites. They’re also family favorites! I can’t wait to hear how your buckeye bars turn out. Please leave a comment below and let me know your thoughts, or share any fun variations you tried!
buckeye bars recipe
Ingredients
Peanut Butter Layer Ingredients
- 8 tablespoons salted sweet cream butter softened
- 3 cups creamy peanut butter
- 4 cups powdered sugar
- 2 teaspoons pure vanilla extract
Chocolate Topping Ingredients
- 12 ounce semi sweet chocolate chips
- 2 tablespoons vegetable oil
Instructions
Preparation Steps
- Line a 9x13 baking dish with parchment paper. Set it aside.
- Using either a stand mixer, or a medium size mixing bowl and a handheld mixer on medium-high speed, beat the softened butter for 1 minute, until smooth.8 tablespoons salted sweet cream butter
- Add the peanut butter and vanilla. Continue mixing for 1 minute, until smooth.8 tablespoons salted sweet cream butter
- Lower the mixer speed to medium-low and add the powdered sugar 1 cup at a time, mixing well after each cup. Increase the mixer speed to medium-high and continue mixing until completely incorporated.8 tablespoons salted sweet cream butter
- Using either a silicone spatula, or an offset spatula, evenly spread the peanut butter mixture in the bottom of the prepared baking dish.
- Add the chocolate chips and oil to a small microwave safe bowl. Heat for 1 minute, stir, and continue to mix in 15 second intervals until the mixture is completely smooth.8 tablespoons salted sweet cream butter
- Using a silicone spatula, or an offset spatula, evenly spread the chocolate over the peanut butter layer. Cover and chill the refrigerator for 15 - 20 minutes.
- Remove the baking dish from the refrigerator. Carefully slice the buckeye bars into 15 - 2 ½ in x 3 in slices. Cover the baking dish and return the bars to the refrigerator to continue chilling for an additional 1 hour 45 minutes.
- Remove the bars from the dish by the parchment paper. You may need to carefully re-slice the bars. Serve immediately.